DirectX used by games, programs and drivers - the presence of all the necessary libraries of the current version is the key to stable operation of Windows. You can remove installed modules if necessary, or reinstall. Below we will look at the features of removing DirectX in different versions of Microsoft OS and provide detailed uninstallation instructions that may be useful for beginners and experienced users.
| Why delete ↓ | Preparing for removal ↓ | |
| Removal in Windows OS ↓ | ||
Why remove DirectX
The need for uninstallation appears when the update process fails, one or more libraries are damaged, or when running very old games. In the latter case, files are required that are no longer used in current versions of DirectX.
Problems with the operation of libraries arise when files are carelessly deleted by the user directly and when they become infected with viruses - security software installed on the computer automatically removes malicious code. As a result, the operating system begins to become unstable - this is expressed in the form of decreased performance and the inability to launch some games.
Before uninstalling, try updating DirectX if there is no need to install an older version. Press the R while holding the Windows . In the window that opens, enter the dxdiag and click OK.
The DirectX Monitor Tool will launch. The version will be indicated at the bottom of the first page. If necessary, update it to the latest one - download DirectX from our portal or the Microsoft website. Just run the installation and wait for the process to complete.
DirectX - what is it and why?
DirectX is a large set of functions that are used when developing in the Microsoft Windows environment. Most often, these functions are used in the development of all kinds of games.
Accordingly, if the game was developed for a certain version of DirectX, then the same version (or newer) must be installed on the computer on which it will be launched. Typically, game developers always include the required version of DirectX along with the game. Sometimes, however, there are problems, and users have to manually search for the required versions and install them.
As a rule, a newer version of DirectX provides a better and higher quality picture* (provided that the game and video card support this version). Those. if the game was developed for version 9 of DirectX, and you update version 9 of DirectX to version 10 on your computer, you won’t see any difference!
Preparing to uninstall DirectX
Go to Control Panel . Select System and go to Advanced system settings .
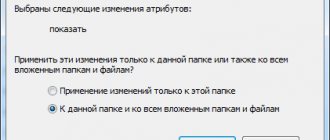
Open the System Protection and click the Create - a restore point will be saved, thanks to which you can return Windows to a working state if problems arise after removing DirectX.
Specify identification information that allows you to determine the recovery point, which will be displayed in the list in a special window. Usually the removal and installation of DirectX goes without problems, but insurance is never superfluous.
Download the current version. Go to the Microsoft website or download from our portal - DirectX is distributed completely free of charge. Save the files in a separate folder, from which you can then launch the installation by clicking on the Setup.exe .
The version of DirectX that is required to run the old game can be downloaded from a disk or an image file downloaded from the Internet. Typically, developers provide the software that is required to run it - look for folders with names like Support, DX, Res, Drivers , etc.
Determining the DirectX version
You can determine the installed version of the library using the following procedure:
- use the combination Win+R;
- enter the command: dxdiag;
- click OK;
- Click “No” to refuse driver signature verification.
The window that appears allows you to see the current version of DirectX and additional information about the library. Windows 10 often uses DirectX 12. There is no need to update it. If you have DirectX 10 or 11, you will have to remove the library and install a newer one. First you need to determine whether the video card is compatible with the latest version of DirectX.
This information can be found in the documents or on the packaging of the video adapter. The GPU-Z program, or one with similar functionality, will also help determine compatibility. After installing this tool, all the necessary information is visible in its main window, in the DirectX Support field. Here is the latest version of the library that can be installed on a current video card.
Preparatory stage before removal
Solving the question of how to remove Directx on Windows 10 begins with preparation. First of all, we create a restore point using the following algorithm:
- right-click on “Computer”;
- select “Properties”;
- We use the “System Protection” function.
When the described steps are completed, you can proceed to creating a restore point. When this feature is disabled, you cannot create it. You will have to open the “Configure” tab and use the “Enable system protection” function on it. As a result, the button responsible for creating a restore point is activated. Let's use it.
Before you remove installed DirectX, you must download the version of the library that is supposed to replace the current one. We get it from the official Microsoft page. We also have to disable system protection and Internet connection.
DirectX Eradicator
Do not miss:
- How to fix Windows 7 update error - all codes, reasons, methods
- All the ways to find out which video card is on your computer
- How and how to open an ISO disk image file on a Windows computer
Now it's time to tell you how to remove the new DirectX using the DirectX Eradicator tool. This simple uninstallation program takes about 200 kb. Note that this tool can only remove DirectX up to version 9.
Algorithm:
- open the downloaded file;
- in the window that appears, confirm the deletion with the “Yes” button;
- We are waiting for a message about the successful completion of the removal process.
If the application does not support the installed version of DirectX, an error message will appear on the screen. In this case, you will have to choose an alternative removal tool.
DirectX Killer
If you are wondering how to remove DirectX 10, try using the DirectX Killer tool. There should be no problems with the application interface, since it is completely Russified. The “Scan” function will allow you to quickly find files that need to be deleted.
Uninstallation on Windows 7, 8 and 10
DirectX libraries are part of the Windows 7 and later OS versions. It is impossible to delete files using standard means. Uninstallation is carried out using special programs and utilities:
- DirectX Happy Uninstall;
- DX Killer;
- DX Eradicator;
- and other similar solutions.
Run the program and remove DirectX - the operation will take no more than a couple of minutes. The interface of the uninstallation utilities is quite simple - any user with at least minimal experience in Windows can easily understand it. Reboot if a corresponding message appears after deletion.
Install DirectX from scratch. Open the folder with the files and run the installation. Installation will take 2-3 minutes. After the process is complete, restart your computer - the operating system will now use the installed version of DirectX.
How to determine the installed version
As a standard, specific direct modifications are already integrated into the operating system. The most famous of them:
- DirectX 9.0c. The main systems on which the version is installed are Windows XP, Server 2003.
- DirectX 10. The version also includes components of its predecessor. Supports Vista and Server 2008. Windows XP does not.
- DirectX 11 . The most common version, including components of earlier editions. Supports Windows Vista, 7, 8, 10.
- DirectX 12. The latest version, supports only Windows 10.
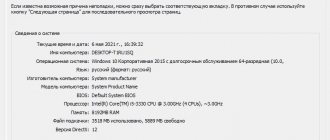
To accurately determine the version, you need to call the “ Run ” window using the Win + R key combination. Then enter the dxdiag command into the line
In the window that appears, the last item will indicate the installed version . For example, I have Direct version 11 installed.
To obtain more detailed information about the version of the installed directive, you must use special programs. The most popular among them: Everest and Aida 64 .
Uninstallation in Windows XP
In earlier versions of the Windows XP operating system, DirectX was installed by users themselves. In later developers, version 8.0 was embedded. In the first case, no special programs are required - select the Add or Remove Programs component the Control Panel , click on the DirectX icon and uninstall by pressing a couple of buttons.
Files and libraries that are part of the operating system can be removed using one of the programs mentioned above. Before uninstalling, it is also recommended to create a restore point for the operating system.
After uninstallation is complete, restart your PC . When the operating system boots, install the required version of DirectX. An additional reboot may be required after installation.
After Windows starts, the installed components will be ready to use. The uninstallation and installation algorithm is the same for all XP builds.
What is Directx
Direct X is a set of libraries that helps you work with graphics hardware and process various visual effects. Therefore, DirectX is important for multimedia applications, as well as games. Some programs require a specific version of Direct X to work.
Previously, in Windows 7 and 8, you could install and remove this component yourself, like a simple application. It is very difficult to remove in Windows 10. From now on, DirectX has become an important part of the OS, and getting rid of it is not easy.
Versions
Installing DirectX 11 for Windows 7 is the optimal solution. This is the latest version, almost all programs and games run successfully with it. But sometimes some games require you to install a specific version of libraries and modules to run. But it won’t be possible to install one DirectX over another, since the previous version will not be automatically removed. Libraries from the new one will be added to it. Therefore, before installation you need to remove the old one. Functional add-on packages are described below.
- DirectX 9.0 c – suitable for XP and Server 2003. New games may not start without installing their own package;
- DirectX 10.1 - supplemented and expanded package 9.0c. Supported by Vista and Server 2008;
- DirectX 11 is a new version. Includes the previous two and additional components and updates. Supported on both 32 and 64 bit OS. Works on Windows 7, Vista, Server 2008. It is possible to install DirectX 11 for windows xp.
As mentioned above, DirectX, the latest version of which is presented on the Microsoft website, is distributed free of charge. When downloading from the official website of the developer, you should not be afraid of viruses and malware getting into your PC, but you still cannot disable the antivirus when downloading. The web installer presented on the site will automatically check the OS and install the update to the latest package.
Uninstalling DirectX
To reinstall DirectX, replace it with the old version, remove the already installed one. When installing a later version, you won’t have to do this, since the update is based on the old one. But it is impossible to permanently remove DirectX 10 for Windows, as the developers claim, since it is an OS component. There are widespread utilities that will help you permanently remove DirectX on Windows 7.
- DirectX Eradictor removes the program core from the OS. Cleans the registry, deletes program files and folders. Works with versions 4 to 9;
- DirectX Killer will only remove older versions. Works on Windows 2000, 2003, XP;
DirectX Happy Unistal – works on OS with XP and up to 8.1. Doesn't work on 10.
Support for 32 and 64 bit OS. Removes modules and technology libraries, has a return function, with the help of which a deleted component is restored.
Additionally, the method of replacing Direct X 10 with Direct X 9 is practiced. To do this, write regedit in the Run line. After opening the Registry Editor, go to the HKEY_LOCAL_MACHINE - SOFTWARE - Microsoft - DirectX branch. Open the Version parameter and enter the number 8 instead of 10. After that, install the desired Direct X 9.0. Now you know how to find out which DirectX is installed.
To experience the graphical power of popular PC games, you'll definitely need to install DirectX software. This is a package of functions that links the OS and PC devices, and is used to run multimedia programs. Without this utility, not a single application will start, including modern games with their realistic high-quality graphics. How to install DirectX? Let's look at it in more detail.
In most cases, DirectX is installed along with the OS installation
How to remove version 12 from Windows 10?
In version 10 of Windows, the utility became built-in to the system, and its removal using the above applications should only be done at your own peril and risk. What should you do if for some reason you need to install an earlier version of DirectX or simply stop the utility from working?
- Using the Win+R key combination, open the Run menu.
- In the typing line, write “regedit” and press the “OK” key.
- In the menu on the left, expand the branch in the following sequence: “Computer”, “HKEY_LOCAL_MACHINE”, “SOFTWARE”, “Microsoft”. In “Microsoft” you need to find all folders starting with the word “Direct” and delete them.
- After deleting all folders, you should restart your computer.
Attention. After completing these steps, you will be able to install an earlier version of DirectX on your computer.
In some cases, the system information may show that you are still using version 12, but this is a bug.
DirectX Killer
Now let's try to uninstall unnecessary things using DirectX Killer. This software is also lightweight, so downloading it is not difficult. Just use the search. It hasn't been updated for a long time, but that doesn't stop it from doing its job successfully. The software works entirely in Russian, so its interface is as clear as possible.
- First we click on the “Scan” button to find all existing files that need to be deleted. The analysis process will take a couple of minutes.
Causes of problems
In addition to the installation failures that I mentioned above, incorrect installation of Direct X can occur due to the use of an installer downloaded from an unofficial resource. As a result, you can not only get errors in games, but also infect your PC with viruses.
It is best to update using a proprietary Microsoft utility. I talked about this procedure in detail in this article.
If the defect still appears, then we will have to reinstall, that is, first we will need to completely remove DirectX 11 or 12 (or maybe an earlier edition, that’s not the point). Find out how this is done further.
How to find out the version?
You can determine the DirectX version using the following algorithm:
- press Win+R;
- write the command: dxdiag;
- click OK;
- Click on “No” to refuse unnecessary verification.
The pop-up window helps you see the DirectX version and additional information about the component. Windows 10 usually uses Direct X 12. It does not have to be updated. If you have Direct X 10 or 11, you will have to uninstall the library and install another version. However, before this you will have to determine whether the video card is compatible with the final version of the component.
This data can be found in the documents or on the adapter packaging. The GPU-Z utility or its analogues will also help you find out everything about compatibility. After installing the program, all important information will be displayed in the Direct X Support field in its main window. Here is the final version of the component that can be installed on a working video card.
When should you remove DirectX?
You need to uninstall the component if:
- game launch errors, if a pop-up window complains about DirectX;
- problems with the update center (not the best option);
- deleting system files associated with Direct X.
These reasons do not seem significant to everyone, but working in a system that has at least one error from the list above becomes slow and inconvenient. As already noted, it is impossible to actually uninstall the component, but somehow getting rid of it or improving its performance is simply necessary. Let's look at the “treatment” options for Direct X.
How to completely remove DirectX 10 on Windows 7
You can safely use the DX Eradicator application (see above), but I would recommend a more correct solution for the “seven” - the Happy Uninstall program, which is officially recommended by Microsoft.
- Follow the link and on the main page click on the download link:
- We install, launch and immediately go to the “Backup” tab (on the left) to make a backup system backup in case of unforeseen circumstances:
- When the procedure is completed, you need to select the “Uninstall” action and in the main window click on the button of the same name to start uninstallation:
It is worth noting that Happy Uninstall can do more than just “destroy”. The utility includes several useful tools - checking the relevance of libraries, diagnosing the integrity of components, etc.
Restoring the system
Unfortunately, uninstallation does not always save the situation. Sometimes you have to resort to the Windows 10 recovery procedure. This is done like this:
- Go to “Settings” by clicking on the “Start” button, then on the “gear” icon:
- Go to the “Update and Security” section, and there select the “Recovery” tab on the left, and click on the “Start” button on the right:
- If there are no rollback points, you will have to boot from a previously prepared media (rescue flash drive). I hope you have it. As a last resort, it can be created on another PC. Well, a completely radical measure is to return Windows to its original state.