Apple is accustomed to surprising its consumers with modern devices, the appearance of which is sometimes quite difficult to keep track of. It’s even more difficult to figure out how to use such gadgets and how to extract a lot of positive opportunities from them. If you have become the owner of a new MacBook, but you don’t understand anything about it, you don’t know even the most basic steps that should be taken to get started, it will be useful for you to read the instructions, which can guide even a beginner regarding many useful functionality.
Adjust mouse or trackpad sensitivity
What to do: Open System Preferences, go to Trackpad and use the Move Speed slider.
The higher the Move Speed, the faster the cursor will move across the screen, depending on how you move your mouse on the table or your finger on the trackpad. There is no correct meaning in this case and cannot be. It all depends on your personal preferences and habits.
macOS Basics
Let's start with the most important parts of using your Mac.
3.1. Desktop and menu bar
When your Mac boots up for the first time, you'll see the main user interface components. At the top of the screen is the menu bar , at the bottom is the dock , and behind all your windows is the desktop .
Like most other desktop operating systems, macOS uses the desktop as a temporary workspace for storing files. Hard drives, external drives, and mounted disk images will appear here when connected to your machine. You can right-click to create folders and drag to arrange your desktop as you see fit
At the top of the screen, the menu bar changes depending on the application that currently has focus. The Apple menu is where you can Troubleshoot your computer, and access information related to your Mac in the About This Mac option.
The menu bar displays application options such as File , Edit , Help , and so on. On the right side of the menu bar are status indicators for system and third-party applications. These include Wi-Fi and batteries, as well as apps like Shazam or Evernote if you use them.
You can reorder these items by holding down Command while clicking and dragging. There is a whole subcategory of menu bar apps
Designed to fit in this easy-to-reach tray at the top of your screen.
3.2. Doc
The Dock is the closest macOS equivalent to the Windows Start menu. It is divided into two parts: application shortcuts and pinned folders or minimized windows. You can position the Dock so that it appears along the bottom, left, or right edge of the screen under System Preferences > Dock .
Launch attached applications by clicking on them. Apps that are not pinned will also appear in the panel when in use. Right-click any icon to decide whether or not to keep it in the Dock, and drag apps to rearrange them. You can also drag icons from the Dock and release them to remove them.
Dragging a file over an application icon and releasing it will open the file in that application, provided the application is compatible with the file. Dragging an application file onto the Dock will add it to the Dock as a shortcut.
In the other (right) section you will find several pinned folders and a trash can. Drag any folder to the Dock to pin it. Right-click to customize its display to show it as a stack or as a regular folder. You can drag files into these folders to move them, just as you can drag files into the Trash to delete them.
Finally, if you want to delete a mounted drive or disk image, simply drag it to the Trash. You can quickly empty the Trash by right-clicking and selecting Empty Trash .
3.3. seeker
Finder is the standard MacOS file management application. Like Windows Explorer, Finder lets you browse your hard drives and other connected devices.
There are several components in the Finder window that you can toggle under the View menu item:
- Tab Bar : Automatically shows and hides when you open a new tab in the Finder ( Cmd + T ).
- Path Bar : Displays the path of the current folder at the bottom of the screen.
- Status bar : Lists the number of items in the location and available disk space.
- Sidebar : List of favorite or frequently used places on the left.
- Preview : Expanded preview panel on the right side of the window.
The sidebar is especially useful because you can customize it to display your favorite places. Right-click and select Delete from the sidebar to remove the entry. Click and drag a folder to the sidebar to add it permanently.
Scroll down to the Devices section to see your mounted volumes and disks. Below you will find common network locations and tags. To remove or add sections, click Finder > Preferences in the menu bar at the top of the screen.
Finder uses the main toolbar to display common controls such as back and forward . There's also a healthy list of viewing options. You can view files and folders as icons, lists, columns, or in Apple's Cover Preview. By default, you will see Share and Tags buttons too.
Right-click on the toolbar to customize Finder. You can add or remove buttons and shortcuts, and change the order of fields, such as the search bar. By default, the search bar is visible, and you can use it to search throughout your entire Mac or just the folder you're currently browsing.
Finder supports copy ( Cmd + C ) and paste ( Cmd + V ) but does not cut. On macOS , Move replaces Slice. To "cut" a file, you must first copy it and then move it ( Cmd + Option + V ). If you right-click and press the option key, you will see the "Insert" change to "Move".
3.4. Spotlight
Spotlight is the name of your Mac's search engine, and it appears in a floating window whenever you click it. Cmd + space . Just enter your query and macOS responds with context-sensitive results. Hit Login for best results, or scroll through the Spotlight searches until you find what you're looking for.
This handy search tool not only works for finding files, but also as an application launcher. Just by typing you can:
- Find files, folders, documents, notes, email, messages and more
- Launch applications and utilities
- Perform basic calculations
- Convert currencies, measurements and other units
- Get suggested sites, definitions, Wikipedia entries and more
- Use natural language to refine your results
You have to get used to using Spotlight
launch applications and find the results you need without taking your hands off the keyboard. It's a powerful tool, especially when you know the best Spotlight tips
,
3.5. Applications
Most applications that you download from the Internet will first appear as disk image (DMG) files. Double-click the DMG to mount it, and it will appear as a read-only drive in macOS. Drag the application file (APP) to your Applications folder to install it. Deleting the APP file from this folder will remove the application from your system.
Add Russian and other necessary layouts
What to do: Open System Preferences, go to Keyboard, expand the Input Sources menu, and use the + button to add new languages.
Usually the Russian layout is added to this menu after selecting the Russian region. However, this usually concerns the classic Apple version with a rather inconvenient placement of periods, commas and other symbols. Better check it in this menu.
Did we manage to set up a Mac for a web developer?
Honestly? When I sat down to write this article, I thought that it would be much more voluminous. But this is why we love Apple technology and everything connected with it. Everything works perfectly without any dancing with a tambourine. Everything you need is already installed and works perfectly.
If you are using a Hackintosh rather than a MacBook, these settings will also work. There are more subtleties in setting up the installation itself than the system. Let me remind you that before buying a Mac I used hackintosh for a very long time. If you have any questions regarding not only the Mac, but also the hack, I will be happy to answer.
Perhaps even, if necessary, I will write a whole manual on how to prepare and configure the config for installing the macOS not on a MacBook . Fortunately, we have experience installing systems from Catalina to Monterey .
Change the keyboard shortcut to switch languages
What to do: open “System Preferences”, go to the “Keyboard” section, expand the “Keyboard Shortcuts” menu, select “Input Sources” and set the required shortcuts for the “Select previous input source” action.
Previously, switching layouts on Apple computers was implemented through the keyboard shortcut Command(⌘) + Spacebar(␣). However, then the company decided to change it to Option(⌥) + “Space”(␣). The original combination is considered more convenient, so everyone usually returns to it.
Select the scale to display the interface
What to do: open “System Settings”, go to the “Monitors” section, expand the “Monitor” menu, set the required scale in the “Resolution” item.
The choice of interface scale is an absolutely subjective matter for each individual user. Some people like small, neat elements, while others will be happy with large buttons and inscriptions. Scale analysis is especially critical when it comes to using an external monitor.
Customize the main panel of Apple computers - the Dock
What to do: Open System Preferences, go to Menu Bar & Dock, expand Menu Bar & Dock, and use the options presented here.
The best place to start is with the location of this panel on your Mac screen. In the standard it is located at the bottom, but you can move it to the left or right. On Apple laptops with relatively small
screens, the choice is usually given to the location of the Dock on the left. This is exactly what I choose.
Working with windows in MacOS
Organized in a similar way to how it is done in Windows. But there are still a few additional “chips” present. Firstly, by default, the “Collapse” button (yellow in the window title) minimizes the interface into the Dock panel, and for each window separately. For those who switched to MacOS from Windows, this is not always convenient. To make each tab collapse to the top panel, just do the following:
- go to “Dock Settings”;
- Uncheck the box “Hide the Dock window into the program icon.”
There you can also configure animations for starting/closing programs.
Also, each window has a “Full Screen” mode of operation - it is activated by pressing the green button in the window title. At the same time, the interface expands to full screen, the Dock panel and other elements are hidden. To exit full-screen mode, just move the mouse cursor to the top of the window - control buttons will appear (as in the header). If any of the programs does not support this mode of operation, then by pressing the maximize button the window will simply be enlarged to the maximum possible size (the Dock and header remain visible).
MacOS also has a useful function called Mission Control, which allows you to show thumbnails of all open windows. Activated by clicking the corresponding icon in the Dock panel. You can also activate it using a gesture on the trackpad (swipe 4 fingers from bottom to top) or by pressing the F3 key on the keyboard.
For many users, the Split View function turned out to be convenient, that is, splitting the screen for simultaneous work with two windows. To activate it, you just need to hover the cursor over the “Maximize” icon of the window, wait for the drop-down menu to appear and select “Move window to left/right”. The remaining half of the screen will be occupied by other open programs. To exit it, you need to place the cursor on the green button in the window title in the same way and select “Exit full-screen mode.” And if you have an iPad, you can select “Move to iPad” and continue working with the open window on the tablet.
Select a color scheme for your system design
What to do: open “System Preferences”, go to the “General” section, select the desired shade in the “Accent Color” item.
macOS 11 Big Sur, which is the current operating system for Mac at the time of this writing, introduced color accents. They affect many interface elements not only of the platform menu, but also of many built-in applications. This, for example, applies to Finder and Music.
What is macOS?
macOS is the name of the operating system that powers all Mac computers, like Windows on a PC. Unlike Windows, macOS only comes with Apple computers. Many users cite the operating system as one of the reasons they buy Apple hardware.
The operating system receives regular security updates and one major update every year. macOS was formerly known as Mac OS X, and the first version (10.0) debuted in 2001. The current version is macOS 10.13 High Sierra, released in October 2017.
Unlike Windows, macOS is based on the Unix operating system, which traces its roots back to the 1970s. As a result, it shares many similarities with Linux and other Unix offshoots, such as the Bash command line interface and the Unix permission level.
macOS is a fairly simple operating system. It comes with a rich set of applications
Simplify everyday tasks such as email and web browsing. It integrates well with Apple's family of mobile devices such as the iPhone and iPad.
Disable automatic system updates
What to do: open “System Settings”, go to the “Software Update” section, expand the “Advanced” menu and set the settings for automatically downloading system updates.
Yes, today we cannot recommend using automatic installation of updates for the Apple operating system. Some releases from developers are not particularly stable, so it is best to first read the reviews and only then decide whether an update is necessary.
Work principles
It is also important to take into account that the manufacturer does not leave MacBook owners alone with the device; the company's developers systematically update the software, adding new functions, as well as correcting identified shortcomings. Considering this circumstance, wanting to help your device work as efficiently as possible, you can update the software yourself. To do this, it is enough to select the “Program Update” option. With the updated version of the software, using your MacBook will be much more comfortable.
Add all necessary internet accounts
What to do: open “System Preferences”, go to the “Internet Accounts” section and add all the necessary ones using the “+” button.
Typically, one or more Google accounts are added here, which will be used in the standard mail client of the Mail operating system, the Contacts phone book, as well as Calendar, Reminders, and even Notes.
Understanding iCloud and macOS
You'll find iCloud throughout macOS, so it's important that you understand it.
4.1. What is iCloud?
iCloud is the generic name for Apple's online cloud services. You'll see it before other services like iCloud Drive or iCloud Music Library. In short, this means that the data of a particular service is stored online, in the cloud.
Not all iCloud services require iCloud storage. For example, iCloud Music Library is a cloud-based library for Apple Music subscribers. It maintains the same library content across all devices and requires no storage space, online or otherwise, unless you choose to keep the content offline.
4.2. Storage space
Apple provides 5GB of free storage on your Apple ID, whether you buy an iPhone, Apple TV, or a new MacBook. It doesn't go very far, especially if you use it to back up personal devices like an iPhone or iPad. You can check your current storage allocation under System Preferences > iCloud .
Eventually, you will need to consider upgrading your storage. When you upgrade your storage, you keep the 5 GB you received when you connected, with the option to add:
- 50GB for $1 per month
- 200GB for $3 per month
- 2TB for $10 per month
You can share the 200GB and 2TB tiers with your family if you've set up iTunes Family Sharing
To update your storage space, go to System Preferences > iCloud > Account Information and select update.
4.3. iCloud on Mac
In macOS, you'll find a smorgasbord of iCloud features, many of which you can turn on or off in System Preferences > iCloud .
iCloud Drive is the basic cloud storage platform. You can upload files to the cloud and then access them on other Apple devices, with no restrictions on the file type or how often you access it. Just make sure the file sizes are less than 50GB.
iCloud Photo Library within the Photos app. This uploads the contents of your photo library to Apple's servers and only allows you to store optimized, lower-quality copies. You can get the contents of your library on any device connected to iCloud.
Many other apps send and retrieve data to Apple servers, including Contacts, Calendars, Reminders, Notes, Safari, and Mail. These services don't use iCloud storage space, but instead use the service as an intermediary to keep all your Mac and iOS devices in sync with each other.
Finally, there are services that use iCloud as a conduit, including Find My Mac and Back to My Mac. The first allows you to track your laptop from the Internet and other Apple devices; the latter is a remote controlled (VNC) solution.
4.4. iCloud.com
iCloud has a web interface at iCloud.com that allows you to access certain services from any device. These include the basics such as mail, contacts, calendar, and notes. It also contains the Find My iPhone service (which works to find your Mac), Photos for browsing your iCloud Photo Library, and a version of iCloud Drive for the web.
Here you'll also find iWork apps for iCloud, including Pages, Numbers, and Keynote. These are web-based versions of Apple's iWork suite, and you can work with any documents you choose to store in the cloud (or create new ones).
This web interface is most useful as a webmail service for iCloud mail, for keeping track of your devices and friends, or for working on documents remotely.
Set required apps as default
What to do:
- web browser: open “System Preferences”, go to the “General” section, select one of the installed applications in the “Default web browser” field;
- email client: open “Mail”, go to its “Settings”, expand the “General” section, define the application in the “Default mail client” field;
- other software: open the “Properties” of the file of the format for which you want to set the default application, select the required option in the “Open in application” menu.
There is no separate menu for selecting all default applications in macOS. The definition of a program for Internet surfing, as well as e-mail, is special. You will have to tinker with all other applications, but this process can be spread out in a thin layer for several days of using the Mac.
Creating folders
To keep your content organized on your MacBook, you'll need to learn how to create folders. After creating them, it is useful to assign each an appropriate name so that later finding the right folder would not be tedious for you. The creation of folders is provided by several methods; the simplest method, aimed at quickly creating a folder, is the Finder.
Go to the “File” menu, there you will find the “New Folder” option, as soon as you click on it, you will immediately be able to create the desired object.
By the way, there is an amazing feature in the MacBook that will definitely delight device users. In just a few seconds you can not only create a simple folder, but one oriented to specific files. To do this, first select the files that you would like to place in one folder, then hold down the keys: Control, Command and N.
All files you designate will be collected automatically into one folder called “New folder with elements”. Of course, it is better not to leave it in this form, because after a while it will be difficult for you to figure out where and what is stored. Accordingly, you will have to rename the folder, giving it any name that suits you. Renaming any object in a MacBook is not difficult, but it is important to note that there is no “Rename” item in the context menu, as in Windows.
ADVICE. To assign a new name to a folder, just click on the old name once, immediately click on the Enter key, then enter any name and click on the Enter key again. No further action is expected.
As you can see, even a beginner will be able to rename objects on a MacBook, since you are not expected to encounter any difficulties when performing such actions.
Select the default directory for Finder
What to do: Open Finder, go to its "Preferences", expand the "General" section, set the default directory in the "Show in new Finder windows" field.
In this case, we are talking about a folder that will open immediately after launching this application. Not everyone pays attention to this parameter, although it is very important. For example, since I myself use Google Drive to store absolutely all documents, it is its directory that I have selected in this case.
Customize "Active Corners" for desired actions
What to do: Open System Preferences, go to Mission Control, expand the Hot Corners menu and select the desired actions for each of them.
“Hot Corners” is a very convenient macOS feature that allows you to enable selected operating system features to launch when you move the cursor to a specific corner of the screen. For example, I myself use minimizing all windows for the lower right corner of the screen and Launchpad for the left.
Enable encryption and the system's built-in firewall
What to do:
- encryption: open “System Preferences”, go to the “Protection and Security” section, expand the FileVault menu, use the “Enable FileVault” button;
- Firewall: Open System Preferences, go to Security & Privacy, expand the Firewall menu, use the Turn on Firewall button.
The Firewall is useful for monitoring network activity, but FileVault encrypts the data in the storage so that it cannot be easily accessed by connecting one Mac to a second in hard drive mode. This is especially true for a MacBook, which is very easy to carry around.
Working with removable drives
The modern user is accustomed to saving many documents on a flash drive, providing himself with the opportunity to always have them at hand and always use them quickly. However, many users are at a loss on how to use a flash drive if they have a device equipped with Windows that is not familiar to everyone.
So, if you want to open a flash drive on a MacBook, we recommend that you worry about installing some software in advance. In particular, you can install:
- X-plore File Manager.
- ES File Explorer.
Connect your flash drive to the USB connector, wait a few seconds, after which your removable drive will be displayed. Double-click on its icon, you will immediately be able to view all the content located on the drive.
If you are faced with a more complex task, you need to connect and then immediately open the flash drive on which hidden files are saved, we recommend that you follow other steps. Initially, open the flash drive in the usual way, then find the “Service” section in the menu, enter it and find the “Folder Options” option. Next, you will need to make two more transitions, sequentially going to the “View” and “Advanced Settings” folders.
Now you will find several “tempting” offers, opposite which there will be empty and filled checkboxes. Clear the checkbox located next to the line “Hide protected system files”, but next to the other option “Show hidden files and folders”, we recommend that you check the box.
Set up backup via Time Machine
What to do: Open System Preferences, go to Time Machine, select the Select backup drive option, identify a removable drive and start saving backups.
Time Machine backup requires a separate drive. This feature, which is built into the operating system, will allow you to save important data, at least just in case. The choice of data to be saved can be changed in the future using the same menu.
Additional features
Using a MacBook, you can visit Internet sites and download any content in the same way. Of course, to do this you will need to install and then use some Internet browsers. We recommend that you do not overload your operating system and choose one of the browsers. Don’t forget to stay safe when working on the Internet; always remember that the global network is full of threats. To protect your device, install a firewall. It is he who will be able to monitor all network protocols, protecting your device from unwanted attacks.
Having a MacBook, you can successfully view videos, all kinds of images, and listen to your favorite audio files on it. And there are also no restrictions when working with archives, since the device successfully archives and unarchives any archives.
Set up Latitude to find your computer
What to do: open System Preferences, go to the Apple ID section, and turn on the Find My Mac switch.
When setting up your Mac for the first time, it's also important to consider what will happen to your computer if it is stolen. Using the Locator application, you can find it on the map and navigate to the device. However, if this feature is not turned on, then nothing will be done in case of theft.
How to set up a MacBook: step-by-step instructions
When turning on for the first time, users will be greeted by an installation assistant who will guide them through the main stages of setting up the device (either Pro A1990 or Air).
And now, in order, how to set up a MacBook as a new device:
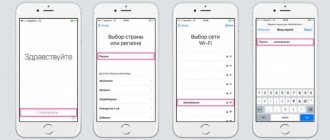
- Language and region . You can select from the list or add the one you need by clicking on the plus sign.
- Keyboard . Select a layout (you can add several and, if necessary, switch, for example, from UK to EN).
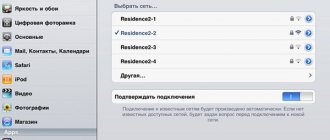
- Select an available Wi-Fi network. A network connection will be useful for some setup steps.
- Transfer of information. If the user has previously used Apple technology and wants to recreate the previous settings on a brand new Mac, you can use this function. The data will arrive to the laptop from the backup copy. You can also click on the “Not Now” button and postpone/cancel this process. Apple has a special migration assistant with which you can transfer information from another computer or cloud at any time.
- Geolocation . Some programs use device location data, such as Find my friends. You can check this box and allow the system to collect geolocation data or skip the step.
- Authorization in the Apple system. You must enter your Apple ID. What will this give the user? Access to all Apple services (for example, App Store, FaceTime, etc.). This identifier is the same for all Apple services. If it does not exist, then at this step you can create it.
- Terms and Conditions. You must read and accept them in order to continue further work with the MacBook (for example, with the Air A1466).
- Create an account. It, unlike AppleID, is intended only for a specific device. To create it, you need to come up with and enter a login and password in the appropriate fields.
In the subsections of the Mac system settings there are many items that you can change at your discretion or leave the factory settings. For example, how to set up the Internet on a MacBook A1708 or any other? Go to system settings → “Network” item → enter the name of the Network → select the connection method → select the Network to which the device is connected → enter the password.
In addition, you can connect various accessories to your Mac, such as a mouse. How then to set up a mouse on a MacBook? To do this, you also need to go to system settings, select the “Mouse” section. Using the sliders on the screen, you can change the parameters: response speed, double click and mouse scrolling.
May be useful: How to increase laptop performance - 8 ways
Create accounts for relatives
What to do: Open System Preferences, go to Users and Groups, add new accounts for everyone who can use this Mac using the + button.
User accounts save settings, content, and even individual software. It is logical to use several accounts on a home computer, to which several family members have access. This way, they won't interfere with each other's ability to fully enjoy their new Mac.
Touchpad
Continuing our story about the MacBook for dummies , it’s worth talking about the touchpad. It would seem that this is a regular mouse substitute, but in the latest versions of the MacBook this is not the case.
In the latest versions of devices, Apple has removed all buttons from it. Control is possible using two technologies. The first is force touch, and the second is gestures.
Force touch is a technology that reads the force of pressing the touchpad, which allows you to use the sensor as a button. When using gestures, you need to know these same gestures. For example, in order to drag a window using the touchpad, you will need to press on it with three fingers.