Windows 10 can install upgrades fully automatically. Not everyone who uses this OS is happy with this. Often, updates can cause conflict situations with existing programs; in addition, they can destabilize the computer and gradually take up more and more space on the drive.
Some reasons for problems when updating the OS:
- the update was installed with an error;
- the upgrade is not compatible with installed drivers;
- critical errors occurred along with the installation;
- multiple installations have occurred;
- incorrect installation due to failures in the original product and others;
If the system works stably, it is not necessary to upgrade in principle.
Uninstalling updates via Windows Update.
To remove Windows 10 updates using standard capabilities using the functionality from the “ Windows Update Center ” box, you need to perform the following sequence of actions:
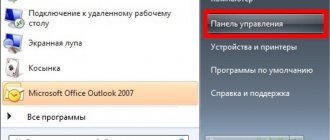
- " Start " - " Control Panel ".
- In the window that appears, click the “ System and Security ” section.
- Once in “ Windows Update ”, enter the “ Update Log ”.
4. Find the button to remove updates, and in the list provided by the system, select unnecessary KB updates and remove them.
Using the Control Panel
From the previous method, we know that we must go to the Installed Updates in Control Panel to uninstall updates. Instead of navigating through the Settings app, we can go there directly from the Control Panel.
Open Control Panel. Click "Uninstall a program" in the Programs .
On the left side of the next screen, you will see the View installed updates .
This will take you to the installed updates screen. The rest of the process remains the same as for the previous method.
So you select the update you want to remove and click " Uninstall " at the top of the window. Alternatively, you can right-click the update and select Uninstall . You will see a pop-up asking you to confirm whether to remove the update. Click Yes and the update will be removed.
How to remove windows 10 updates from the command line?
The most advanced way to remove unnecessary updates to Windows OS version 10 is to use the command line.
To enter the command line, you need to right-click on “Start” and enter “Command Prompt” in the drop-down menu; you must run it as an administrator. In the command line editor window that appears, enter the appropriate command:
WMIC QFE LIST BRIEF /FORMAT:TABLE
And confirm the action with the Enter key. As a result, we get tabular data of all possible updates in the system.
To remove a specific update, you need to run the command:
WUSA /UNINSTALL /KB:[UPDATE NUMBER]
We take the update number from the data table. It looks something like this KV1234567.
To delay the system reboot, you can enter a different command instead of the previous one:
WUSA /UNINSTALL /KB:[UPDATE NUMBER] /QUIET
Thus, it is easy to remove any updates, you just need to type the command and specify the number.
Brief history of the issue
It was possible to remove updates from RE using DISM back in Windows 7. In principle, nothing complicated - one command displays a list of packages, the second removes the package with the desired name.
dism /image:c:\ /get-packages dism /image:c:\ /remove-package /packagename:"SomePackageName"
However, for an unprepared person this method is not very friendly - first you need to decide on the drive letters, then the scary command line, a huge list of packages from which you need to select the right one to remove...
Rollback was introduced in Windows 10 and got its own tile in the RE menu, but it has nothing to do with the removal of the latest fix. Now you have it - just a few clicks. The main thing is not to get lost in two pines!
How to remove the latest windows updates?
Windows 10 has introduced a new settings menu, which can be accessed through the Start menu.
Go to “Settings”, find “Update and Security”, and then go to the update management center. In our case, it is necessary to study the log with records of installed updates, where there is complete information on this topic.
The system sorts all events by date, so the new update will always be at the top of the list. To delete it, you need to click on the element with the mouse. After clicking, the delete button will become active. The system will ask for additional confirmation. Sometimes after this operation the computer may reboot.
In the same way, you can remove the latest upgrades through the command line, as was written in the previous section. point.
Updates should be removed carefully, since they are already installed on the system, and any violation of intra-system connections will certainly affect the registry and the system will crash.
Using Windows RE
If Windows won't boot in either Normal Mode or Safe Mode and you think the problem is related to an update, don't go to a backup yet to restore your PC. You have a last resort.
Press and hold the computer's power button while it boots to turn it off, and then press the power button again to turn it on. You should now see Windows recovery options much the same as if you booted into Safe Mode.
Go to Troubleshoot -> Advanced Options and click Uninstall updates .
You will now see the option to remove the latest quality update or feature update. Remove it and it will probably allow you to boot into Windows.
Note. You won't see a list of installed updates like you do in Control Panel. So, as long as you can boot into Windows, use the methods we discussed earlier. Use Windows recovery options as a last resort.
How to remove old updates?
In order to “demolish” files of old Windows 10 updates, you need to perform the standard procedure for cleaning the hard drive with the system. But, in this case, you need to check the “ Clean up system files ” checkbox, since this utility is disabled by default.
After this, select the items “ Update log files ” and, if desired, optionally previous Windows installations. After the cleaning process is completed, several gigabytes of free space may be added to your computer.
A large amount of space on the drive is occupied by the previous installation of the platform. Even if a rollback is made to older but stable versions of the OS, the system will search for and try to install all deleted updates. To avoid this, you need to disable the installation of add-ons.
How to remove installed, downloaded and frozen updates?
Downloaded updates are stored in the device’s memory in the form of ordinary files. You can perform all necessary operations with these files - delete, copy, move. Among the downloaded files, there are also those that are frozen or not installed. Another name for these resources is “ update cache ”.
You can go there through a standard explorer and go to the folder along the path C:\Windows\SoftwareDistribution\Download
This is where the files we are interested in are located. You can remove problematic updates by their ID , size or download date.
You should approach cache deletion with caution. Mechanically clearing the update log can cause damage to the device. Only in an emergency, when the system is very slow or glitchy after downloading a patch, can you remove it through the explorer.
It is advisable to create a recovery point and save important files on another medium, disk or flash drive, so as not to lose them if the operation fails.
To properly clear a category with a cache, you need to go to the command line as an administrator and run the following commands one by one:
NET STOP WUAUSERV
DEL %SYSTEMROOT%\SOFTWAREDISTRIBUTION\DATASTORE\LOGS\EDB.LOG
NET START WUAUSERV
All! The update log should be empty, now you need to reboot.
Problematic updates can be removed either in a standard way or using external software.
After the action is completed, you should prohibit downloading and installing this update. Otherwise, the system will attempt to install it as soon as it detects its absence.
Uninstall the update through the control panel.
There is a standard way to properly remove unnecessary updates in the Windows operating system, through the control panel.
Through the standard icon, go to the control panel. After the window opens, you need to look for the “ Programs and Features ” column. We go there and at the top left we find the line “ View installed updates ”.
The system sorts all events by date, so the newest update will always be the first. To delete it, you need to click on the element with the mouse. After clicking, the delete button will become active. The system will ask for additional confirmation. Sometimes after this operation the computer enters reboot mode.
How to remove uninstallable updates?
Now there are no ready-made methods to remove uninstallable updates in the Windows environment, but it can still be done. However, if such an error occurs, this indicates the presence of a critical error on the computer.
To eliminate the malfunction, an integrated approach is required. Diagnostics, checking for viruses and the integrity of the hard drive are carried out.
Basic measures to eliminate a critical fault:
- Checking your computer for viruses;
- Diagnostics of the system and hard drive using special utilities;
- Checking and cleaning the registry;
- Defragmentation of hard drive sectors;
- Restoring the system from the installation distribution.
If after carrying out these measures there is no positive result, you should contact a workshop, call a specialist, or reinstall the OS.
Updates themselves do not pose a threat, but monitoring the correct installation and interaction with existing programs is necessary.
Finding out that the update has gone wrong is quite simple - the computer loses performance and begins to behave inappropriately. One update cannot completely disable the system, but it is quite likely to create some kind of malfunction.
System rollback after unsuccessful updates
System updates often affect core system files. Therefore, if there are possible failures during the update, important components of the OS may be so damaged that Windows simply stops loading. In order not to lose important data, it is recommended to regularly create system restore points. This tool will help you get your OS back up and running if updates, viruses, or disk errors cause Windows to crash.
In order to use the restore point tool when the OS is not working, you need to have a bootable Windows 10 USB flash drive.
- In the BIOS settings, we change the method of loading the OS to USB-HDD or similar, depending on the manufacturer of the motherboard.
- In the installation window, click the “System Restore” button.
On the installation screen, click “System Restore” - Next, select “Troubleshooting”.
Go to the “Troubleshooting” element - The following items: “Advanced options” - “System recovery”.
Go along the path: “Advanced options” - “System Restore” and select a point to restore - Next, select one of the last saved restore points and wait until the installation program returns Windows to a working state.
In my personal experience, sometimes a restore point is not enough to get the system back to working order. Personally, I think it’s better to accept it and do a clean installation of the system from the latest distribution, which already has all the necessary updates installed. If the update became so crooked that the operating system crashed, there is no guarantee that re-installation will not lead to the same result.
Video: how to launch a restore point
Third-party programs to remove updates.
The best program for customizing updates to your taste is Windows Update MiniTool . With this utility it has become very easy to find the update you need or remove an already installed one. The most important thing is that the program allows you to reinstall upgrades or completely refuse further system updates.
Another program that has great functionality and performance is Revo Uninstaller .
The application works similar to a standard service for installing and uninstalling software products.
This is an excellent manager that allows you to track all the information on updates and installed programs on the OS. Among the disadvantages are the presence of one list, both for updates and for programs, as well as a complex interface that is difficult to learn for a beginner or non-specialist in this field.
Disable all or specific updates
Yes, we deleted the update, but it will try to update again. In this case, we have two choices. The first is to completely disable the update option. In fact, there are a lot of ways to do this, so I advise you to read the separate detailed instructions - at this link.
The second way is to disable updating of specific packages. Everything is done very simply; using the official “Show or Hide Updates” program from Microsoft, you turn off specific updates, and they will not be installed on your system.
ATTENTION! At the time of writing, Microsoft has again turned off support for this application and removed the link to download it on the official website. For what? - unclear. But the program can still be downloaded from third-party sources, and it works. Therefore, we look for an application, download it and launch it.
- When you first launch the program, you briefly introduce its functions.
- In the second step, select “Hide Updates”.
- Now select the updates that you want to hide - select them with a checkmark.
- We are waiting for the procedure to finish.
Clearing downloaded updates and cache.
A normal option for optimizing the system and increasing the speed of performing basic functions is to clear the cache and archive with updates. When the cache is full, this will affect the availability of new updates and problems with downloading and installing them.
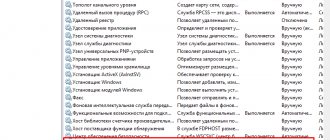
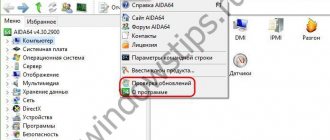
First you need to enable the Update Center service. To do this, right-click on “ My Computer ” on the desktop and go to the “ Management ” section.
At this point we look for “ Services and applications ”, enter services. In services, look for “ Windows Update ” and double-click on it. Here we are interested in the “ Startup type ” column, in which we set the “ Disabled ” parameter.
After the confirmation procedure and restarting the service, we move on. Using Explorer, go to the directory along this path : C:\Windows\SoftwareDistribution\Download . We delete all contents in this directory. Thus, we clear the folder with the cache and stored patches.
Next, you should restart your computer and turn the update service back on..
Cleaning the folder with old updates and copies.
The folder containing all updates has the system name WinSxS . The longer this system operates, the more data there is in this folder. There is no automatic cleaning provided here, and if timely measures are not taken, the folder can take up a lot of disk space.
There is an opinion that Windows takes up as much space as it can take, that is, over time, service information can gobble up all the free space on the system partition of the disk.
The difficulty in deleting data from this folder is that you cannot take it and simply delete it. This will inevitably lead to problems with the functioning of the computer.
Cleaning should be carried out using tools specially designed for this purpose. This is the Disk Cleanup system utility and the command line.
In the first option, you can invoke disk cleanup with a command from the terminal or search cleanmgr .
In the window with the utility there is a list of programs that can be removed without the risk of harming the computer. It should be remembered that if there are no updates in this list, then their removal is not recommended and generally undesirable.
It is enough to confirm your choice and the system will clear the disk of unnecessary programs and related data.
In the second method, you just need to enter the following command into the command line terminal:
Dism.exe /Online /Cleanup-Image /StartComponentCleanup
Press Enter, the system will do the rest itself.
After completing the optimization procedure, you need to restart your computer. This way, the maximum amount of disk space will be cleared.
If that doesn't work, try using advanced options.
you are unable to uninstall the update through the Settings This allows you to avoid downloading programs that may block or otherwise interfere with the update removal process.
Open the Settings , go to the Update & Security . In the left panel, go to the "Recovery" . At the bottom of the window there is a section “Special download options” . Click Restart Now to boot your computer with additional options.
When does cleaning up updates fail?
If you have problems uninstalling updates, this indicates one or a number of serious errors in the computer system. Windows is far from an ideal system; loads on the processor and memory can constantly arise due to failures, viruses, errors, conflicts and a host of other issues.
Serious errors are recorded in the registry responsible for installing patches and upgrades or in the section of the hard drive that manages the storage of the update file system.
Correct work with diagnostic tools integrated into the system can give effective results in optimizing computer performance.
Terminology
Microsoft has always had a hard time with terms in this area, and in Russian translation it’s very difficult. An update was called both a correction (update) and the installation of a new version over the current one (upgrade).
In Windows 10, the company switched to a new external
terminology (below in brackets is the official Russian translation).
The internal
terminology is more complicated, but I've already covered B, C and D.
Quality update (fix)
This category includes:
- package with OS and security system fixes
- service stack update
- .NET Framework update
- new version of Adobe Flash
All of these fixes replace the previous ones. The first three are cumulative, and for Flash the latest version is simply installed.