Updated: 04/23/2021 11:09:59
Expert: Boris Evgenievich Levitin
A blurry, blurry image on the monitor not only impairs the workflow, but also negatively affects vision. Therefore, such “picture defects” need to be eliminated, and the sooner the better. Fortunately, adjusting the clarity of the monitor is not difficult - you just need to set the appropriate resolution and launch ClearType in the settings of the Windows operating system.
“Monitor clarity” refers primarily to the sharpness and detail of the image. In addition, the quality of font display is important, because people who work at a computer have to read and write a lot.
Therefore, “adjusting monitor clarity” means setting adequate sharpness, contrast, level of detail, and also improving the display of fonts. It is worth noting that old CRT displays (if they are still left somewhere) are extremely difficult to adjust - and this is done in the parameters of the “picture tube” itself.
Let's figure out how to adjust the clarity of your monitor in just a few clicks.
Setting the optimal screen resolution
Each LCD monitor has its own actual resolution - its matrix is equipped with a certain number of pixels. And if the actual and set number of pixels in the picture horizontally and vertically do not match, the image quality may suffer.
You can find out the actual resolution of the monitor from the technical characteristics of the device - from the instructions, from the box, or simply by Googling the model. You need to adjust what is installed to it. Only in this case will each software point correspond to a physical pixel - and the image will become sufficiently sharp and clear.
Instructions:
- Find out the actual resolution of your display
. This information can be obtained from the instructions, from the box, or by searching the Internet for the characteristics of the model used. In some cases, this reference characteristic is indicated in the setup menu of the screen itself; - Right-click
on any free space on the desktop and select “Display Settings” from the menu that appears.
“display resolutions” in the Start menu - Select the recommended resolution
or set a value that matches the actual one.
If any item in the list of available pixel ratios is o, you should select it. Windows has a way to independently select the optimal display settings.
It is also worth noting that these instructions were written for the Windows 10 operating system. In older versions, however, the necessary parameters are in the same places, except that they may be named a little differently.
If, after setting the optimal resolution, the image has become too small, then in the same “Display” window, which opened after completing the second point of the above instructions, you should scroll to the “Scaling” section and select 125%.
Calibration with third-party programs
Not everyone can be satisfied with both the convenience of the tool built into Windows 10 and the result of its work, so we will consider several third-party solutions.
Adobe Gamma
The best monitor calibration tool for users working with Adobe products.
1. Launch the application and select Step by Step.
2. Name the profile you are creating.
3. Using monitor adjustments, achieve the optimal level of brightness and contrast. A sample will help with this.
4. Select a display light profile.
5. Adjust the gamma to create an eye-friendly brightness for the midtones (grays). The value will be within 2.20 ± 0.2.
6. Decide on color temperature, which Windows 10 does not allow. The parameter depends on the external lighting. When backlit with fluorescent lamps, you should choose 9500 0 K, with natural light - 6500 0 K.
7. To visually select the color temperature, click “Measure” and select a satisfactory option.
8. The final step is to set the white point value, but it is not required.
To switch profiles, run the utility in the form of a control panel.
There are many similar programs: Cltest, TFT Test, Atrise Software LUTCurve, QuickGamma. They have a larger set of tools and capabilities, making calibration more accurate, but also more difficult. The average user is unlikely to need their functionality.
Monteon Web Application
To accurately calibrate the display, gamers and bright movie lovers should adjust their monitors using dynamic scenes (available from the Monteon web service), but their intensity is designed for devices 10 years ago.
Selecting and setting up an LCD monitor
Initially, you need to understand what types of monitors there are, since their settings directly depend on this. Truly “harmful” displays have not been produced for a long time, so we can say that all modern models on the market are safe for the eyes if the operating rules are followed.
Previously, CRT monitors were actively used, the functioning of which was based on the use of a cathode ray tube. They were quite damaging to the organs of vision and consumed a lot of energy. They have been replaced by new LCD (liquid crystal) LCD screens, which are gentle on our eyes. Depending on the matrix used, they are divided into three categories: TN, IPS and MVA/VA.
TN matrix
The most affordable option is a screen with a TN matrix, which provides a fairly poor viewing angle. If you look at it from the side, the colors of the picture are greatly distorted, which contributes to rapid fatigue of the visual organs. Correct positioning of the monitor relative to the eyes is extremely important in this case. You should sit directly opposite such a display, otherwise it will be difficult to distinguish a picture or text.
IPS matrix
This type of matrix is the highest quality and safest for the eyes today. It provides a good viewing angle and color saturation. The disadvantage of such a screen is its high cost. As a rule, IPS matrix is found in laptop monitors in the middle and high price segments.
MVA/VA matrix
The best option in terms of price-quality ratio is the MVA/VA matrix. It is somewhat inferior to IPS in terms of color saturation, but it is almost impossible to notice this with the naked eye. Such monitors provide a good viewing angle, but at the same time cost an order of magnitude cheaper than IPS. This is a good choice for those who spend a long time at the computer.
Since CRT monitors are no longer used, let's look at how to set up a LCD monitor with any of the matrices described above.
Please note that screen parameters for comfortable work may vary in each specific case. It all depends on the individual characteristics of the human visual system. However, there are a number of simple recommendations that should still be followed.
Who needs calibration and why?
First of all, calibration is needed by professionals working with color. These could be photographers, designers, videographers, printers, etc.
The main goal is to display colors correctly on the monitor. In order for other users to see exactly what the author wanted to show, the device must be calibrated.
Secondly, if a professional photographer's camera, monitor and printer are calibrated and have the same color profile, the final print on paper will produce exactly the same colors that were in the viewfinder and on the screen.
Thirdly, calibration allows all user displays to be brought to the same color setting. The designer's and photographer's work screen must match its home counterpart and/or laptop.
Please note: even after calibration, the picture on the two devices may differ slightly due to the individual characteristics of the matrices.
Fourthly, using this procedure you can level out changes that have occurred over time. Over the years, all monitors lose brightness and develop slight color shifts.
Desired calibration results:
Question: Can all monitors be calibrated?
Answer: Any monitor can be calibrated, but there is little point in doing so, for example, with a TN device with a color gamut of 70% sRGB. It is impossible to bring such displays to ideal color rendition.
Some people believe that there is no need to calibrate monitors because they go through this procedure at the factory. Indeed, in most cases, calibration from the manufacturer is sufficient for a typical home display.
Correct connection
To connect the monitor to the system unit, different cords can be used, depending on the model of the video card and the availability of corresponding ports on both devices.
The traditional analog VGA port (blue) is considered obsolete and has some disadvantages compared to digital DVI (white) and the more modern HDMI and DisplayPort.
To ensure the best image contrast, it is recommended to use digital ports. If they differ on the monitor and the system unit, it is acceptable to use adapters.
Alternative software for calibrators
For those who have already outgrown automatic step-by-step calibration and want to meticulously manage the process, there is more complex and, no less important, free software. It significantly expands the capabilities of any calibrator, but before starting work you will have to read manuals and forums, since connecting a calibrator with such programs can sometimes be difficult.
ArgyllCMS is an open source software for building an ICC profile using a calibrator. A kind of universal “driver”.
ColorHCFR ( HCFR Colorimeter ) is an excellent (let's not be afraid of this word) French program that provides the user with complete reports on the capabilities of the monitor, TV, and projector. The software is unfriendly to many models of calibrators, but dancing with a tambourine pays off with the program’s capabilities. To work, you need to install ArgyllCMS and basic knowledge of English. The latest current version for 2022 is HCFR Colorimeter 3.5.2.
DisplayCAL (formerly dispcalGUI) is the most famous program for calibrating, profiling and testing monitors. Also requires ArgyllCMS. It has a huge number of settings and makes it possible to make more accurate calibration by increasing the number of measurements. The procedure can last from several minutes to several hours. The software is simpler than HCFR, better designed visually, the calibrator is easy to find and has a Russian interface.
Process for adjusting white point and brightness
There are many video tutorials on the world wide web on setting up monitors using DisplayCAL.
Why setup is needed
When connecting a new monitor to a computer, the system automatically detects it and adjusts the default settings for this monitor. But, the default parameters do not always correspond to the required ones both in terms of screen expansion and color rendition. In addition, the first and repeated connections of the display in Windows do not guarantee correct settings immediately after connection.
Color management
Windows also includes advanced color controls. Color management systems guarantee the most accurate color reproduction everywhere, and especially for devices such as monitors and printers.
Fixing blurry fonts
Often it's just the fonts that are unclear. This can be fixed in the Control Panel under ClearType text settings. Press the Win+S key combination and enter the name of the parameters in the search bar.
In the first window we see a description of the technology. The ClearType tool makes text clear and easy to read. The marker opposite “Enable...” is set automatically, but make sure once again that it is exactly set.
Click “Next”. There will be information about the monitor resolution. Click “Next” again. Then there will be 5 text settings. Choose those that you think are best for your perception. Here is an example of one of the settings.
After setting the text, the final window will appear. Click "Done". Please note: Administrator rights are required to complete the monitor text settings. We have a detailed article on how to obtain these rights.
We recommend that you restart your computer after setting the fonts.
We wrote in detail about how to fix blurry fonts in Windows 10 in this article.
How to adjust clarity correctly
If changing the resolution doesn't help, you may need to adjust the clarity setting manually. This can be done on Windows 7 and Vista. To do this, you need to go to “Control Panel” - “Screen” and click on the Clear Type tab. Next, manual adjustment will begin, where the user needs to select comfortable images among those offered.
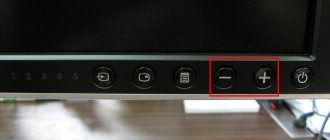
You can also adjust the clarity using the settings on the monitor itself. To do this, you need to go to the corresponding menu and select the required sub-item using the buttons on the device panel.
How to fix blurry Android screen?
How to get your phone back to normal when the screen is blurry
- Step 1: Inspect the damage. Inspect the device for damage caused by water/liquid. ...
- Step 2: Dry. Dry your mobile phone if it has been damaged by water. ...
- Step 3: Reset the system. Perform a soft reset on your device. ...
- Step 4: Hard reset instructions. Perform a “hard reset” to restore your phone to factory condition.
Oct 30 2022
Setting ClearType
ClearType is a special font smoothing system that allows you to set the most optimal display of text on displays with high pixel density. However, on screens with medium or even low density it can also be very useful. In any case, it can significantly improve clarity - and that is exactly what we are trying to achieve in this instruction.
Instructions:
- Open Start and start typing “ClearType” on your keyboard. Most likely, after the first few letters the desired option will be offered - “Setting ClearType Text”. Feel free to left-click on it;
- In the window that appears, check the box next to “Enable ClearType” and click “Next”;
- If the selected screen is set to an inappropriate resolution, Windows will notify you during the next setup step. If it is suitable, he will also inform you, but will not allow you to change it. Feel free to click “Next” - and do this after each stage;
- Next there will be five steps to adjust the quality of text display. Choose the best option, in your opinion;
- Click "Done." The display of text on your monitor will change slightly based on the items you select.
This stage allows you to quickly and accurately adjust the clarity of the monitor, since it affects not only texts, but also some elements of the system interface.
Screen calibration
Display calibration software ensures colors appear accurately on your screen. If you already have a screen calibration program from another vendor installed on your computer, you can use that. Screen calibration devices often come with software. By using a calibration device with calibration software, you can get the best color on your screen.
Windows also has a feature to calibrate the display.
How to calibrate your monitor in Windows 10
The user can improve the color quality of the monitor using the color calibration tool. Follow the steps in the monitor color calibration tool to adjust gamma, brightness, contrast, and color balance.
Using the updated search, find and open the Monitor color calibration . If multiple monitors are connected, then move the calibration window to the screen that needs calibration.
- Gamma defines the mathematical relationship between the values of red, green, and blue that are transmitted to the monitor and the intensity of light emitted by the monitor.
- The brightness setting determines how dark colors and shadows appear on the screen.
- The contrast setting determines the level and brightness of the highlights.
- The color balance setting determines how shades of gray appear on the screen.
Once completed, you can save the calibration results or continue to use previous calibrations. It is possible to compare the results by choosing between the current and previous calibrations.
Users need to adjust the colors of images on the monitor to suit themselves, since the perception of colors by different people may differ. Using the operating system, you can adjust monitor brightness, color saturation, and screen contrast in Windows 10. Applications for managing video card settings also allow you to adjust the monitor image.
Parameters such as the brightness and contrast of the monitor or display are paramount when choosing a laptop. If they are accompanied by excellent characteristics, then this favors comfortable reading and quick completion of all assigned tasks.
The brightness and contrast of the laptop are very easy to adjust
Otherwise, very rapid eye fatigue occurs, pain, lacrimation and other undesirable consequences appear. However, you can adjust the brightness of the monitor yourself, using practical advice from experienced users on how to adjust the brightness of the monitor.
Programs for setting up a monitor
Everything that the system offers us is also available in specialized utilities from manufacturers of integrated graphics chips and video cards. The most popular applications for customizing the display:
- NVidia Control Panel.
- AMD Catalyst™ Control Center.
- Intel Graphics Control Panel.
Visually, they differ from each other, but they offer similar functionality for monitor parameters. Using an example of interaction, let's look at a program from NVidia, which is useful for those who do not know how to change the screen contrast on Windows 7.
All basic information is located in the display section:
Each item has many parameters that, in one place, allow you to customize the display.
Setting up Windows 7 to work with a 4K monitor
Windows 10 recognizes 4K and 5K monitors and adjusts graphics settings accordingly. The situation is different with previous versions of Windows 7 and 8, which were not originally designed for such resolutions. Chip tells you what you need to do to make your work comfortable.
Windows 7/8, when connecting a 4K monitor, displays extremely small fonts, icons and menus. It is recommended to increase the font size to 125% or 150% if necessary. Icons should also appear enlarged on both the Desktop and Start menu.
You can also change the mouse pointer speed if necessary. We will show the corresponding settings using Windows 7 as an example. However, it may happen that your changes will not lead to the desired result in third-party programs.
Reasons for image inversion
- Accidental pressing of hot keys - This happens if a pet, a child accidentally presses them, or you make what is sometimes called a “miss click,” that is, an unintentional miss when pressing a button. Such a revolution can also be corrected by pressing a special combination. After this, it is better to disable hot keys.
- Problems with software or hardware – it also happens that hardware components or their drivers begin to conflict with each other. In this case, it would be best to carry out diagnostics in order to determine what was to blame for the image rotation
- Virus - another reason may be infection of the system.
Reasons why the image on the screen becomes upside down and their solution
In the case of a virus, there are three solutions:
- scanning with an antivirus and quarantining suspicious files;
- rollback to the last system change;
- if system files are already infected, reinstall the entire OS.
Image optimization
Internal image optimization helps improve sharpness, without the use of additional mechanical tricks. Optimization is usually understood as setting:
- Brightness. Brightness can hide natural blur and allows you to focus on general plans. Also, competent (correct) optimization of brightness can emphasize the positive effect of contrast and color rendition.
- Contrast. Contrast can compensate for some “jaggedness and blurriness” in the image by brightening or darkening the transitions between objects in the image. This effect is based on a natural phenomenon commonly called “reflection” - the ability of light rays (to bend around objects) to scatter in the air. Increasing or decreasing the contrast can “optimize” the image and make it clearer and more pleasing to the eye.
- Color rendition. Color rendering is one of the most important optimization parameters. With its help, you can “saturate” the internal component of objects in the frame and visually reduce the transition between them, which can increase the clarity of the picture.
Modern monitors may have other settings that help with overall optimization. Using them, you can reduce the “strain” on your eyes, and also improve the image, without using software methods. When working with them, it is recommended to strictly follow the rules from the manufacturer. This recommendation will help you achieve quick setup and will be optimal for any user and monitor type.
Adjustment algorithm
There are several options to solve this problem. Moreover, each option is available for understanding the sequence of actions and is unlikely to provoke additional questions in you related to misunderstanding of individual steps.
In general, everything, even outdated laptop models, are configured to average such parameters.
In addition, you may encounter a situation where your modern laptop will be able to independently adjust the brightness and contrast settings.
Indeed, modern manufacturers equip some computer units with such functionality. In this case, as the light in the room increases, the brightness on the laptop automatically decreases. In the same way, on the contrary, when the illumination decreases, the laptop is able to increase the brightness itself to provide the user with comfortable working conditions even for a long time.
If you do not own such modern technology, but are content with slightly outdated models that are not accompanied by such functions, you can still intervene in the process of adjusting brightness and contrast, providing yourself with conditions under which your eyes will not experience strain.
Before starting to directly study the recommendations on how to increase the brightness of the monitor, each user must understand that such a setting directly affects the battery charge state.
The higher the brightness, the faster the laptop will discharge
The higher the brightness, the faster the battery will discharge. In this regard, if you are beyond the reach of recharging the laptop from the mains, on the contrary, it is recommended to reduce the brightness and contrast settings.
Adjustment via OS
The operating system itself contains unique capabilities, using which you can adjust the brightness and contrast settings.
At the same time, you can set completely different parameters when operating the laptop from the mains, as well as exclusively from the battery.
This setting is equally suitable for any laptop, regardless of what technical parameters and resources it has.
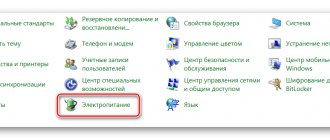
Initially, launch the “Control Panel”, in the window that opens, find the “Power Options” option, click on it.
A window will now open containing tools that will allow you to successfully configure the display settings, either increasing or decreasing the brightness.
You don't have to do anything difficult. Simply drag the slider to the right or left, thereby adding or decreasing parameters. By the way, you will immediately be able to visually observe all these changes. If you agree with them, simply complete your actions.
Adjusting brightness in the Power section
In the same window, you can configure the laptop for the actions that the display should perform under different operating conditions of the laptop.
Adjustment via interface
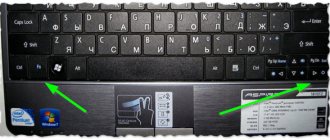
Modern manufacturers are trying to expand user capabilities, so they equip the keyboard with special functional buttons.
In particular, adjusting the brightness and contrast of the monitor can be done by simultaneously pressing two buttons, one of which is Fn. This button is in most cases located at the bottom of the keyboard.
The second button on different models may be different, but its main landmark is, in addition to the main inscription, the presence of an icon with a picture of a sun.
It is important to understand that there should be two buttons with the image of the sun. One is aimed at increasing brightness, and the second helps to reduce it.
Sun buttons allow you to adjust brightness
Often these additional buttons are arrow keys, which are located between the main keyboard and the numeric keyboard.
Having used these methods at least once, you will understand not only how to reduce the brightness of the monitor, but also that such actions are not accompanied by difficulties.
How to adjust sharpness on a computer monitor?
After the optimization has been carried out, you can begin the setup itself through the operating system. Let's look at the example of the Windows operating system - the algorithm of actions is as follows:
- Start.
- Control Panel.
- Screen.
- Sharpness.
IMPORTANT. The procedure may differ in some versions of the Windows operating system. This is due to the high frequency of updates, however, you can always check the setup information on the official Microsoft website or on the Internet.
A context window will open in front of the user with the ability to change sharpness. Simply by changing the position of the slider, you can change the characteristics of the image.
Three standard modes will be available for the user to choose from, with the ability to further adjust sharpness - these are the values:
- 0;
- 50;
- 100.
Having chosen the optimal value, activate the “advanced settings” tab, you can make the desired changes, making the picture clearer or blurrier. After this, you need to save the changes made and the monitor is ready for use.
Setting up your screensaver
If you need a screen saver on your monitor when you leave the computer, then in Windows 7, open the “Control Panel” and go to the “Personalization” section.
Click on the “Screensaver” item.
Choose the one you like and set the inactivity interval after which the screensaver will automatically start.
In the “top ten” the same options are located at “Settings” - “Personalization” - “Lock screen” - “Screen saver options”.
Best Display Options for LCD Monitors
If you are using an LCD monitor, check its resolution. This will determine the clarity of the image on the screen. For LCD monitors, it is recommended to set your own resolution: the one that the manufacturer has provided for the monitor according to its size.
To check your monitor resolution, check the display settings in Control Panel:
- Open the Screen Resolution window.
- Click the drop-down next to Resolution. Find the resolution with the (recommended) icon. This is the native resolution of the LCD monitor. This is usually the highest resolution it supports.
Changing the window color scheme
You can also customize the included theme more subtly by clicking on the “Window Color” link below. Provides a variety of colors, the ability to turn transparency on and off, and other options.
If you selected the classic theme at the previous stage, then clicking on “Window Color” will open a window familiar from Windows XP, where you can configure in detail all the elements of the window color scheme.
In the “top ten” you can change the window color in “Personalization” - “Colors”.
Built-in Screen Color Calibration tool
The utility is launched through the command interpreter, Settings and Control Panel; there is no shortcut for it in Start.
To start the utility, you need administrator rights.
The first option is much faster than the second.
If you like to do everything through a GUI, follow these steps.
1. Open Control Panel, and visit the Color Management applet.
2. In the newly opened window, go to the “Details” tab and click “Calibrate...”.
2. In the window that opens, scroll down and activate the “Advanced display settings” link.
3. Select the display you want to calibrate, if there are several of them.
4. Click on “Video adapter properties...”.
5. In the “Color Management” tab, click on the button of the same name.
6. Visit the “Details” tab, where at the bottom click on the “Calibrate screen” element.
1. Open the Desktop context menu and select “Display Settings”.
2. Click “Advanced Options...”.
3. Go to step 3 of the above method.