04/24/2018 Category: UpdateAuthor: Denis Dolgopolov
Since a huge number of people use the Windows operating system, Microsoft cannot immediately release a perfectly debugged product, since it is impossible to take into account the wishes and characteristics of all users, while keeping up with progress. This is why Windows 10, released several years ago, still needs updates.
- Ways to get updates
Automatic update - Through computer settings
- Via command line
- Via Windows Upgrade
Video: Windows 10 update
Checking for updates through system settings
By default, all services responsible for checking and automatically installing the latest updates are activated in the system. If necessary, you can view new releases manually through the system parameters:
- Expand the Start menu, click Settings.
- Go to "Update and Security".
- In the Windows Update tab, click Check for updates.
Note! If the data packages were downloaded automatically by the system, a list will be displayed on the page. You can also update there.
Time at which the PC does not restart
Before the procedure, you can make sure that the computer does not restart after downloading the update. To do this you should:
- Go to Windows 10 Update Center.
- Find the section with changes in the activity period.
- Specify the time during which the computer is in working condition.
- At the next stage, specify the time when the PC shuts down.
- After this, the system will not be able to reboot on its own.
- To complete the procedure, click on the save button.
Enable Windows 10 updates
Windows 10 cannot be updated if the corresponding service is disabled on the system. To activate, you will need to use a special utility or perform the action via the Command Line.
Services
The Windows Update service is responsible for checking, downloading and installing updates. To enable this process, you need to:
- Using the search on the left side of the “Taskbar”, enter the request “Services” and click on the item of the same name in the search results.
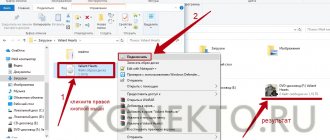
- In the list of all processes, find “Windows Update”, right-click on the name (RMB) and click on the “Properties” line.
- From the “Startup Type” drop-down menu, select “Automatic” and click Apply.
Important! If the process status is shown as Stopped, you must first click Run.
After completing all the steps, the service window can be closed. It is recommended that you restart your computer for the changes to take effect.
Command line
You can enable the Windows 10 update through the console launched with superuser rights. Step by step guide:
- Expand the “Start” menu, open the “Utilities - Windows” directory in the list of programs.
- Right-click on the “Command Prompt” item, select “Advanced” → “Run as administrator”.
- Confirm initialization by clicking Yes.
- In the console, enter the command net start wuauserv and press Enter.
If the operation is successful, a corresponding message will be displayed - the window can be closed.
Clean installation of Windows 11
The need for a clean installation of Windows 11 appears among owners of new PCs or those who want to delete all data from the previous OS, ensuring the correct operation of the new one. If you currently own Windows 10, using the following instructions is almost pointless, unless you want to remove everything related to the “ten”.
«Windows 11 Installation Media Builder»
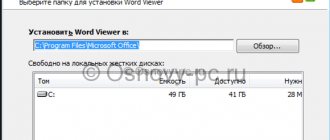
- We will take the simplest route and use a proprietary tool for creating installation media for Windows 11. It can be downloaded from the website using the link above. There you will also find an image in ISO format, which you can use if you want to create a bootable USB flash drive or disk not through a program from Microsoft.
- Launch the downloaded application and accept the terms of the license agreement to proceed further.
- Select your preferred language and edition of Windows. The default settings are the recommended ones, so you usually don't need to change them.
- In the next step, mark with a marker "USB flash memory device", because you want to immediately write the installer onto a USB flash drive for further installation. I already said above about working with an ISO image; you do not need to use the installation program to download it.
- Connect the USB flash drive and select it in the list of drives, then confirm formatting and wait for the bootable media to be written.
- Leave the flash drive connected or connect it to another computer. Before starting, it is recommended to set the boot priority in the BIOS from the flash drive so that it starts first.
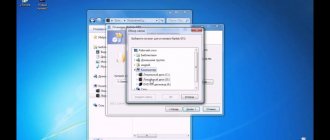
- After turning on the computer, a standard Windows installation window will appear on the screen. First select the time format, language and input method, then proceed to the next step.
- Click the button "Install", thereby starting this process.
- Enter the activation key you received by email, or skip this step if you have a digital license linked to a Microsoft account.
- Specify which version of Windows 11 you want to install on your computer. As you can see, only x64 architectures are supported, which is logical, because this OS is no longer compatible with 32-bit processors.
- You may receive a notification that your computer does not meet system requirements. This may be due to TPM 2.0 being disabled, which I mentioned above. Go back to the first section of this article to understand what's wrong with your PC.
- If all is well, the next step is to select a hard drive partition for installation. Everything is simple here - select the appropriate volume, which will be drive C. Keep in mind that all data from it will be erased, that is, formatting will be performed.
- Wait for the installation to complete and follow the on-screen instructions. Give your computer a name, sign in to your Microsoft account, and pay attention to your privacy settings, turning off settings that you don't need.
This completes the clean installation process and you can start using the new version of the operating system. Unfortunately, there is not yet a workaround for not meeting the minimum requirements when using this installation method, so you must ensure that your PC is compatible with Windows 11.
Setting up automatic updates
You can change the auto-update configuration in the OS settings menu; for this you will need:
- Go to “Start”, click on Settings.
- Go to "Update and Security".
- In the “Windows Update” tab, click on the “Change activity period” item.
- Click on the “Change” link and select the activity period during which updates will be downloaded but not installed.
You can perform a similar setup through other OS tools: the Group Policy Editor and the system registry.
Local Group Policy Editor
The tenth version of the OS contains a special tool that allows you to configure individual components. To change the auto-update configuration you will need:
- Press Win + R and run the command gpedit.msc.
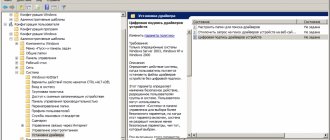
- Using the directory tree structure in the sidebar, navigate to Computer Configuration → Administrative Templates → Windows Components → Windows Update.
- In the list of files, find and open “Setting automatic updates”.
- Check the box next to “Enabled”.
- From the drop-down list, select “4 - auto. download and install Scheduled".
- Set the installation schedule to “0 - daily” and “Automatic”, as shown in the image below.
- Click OK and close the window.
Important! The method can only be used in the Pro edition.
System registry
You can set a similar configuration in the Registry Editor, for this you need to:
- Press Win + R and run the regedit command.
- Go to the path HKEY_LOCAL_MACHINE\SOFTWARE\Policies\Microsoft\Windows\WindowsUpdate\AU.
- Using the context menu, create the following DWORD parameters:
- AUOptions - 4;
- NoAutoUpdate - 0;
- ScheduledInstallDay - 0;
- ScheduledInstallEveryWeek - 1;
- ScheduledInstallTime - 24.
Important! If there is no specific directory on the path to the specified address, you must create the folder yourself.
Adding a DWORD parameter works like this:
- Right-click on the free area on the right side of the interface.
- Select New → DWORD Value (32 bits).
- Set a new name, then double-click to configure.
- Enter the number corresponding to the name of the parameter in the “Value” field.
After following the instructions, the registry window must be closed and the computer restarted.
Possible problems
In frequent cases, errors and system failures appear during the update. If such a situation arises, it is recommended to take several actions:
- Check the data transfer speed.
- To restart a computer.
- Run the update tool again.
- Use another method for the update.
If none of the above methods help, the user will need to open the system parameters block and use the troubleshooting tool.
Third-party programs for running updates
The standard Windows 10 tools have increased interface complexity, due to which an inexperienced user may not understand all the nuances of updating the OS. It is recommended to pay attention to products from third-party developers, for example:
- Winaero Tweaker;
- Windows Update MiniTool;
- WAU Manager.
Each application has an intuitive interface and has additional functions when working with updates. For installation, it is recommended to use the installer downloaded from the developer’s official resource.
How do the versions differ?
The main difference between Windows 10 professional and home is the presence of advanced tools designed for virtualization, administration, system testing and business promotion. The list of key features includes:
- Remote Desktop feature. Designed to provide access to the operating system desktop.
- Microsoft Hyper-V. A technology with which you can install and move to virtual hardware in the OS.
- Bit Locker security system. It allows you to encrypt any information on solid-state drives for one language. At the same time, it is absolutely impossible for malware to gain access to files.