After publishing an article on how to disable automatic updates to Windows 10 and get rid of all unnecessary updates downloaded, users began asking how to delete the $WINDOWS.~BT folder.
It can’t be deleted just like that, because when you try to do this, a window appears with the message “You need permission to perform this operation. Request permission from Administrators to edit this folder."
Indeed, the “caring” Microsoft developers have provided an option to use your computer for your own purposes, and so that you simply cannot get away with distributing it to dozens of other users. It is in the $WINDOWS.~BT that the update files to Windows 10 are contained, and they are downloaded to your computer automatically, even if you are not going to upgrade the OS at all.
$Windows.~WS folder is also created , which also takes up a lot of space on the hard drive (in total, both folders weigh about 7 GB), and which can also be deleted without negative consequences. But how to do this?
We offer several truly working methods to choose from: if one doesn’t work, try another, if another doesn’t work, try a third. As a result, one of them will definitely lead to the desired goal - verified!
Removing a directory using the Unlocker utility
download the Unlocker from its official website www.emptyloop.com/unlocker. After downloading, install the utility. Installation is quite simple and will not cause difficulties even for novice PC users. the Unlocker launch menu will appear in the Explorer . That is, if you right-click on any folder or file, you will see an item called “ Unlocker ”.
To delete the “ $Windows.~BT ” directory, find it on the local drive “C:\” and right-click on it and select “ Unlocker ”. A program window should appear. In it you need to select an action from the drop-down list. In our case, the action will be Delete.
After selecting an action, you can safely click on the OK button, after which the directory will be completely erased.
Having successfully deleted the directory, Unlocker will display the following message.
Additional Information
In addition to the above directory, those who switch to “Ten” sometimes create a similar section, but only with a slightly different name: “Windows WS”, which also has an installation distribution of the new system. The procedure for getting rid of this folder is completely similar to the methods described above.
Note: for users who installed Windows 10 “from scratch,” the directories described in this article are not created, so the article is relevant only for owners of computers that have upgraded to the new system.
Deleting a directory using standard Windows tools
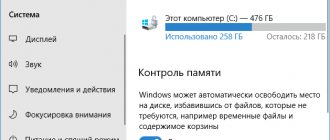
To delete the “ $Windows.~BT ” folder, we will have to use a little trick, which is to rename the directory to “ Windows.old ”. This folder contains program settings, as well as personal information of the user of the previous OS. After renaming, select the local drive “C:\” and go to its properties.
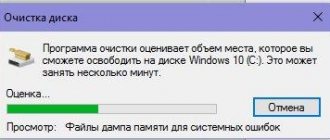
Click on the Disk Cleanup button.
After clicking on the button we will see the same window.
Click on the Clear system files button and go to the next window.
Select the “ Previous Windows installations ” checkbox and click OK.
As you can see, by renaming the directory, we managed to get rid of the “ $Windows.~BT ” folder using standard Windows 10 tools.
What is this folder and what is stored in it?
So, Windows bt - what is this folder and what is stored in this directory? If you open it and pay attention to the files and directories it contains, it will become clear that these are installation binaries for Win 10.
This storage appears on the hard drive when the user has reserved the transition to Win 10 and is used when installing this OS. And even after this, the directory in question still remains on the hard drive and takes up quite a lot of disk space. Its volume is almost 6 gigabytes.
If you do not plan to return to the previous OS on your computer, then this directory can be deleted. We will describe removal methods using our own applications and programs from third-party developers.
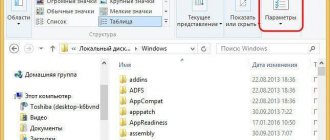
See what the folder location and contents look like:
Now let's get acquainted with ways to delete the Windows BT folder.
Removing a directory using CCleaner
CCleaner is a fairly popular system cleaning program, as evidenced by millions of installations on PCs around the world. The program has become popular due to its functionality and the availability of a free version , which can be downloaded on the official website www.piriform.com.
In order for CCleaner to see the directory to be deleted, perform the renaming operation as in the previous example. After installing the utility, run it and select “ Old Windows installation ” as shown in the figure below.
Now you need to click the Analyze button for the utility to analyze the list of files to be deleted. After analysis , CCleaner will display a list of data that can be deleted.
The final action to delete the “ $Windows.~BT ” directory is to click the Cleanup button.
What to do if an important file was accidentally deleted?
It is worth noting that if you suddenly need deleted data from folders or you accidentally lost important information from your computer, we recommend using the convenient file recovery program RS Partition Recovery.
With its help, you can return data lost during:
- Formatting a disk or removable media (flash drive, portable hard drive, etc.)
- Accidental deletion from media.
- Virus removal.
- Loss of important data from the desktop during OS reinstallation .
RS Partition Recovery has advanced functionality and several algorithms for searching for traces of deleted data, which allows you to quickly scan and identify recently deleted files, or conduct a deep analysis of the media to recover files deleted up to several months ago. Together with RS Partition Recovery you can recover photos, media files, text documents and other formats used in various applications. More detailed information about RS Partition Recovery can be found on the official page of the program.
Removing a directory using CMD
To remove “ $Windows.~BT ” using the command line, you need to run and enter the necessary commands. You can launch the command line using the “ Run CMD command in it .
Having launched the command line, we need to enter three commands. The Ctrl + V text insertion key combination does not work in the command line, but you can paste text through the “ Paste”
" context menu by right-clicking it in the
Command Prompt
.
First command: takeown /FC:\$Windows.~BT\* /R /A
Second: icacls C:\$Windows.~BT\*.* /T /grant administrators:F
Third: rmdir /S /QC:\$Windows.~BT\
After entering each command, you must press the Enter key for the operation we have specified to be completed. After entering and executing all the commands, the “ $Windows.~BT ” folder will be erased.
Removing Windows bt via command line
You can use Command Prompt commands to perform the task of erasing this directory from disk. To do this, press WIN+R and type cmd.
Write the following three commands in sequence:
in order to transfer administrative rights to the user.
Another hidden folder
$Windows.~BT directory , after the update, another directory named “ $Windows.~WS ” may appear. This directory also contains the Windows 10 installation files. The process for deleting this folder is the same as with “ $Windows.~BT ”. Therefore, feel free to use all four removal methods.
How to avoid the appearance of hidden folders “ $Windows.~BT ” and “ $Windows.~WS ”
The only way to avoid the appearance of hidden folders “ $Windows.~BT ” and “ $Windows.~WS ” is to clean install Windows 10 on the user’s computer. To install ten from scratch, you need to use a licensed disk or bootable flash drive with ten. By performing a clean install, you'll save yourself the hassle of deleting those unnecessary folders. In addition, during a clean installation, Ten will correctly create UEFI , provided that your computer supports UEFI BIOS.
Purpose
The essence of this directory is the hidden storage of operating system installation files, which were downloaded in the background without notifying users. The weight/volume of the folder is quite impressive, on average more than 6 GB, which raises certain questions regarding the benefits of having it on your hard drive. It is worth noting that despite the fact that the peak of its distribution occurred precisely during the promotional update of the operating system to “Ten,” it is still found on computers today, still taking up grains of the volume of a hard drive or solid-state drive.
Tips for extending the operating time of ssd drives
Tip 1. The first thing you need to do is disable the disk content indexing service, the use of which on home computers is often practically useless. The work of this service is that when files are created and modified, the operating system indexes them in order to quickly and efficiently search for information using the index in the future. However, try to remember how often you use the search function? The fact is that the file indexing service is practically useless in cases where information is searched rarely or not at all, and also when the contents of disks simply do not need to be searched. For example, on home computers, one partition is often allocated for the operating system and software, and the others for storing information. In this case, the user probably knows where the information he needs is stored, and there is simply no need to use the search function, and therefore disabling the file indexing service would be justified and would reduce a significant number of useless procedures for rewriting small amounts of information onto an SSD drive.
This is very easy to do - just go to the properties of the selected drive and in the window that opens, uncheck the box “Allow the contents of files on this drive to be indexed in addition to file properties.” If a pop-up window appears with a message about an error applying attributes, you can simply ignore it, since this will in no way affect the operation of the information system.
Tip 2. It’s no secret that when using the so-called sleep mode, designed to reduce energy consumption and the recovery time of interrupted operation of the information system, all files necessary to restore the work session are saved in the file hiberfil.sys, the size of which is equal to the amount of installed RAM . However, when replacing a conventional hard drive with a solid-state drive, the time required to start the operating system is so short that using sleep mode simply disappears.
In order to disable the computer from going into sleep mode, you need to run the command prompt as an administrator and run the command powercfg –h off.
Tip 3. To store large fragments of files and program elements that do not fit in RAM, the operating system uses the so-called paging file. In this case, the system moves data from the paging file into memory as necessary to perform any actions, and then places it back in the file in order to free up space in memory for new data
It is important that during these data manipulations a large number of write operations are performed on the storage medium, which, as we know, negatively affects the performance of SSD drives
By default, the page file is located in the root directory of drive C and is named pagefile.sys. If the system uses only one SSD drive, and the amount of installed RAM exceeds 4 GB, the size of the paging file can be minimized or completely disabled. If the amount of RAM does not exceed 4 GB, then it would be advisable, in addition to the main SSD drive, to have an additional hard drive, which would accommodate a swap file of sufficient size. To disable the use of the paging file on the primary disk and move it to a secondary disk, you need to follow these steps:
- Through the “Start” menu, go to “Control Panel” and open “System and Security” -> “System” -> “Advanced system settings”;
- in the window that opens, in the “Advanced” tab, find the “Performance” section and click the “Options” button, then go to the “Advanced” tab and click the “Change” button;
- in the window that opens, you need to uncheck the “Automatically select the size of the paging file” option, and then from the list of disks available in the system, you need to select the one to which you are going to transfer the paging file, and set the “Specify size” switch;
- Finally, you need to remove the paging file from the main partition by clicking on the corresponding drive in the list and setting the switch to the “Without paging file” position, ignoring system warnings about the impossibility of recording debugging data.
After carrying out these manipulations and rebooting the system for the changes to take effect, the paging file will be transferred from the main disk to the secondary one. In this way, we can relieve the SSD of unnecessary load, reduce the number of read and write operations, and therefore extend its service life.
Tip 4. Each SSD controller uses its own performance optimization algorithm, which in turn can be launched either automatically or manually. Almost every manufacturer produces specialized utilities for working with their controller, which, among other things, usually include an optimization function, which is recommended to be run at least once every few weeks.
In conclusion, it is worth noting that the resources of modern SSDs are very high and continue to grow, so all the manipulations described above are aimed not so much at preventing the storage device from failing, but at preventing a decrease in its speed, which drops over time. Even if the user does not monitor the condition of his SSD at all, it will serve him for a long time and will noticeably speed up the system; however, only by using optimization methods can the device achieve maximum quality and performance.
Method 1: Disk Cleanup Tool
"You can use Windows' built-in Disk Cleanup utility to delete the folder containing temporary installation files."
- Open the “Properties” of the system partition through the “This PC” window.
- On the General tab, click Disk Cleanup. You can also run the utility using the cleanmgr command from the Run dialog box, which is accessed by pressing the Win + R keys.
- After a few seconds, the Disk Cleanup window will open with the scan results. Check the "Temporary Windows installation files" and "Clean up Windows updates" checkboxes.
- Click "OK" and confirm the action in the dialog box.
If suddenly this method does not work, move on to the next one.