How to remove table borders in Word 2010?
How to hide table borders in Word
- Click on this square to highlight the table.
- Right-click on the selection to bring up the context menu. ...
- A dialog box of the same name will open, in which, on the Borders tab, select the border type None.
Interesting materials:
Can I connect a wireless keyboard to a laptop? Can I connect a wireless speaker to a PC? Can I connect wireless headphones to a laptop? Is it possible to connect to home Internet without a computer? Can an oven be connected to a hob? Is it possible to connect two routers to the same network? Is it possible to connect two different video cards in SLI mode? Can I connect a joystick to an Xbox 360? Is it possible to connect a joystick from PS 3 to PS 4? Is it possible to connect a PS5 joystick to a PC?
Making borders invisible
Let's take this example. Here the text is written vertically. I wrote how to make vertical text in Word, and this is another way.
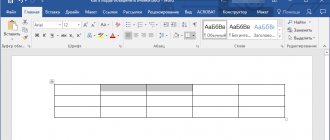
Select the cells completely by clicking on the four arrows pointing in different directions in the upper left corner.
Next, go to the “Working with Tables” tab – “Design” and in the “Table Styles” group, click on the arrow on the “Borders” button. Select "All Borders" from the drop-down option.
After this, unnecessary lines on the page will be removed.
Everything can be done a little differently. Select it by clicking on the arrows at the top left. Then right-click on any cell. A context menu will appear. Click on the small arrow next to the "Borders" button.
From the drop-down list, select “All boundaries”, and you will also get the desired result.
How to highlight the borders of only one or more cells
First way
. To change the borders partially (select some cells), you can perform all the steps in steps 2 or 3 except selecting the entire table. And the cursor must be placed in the cell whose borders are subject to special framing.
Second way
. You can act through the “Coloring borders by pattern” button from the menu in the “Border styles” table. First, you need to select the appropriate contour, width and color of the lines. In the video below I clearly demonstrate how to create table frames at your own discretion and how to select one or more cells.
Eraser and Draw Table tools
There is another way to set the “cap”. Each edge can be removed using the eraser. If you click on any cell, an additional tab “Working with tables” will appear above the command line. If you click on it, you will be able to use the Eraser tool. Its icon is located in the upper right corner.
Clicking on the “Eraser” tool turns it into an image of an ordinary drawing eraser. By bringing it to any edge, the user can easily delete any line with one click of the mouse button.
It should also not be difficult to answer the question of how to make a table in Word using the “Draw Table” tool. This function can be used from the initial window in the “Insert” tab. By selecting the line called “draw table”, the user will see a pencil instead of a mouse pointer. If you bring it to the sheet, a rectangular figure is displayed, indicated by Drawing the pencil to the desired size, the user thus draws the first line. Then you can continue drawing the table or use the already familiar method of adding and separating cells, rows, and columns.
Changing Individual Face Settings
For deeper customization, when selecting a plate, pay attention to the toolbar, in which the “Designer” area will appear. By going there and then opening the “Framing” (Word 2013) or “Drawing Borders” (Word 2010) window on the right side, you will be able to hide certain edges (for example, only the right or left), adjust their thickness and color.
The first adjustable option will be “Type”, among which you will see: “Frame”, “All”, “Grid” and “Other”.
The following function will allow you to customize the type, color and width of a specific line. You have the opportunity to make the frames one simple line, a dotted line with different intervals, several lines, or both bold and simple, etc. A little lower, you can change the color of the borders and their width.
Having completed all the necessary operations, do not forget to click on the “Apply to...” function and select “Table”.
Task
Set the translucency value for the entire table, and make individual cells opaque.
Solution
To change the transparency of an element, CSS3 provides the opacity property; its value can vary from 0 to 1. Zero corresponds to full transparency of the element, and one, on the contrary, opacity. Modern browsers work quite correctly with this property, with the exception of the Internet Explorer browser, so for it you have to use a special filter property with the value alpha(Opacity=X) , where X can vary from 0 to 100.
To make a table translucent, just add opacity: 0.5 to the TABLE selector. There is a temptation to do a similar action with the TD selector, only setting it opacity: 1. However, the expected result will not happen; the cell will remain translucent. This is because child elements cannot exceed the opacity value of the parent. Therefore, you should do the opposite by setting opacity: 0.5 for the TD selector. For those cells where transparency is not needed, you need to enter your own class by adding opacity: 1 for it, as shown in example 1.
Layout
All of the above provides wide functionality for customizing the appearance. As for the content specifically, here you need to go to the adjacent tab - “Layout”.
- The first three areas can be conditionally connected together, since they are generally intended to expand the size of the component, create new rows, columns, and so on. Here you can work with cells and tables in general.
- The next section – “Cell Size” – allows you to format the dimensions of each individual cell, creating additional elements of the desired size.
- “Alignment” and “Table Size” offer optimization opportunities - for example, here you can align all cells protruding beyond the outer borders, align the edges, set some parameters for the text inside, and so on. Arrange also gives you the ability to rearrange certain table elements in relation to other slide components. For example, you can move this component to the leading edge.
As a result, using all these functions, the user is able to create a table of absolutely any degree of complexity for a variety of purposes.
How to hide and show markup in Excel
The grid in Excel is displayed by default. Sometimes it is not needed on a sheet or in a workbook - in the case when you are working with various objects (for example, images). In addition, a “clean” page without an outline looks neater.
At the same time, some Excel files lack markup, but are necessary. This happens in case of a failure, or if you are working with a document that was compiled and configured by another user.
Hide or show using Excel functions
If you need to make lines visible, you can use one of two methods - the first will customize the entire Excel workbook, and the other will allow you to specify this selectively.
First option:
- Open the Page Layout tab and find the Grid area;
- Set the "Show" option - this will enable the display of baselines;
- Save your progress;
- If you need to hide the outline that is displayed, uncheck the “Show” box.
Second, more functional option:
- Select the sheets on which you want to enable display (if you need to select several non-adjacent ones, click on them while holding Ctrl, and if adjacent, click on the outermost one on one side, then, holding Shift, on the opposite one);
- Open the “View” tab, then check the “Grid” box in the “Show” area;
- Save your progress;
- If, on the contrary, you need to remove it, uncheck the box next to “Grid”.
Hide or show by changing fill color
Another way to remove markup is to set the fill color to white. Excel hides the gray grid if the object is filled with any color, but white is the neutral, standard color for the page. In turn, if you want to show the outline, set the “No fill” option. To do this you need:
- Select a certain number of objects;
- Go to the “Home” tab, then in the “Font” area, find the “Fill Color” function and select white, then click on it;
- Save your progress.
Hide or show markup by adjusting its color
The third way to hide or restore the basic markup in an arbitrary number of Excel cells. To use it, you need:
- Select a certain number of document objects where you want to hide or restore lines;
- Right-click on them, after which a context menu will open - click on “Format Cells”;
- Open the “Border” tab;
- Select white color and click "External" and "Internal" in "All";
- Click "OK" to see your progress, then save it.
How to hide or show lines of selected objects
In some cases, it is necessary to remove or restore not the entire grid on the Excel page, but only for some objects. This can be configured by manually selecting the number of objects:
- One cell - left-click on it;
- Several adjacent ones - click on one at the beginning of the range, and then, while holding Shift, click on the opposite one;
- Several non-adjacent - click on any one, then, holding Ctrl, add elements to the set with the left mouse button;
- Several adjacent sheets - click on the bottom one in the corresponding menu, then, while holding Shift, select the opposite one;
- Several non-adjacent sheets - click on an arbitrary page, then, holding Ctrl, add the rest to the set by clicking the right mouse button.
Once you have specified the required number of objects, hide or show their lines. This can be done by any of the described options - by adjusting the fill color or the outline itself.
Table builder
Basically a hidden header tab that appears when you select a table of any type - be it standard or manual.
The following important areas and elements can be highlighted here.
- Table Style Options allow you to mark specific sections, such as the total row, headings, and so on. This also allows you to assign a unique visual style to specific departments.
- Table Styles has two sections. The first offers a choice of several basic designs for these elements. The choice here is quite large, you rarely have to invent something new.
- The second part is the manual formatting area, which allows you to independently configure additional external effects, as well as color shading for cells.
- WordArt Styles allow you to add custom text in image format with a unique design and appearance. It is almost never used in professional tables.
- “Draw Borders” is a separate editor that allows you to manually add new cells, expand borders, and so on.
Insert
If you hover over the icon called “Table”, a drop-down window will appear. You can choose several construction options from it. Word will automatically display a table with ten columns and eight rows. You can reduce this amount, but you will have to increase it from the sheet.
To make the answer to the question of how to make a table in Word more clear, let’s build it, for example, with five columns and three rows.
In order to increase the number of rows, you need to left-click in any cell, then right-click. Select the desired command from the drop-down menu. Word offers several of them:
Creating an invisible table for content
Now let's look at what to do if you have content in a document. To begin, insert the table on the desired sheet. A link to a detailed article on how to do it is given at the beginning.
Open the “Insert” tab, click on the “Table” button and select the appropriate number of rows and columns – “2x5”. "2" are columns. The first will contain the title of the section, the second will contain the page number. "5" are lines. Here indicate the number of points you have in your content.
Complete the content points and their corresponding pages, and move the center line to the right.
Now select it completely - click on the image of the four arrows. Open the Design tab, click the arrow on the Borders button and select All Borders.
After this, the lines will disappear. To make it easier to work with the content, you can click on the “Borders” button again and select “Display grid” from the list.
The lines will be shown as blue dotted lines on the sheet. They won't print when printed, so feel free to work with them.