11/26/2016 windows | for beginners | programs
When purchasing a computer or installing Windows or another OS, many users want to split the hard drive into two or, more precisely, into several partitions (for example, drive C into two drives). This procedure makes it possible to store system files and personal data separately, i.e. allows you to save your files in case of a sudden system crash and improve the performance of the OS by reducing fragmentation of the system partition.
Update 2016: new ways to split a disk (hard or SSD) into two or more have been added, a video has also been added on how to split a disk in Windows without programs and in the AOMEI Partition Assistant program. Corrections have been made to the manual. Separate instructions: How to partition a disk in Windows 10.
See also: How to partition a hard drive during Windows 7 installation, Windows does not see the second hard drive.
There are several ways to partition a hard drive (see below). The instructions discuss and describe all these methods, indicating their advantages and disadvantages.
- In Windows 10, Windows 8.1 and 7 - without using additional programs, using standard tools.
- During OS installation (including how to do this when installing XP).
- Using free programs Minitool Partition Wizard, AOMEI Partition Assistant, and Acronis Disk Director.
How to partition a disk in Windows 10, 8.1 and Windows 7 without programs
You can partition a hard drive or SSD in all the latest versions of Windows on an already installed system. The only condition is that there be no less free disk space than you want to allocate for the second logical drive.
To do this, follow these steps (in this example, the system drive C will be partitioned):
- Press the Win+R keys on your keyboard and type diskmgmt.msc into the Run window (the Win key is the one with the Windows logo).
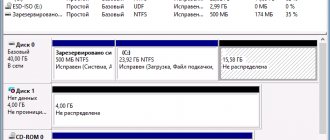
- After loading the Disk Management utility, right-click on the partition corresponding to your C drive (or another one that you want to partition) and select the “Shrink Volume” menu item.
- In the volume compression window, specify in the “Size of compressed space” field the size that you want to allocate for the new disk (logical partition on the disk). Click the Compress button.
- After this, a space that is “Unallocated” will appear to the right of your disk. Right-click on it and select “Create Simple Volume”.
- By default, a new simple volume is set to a size equal to all unallocated space. But you can specify less if you need to create multiple logical drives.
- In the next step, specify the drive letter of the drive you are creating.
- Set the file system for the new partition (it’s better to leave everything as it is) and click “Next”.
After these steps, your disk will be divided into two, and the newly created one will receive its own letter and will be formatted into the selected file system. You can close Windows Disk Management.
Note: You may later want to increase the size of your system partition. However, it will not be possible to do this in the same way due to some limitations of the considered system utility. The article How to enlarge drive C will help you.
What can you do using built-in Windows tools?
By taking advantage of the hard disk management capabilities available in Windows, you can solve some problems, such as, for example:
- resize existing volumes;
- divide the disk into several independent partitions;
- shrink the volume or delete it.
Thus, the built-in disk management capabilities in the operating system may be quite comparable to some paid programs.
How to partition a disk using the command line
You can split a hard drive or SSD into several partitions not only in Disk Management, but also using the command line in Windows 10, 8 and Windows 7.
Be careful: the example shown below will work without problems only in cases where you have a single system partition (and possibly a couple of hidden ones) that needs to be divided into two sections - for the system and data. In some other situations (MBR disk and already have 4 partitions, when shrinking the disk, there is another disk "after" it) this may work unexpectedly if you are a novice user.
The following steps show how to split the C drive into two parts at the command prompt.
- Run Command Prompt as Administrator (how to do this). Then enter the following commands in order
- diskpart
- list volume (as a result of executing this command, pay attention to the volume number corresponding to drive C)
- select volume N (where N is the number from the previous paragraph)
- shrink desired=size (where size is the number, in megabytes, by which we will shrink drive C to split it into two drives).
- list disk (here pay attention to the number of the physical HDD or SSD disk on which partition C is located).
- select disk M (where M is the disk number from the previous paragraph).
- create partition primary
- format fs=ntfs quick
- assign letter=desired_drive_letter
- exit
Done, now you can close the command line: in Windows Explorer you will see the newly created disk, or rather, the disk partition with the letter you specified.
Method 2: Using the Command Line
Rarely do users prefer to use the Command Prompt when it comes to creating a hard drive partition, but sometimes this needs to be done, for example, through the Windows Recovery tool. This is suitable in situations where you plan to create a new volume for installing a second Windows, if for some reason this one does not start or the shell itself interferes with sharing the space. To perform this method through the recovery environment, you will need to launch it, and this can be done through safe mode or when booting from a flash drive, which you can read about in detail in the articles below.
Read more: Entering “Safe Mode” in Windows 7 Booting Windows 7 from a USB flash drive
All the following actions are performed through the recovery environment. Now we recommend that you be as careful as possible and follow the instructions exactly so as not to accidentally lose data stored on the physical drive.
- If you downloaded Windows 7 from a USB flash drive, select the installation language and proceed to the next step.
- At the bottom left of the installer window, click on “System Restore.”
- Among the list of all tools, you are interested in “Command Line”.
- After opening the console, run the DiskPart utility - you will need it for further disk management. This can be done using the diskpart command.
- Consider a situation where you first need to shrink one of the existing volumes to obtain unallocated space. To do this, look at the list of existing partitions via list volume.
- Find a volume that you can use and remember its number.
- Enter select volume + partition number to select it for further actions.
- Initially, it is not clear how much free space is on the volume, so you need to find out before shrinking by entering shrink querymax.
- The new line will tell you the maximum number of bytes that can be reused, which means that this is the amount that can be separated.
- Enter shrink desired=X, where X is the number of megabytes desired for separation. Confirm the command by pressing the Enter key.
- You will be notified that the volume has been successfully shrunk by the previously specified number of megabytes.
- Now use the list disk command and determine the number of the current physical drive to further select it for interaction.
- Use the already familiar, but slightly modified command - select disk X, where X is the previously defined HDD number.
- To create a new partition, enter create partition size=X. size=X should be entered only if you do not want all the free space to be used. At the same time, add primary to the command, as shown in the following screenshot, if you want to designate this logical volume as the primary one, for example, for later installing a second operating system on it.
- After confirming the command, information about the successful completion of the operation will be displayed on the screen.
- Using list volume, make sure that a new volume is created and just determine its number, because it is not yet formatted into the desired file system and does not have a letter.
- Select the new partition via select volume X.
- Use the standard assign letter=X command, where X is replaced with the appropriate drive letter.
- Formatting into the file system occurs by entering the line format fs=ntfs quick. You can replace NTFS with FAT32, for example, but only if required.
- Make sure that the operation was performed correctly, and after that you can close the Command Prompt, start the OS in normal mode, or immediately proceed to install the second system.
Keep in mind that all changes made through the console take effect immediately after activating the command, so you cannot simply undo all previously made actions by simply exiting the Command Prompt application.
How to partition a disk in Minitool Partition Wizard Free
Minitool Partition Wizard Free is an excellent free program that allows you to manage partitions on disks, including dividing one partition into two or more. One of the advantages of the program is that a bootable ISO image with it is available on the official website, which can be used to create a bootable flash drive (the developers recommend doing this using Rufus) or to burn a disc.
This makes it easy to perform disk partitioning in cases where this cannot be done on a running system.
After loading into Partition Wizard, you just need to right-click on the disk you want to split and select “Split”.
The next steps are simple: adjust the partition sizes, click OK, and then click the “Apply” button at the top left to apply your changes.
You can download the Minitool Partition Wizard Free bootable ISO image for free from the official website https://www.partitionwizard.com/partition-wizard-bootable-cd.html
How to create a new volume or partition through Disk Management
Open the Disk Management tool.
To do this, open the Run dialog (Win + R), enter the command diskmgmt.msc and press Enter. Right-click on the unallocated space and click Create Simple Volume.
In the Create Simple Volume Wizard window, click Next.
Enter the amount of space you want to use for the new volume (or partition) and click Next.
Assign a drive letter and click Next.
In the next step, you can change the formatting options, but this is not necessary, especially if you are happy with the default settings. Additionally, you can change the volume label to any name you prefer, but it's better to use something descriptive: for example, "Movies", "Documents", "Backups", etc. You can also enable the option to compress files and folders. When all settings are selected, click Next.
Review your selections. If you want to change anything, click "Back" to return to the previous steps. If you are happy with everything, click "Done".
After this, a new partition should be successfully created on your computer.
How to partition a disk during installation of Windows 10, 8 and Windows 7
The advantages of this method include its simplicity and convenience. Partitioning will also take relatively little time, and the process itself is very clear. The main disadvantage is that the method can only be applied when installing or reinstalling the operating system, which in itself is not very convenient; in addition, there is no possibility of editing partitions and their sizes without formatting the HDD (for example, in the case when the space of the system partition has run out and the user wants add some space from another hard drive partition). Creating disk partitions when installing Windows 10 is described in more detail in the article Installing Windows 10 from a USB flash drive.
If these shortcomings are not critical, consider the process of disk partitioning during OS installation. These instructions are fully applicable when installing Windows 10, 8 and Windows 7.
- After launching the installation program, the bootloader will prompt you to select the partition on which the OS will be installed. It is in this menu that you can create, edit and delete hard drive partitions. If the hard drive has not been partitioned before, one partition will be offered. If it was split, you need to delete those partitions whose volume needs to be redistributed. In order to configure partitions on your hard drive, click the corresponding link at the bottom of their list - “Disk Settings”.
- To delete partitions on your hard drive, use the corresponding button (link)
Attention! When you delete disk partitions, all data located on them will be deleted.
- After that, create a system partition by clicking “Create”. In the window that appears, enter the partition size (in megabytes) and click “Apply”.
- The system will offer to allocate some space for the reserve area, confirm the request.
- Create the required number of partitions in the same way.
- Next, select the partition that will be used for Windows 10, 8 or Windows 7 and click Next. After this, continue installing the system as usual.
Method 3: Third Party Programs
In conclusion, we want to talk about third-party programs that allow you to manage HDDs. In essence, they repeat the same functions that you can manage through the Disk Management graphical menu or the console, but often in such solutions they are implemented in a more convenient form, and sometimes they expand the standard capabilities. We propose to touch upon this topic using the example of the free AOMEI Partition Assistant solution.
- AOMEI Partition Assistant, like some other similar programs, allows you to split an existing partition, immediately creating another one. To do this, first mark the drive and then select the appropriate option.
- Set the size of the new logical volume, its position, and assign a letter to it. After this, you can apply the changes.
- If you have unallocated space or you created it yourself by shrinking an existing volume, select it and select Create Partition.
- Set the size, letter and file system.
- Apply the changes in the main program window.
- Review all the operations that will be launched. If you agree with the changes, click “Go”.
- Wait for all settings to complete.
- Now you can see that the new partition has been successfully created. It took literally a few minutes to implement this task through AOMEI Partition Assistant.
There are many other similar programs on the Internet that allow you to interact with hard drive partitions. If AOMEI Partition Assistant is not suitable for you, we recommend that you familiarize yourself with other representatives in a separate review on our website using the link below.
Read more: Programs for creating partitions on your hard drive
We are glad that we were able to help you solve the problem. In addition to this article, there are 12,719 more instructions on the site. Add the Lumpics.ru website to your bookmarks (CTRL+D) and we will definitely be useful to you. Thank the author and share the article on social networks.
Describe what didn't work for you. Our specialists will try to answer as quickly as possible.
Partitioning a hard drive when installing Windows XP
During the development of Windows XP, no intuitive graphical interface was created. But although control occurs through the console, partitioning the hard drive when installing Windows XP is as easy as when installing any other operating system.
Step 1. Delete existing partitions.
You can repartition the disk while defining the system partition. You need to split the section into two. Unfortunately, Windows XP does not allow this operation without formatting the hard drive. Therefore, the sequence of actions is as follows:
- Select a section;
- Press “D” and confirm deleting the partition by pressing the “L” button. When deleting the system partition, you will also be asked to confirm this action using the Enter button;
- The section is deleted and you get an unallocated area.
Step 2. Create new partitions.
Now you need to create the necessary hard disk partitions from the unallocated area. This is done quite simply:
- Press the “C” button;
- In the window that appears, enter the required partition size (in megabytes) and press Enter;
- After this, a new partition will be created, and you will return to the system disk definition menu. Create the required number of partitions in the same way.
Step 3. Determine the file system format.
After the partitions are created, select the partition that should be system and press Enter. You will be prompted to select a file system format. FAT format is more outdated. With it you will not have problems with compatibility, for example, Windows 9.x, however, due to the fact that systems older than XP are rare today, this advantage does not play a special role. If you also consider that NTFS is faster and more reliable and allows you to work with files of any size (FAT - up to 4GB), the choice is obvious. Select the desired format and press Enter.
Then the installation will proceed in standard mode - after formatting the partition, the installation of the system will begin on it. You will only be required to enter user parameters at the end of the installation (computer name, date and time, time zone, etc.). As a rule, this is done in a convenient graphical mode, so it is not difficult.
Basic ways to divide hard drive space
Regardless of the reasons that prompted you, you want to partition your hard drive yourself, but have little idea how this is done in practice. This is where we will try to help you by telling you not only about the basic ways to properly partition a hard drive, but also pointing out certain nuances and difficulties that you may encounter during this difficult work.
Let's look at how to divide a hard drive of any type (HDD or SSD) in three ways, namely using:
- standard utilities running Windows installed on your computer;
- special programs for working with various information storage devices;
- Windows PE boot shell.
So, let's get started and try to exactly follow the sequence of actions, otherwise, this may lead to either repeating operations for a new drive, or losing important data when working with existing storage media.
Free AOMEI Partition Assistant
AOMEI Partition Assistant is one of the best free programs for changing the structure of partitions on a disk, transferring a system from HDD to SSD, and, among other things, you can use it to split a disk into two or more. At the same time, the program interface is in Russian, unlike another good similar product - MiniTool Partition Wizard.
Note: despite the fact that the program claims to support Windows 10, on my system it did not partition for some reason, but no failures occurred (I think it should be fixed by July 29, 2015). Works without problems in Windows 8.1 and Windows 7.
After launching AOMEI Partition Assistant, in the main program window you will see the connected hard drives and SSDs, as well as the partitions on them.
To partition a disk, right-click on it (in my case on C), and select the “Partition Partition” menu item.
At the next step, you will need to specify the size of the partition to be created - this can be done by entering a number, or by moving the separator between the two disks.
After you click OK, the program will display that the disk has already been partitioned. In fact, this is not the case yet - to apply all the changes made, you need to click the “Apply” button. You may then be warned that your computer will restart to complete the operation.
And after the reboot, you will be able to observe the result of disk separation in your Explorer.
What to do if the Windows 7 disk failed to partition?
When partitioning a disk in Windows 7, difficulties may arise due to the presence of files on it (hidden and system) that could not be moved to another location.
In this case, you need to use third-party utilities (Acronis or Paragon), which also allow you to partition the disk. You can also boot from any OS boot disk, and then defragment the department.
To partition a disk in Windows 7, you must have administrator or archive operator rights on this PC. With Windows 7 features, you can shrink a volume to a file size that can't be moved.
Other programs for creating partitions on your hard drive
There is a huge amount of different software for partitioning a hard drive. These are both commercial products, for example, from Acronis or Paragon, and distributed under a free license - Partition Magic, MiniTool Partition Wizard. Let's look at dividing a hard drive using one of them - the Acronis Disk Director program.
- Download and install the program. When you first start, you will be asked to select an operating mode. Choose “Manual” - it is more customizable and works more flexibly than “Automatic”
- In the window that opens, select the partition that needs to be split, right-click on it and select “Split Volume”
- Set the size of the new partition. It will be deducted from the volume that is split. After setting the volume, click “OK”
- However, that's not all. We have only simulated the disk partitioning scheme; in order to translate the plan into reality, it is necessary to confirm the operation. To do this, click “Apply Pending Operations.” The creation of a new partition will begin.
- A message will appear asking you to restart your computer. Click "OK", after which the computer will restart and a new partition will be created.
How to fix the problem if “Disk D is missing”
There may be several methods for solving the problem of the missing D drive, which, again, depends on whether you have lost a logical partition on your hard drive or a separate physical drive. Let's consider the solution options in order.
Lost logical drive D
So, suppose you have a hard drive on which two logical partitions, C and D, quite traditionally coexist. One day, partition D simply disappeared. What needs to be done?
- Assign a letter to the missing logical partition. A fairly common reason for section D to go missing is that it has lost its identifying letter (in this case, “D”).
- To restore it, click on the “Start” button, enter in the search bar: diskmgmt.msc - and press enter.
- The disk management menu will open in front of you. If your missing disk appears in the list of disks, but does not have an identifying letter (in the “Volume” column on the left), then you need to give it such a letter.
- We click on the empty space in the “Volume” column to the left of our unidentified disk with the right mouse button, and in the menu that appears, select “Change drive letter or drive path.”
Select "Change drive letter..."
Then click on “Add”, then on “Assign a drive letter” (select, for example, “E”). After making these changes, click on “Ok”, the specified disk should become available for viewing in Explorer.
Use the functionality of the Acronis Disk Director program (currently version 12 of the product is current). Download and install this tool, run it, and in the menu on the left, select to launch the Acronis Recovery Expert program, which is used to recover hard drives.
Select Acronis Recovery Expert
After launching this program, select the manual recovery mode and click on the unallocated space of the hard drive.
Selecting unallocated hard disk space
Then we decide on the search method (choose the fast method). The program will look for the missing disk and, quite likely, will find it. Click on this disk with the mouse, and then click on “Next”. The program will restore this disk, and the problem of the missing D disk on the computer will be solved.
Acronis Recovery Expert functionality allows you to restore access to drive D
Hard drive D is missing
If your HDD (SDD) under the letter D is not displayed in the system, first of all I recommend checking the connection density of the cables going to this hard drive (check the connection density both to the connectors of the hard drive and the motherboard).
- If everything is tightly connected, and, nevertheless, the disk is not displayed, then click on the “Start” button, enter diskmgmt.msc in the search bar and press enter.
- In the Disk Management window that opens, see if the connected (but not visible in the system) disk is displayed here.
- If it is not displayed, then the problem is with the hard drive itself (faulty), or one of the hard drive cables is not working normally (damaged, not tightly connected to the appropriate connector, and so on).
Disk D may be displayed, but have different statuses:
- RAW (raw). Typically, this status is assigned to a recently connected, purchased drive, which, in most cases, is not even formatted. Right-click on it and select “Format”. If a logical partition has such a status, then give it an identifying letter as described above. If, for some reason, a disk that previously worked normally has the “Raw” status, then I recommend trying to restore it;
- No data (not initialized). In this case, right-click on such a disk, and in the menu that appears, select “Initialize disk”, and then decide on the format (it is better to select MBR).
Let's initialize our disk
The disk will be initialized and will receive the status with the “unallocated” area (sometimes some area of the disk may initially have this status). Right-click again on this unallocated area and select “Create simple volume”, then assign it a letter, size, and file system type (NTFS).
Select “Create a simple volume”
After completing these operations, drive D should appear in the Windows Explorer display on your PC.