Recuva is a shareware program for recovering deleted or damaged files of various formats from a computer hard drive, USB flash drive, memory card and similar devices.
We also recommend reading: “PhotoRec – effective recovery of deleted files.”
Recuva works with popular file systems: NTFS, FAT32 and exFAT. The free version contains functions that are sufficient for most tasks of the average user. The paid version of Recuva Professional offers additional features: working with virtual disks, automatic updates and premium support.
An important factor is that in addition to the installer, the program also comes in a portable version that does not require installation. Thanks to this, you can run it from a flash drive, having previously unpacked it from the downloaded archive and, thus, protect the recoverable files on the system drive from being overwritten. It should be noted that there are also advantages to installing Recuva, namely the commands to call file recovery from the context menu of the recycle bin and folders in Windows Explorer.
from the official website.
Securely delete files using Recuva
In the same file selection window, select those that you want to delete permanently, right-click the context menu and select “Delete marked ones securely.” After some time, Recuva will permanently delete these files.
Do you have any questions or unclear points? Do you want to express your opinion or wishes? Write them in the comments and we will definitely answer!
Installation process
Initially, you need to know that the software in question is free and in the public domain. The sequence of actions is not difficult and implies the following instructions:
- At the initial stage, you need to launch the installer by double-clicking the left mouse button. Based on the results, the main menu will automatically open.
- At the top of the start page you need select Russian language for the functional menu to ensure the most comfortable user experience.
- The bottom portion of the control panel displays a dedicated, optionally designed area through which users can optionally install partner professional software such as CCleaner .
- To continue with the installation process, users need to click on the link that says “No thanks, I don't need CCleaner”.
- When finished, press the software launch key.
- If necessary make personal changes settings for the installation procedure and the path to unpack system files, you need to press the button Customize. Based on the results, a context menu will be opened, where the future location for displaying the software icon will be set, including the built-in functionality in the explorer and system recycle bin.
- By pressing a key More A specialized panel opens with a specific list of parameters. In this case, it is necessary, if desired, edit path and value followed by selection installations for all registered desktop computer accounts or immediate active profile.
- Press the button to continue the installation process Install .
Attention! The procedure is not difficult and takes no more than 2 minutes of the user’s free time. The process takes place in a semi-automatic mode, which eliminates the risk of making mistakes with the ensuing negative consequences.
Recuva - what is the program and what is it for?
Recuva is a program for restoring permanently erased files from the British software developer Piriform, known to Russian users for the CCleaner and Defraggler utilities. It is produced in three versions:
- Standart - designed to work on PCs, laptops, netbooks and all-in-one computers;
- Portable - does not require installation on a computer, as it is used to work with removable storage media.
- Professional - version with automatic updates, designed for in-depth recovery of damaged or lost files on PCs and virtual disks.
Standard and Portable are available for download for free. The Professional version costs 800 rubles. It is also sold as a set of four professional versions of the company’s products: CCleaner, Defragler, Speccy and Recuva for 1,190 rubles.
There are many resources on the RuNet from which this program can be easily downloaded, but the download files they offer may well contain viruses, so in the absence of a reliable antivirus program, it is better to download Recuva from the “native” site
Advantages and disadvantages
According to numerous ratings from ordinary users and professional magazines, this program has been the leader among utilities for recovering deleted files for several years now. However, like any program, it has its advantages and disadvantages.
The advantages of the product include:
- Russified, intuitive interface;
- availability of a fully functioning free version;
- interaction with any types of information storage devices - from hard drives to memory cards;
- the ability to manually select places to search for lost files;
- search for system and hidden files;
- the ability to restore the structure of previously erased folders and archives;
- work with most of the most common formats, types and types of information: text documents, tables, presentations, photographs, audio and video files, folders, archives, etc.;
- the ability to manually set the degree of depth for file recovery and the level of reliability of information deletion.
The disadvantages of the product include:
- duration of work - from several hours even with a simplified search;
- the ability to restore only those files whose condition was rated as excellent after data search - if their quality is average or worse, then they cannot be restored.
In practice, the vast majority of files do not lose their quality when deleted
The program can recover different types of files, but only if they are erased in the standard way, by moving and then emptying the recycle bin or formatting the disk. If you previously used any other utility to permanently delete files, then Recuva will not be able to restore them.
Quick start if you know the file names
You will greatly speed up searching and recovering data from your hard drive if you know the name of the file you are looking for or other useful information.
- Launch Recuva in Advanced mode. If a step-by-step wizard appears, select the Do Not Show This Wizard on Startup and then click Cancel .
- In the main Recuva window, enter all or part of the name in the Filename or path . Select the location you want to search from the drop-down list and then click Scan .
- Recuva displays the scanning process, shows search results in the main window. If the files you are looking for are not in the list, see the information below.
- Click Recover . Select a location on your hard drive where to save the recovered files. Ideally, choose a different hard drive. Click OK .
If the files were still not found in time, select the Deep Scan in the Options , Actions . Repeat the scan. It may take longer (sometimes up to several hours).
After scanning, Recuva offers a very detailed list of found files. When you click on any file, information about it will be given: its status, whether it was overwritten, a hex image in the header or even a preview, in the case of jpg photos or other supported formats. Recoverable files can be displayed as thumbnails, which is useful if you are looking for just one photo that was long deleted. You should also understand that file names are often not returned. Therefore, in the process of searching for data, you have to rename the file yourself.
Reviews
Most people speak positively about Recuva . With its help, you can recover files marked in yellow and red. Also on the positive side are updates that improve the operation of the application.
glitches occur during operation , and you have to restart the program or use its analogues. However, it is not always possible to save files. The disadvantages include difficulties in establishing communication with other devices.
Why does the application not see external media?
If the program does not see smartphones, phones and other devices, then you should connect them in storage mode , if this does not work, then you should activate developer mode and enable usb debugging.
If the application does not see photos and video cameras , it is worth updating the drivers for them, which can be downloaded from the official website of the device. You can also take out a flash drive from them and use a card reader.
In the case when the application does not see the flash drive , it itself is most likely not working and the computer itself does not see it. It’s worth plugging it into another port, if there’s still nothing, then you should use other programs, Recuva recovers the data, but not the flash drives themselves.
How to return files from a disk by a specific type or location
So, what is the fastest and most reliable way to recover information from a hard drive?
- Launch Recuva in guided setup mode. If the wizard does not appear, click the Options and then click Run Wizard to search for information.
- On the Welcome to the Recuva Wizard click Next .
- On the File Type , select the file type to recover data from your hard drive, then click Next . If you are not sure you have selected the correct data type, click Other.
- On the File Location , select the location where to look for deleted files, then click Next .
- On the Thank You , click Start. Recuva displays the progress of the scan, resulting in search results in the main window. If the lost files you need are still not listed, read on.
- Select the checkboxes next to the file or files you want to restore.
- Click the Recover . Select a source to save files to your hard drive. Click OK .
How to recover information from a hard drive if you want to recover not only files, but also mail (email)? Switch to advanced scanning mode. Relax, it's quite simple. Read other materials on the site on the topic.
Rekuva: preparing to recover files on disk
Close unnecessary and unused applications that have access to the HDD.
If you are trying to recover files from a media (sd) card, do not use this card under any circumstances. Ideally, you should install Recuva on the HDD before starting the recovery process.
Open the Rekuva program. Before us is an application window where you need to specify the source for scanning. This could be any file volume or removable drive where the files were likely to be located before they were deleted. Having selected the desired disk in Recuva, the source for recovery, click the Analyze button.
The process of scanning deleted files in Piriform Recuva.
- Recuva displays the progress of the task. Currently searching for deleted files
- How much time is left before the end of scanning the information source?
- The number of files found that, theoretically, can be recovered using the functionality of the Recuva program
Thus, we need to wait until the end of the scan in order to understand what can be returned unharmed and what cannot.
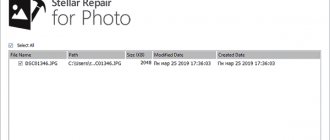
Recuva Professional: Scan Search Results Window
- List of files for later recovery. Also here Recuva indicates the path from where the data was deleted. You can mark one or more items on the list for recovery. Select the check boxes for the file or files. In addition, here you can see the color designation. The color informs about the degree of success of their treatment (green – cool, orange – there is a chance of recovery, red – the file is permanently deleted and cannot be restored).
- Rekuva status bar, which informs about where the element is located, cluster size, file record size, number of files found, etc. This information is useful for obtaining a summary of the recovery results.
- File preview area. For example, if you are dealing with a graphic file, then if it is intact, you will be able to see the actual images without starting restoration. This feature is useful if you are restoring photos. In other cases, the Header tab can be useful, where the HEX code of the file is available, allowing you to convert directly to its original format. If you work with RAW data, you can find the element you are looking for by the title.
How to use Recuva when saving files to the source
- Selecting the items needed for recovery from the list of files in the Recuva window
- Click on the “Restore” button after selecting the previous one. step
- We indicate to Rekuva the source for saving the recovered information
Results
Recuva is software that is open source and free for everyone. The main purpose is to be able to recover previously deleted data in full, regardless of the type of media used, for example, a hard drive or flash drive. Numerous user reviews confirm the absence of difficulties in use, due to the use of an intuitive interface. In order to complete the assigned tasks as quickly as possible, it is enough to follow the instructions provided. In general, the recovery procedure takes a minimum of free time, which once again confirms the feasibility of installing the software.
For whom it may be useful
The Recuva Piriform program is used by system administrators, computer scientists and ordinary PC users . It allows you to recover absolutely any file, not only on the internal drive of your computer, but even on removable media.
Since the application has a simplified interface, you do not need to have specific knowledge to use it. The Russified version allows any user to perform the necessary actions to find a lost file.
Interface
Recuva has a clear interface, so even a beginner can understand the nuances of using the utility . After installation, a small window appears, presented by the Data Recovery Wizard. To use the software, you only need to select the specific type of file that needs to be recovered, after which the scanning begins.
Experienced users can take advantage of additional settings by selecting the “General”, “Actions”, “Advanced” and “Disks” sections.