Sometimes several identical names with identical numbers appear in the phone book on your mobile device. This is called “duplicate contacts,” and this problem occurs on both Android and iOS.
Of course, this clogs up the smartphone's memory and prevents you from navigating the phone book. The problem is especially relevant if there are many contacts saved in the address book.
Why are contacts duplicated on my phone? Let's figure it out today. Let's talk about the reasons for such repetitions and tell you how to make sure that contacts are no longer duplicated.
Why are there duplicate contacts on my phone?
The situation when there are duplicate numbers in phone contacts can be caused by various reasons. Among the most popular are the following:
- Installation of instant messengers: WhatsApp, Viber, Skype and others. They store your phone book data and can duplicate it when you log into your account again;
- Errors during synchronization or when restoring data from a backup copy on a new device;
- Installing a second SIM card, which partially contains the same accounts as the first;
- Smartphone firmware failures, as well as incorrect operating system updates.
Also, sometimes duplication can be caused by viruses on your mobile device. But in recent years, virus infections have become less and less common, because modern smartphones are well protected from such threats.
Reasons why subscribers are duplicated in Android
There are several factors why data is duplicated in Android:
- backing up information or re-importing it from a SIM card;
- technical failures associated with frequent flashing of the device, or installation of incorrect updates;
- re-synchronization of contacts after installing any instant messengers;
- two SIM cards in one phone. This also happens when the same subscribers are indicated on both cards.
Note! Another reason may be that the user himself could duplicate two identical numbers under different names. Fortunately, dealing with all the problems is quite simple.
Duplicate callers are often repeated on a smartphone, which makes it difficult to work
In the Contacts application
This method is suitable for users who have duplicate contacts on Android. To use it, you need to launch the standard Contacts application installed on your device by default.
After launching the application, do the following:
- Launch the context menu. Here the instructions depend on your smartphone: sometimes it’s enough to click on the “Settings” item, and sometimes you need to hold down an empty area in the application for a pop-up menu to appear.
- Scroll down and select “Merge Duplicates”.
- Click on the “Merge” button.
Also, the desired menu item may be called “Merge and Fix”. Afterwards, you need to wait a few minutes until the numbers are reconciled and the data is merged.
Important point:
When the system sees several different names with the same number, it saves the name that was recorded first in the phone book. That is, if you resave a contact under the desired name later, information about this will not remain anywhere.
Manually deleting contacts
The first, simplest and most accessible way to delete duplicates in the address book is manual deletion. Just go to contacts, select a duplicate, tap on it, press the three dots in the upper right corner and in the context menu that appears, tap on the DELETE item.
By the way, some phones support group deletion of contacts, i.e. If you press and hold one contact, a check mark will appear next to it, and a trash can will appear at the top or bottom of the screen, and you can then tap on other contacts, highlighting them, and then delete them all at once by clicking on the trash can.
True My phone mi 9t pro does not support this function, write in the comments whether your phone supports this function.
In the Google Contacts service
It is not always possible to combine duplicate numbers in an application. For example, in Xiaomi smartphones with MIUI 10 firmware or a newer version, as well as in phones that run on bare Android, this option may not be available.
What to do if there are duplicate contacts in such a device? Just use the Google Contacts service.
- Open the Google Chrome browser and log in to the account that is active on your mobile device.
- Click on the “Google Apps” button and select the “Google Contacts” option there.
- In the main menu of the service, switch to the “Merge and Fix” tab.
- Follow the prompts on the screen.
As with the built-in application, after a few minutes all unnecessary numbers will be erased from your account. This operation can be performed either from a computer or through a browser on a smartphone.
For the changes to be reflected on your smartphone, you need to synchronize data from your Google account. This can be done automatically or manually.
Deleting contacts from the SIM card
To delete contacts from your SIM card, you must first set up their display. Here is the sequence of actions:
p, blockquote 10,1,0,0,0 —>
- Launch the Contacts application.
- Press the “Menu” button on the phone.
- The application settings will open, where you need to click on the “Display” button.
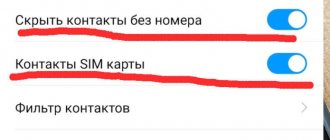
In the “SIM card contacts” line, check the “Enabled” position.
- We return to the “Contacts” application, in the list of numbers we find the SIM card contacts that have appeared. They will be displayed with the appropriate mark. We select them and delete them at our discretion.
Go to system settings, using the notification shade or a special section in the menu with all applications. Open “Accounts”, open a non-main Gmail account and tap on “Synchronization”. Scroll down and set the “Contacts” slider to inactive. We repeat these steps with the remaining profiles.
On iPhone and iPad
Owners of Apple equipment encounter such problems less frequently than owners of Android smartphones. This is largely due to the well-thought-out security system of iOS, which prevents the installation of dubious applications.
However, the phone book glitch can happen on Apple devices as well. If you have duplicate contacts on your iPhone, follow these steps:
- Launch the Settings application. Go to the “Confidentiality” section, open the “Contacts” sub-item. Block access to them for all third-party applications with the exception of instant messengers and payment systems.
- Return to “Settings”. Open the “Contacts” section and select “Account”. default record” account that contains your database of numbers. This could be a SIM card, the phone itself, or any cloud service.
- Go back to “Settings” again. Launch the “Passwords & Accounts” section and select the account you want to use to sync your contacts. You should not use several options at the same time: this leads to duplicates.
Once you're done with these steps, all duplicates should disappear on their own. If this does not happen, try other options.
In Duplicate Contacts
If you have duplicate contacts on your smartphone and the built-in tools didn’t help, try the free Duplicate Contacts app. It can be downloaded from Google Play.
After installing Duplicate Contacts, do the following:
- Launch the program and accept the user agreement.
- Give permission to view your phone book.
- Wait until the system finishes searching for duplicates.
- Check the list carefully and uncheck those takes that you need.
- Confirm deleting all unnecessary copies.
If you suddenly delete something you need, it’s not a big deal - the program creates internal copies from which you can restore lost numbers.
The application has only two disadvantages: it has built-in advertising and does not support iOS.
In Contacts Optimizer
iPhone owners who have duplicate contacts can use the Contacts Optimizer program. Here you can remove unnecessary numbers from your Google, Skype or WhatsApp account, from your SIM or from the phone’s internal memory.
It should be used like this:
- Install and launch the application. Confirm that you agree to the license agreement, otherwise the program will not start.
- Give the app access to your phone book when prompted.
- Switch to the “Select Account” section and select the required account here.
- Click on the “Tap to find duplicates” item and wait until the search for duplicates is completed.
- Check the marked numbers and confirm to remove anything you don't need.
The program itself is free, but additional functionality can only be obtained in the PRO version.
Contacts Optimizer supports both iOS and Android.
How to remove duplicate contacts manually
If there are not many duplicates on your smartphone, you can delete them yourself. This doesn't require any apps or built-in options for merging—just mark off any unnecessary stuff and get rid of it manually.
The exact instructions depend on your phone, as well as its firmware version. For example, if you have several duplicate contacts on Honor, you can select them and delete them together, but on a Xiaomi phone you will have to delete everything unnecessary one by one.
Important! Check the numbers carefully before deleting. Sometimes the names may be the same, but the phone numbers behind them are completely different. This way you may lose important contacts, and you will no longer be able to restore them.
If data synchronization is set up on your phone, be sure to complete it to complete the procedure - you can start it manually, or it will later be performed automatically.
The reasons for duplication when using the Android OS are known:
- replacing OS firmware;
- use of backup;
- re-synchronization from different sources and applications when importing numbers;
- availability of multiple SIM cards.
- The reason for the appearance of duplicates on the phone may, oddly enough, be the good intentions of the messengers. When trying to make a call, we dial numbers from “8” to “+7”. Errors should be corrected automatically. But due to applications installed on the smartphone with limited capabilities, numbers can be duplicated, mistaking the incorrectly dialed number for a new one starting with “8”.
We do not consider the manual, most routine and time-consuming, method of merging identical records, especially since this procedure will have to be repeated regularly.
What to do if records are recovered
Sometimes this situation happens: you have duplicate contacts on your phone, you delete all the duplicates, but after some time they return to the phone book.
A similar situation can happen not only with duplicates, but also with any deleted numbers on your device.
Most often this is due to synchronization. You only delete data on your device, but in the cloud the information remains unchanged. At the first convenient opportunity, it is downloaded to your smartphone, and the unnecessary recording is returned.
You can disable synchronization on your device like this:
- Open the Settings app on your phone.
- Find the “Synchronization”, “Accounts and Synchronization”, “Passwords and Accounts” tab. On your device, this section may be called differently, the main thing is that the meaning is similar.
- Select the account for which you want to disable synchronization. This could be a Google account, a messenger account, and so on. Click on it.
- In the new window, select which partitions you want to disable synchronization for. Just uncheck the box next to “Contacts”.
Synchronization will now be disabled. The data from the cloud won't be returned to your phone, but there's a downside: any new numbers you save won't be copied to your account either. If you break or lose your smartphone, this information will be lost forever.
Therefore, it is recommended not to disable synchronization. Use the above methods to delete duplicates, but, most importantly, carefully look at exactly what notebook data is being edited—those saved in your account and not on the device’s internal memory.
What are the possible problems and how to fix them?
It is possible that the problem will reappear after you fix it. Most likely this will happen due to incorrect synchronization. In this case, you can do this:
- We enter the settings of the smartphone;
- Select “Accounts and synchronization” (Synchronization);
- Scroll down the page to the “Google Sync” section and go to the tab;
- Select the desired account and go to it;
- Scroll down the page to the “Contacts” tab and uncheck the box.
After this, you should no longer have unnecessary contacts. As you noticed, to do this we did the opposite and turned off synchronization. If, after this, clones of numbers remain, then you will have to manually delete each clone that appears one by one. The method is tedious, but in this case necessary. Good luck!
Sincerely, Andrey Zimin 11/21/2021
Restoring data when synchronization is disabled
Sometimes this happens: you delete an unnecessary contact, turn off synchronization in the settings, but after that the number is still restored. You repeat the deletion, but after some time the entry comes back again.
Only Android users encounter this - and in particular, owners of Xiaomi devices with MIUI 10 firmware or older.
Recovery does not occur spontaneously, but immediately after the system is rebooted.
At the same time, unnecessary information is not displayed in Google Contacts - the service thinks that it has been deleted.
This situation occurs due to a failure of the standard “Phone” application from Google, or due to a firmware bug. Unfortunately, there is nothing you can do about this - no matter how much you delete the data, it will come back again. Third-party programs won't help here either.
All you can do is write to technical support and wait patiently for the developers to fix the bug. Therefore, be sure to install official firmware updates - they not only bring new functionality, but also fix previously identified “bugs”.