If you just bought or received a new iPad (whether it's the iPad 9.7in, iPad Pro 12.9in, iPad Pro 11in, or iPad mini 4) and want to know how to get it up and running, you've come to the right place. Apple makes it incredibly easy to set up and use its products, which should instill confidence in newbies; but a little straightforward guidance never goes awry. This is what we will try to present in this article. This guide will walk you through the process of setting up your new iPad and getting started. Here's how to start your iPad.
Unpack and turn on iPad
The first thing to do is take your iPad out of the box. You may laugh, but unboxing is always our favorite part of buying a new Apple product. The company is known for the simple and attractive quality of its packaging, as well as its understanding of the importance of first impressions.
Press and hold the Sleep/Wake button (it's located in the top right corner of the iPad with the screen facing you) and it should wake up. Most iPads come with a 90 percent charge, so no charging is required at this point...
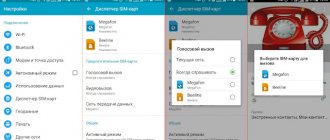
Insert SIM card (if you have a cellular iPad model)
If you purchased the iPad Wi-Fi + Cellular model, you may need to install a Nano-SIM card.
To do this, you need to open the iPad's SIM card tray, which is located on the right edge - you need a thin, half-inch-long rectangle with a hole at one end. You can use the SIM eject tool provided by Apple or a paperclip; Either way, gently push the tool into the hole until the tray lifts outward slightly, then pull it out with your fingers. Insert the SIM card and slide the SIM card tray back into the iPad.
For more details and pictures, see our long guide: How to insert a SIM card into a new iPad.
If you asked Apple to help you set up your iPad when you bought it, it may have already set up a SIM card for you.
say hello and start the slide
Swipe your finger across the screen to get started. The first thing you need to do is connect to a wireless network so that your iPad can connect to Apple's servers to request and send setup information.
Select your Wi-Fi network from the list and enter the password. Click Join.
If you don't have access to a Wi-Fi network and you have a Wi-Fi + Cellular iPad, you can continue to use the 3G/4G connection, which will work. But we recommend waiting until you're on a good Wi-Fi network first. It will likely be faster and more reliable, and if you decide to download some apps after setup, they may use up more of your data.
Technical data and design
Specification:
- Screen: 9.7 inches, resolution 2048x1536, IPS;
- Processor: Apple A6X with a frequency of up to 1.4 GHz (2 core);
- OS: iOS 6.0.1;
- Graph. processor: PowerVR SGX (4 cores, 300 MHz frequency);
- Internal memory: 16/32/64 GB;
- RAM: 1 GB;
- Navigation: GPS, GLONASS;
- Cameras: front 1.2MP (video 720p), rear 5MP (1920x1080);
- Networks: optional 3G, Wi-fi and 4G LTE (does not support Russian networks), Bluetooth 4.0;
- The battery is designed for 10 hours of operation without networks, and 9 hours of operation with Wi-fi, 3G or 4G networks turned on (11560 mAh);
- Add. devices: built-in speaker, microphone, headphone jack, docking station connector, gravity module.
Specifications
The tablet used the new dual-core Apple A6X processor on a 32-nm chip, with a clock frequency of 1.4 GHz, which increases the computing potential, which is important for resource-intensive games, of which a large number have been released recently. The new quad-core graphics processor is also a gaming processor, and allows you to process higher-quality graphics and support a resolution of 2048x1536 (with 300 dpi). The tablet has a standard amount of RAM – 1 GB, which is quite enough to fully use all applications and new hardware. The tablet has 16-64 GB of built-in memory; the apple ipad 4 32gb tablet is most often supplied to Russia. Unfortunately, the tablet does not support memory cards, which is a big disadvantage.
The tablet has built-in support for Wi-fi and Bluetooth 4.0, with optional 3G and 4G support. 4G does not support Russian telecom operators. The built-in GPS module is responsible for navigation, which in addition to GPS also supports GLONASS. Video formats: MOV, ASF, MPEG-4, 3GP, 3G2, H.264, VC-1, WMV-9, MP4, RM, RMVB (there is AVPlayer to play them). Supported audio: APE, OGG, FLAC, WAV, RA, MP3, WMA. Text formats: PPF, FB2, DOC, XLS, TXT.
Device design
The design has remained virtually unchanged. The usual all-metal aluminum alloy body, which has already become the hallmark of the IPad, Retina display, high definition with a scratch- and mechanical damage-resistant coating. Standard for iPad vertical positioning of the display, with a touch button to return to the main menu.
Front view
The tablet size is 241.2x185.7 mm, its thickness is 9.4 mm, and its weight is 662 g (without a docking station). The assembly is high quality, there are no creaks or play. Occasionally you come across tablets with signs of poor assembly, this is a defect, require a replacement immediately. In general, the tablet completely repeats the design of the iPad 2, with the exception of the docking station connector, now it has become different and if you buy a 4th one, then first of all you should pay attention to it.
1st device diagram
2nd device diagram
Create a password and Touch ID
You will be prompted to enter a four or six digit password. This is used to sign in to your iPad along with Touch ID.
By default, the iPad will offer a six-digit passcode when setting it up as a new device (if you set it up from a backup and used a four-digit passcode, it will happily let you stick with that). If you prefer to use a four-digit password rather than a six-digit password, click Password Options and select the appropriate option. You can also switch to an alphanumeric code (a regular password with letters and numbers) or select "Don't add a password."
If you select four digits, six digits, or an alphanumeric code, we recommend that you set some kind of passcode. It provides basic protection for your personal data, prevents identity theft, and makes your device more difficult for a thief to use.
The passcode is not highly secure, but it helps. Tapping a few digits every time you start up the iPad (or having your finger touch the Touch ID scanner, or having your face pop up in front of the Face ID scanner, depending on your hardware) is a minor inconvenience that we think is greatly outweighed by the benefits.
After entering your password, you will be prompted to set up Touch ID. Select one finger or thumb and lightly touch the Home button (without pressing it) as required. You can add additional fingerprints later.
If you're lucky enough to own one of the iPad Pros in 2022, you'll be prompted to set up Face ID.
New or Restore?
You can set up the iPad as a new iPad, or restore it from an older iPad backup (which essentially copies everything from the old iPad to the new one).
You have four options:
- Set up as a new iPad
- Restore from iCloud Backup
- Recovering from iTunes Backup
- Move data from Android
iCloud backup works great and more and more people are using iCloud to backup their devices these days. But we still find iTunes Backup a little faster.
If you have an Android tablet and want to transfer your data to iCloud, select Move Data from Android and follow the onscreen instructions.
Either way, make sure you've recently backed up your old iPad to iCloud or iTunes.
iCloud backup
If you're going the iCloud route, tap on the old iPad and go to Settings > iCloud > Storage & Backup, look at the bottom where it says "Last Backup" and tap "Back Up Now."
iTunes backup
If you're going the iTunes route, connect your old iPad to your Mac/PC and open iTunes. Click on the iPad icon in the top right corner and find your latest backup. If it's recent, click "Backup Now." (Here's how to back up your iPad, by the way.)
Recover from iCloud/iTunes
If you click Recover from iCloud/iTunes, you will need to enter your Apple ID and password. When it finishes, you will see a screen saying “Update Complete.”
If you click Install as new...
If you click "Set as new" you will be taken to the Apple ID screen. Click Sign in with your Apple ID and enter your Apple ID and password.
If you don't have an Apple ID yet (seriously?) or want to start with a new Apple ID, click Create a free Apple ID and go through the setup process. You will need to provide your birthday, name, address and other details.
What to do if there is no SIM card and Wi-Fi?
If your device does not support a SIM card, and there is no wireless Internet at home, then you can set up the device via a computer using iTunes:
- Connect your device to your computer and launch the program.
- Select the option to set up your new iPad.
- We initiate the process and wait for it to finish.
- We pick up the tablet and act according to the prompts on the screen.
Roman Vladimirov, Apple product expert, manager of pedant.ru. Consultant for the site appleiwatch.name, co-author of articles. Works with Apple products for more than 10 years.
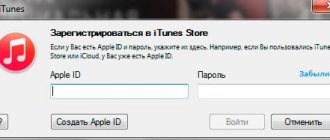
Apple ID
Your Apple ID is used to make purchases on the App Store and iTunes, and to sign in to iCloud services. You may already have one, in which case enter the Apple ID and Password fields and press Return.
If not, click "Don't have an Apple ID or forgot it" and "Create a free Apple ID." (Here's how to set up a new Apple ID.) Enter your information to get an Apple ID.
iPad in a bag: what you need to know when you pick up your first Apple tablet
So, you have a new iPad in front of you, and we congratulate you on it. And, naturally, you want to set it up, install a bunch of applications on it and start using it for a variety of purposes.
Lists of the best apps for Apple tablets literally fill the Internet, so we won't list another one here. But in this post we will tell you how to properly set up your iPad. So that it is more secure and more convenient, without installing any additional applications.
So, let's figure out what every novice user of Apple's new tablet should know.
What password should I choose?
In Touch ID and Passcode settings, you can set/change your password. Most often, users choose a combination of four or six characters - it is the most convenient, since when working with iPad you often need to enter your password: every time you want to unlock the tablet, buy something in the App Store or change some settings.
When it comes to security, the simplest choice is not the best. Therefore, it is better to change the short combination to a more reliable option. Open Touch ID & Passcode -> Change Password -> Password Options
and select “Custom code (letters + numbers)”. Now you can enter a traditional combination of numbers, letters and other symbols, which is much more reliable than a regular PIN. We talk about how to come up with a good password that is easy to remember in this post.
If speed is important to you and you don’t want to waste time entering a complex combination, select the “Custom code (numbers)” option and enter a password consisting of at least eight digits. With a little practice, you will be able to enter it as quickly as the shortest four-digit PIN.
How to set a password for purchases in the App Store?
Advice for those who at least occasionally let their children play on a tablet. If you have linked a bank card to your Apple ID, do not forget to configure the tablet so that the gadget asks you for a password every time you make a purchase. Kids can easily spend the entire contents of your card on virtual “stuff” for the farm or upgrades for the race car without even noticing that they are spending real money and not in-game currency.
The tablet itself will prompt you to choose the appropriate protection method. You can change your choice in the settings, in the “Touch ID and password”
. For protection, you can use your fingerprint or a regular password - for maximum security it is better to use a password.
Why do you recommend using passcodes if you have Touch ID?
The fingerprint scanner is certainly a handy feature, but it's still unreliable. The fact is that the iPad screen gets stuck quite easily. If thieves steal your device, there is a high probability that they will be able to find your fingerprints directly on the device's display, copy them and make a fake - it's quite easy.
Fingerprint scanner in a smartphone: additional security or vice versa? https://t.co/12V3cWbG0Z pic.twitter.com/ncBNmjoBPv
— Kaspersky Lab (@Kaspersky_ru) January 21, 2016
With its help, they will not only unlock your iPad, but will also be able to browse all those applications in which you log in with your finger for convenience: banking applications, the App Store, and so on.
If you still want to use Touch ID, use the fingers with which you touch the tablet and especially the screen less often: for example, the ring finger of your left hand.
How to hide personal information that is constantly displayed on the lock screen?
Your iPad's lock screen shows a lot of different information. Of course, it's always fun to hear that something has happened in Fallout Shelter that needs your attention, or to see that someone has commented on your Facebook post. On the other hand, there is nothing pleasant about the fact that anyone can read your personal messages, letters or SMS with bank one-time passwords.
If you want to hide your correspondence from the prying eyes of colleagues, friends or family members, open Settings -> Notifications
and choose which notifications from which apps you don't want to see on your lock screen.
Why do I need to disable automatic Wi-Fi connection?
Auto-connection to known Wi-Fi points is a very convenient feature. Every time you go to your favorite cafe or shopping center, your tablet independently connects to the remembered network and downloads the latest updates, and you are always up to date. Unfortunately, criminals often create Wi-Fi networks with the same name to trick you and your device and steal your data. Moreover, sometimes not only hackers, but also completely official companies engage in data theft.
An instructive story about how St. Petersburg residents gave away their VKontakte passwords for free WiFi: https://t.co/e0YKe3P2Po pic.twitter.com/5AQ8ffPzsz
— Kaspersky Lab (@Kaspersky_ru) April 10, 2015
Therefore, it is better to configure the tablet so that it requests confirmation every time to connect to Wi-Fi. This can be done in the settings by selecting “Confirm connection”. In any case, be careful when connecting to any network, even one you are familiar with, and never conduct any financial transactions using public Wi-Fi.
What you need to know about iCloud settings?
There are two important features in iCloud Settings to keep in mind. Firstly, there you can check exactly what data is synchronized with cloud storage by default. Remember this scandalous story when explicit photos of celebrities ended up on the Internet? Many stars were very surprised then, as they were sure that they had long deleted these photos from their devices.
But simply deleting it from the device is useless if automatic synchronization with Apple iCloud is enabled. Therefore, we recommend that you check what exactly your iPad saves to the cloud: notes, mail, contacts, documents, photos. If you don’t want to clog up your cloud storage with some files or want to delete something permanently, be sure to check if you have sent anything unnecessary to Apple’s servers.
Five ways to protect your (or not yours...) intimate photos: https://t.co/44QBk7znEx pic.twitter.com/b2EwJa9ge9
— Kaspersky Lab (@Kaspersky_ru) August 28, 2015
In addition, in the Settings tab -> iCloud
there is such an important function as
“Find iPad”
. Turn it on just in case, it will definitely come in handy. If you lose your device somewhere in the apartment, you can use it to turn on the sound signal on your tablet and quickly find it.
Forgot your gadget at work or with friends? Check its location using a geolocation service so as not to worry again. Well, if the device is stolen, you can use this function to erase personal data from the tablet. True, there are some restrictions, which you will become familiar with by clicking on the button “About Find iPad and privacy”
.
How else can you protect your Apple ID?
Enable two-factor authentication. After that, anyone who tries to sign into your Apple ID and iCloud account or use your data to make purchases in the iTunes Store, App Store or iBook Store will have to enter a one-time code from SMS in addition to the usual password.
And here is the promised post about iPhone settings for the paranoid: https://t.co/wHCR9Dw3rz Tin foil hats are not included.
— Kaspersky Lab (@Kaspersky_ru) September 30, 2014
We talk about how to enable two-step verification in this post.
How to use Safari and other mobile browsers safely?
Every owner of a modern gadget regularly makes a choice between convenience and security. Safari and other browsers have such a relaxing feature as autofill: owners of touch devices often find it inconvenient to enter logins and passwords, and browsers strive to make life easier for you and me.
But this function also has a downside. If someone gains access to an unlocked tablet, they will be able to log in to all the sites you visit. Not the most pleasant prospect, is it?
Therefore, we recommend that you open Settings -> Safari/Other Browser -> Autofill
and disable this feature completely or choose which data you are willing to trust to your browser and which data you are not willing to trust.
What are some good Safari features worth knowing about?
Hidden in the address bar of your browser is an inconspicuous Reader button. By clicking on it, you will give the cluttered Internet page a completely decent look - advertising and various distracting elements will disappear, small fonts will become larger, and the entire page will be more readable.
Unfortunately, this magic button does not appear on all sites. Therefore, we advise you to install some kind of ad blocker if you want to completely get rid of annoying banners. The latter not only interfere, but are often generally unsafe.
How often should you install updates?
Get into the good habit of installing critical updates as soon as they become available. Such updates bring with them not only new functions, but also security patches that correct vulnerabilities in the software. If such a “hole” is not patched in time, hackers can take advantage of it.
Of course, Apple devices are less likely to suffer from viruses than their Android counterparts, but this also happens to them. And if you remember that Apple’s policy does not allow anyone to create antiviruses for iOS, then once the malware gets into your system, you will be left alone with it.
Terms of Use
Click Agree next to the Terms. You can read them if you want (in fact, strictly speaking, we should instruct you to do so, even if they are inhumanly long), but you don't have much choice in the matter: you have to agree to use your iPad with them. Click "Agree" again in the pop-up window.
How to link iPad and iPhone?
On your main iPhone or iPad, go to the Settings app, then select Mobile Data or Personal Hotspot. Click the toggle next to Allow others to join.
Interesting materials:
How to enable the camera in the Opera browser? How to enable the camera in the browser? How to turn on the camera in Safari on iPhone? How to turn on the camera in WhatsApp? How to turn on the camera in video chat on Instagram? How to turn on the camera in zoom? How to enable cameras on Yandex Maps? How to enable caps lock on iPhone? How to enable a memory card on an Android Samsung? How to enable a memory card on Android?
Set up Siri
Siri is the built-in iOS voice assistant; it is very flawed, but has improved greatly since the beginning and can be very useful. With Siri, you can issue voice commands to your iPad, such as “remind me to mow the lawn,” or ask questions such as “What is the capital of Bulgaria?”
What you may not know is that your voice recordings are not interpreted on the iPad itself: they are sent to Apple for machine analysis (very quickly, so you won't notice much of the delay, but that means you need to be on-line). line). And some people feel more comfortable than others. Tap "Turn on Siri" to set up Siri, or "Turn on Siri Later" if you want more time to review it.
(If you're having trouble with Siri or are unsure, check out our Siri troubleshooting guide and our Ultimate Guide to Siri.)
Understanding your options
You can customize your new iPad Pro in one of three ways: start from scratch, restore from another iPad, or import content from a third-party tablet. Here's what each of these options means in more detail.
- Setup like new means starting everything—every setup—from scratch. This is for people who have never used smartphones or online services before or want their iPad to look truly new.
- Restore from a previous iPhone, iPad or iPod touch backup - You can do this online using iCloud or via USB using iTunes. This is for people who had a previous iOS device and are upgrading to a new one.
- Import from Android - Apple has an app on Google Play to make the transition from Android easier, but online services allow you to transfer a lot of data from any old device. This is for people moving to iPad.
Diagnostics
You will be asked if you would like to help Apple improve its products by agreeing to a diagnostic test. If so, details about app crashes and the like will be sent to Apple for analysis by its engineers. This is a public activity that may help you solve the problems you are facing faster, but it is not necessary.
Apple encourages iPad users to submit diagnostic information whenever their devices crash, but decide if you want to do so. Click "Automatically Send" or "Don't Send" to give Apple a diagnosis. We usually click "Automatically Send" to help Apple, but it's up to you.
Use iCloud (or don't)
Click "Use iCloud" if you want to link your Apple ID to your iCloud account and start storing things on Apple's servers. iCloud is quite a useful thing, so click "Use iCloud" unless you really want Apple to have access to any of your data.
Find my iPad
Click Find My iPad to start using Apple's Find My iPad service. This is great if you ever lose your iPad: you can find it in Apple Maps, message whoever has it, lock it, or erase it. This is very useful, so we recommend that you click "Find My iPad" - but, as always, it's your decision.
Focusing in iOS 15
One of the most useful features that could ever appear in iOS. Using it, you can limit the “scattering” of push notifications that come from various applications. Let's say you need to limit notifications only on the iPhone so that Focus doesn't turn on on the iPad at the same time. What to do?
Turn Off Focus on iPad to Receive Notifications
- Go to Settings.
- Select Focus.
- Turn off the "Accounting on all devices" slider.
Don't forget about our Yandex.Zen: we write about Apple and more!
Welcome to your iPad!
And it's all. You're okay now. Tap the Get Started screen to start using your iPad.