Every owner of a new computer or laptop has to face the need to create several partitions on their hard drive. Ideally, there should be at least two of them: system C and D, which will store the data necessary for the user. Each of them can have its own file system, which will allow you to boot several operating systems from one hard drive and not lose personal files if you need to reformat it.
How to create a disk on Windows 10
How to create D drive on Windows 10
Typically, partitioning the drive is done when installing the Windows 10 operating system. This creates drive C, drive D, etc. But, in some cases, this step is skipped and the system is installed without partitioning.
In this case, the user receives one single drive C on which the system is installed. Most often this happens if the user who installed Windows does not have sufficient experience. Additionally, the D drive is not created when Windows is installed at the factory. Therefore, if you purchased a ready-made computer or laptop with Windows 10 pre-installed, then there will be only one drive C. Fortunately, to solve this problem there is no need to reinstall Windows 10 or delete data that is already present on the drive. You can create a D drive simply by cutting off some of the free space from the existing partition. In this case, this is done from an already installed operating system without using any third-party programs.
Video solution
If you have lost drive D on Windows 7 or 10, it is important, first of all, to determine the essence of the missing drive D (logical or physical), and, depending on this, use the tools I listed above. After restoring access to the disk, I recommend checking the system for a virus (for example, Dr.Web CureIt will help!) It is quite possible that the cause of this dysfunction was the malignant activity of virus programs.
Of course, such a loss can greatly disturb the owner of a computer in which important information and valuable files are stored.
However, if you look at the problem judiciously and consistently, then the anxiety will quickly go away, and the PC will work again in normal mode, providing the user with free access to his files.
To resolve this issue, you must first clarify which disk has disappeared. A physical separate hard drive, designated by the letter “D”, or a logical partition “D” on a screw.
Further, detecting it and restoring normal display in Windows 7 Explorer will not be difficult, you just need to follow the instructions below.
Using "Disk Management"
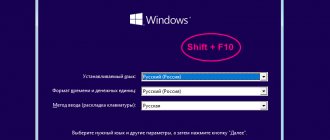
As already mentioned, to create disk D, it is not necessary to resort to using third-party programs, since everything can be done using tools that are already present in Windows 10. The main such tool is “Disk Management”. You can run this program in different ways. The easiest option is to right-click on the “Start” button (or press the Windows-X key combination) and select the appropriate item in the menu that appears.
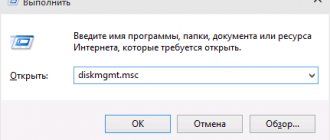
In addition, you can use “diskmgmt.msc”, which must be executed using the “Run” menu (Windows-R).
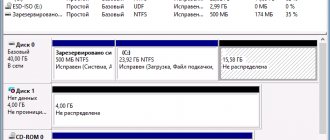
As a result, the “Disk Management” window will open in front of you. All drives connected to your computer will be displayed here. In order to create drive D, find drive C, right-click on it and select the “Shrink volume” option in the menu that opens.
The system will then begin analyzing the selected partition to determine the free space that can be used. This process may take several minutes, so do not close the window.
Next, the disk compression window will appear. There will be a numeric field in which you can indicate the maximum size of free space (in megabytes) that can be cut off from drive C to further create drive D. If you leave the value that Windows 10 suggests, then almost all of the free space will be cut off. This is not very good since there should always be some extra space on the system partition. Therefore, you need to set the value so that there is enough free space for Windows 10. For example, if the system partition size is currently 500 GB, then you can cut off 400 GB to create the D drive and leave 100 GB for the operating system.
After compression, some of the free space on the system partition will turn into unallocated space. This unallocated space can be used to create a D drive.
Now, in order to create disk D, you need to right-click on the unallocated space and select “Create simple volume” from the menu that opens.
Next, the “Simple Volume Creation Wizard” window will open. To start creating disk D, click on the “Next” button.
In the first step of creating the D drive, you will be asked to specify the partition size. If you want to create only one D drive, you can simply leave the maximum possible size and click on the “Next” button.
Next you need to select the letter that you want to assign to the new drive. This can be the letter D, E or any other from the proposed list.
The last step is formatting settings. Here select the NTFS file system, leave the cluster size at default and enable quick formatting (so as not to wait several hours). You can specify the volume label at your discretion; this is the name of the disk that is displayed in Explorer.
That's all. Confirm the creation of drive D by clicking on the “Finish” button.
As a result, a new partition will be created in the unallocated space that was cut off from the C drive.
After this, you can open Explorer and check the results. If everything was done correctly, then you will see two disks there.
Creating a new partition during OS installation
The best way to create disk D on Windows 10 is during installation. This is the most convenient way to divide non-volatile memory, and this Method works for Windows 7 and Windows 10, 8.
Creating a new partition
At the installation stage, it is impossible to edit partitions, including memory amounts. To do this you will have to format the HDD.
For some, this situation may seem unacceptable. However, if such shortcomings are not critical, you can safely create several separate memory areas at the OS installation stage.
Adding steps:
- Launch the program installation loader.
- Select a partition to install the OS from those suggested by the installer. This is where you can divide, make changes, remove sections. However, upon initial division, only one partition will be available. In other cases, the redistributed parts should be deleted.
- To further configure the non-volatile memory of the PC, you need to activate the “Disk Setup” button.
- In the corresponding tab, delete the partition on the HDD. It is important to consider that deleting partitions also involves deleting all information on them.
- By clicking on the “Create” button you need to create a System partition. To do this, you should specify the drive size in megabytes in the pop-up window.
- Confirm the command with the “Apply” button.
Attention! At this stage, the system will prompt you to create a small reserve area in the main partition. The offer should be accepted.
If necessary, the desired number of departments can be created in the same way. At the end, you need to select a location to download Windows OS and continue with the installation.
Using the command line
You can also cut off some free space from the system partition and create disk D using the command line. This is a more complex method, so if you are not confident in your abilities, it is better to use the option using Disk Management.
In this case, you need to launch a command prompt with administrator rights and run the following commands one by one:
| diskpart | Launch a console program to manage drives and partitions. The diskpart program allows you to perform all the same actions as Disk Management, but in command line mode. |
| list volume | Display information about current sections. After executing this command, you need to remember the number that was assigned to the system partition. |
| select volume n | Selecting a section for further work. Instead of n you need to substitute the number of the system partition that you remembered at the previous step. |
| shrink desired=s | Compress the selected partition. Instead of s, you need to specify the size of free space that needs to be cut off from the system partition (in megabytes). |
| create partition primary | Creating drive D. |
| format fs=ntfs quick | Quick formatting to NTFS. |
| assign letter=D | Assigning the letter D for the created disk (the letter must be free). |
| exit | Exit diskpart program. |
The screenshot below shows what all these commands look like on the command line.
This completes the creation of disk D. You can open Windows 10 Explorer to check the result.
Source
Defragmentation and optimization of the drive
HDD disk defragmentation is necessary to maximize performance. It automatically rewrites files so that they are not split into parts and are physically located on the same track. Otherwise, the read and write speed of the media is reduced. Due to the excellent operating principle of a solid state drive, defragmentation is not necessary.
With the advent of Windows 8, the defragmenter was replaced by another utility - TRIM. It serves to optimize the operation of the SSD drive. In addition, it determines the type of disk and performs the necessary actions for each.
How to create D drive in Windows 10
As a rule, on any computer with Windows on board in the “ My Computer”
You
can find two disks -
C
and
D. The first is usually allocated to the system. It is where the OS files, registry, programs and other attributes of any system are located. And disk D
is allocated for multimedia: movies, photos and music.
You need to store all this on a separate disk for several reasons. Firstly, if you decide to remove or reinstall the OS, the multimedia library will still remain untouched, because the changes will affect only drive C
. Secondly, do not forget about the banal convenience when working with a computer. When one type of file is stored in a separate directory, it is always comfortable, and the possibility of accidentally deleting precious photos with this method of storing information tends to zero.
To create two different partitions, it is not necessary to have two hard drives in your computer. The fact is that these disks can be virtual - the files will still be stored on one physical medium.
Create disk D
on a computer with Windows 10, you can use the standard “
Disk Management
” system utility.
Press the key combination Win
and
R
, paste “
diskmgmt.msc
” into the window that appears.
Select drive C
and click on “
shrink volume
”, as shown in the screenshot.
The utility will analyze the disk. After which a window will appear in which you can specify the size of the future disk D
in the paragraph “
Size of compressible space
”.
After some time, unallocated space will appear on the disk. It will subsequently become a new virtual disk. Click on it with the mouse and select “ Create volume”
».
Select the name of the future disc. It is not at all necessary to choose the letter D
to indicate a new disk.
Choose any letter
from A
to
Z.
Format the finished disk to NTFS
and choose a name for it. For example, “multimedia disk” or “document disk”. It will appear in the drive name next to the selected letter.
Source
Actions required to resolve the problem
If the disk indicated by the letter D has disappeared in a Windows 7 computer, you must take the following steps:
- Turn off and disconnect the PC. Make sure that all wired connections of the hard drive are secure, as well as the connections of its cables to the connectors on the computer’s motherboard;
- After checking the density of physical contacts, boot the PC and click “Start”;
- Next, type “diskmgmt.msc;” in the search field;
- Then press “Enter”;
- If there is also no disk in the “Disk Management” menu that appears, it means that the hard drive itself is faulty or its cable, connector, etc. is damaged;
- If it is in the disk menu, but, for example, has the “RAW” status, then to solve the problem it is recommended to format it. To do this, you just need to call up the context menu from it and click on the “Format” line;
- In the case where such a “Raw” status is assigned to a logical volume “D”, you will need to assign an identifier in the form of a letter to it (instructions on how to implement this are given below);
- If it says “No data”, then you should call up the context menu on it and click “Initialize disk”. For this procedure, it is recommended to specify the format as "MBR";
- Call up the context panel from the unallocated area and click “Create simple volume”. Then specify a letter to designate it (the main thing is that it does not coincide with existing disks).
- Ready. Check the success of the operations performed by launching Explorer, where the missing disk is already visible and all files stored on it are available for the user to work with.
Adding a new hard drive in Windows 10
The process of connecting a drive involves minor disassembly of the system unit or laptop. Except when the hard drive is connected via a USB connector. We will talk about these and other nuances further in detail. If you follow the instructions given, you shouldn't have any difficulties.
Drive connection process
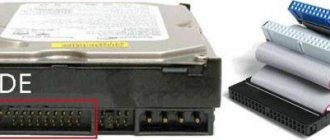
In most cases, the hard drive is connected directly to the motherboard via a SATA or IDE connector. This allows the device to operate at the highest speed. USB drives are somewhat inferior in performance in this regard. Previously, we published an article on our website that described in detail and step-by-step the process of connecting a drive for personal computers. Moreover, it contains information about both connecting via an IDE cable and via a SATA connector. In addition, there you will find a description of all the nuances that should be taken into account when using an external hard drive.
In this article we would like to separately talk about the process of replacing a drive in a laptop. You can't just add a second drive inside a laptop. As a last resort, you can disconnect the drive and place additional media in its place, but not everyone agrees to make such sacrifices. Therefore, if you already have an HDD installed, and want to add an SSD drive, then in this case it makes sense to make an external hard drive from the HDD drive, and install a solid-state drive in its place.
To replace the disk internally, you will need the following:
- Turn off your laptop and unplug it.
- Turn upside down. On some laptop models, there is a special compartment at the bottom that provides quick access to RAM and hard drive. By default it is closed with a plastic cover. Your task is to remove it by unscrewing all the screws around the perimeter. If your laptop does not have such a compartment, you will have to remove the entire cover.
- Then remove all the screws that hold the drive in place.
- Gently pull the hard drive cage in the opposite direction from the connection.
All that remains is to screw on the hard drive, close everything with the lid and secure it back with screws. This way you can easily install additional storage.
HDD or SSD
This choice is one of the most difficult when buying a new hard drive, since HDD and SSD differ in characteristics and price.
| SSD | HDD |
| High data transfer speed | Devices with SATA III connection type have medium-high data transfer speeds, average for SATA II and low for SATA I. |
| Resistance to vibrations and shocks | If there is too much vibration or shock, it may simply crack. |
| Limited rewriting capabilities - several hundred thousand times, which is enough for 3-5 years of active work | Virtually unlimited rewriting capabilities - up to several million times. Therefore, in everyday life they live up to 10 years |
| Solid price - 3-4 times more than a similar-sized HDD | Budget cost - price starts from 1200 UAH for a solid volume of 1 TB, like WD 1TB 7200rpm |
If you take your time and do everything according to the instructions, connecting another hard drive will go without a hitch. It is enough just to correctly select the size and path of the carrier’s connet. Good luck!
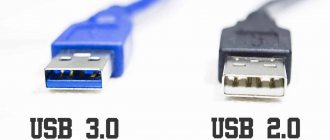
Technical information: What is USB type C: what 3 advantages will users appreciate after the introduction of USB4
Disk setup
Like any other device, the drive requires some setup after connecting to the system. Fortunately, in Windows 10 this is done quite easily and does not require additional knowledge.
Initialization
After installing a new hard drive, the operating system often “picks up” it immediately. But there are situations when there is no connected device in the list because it has not been initialized. In this case, you need to let the system know that this is a drive. In Windows 10, this procedure is done using built-in tools. We talked about it in detail in a separate article.
Please note that occasionally users have a situation where even after initialization the HDD is not displayed. In this case, try the following:
- Click the “Search” button on the taskbar. In the lower field of the window that opens, enter the phrase “Show hidden”. The required section will appear at the top. Click on its name with the left mouse button.
A new window will automatically open in the desired View tab. Scroll down to the bottom of the list in the “Advanced options” block. You need to uncheck the box next to “Hide empty disks”. Then click the "OK" button.
As a result, the hard drive should appear in the list of devices. Try writing any data to it, after which it will no longer be empty and you can return all the parameters to their places.
Using a third party application
If using the instructions described above it was not possible to resolve the problem, then a special utility will effectively help in solving the problem: “Acronis Disk Director 11”.
The order of action steps consists of the following steps:
- Download and install the above application on your PC;
- Launch it and in the main menu click “Acronis Recovery Expert”;
- Click “Next”;
- Put o;
- Click “Next”;
- Left-click once on the “Not occupied” area;
- Click “Next” again;
- Set o;
- “Next” again;
- Left-click the “rodent” button once on the problematic drive “D”;
- “Next” again;
- Wait until the procedure is completed;
- We can already say that everything has been completed successfully and the partition has been restored;
- In the last window, click “Continue”;
- Click “Exit”;
- Log in to Explorer to make sure all information is safe.
It is imperative that, after completing the disk mapping restoration procedure, you need to perform a full system scan with an antivirus, since very often such difficulties appear due to the influence of malicious applications.