10/24/2013 windows | for beginners
As various statistics show, not all users know how to perform the specified action. The biggest problems arise if you need to format the C drive in Windows 7, 8 or Windows 10, i.e. system hard drive.
In this instruction we will talk about how to perform this, in fact, a simple action - format the C drive (or, rather, the drive on which Windows is installed) and any other hard drive. Well, I'll start with the simplest thing. (If you need to format your hard drive to FAT32 and Windows says the volume is too large for the file system, see this article). It may also be useful: What is the difference between quick and full formatting in Windows.
Booting a PC from external media
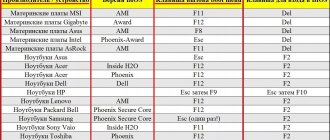
To boot from a flash drive or DVD, you will need to go into the BIOS or UEFI and change the boot priority. This procedure may differ in different BIOS versions, for example, in AMI BIOS you need to go to the Boot section, select “ USB Floppy Drive”
", and then call up the menu in the "
1st Boot
" subsection and select a flash drive from it that is previously connected to the computer.
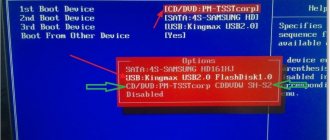
But it is much more convenient to use the boot menu - Boot Menu
, called up by pressing the F12 key when turning on the computer or laptop (there may be other options). All you need to do is select in this menu your flash drive or other external drive from which you intend to boot the computer. Naturally, at the moment you press the Boot Menu key, it should already be connected.
Detailed material on how to set boot from a flash drive in BIOS:
GPT or MBR?
Modern hard drives (HDDs) are becoming more spacious and less expensive, and many people believe that it is better to buy one large drive - 2 - 3 - 4 terabytes - than several small ones. But not everyone realizes what difficulties they will encounter when installing an operating system on such a disk. The fact is that disks larger than 2 TiB use a non-standard, new type of data organization - the GPT partition table. It contains “surprises” that await the inexperienced user.
The main differences between GPT (new) and MBR (old) disks
- Disk partitioning according to the MBR standard cannot address space exceeding 2.2 TiB, and for GPT disks there are no restrictions (or rather, their limit is an astronomical number by our standards - 8.6 billion TiB).
- Only 64-bit versions of Windows, starting with Windows Vista x64, can be installed on GPT disks. Windows XP 64-bit and all x86 versions since Vista can write to and read data from GPT partitions, but cannot boot from them. Windows XP x86 and higher versions do not support the GPT platform.
- The GPT partition table is part of the UEFI interface - the new BIOS, so to speak. Computers with traditional BIOSes do not support the GPT structure.
But this does not mean that modern, capacious GPT hard drives cannot be used the old fashioned way - on computers without UEFI or for installing 32-bit systems. You can: to do this, the GPT partition table just needs to be converted to MBR. Part of the volume - that which is beyond 2.2 TiB - will be inaccessible, but nothing can be done about it.
Formatting using a bootable USB flash drive
Using the installer wizard may seem like a more convenient solution, but only if we are talking about formatting a separate partition. Even if you delete all partitions from the drive, when creating a new partition with a file system, the installer will create an additional service partition. You need to completely format the disk from the command line.
- Boot from the installation disk, and when the installer wizard window appears on the screen, press Shift + F10 to open the command line;
- Run the diskpart utility with the same command and display a list of physical hard drives using the list disk command;
- Select the system disk using the select disk 0 command and remove all data and partitions from it with the clean or clean all command;
- Using the create partition primary command, create a partition in place of the resulting unallocated space and format it with the format fs=ntfs quick command. If you need to erase all the files remaining on the disk,
you do not need to specify quick - Wait until formatting is complete, exit the installer, and turn off your computer.
Blog about modems, routers and gpon ont terminals.
Of course, modern users of personal computers and laptops are much more advanced in terms of IT technology than they were 10 years ago. Much has already become part of everyday life and a normal way of life. In my practice, I have encountered computers where the Windows operating system has not been reinstalled for about 7 years. Nowadays, of course, you almost never see this - people are constantly installing some kind of programs, updates, games, with which a bunch of other necessary and not so necessary software gets into the system. A lot of movies and music are downloaded from torrents, as a result of which there is no more space left on local disks. Therefore, sooner or later the user faces the question of how to format a hard drive to reinstall Windows or free up free space. This simple action can become a serious obstacle for an inexperienced user. Therefore, in this article I will try to talk about how to format the system drive (usually the C: drive), local computer drives, as well as an external removable hard drive.
Formatting using WinPE 10-8 Sergei Strelec
This method of formatting a disk with a system partition on it is much simpler and more convenient, but you need to have a rescue disk at hand, in this example WinPE 10-8 Sergei Strelec
. It is advisable for any administrator to have it with him.
- Boot your PC from the Sagittarius disk and select the option “Boot USB Sergei Strelec Win10
» appropriate bit depth; - When the desktop loads, click the Start
and select
WinPE Programs → Hard Disk
; - Select from the list of programs any application you are familiar with for working with disks and partitions, for example, Acronis Disk Director
; - Sequentially delete all partitions on the selected hard drive;
- After the volumes have been deleted, right-click on the disk and select the only menu item “Create Volume
»; - Follow the instructions of the wizard, in the third step, specify, if necessary, the file system (NTFS by default) and volume type (preferably primary) and click “ Finish
”; - Apply pending operations and confirm the actions planned by the program.
Unlike Disk Director
Aomei Partition Assistant
program included in the rescue disk will allow you to delete partitions with complete destruction of data.
- Having launched the disk manager, right-click on the visualized disk (namely the disk, not the partition) and select the option “Erase hard drive
", specify the algorithm and confirm the action; - Click "Apply
» → «
Go
" And "
Yes
» for final confirmation. As a result, all partitions on the disk will be deleted and the sectors will be filled with zeros; - Right-click on the resulting unallocated space and select “Creating a section
»; - Select a file system and drive letter if necessary, and then click "OK
»; - Apply the actions as shown in step 2.
Through the installed OS
Via Explorer
- Click on the most important Windows button in the lower left corner and then select your computer - you can also go to Explorer if it is displayed on your desktop.
- As soon as you select the partition you want to clean, right-click on it and then select the appropriate item.
- There is usually no need to change the file system - we leave the parameter that was set previously. The label and cluster usually do not need to be changed either. The default will be “Quick (cleaning table of contents)” - I strongly recommend unchecking this checkbox if the section is large and you want to clean it efficiently.
- At the very end, click “Start”.
Command line
In the search line enter: “Command line” or “cmd”. Be sure to run the utility with administrator rights, otherwise you will not be able to clean the desired partition.
We have two options. Specify a regular command with a default value - write the volume letter at the end:
format D:
The second option is to add two more parameters to the command.
format D: fs:NTFS /q
- fs:NTFS - here we indicate the file system into which we want to turn the partition. If this parameter is not specified, the current file system will be used.
- /q – quick cleanup. It is better to install if the section is small.
To run the command, press the “Enter” key.
Disk Management
- On the keyboard, press simultaneously the key (May have a Windows icon) and the English letter R. As soon as the execution window appears, enter the command: diskmgmt.msc . If this window is not there, then go to “Start” and enter a similar command in the search bar, and then run the utility.
- Everything is similar here - select a section, go to the formatting section.
- Same as in the first method: select the volume label, file system. Set the cluster size to default. We also uncheck the box next to quick cleaning. Click "OK".
- A warning window will pop up - just agree and wait for the procedure to end.
If there is no boot disk
Finally, you can format the disk from the built-in WinPE
, but in this case, on the formatted disk you will still have one partition with the boot environment itself, since it cannot be deleted from itself.
Here we will not describe this procedure in detail, since this method does not solve the problem and does not achieve the goal of completely formatting the system disk. However, you can delete the system and user partitions or format them in Diskpart
with the format fs=ntfs command.
Third party software
Method 4: Using Windows support software. There are a huge number of specially designed applications with which you can perform this operation on your computer. Their advantages include the highest possible level of disk cleaning and the use of complex formatting algorithms. One of the disadvantages is the fact that there is an almost universal requirement to pay a certain amount in order to obtain the full functionality of the program. We will not describe these applications due to their diversity.
Views: 16941
Formatting a blank disk or redistributing partition sizes from Windows
A hard drive fresh off the assembly line
, as a rule, contains only
one logical volume
, and may not have any at all.
In any case, if you do not want to use the entire size of the hard drive in its original form, and specifically with just one partition, you will need to create additional
smaller volumes on it.
This can be done in many ways, but all of them (methods) are divided into two categories - formatting from within a running system
or from the outside using
boot programs
. Let's start with something simple.
Let's say you purchased a hard drive and would like to create partitions on it
. After connecting it to a computer running Windows 7, you need to do the following:
To create additional partitions in an unallocated area, use the same instructions. Then you can proceed directly to installing Windows.
Warnings
- When formatting your laptop, remember that the hard drive will be completely wiped and the new operating system will be installed on it. All your data will be lost forever, so before formatting, first make a backup copy on an external drive. Keep in mind that once the process has started and reached a certain stage, there is no turning back. Even if you change your mind, you will not be able to recover your data and your old operating system will be completely removed.