In this article we will answer the question, how to update Windows 10 features And install cumulative updates. Having on your computer not only the latest version of the operating system, but also all the current patches for it significantly increases the safety of its use. Outdated software is one of the most common reasons why viruses enter a PC. Not only Microsoft, but also all the largest antivirus laboratories in the world recommend keeping Windows 10 up to date.
In general, all the latest updates in Windows 10 are installed automatically by default. This applies to both small patches and major upgrades. The question of forced renewal stimulation, which is almost certainly of interest to readers of this article, may arise in several cases:
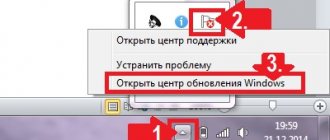
- Immediately after a clean reinstallation of Windows 10. Even the latest version of the OS installation image needs to be updated.
- When there is news about another major update or important security update. Many people want to be among the first to try out a new product.
- Before temporarily disabling the update center (for example, before going on a business trip or to the country, where downloading large packages will be impossible due to a limited Internet connection). By the way, we have an article where you can read how to temporarily turn off Windows 10 updates.
There are four main ways to update Windows 10.
Determine the date of installation of the latest updates and the version of Windows
You can check the latest update date on your computer using the following PowerShell command:
gwmi win32_quickfixengineering |sort installedon -desc
Source Description HotFixID InstalledBy InstalledOn —— ———— ——— ———— ———— PCname1 Security Update KB4509095 NT AUTHORITYSYSTEM 7/17/2019 12:00:00 AM
This screenshot shows that the last time a security update was installed on this computer was June 17, 2022.
You can also display the update installation history using the Get-WUHistory cmdlet from the PSWindowsUpdate module:
Get-WUHistory|Where-Object {$_.Title -match "KB*"} |Sort-Object date -desc
Now we need to find out the current version and build of Windows. Use the command:
Get-ComputerInfo | select WindowsProductName, WindowsVersion, OsHardwareAbstractionLayer, OsArchitecture
WindowsProductName WindowsVersion OsHardwareAbstractionLayer, OsArchitecture —————— ————— ————————— ————————— Windows 10 Pro 1803 10.0.17134.285 64-bit
In my case, I need to look for the latest security updates for Windows 10 1803 x64.
Updating Windows to version 1909
In total, there are three main methods that allow you to correctly update to the latest current version of the operating system. Let us immediately note that in this article we will not consider the option of a clean installation of Windows 10. If you are planning to perform a complete reinstallation, read our guide, especially since as a result you will also receive version 1909.
Before you start installing updates, we recommend making sure that you do not have build 1909 installed. Otherwise, you will only waste time. This is done in two clicks:
- Press the key combination “Win + R”, enter the command winver in the text field and press “Enter” on the keyboard.
A window will appear with information about the installed OS version and its edition.
Important! Only owners of Windows 10 with Pro and Home editions will be able to install version 1909. For others, the described methods will not work.
Having dealt with the nuances, let’s move directly to the methods of updating Windows 10 themselves.
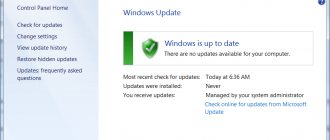
Method 1: Windows 10 Settings
The fastest and easiest way to install the latest updates is to use standard system settings. In this case, the procedure should be as follows:
- Use the Win+I key combination to open the Settings window. In it, left-click on the “Update and Security” section.
In the right half of the window that opens, click on the “Check for updates” button.
After some time, the line “Updating features to Windows 10 version 1909” will appear a little lower. Click on the “Download and Install Now” button below it.
As a result, the preparation of update files will begin and their direct downloading to the system. This will be indicated by the corresponding entry opposite the “Status” line.
Upon completion of these operations, the “Reboot Now” button will appear in the same window. Click on it.
Unpacking and installation of the update will take place during the system reboot. The installation progress will be displayed on the screen.
After finishing working with updates, the system will finally restart. After logging into the OS, version 1909 will be ready to work. You can verify that the installation is correct in a special window with information about the Windows version.
Method 2: Update Assistant
This method allows you to update Windows 10 to version 1909 through a special utility from Microsoft. The update process takes a little longer than the first method, but it is fully automated. In practice, everything looks like this:
- Go to the official utility download page. Click the “Update Now” button on it.
The executable file will begin automatically downloading. Once the download is complete, launch it. As a result, Windows 10 Upgrade Assistant will be installed on your computer. After a moment, you will see the initial window of the utility. In it, click the “Update Now” button.
Next, the system will be analyzed for compliance with technical specifications. If any of the items does not meet the conditions, you will see in the next window a description of the problem and recommendations for resolving it.
If the requirements are met, all lines will have a green checkmark and a “Next” button will appear. Click on it.
As a result, the preparation and download of the cumulative update will begin, as well as checking all downloaded files. The progress of the operation will be displayed in a new window. It takes a long time, so be patient.
After some time, another window will appear. In it you will see a message indicating that the update is ready to install. To do this, you need to restart the device. Click the "Restart Now" button. If you do nothing within 30 minutes, the restart will begin automatically.
A notification will appear on the screen in advance. You can click on the “Close” button or don’t touch anything. After a while it will disappear on its own.
The reboot will take longer than usual. This will install update 1909. After logging in, be sure to uninstall the Update Assistant app if you no longer need it.
Method 3: Installer
Specialists from Microsoft have developed a special tool that allows you to install and update Windows 10 to the latest version. It is with the help of this that we will implement this method.
- Go to the official Windows website page and at the top of it click the “Download tool now” button.
- As a result, a file called “MediaCreationTool1909” will begin downloading to the system. After the operation is completed, launch it.
- First of all, the utility will check your system and perform a series of preparation steps. This will be indicated by the corresponding line in the first window. Just wait until it disappears.
In the next window you will be asked to accept the license terms, just click the button of the same name to continue.Check the box next to “Update this PC now,” and then click “Next.”
The process of downloading the necessary files will begin. The progress of the operation will be displayed in a new window.
Upon completion of the operation, the process of creating media with the received information will begin. You'll have to wait again.
Next, another window will appear in which you will see a notification that your system has been checked for compliance.
After about a minute, you will see the license agreement text on the screen again. This time it is different. Click the "Accept" button.
After this, the next stage of the scan will start - the utility will search for available updates for your system.
Only after this you will see the final window with a message indicating that you are ready to install the new version. Click the coveted “Install” button.
The installation of updates will begin. Please note that the system may reboot several times during the process. This is fine.
- After all reboots, Windows 10 version 1909 will be installed.
Thus, you have learned about all the methods for updating Windows to the latest version. As a conclusion, let us remind you that if problems arise, you can always restore the system to its original state or roll back to the previous edition.
We are glad that we were able to help you solve the problem.
Add the Lumpics.ru website to your bookmarks and we will be useful to you. Thank the author and share the article on social networks.
Describe what didn't work for you. Our specialists will try to answer as quickly as possible.
How to find and download the latest security updates for your version of Windows 10?
You can manually download the latest updates for Microsoft products from the Microsoft Update Catalog - https://www.catalog.update.microsoft.com/Home.aspx. In the catalog you can find almost any update for all supported versions of Windows (direct import of updates via the WSUS console is also supported). The main problem is that the catalog does not have a convenient search system, and if you do not know the KB number that you need to install, it is quite difficult to find and download the update package.
Let's look at how to form the correct query to search for updates for your edition of Windows in the Microsoft update catalog. The article was written on September 10, 2022, so the latest security updates were released a month ago, in August. In our case, to search for security updates for Windows 10 1803 x64 for August 2022, use the following search query, which must be inserted into the search bar in the upper right corner:
windows 10 1803 x64 8/%/2019
The Microsoft Update catalog returned a list of 6 updates.
How do you decide which of these updates you need to download and install? Of course, you can install all these updates manually, but you can also save time. Because Microsoft has switched to cumulative updates, you just need to download and install the latest Cumulative Update for your system.
Our list has two large (900+ MB each) cumulative updates for Windows 10:
- 2019-08 Cumulative Update for Windows 10 Version 1803 for x64-based Systems (KB4512509) Windows 10 Updates 8/19/2019 - 930.7 MB
- 2019-08 Cumulative Update for Windows 10 Version 1803 for x64-based Systems (KB4512501) Windows 10 Security Updates 8/9/2019 - 919.3 MB
Click the security update KB4512501 . In the window that opens with information about the update, go to the Package Details . This tab shows which updates this update replaces (This update replaces the following updates:), and which update it in turn replaces (This update has been replaced by the following updates). The screenshot shows that update KB4512501 is being replaced by KB4512509.
Now let's open the properties of update KB4512509 . As you can see, it is not replaced by anything: This update has been replaced by the following updates: n/a . This means this is the latest and most current cumulative update for your edition of Windows 10.
Click on the Download , a direct link to download the MSU update file will appear in the window that opens. Download the file and save it to disk.
You can also find the KB number of the current cumulative update for your version of Windows 10 using https://support.microsoft.com/en-us/help/4498140/windows-10-update-history.
In the list on the left, select your version of Windows 10 (in my example it's Windows 10 1803), then look at the In this release . The very first entry links to the knowledge base article for the latest Windows cumulative update for the selected edition. In our example, this is August 19, 2019—KB4512509 (OS Build 17134.984) . It was this update that we downloaded according to the first method.
Possible problems
Windows 10 includes automatic updates with no option to reject or cancel them. Often, automatic installation of updates leads to graphics system failures, which can cause monitors to turn off. One of the first updates from Microsoft included numerous bugs related to the security system, which resulted in the permanent termination of the “explorer.exe” process, which is responsible for the window interface. The reason for this was that the update process, one of the first Windows 10 updates, could not complete correctly. Therefore, a message appeared about the impossibility of completing the installer’s work correctly, and cancellation would result in a mandatory reboot of the PC. The process would then begin again, and this could continue cyclically due to the fact that updates are imposed by Microsoft without the ability to cancel or refuse the installation process.
Recently, these problems have been solved, but no one is immune from their recurrence or the emergence of new, possibly more serious ones.
How to install Windows 10 cumulative update?
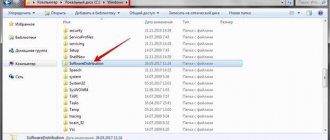
Once you have downloaded the MSU file with the current cumulative update for your edition of Windows 10, you can install it.
To do this, double-click on the downloaded msu file and follow the steps of the Windwows Offline Update Installer Wizard.
If, when installing an MSU update, the message “The update is not applicable to this computer” appears, you most likely downloaded a cumulative update package for another version of Windows or the update is already installed.
After installing the update package, you need to restart your computer (if after installing the update you experience problems with the operation of the OS or applications, you can uninstall it).
You can also install a Windows update from the command line in silent mode using the wusa.exe (Windows Update Standalone Installer) utility. The following command will install the specified update in silent mode and delay the automatic reboot of the system after the installation is complete:
wusa C:updateswindows10.0-kb4512509-x64_3dcaa0cca0554ec2b11491a9633a13b56dc6db1b.msu /quiet /norestart
You can unpack the MSU file and install the update via the CAB file with the command
start /wait DISM.exe /Online /Add-Package /PackagePath: c:updateskb4056887Windows10.0-KB4512509-x64.cab /Quiet /NoRestart
Or use this CAB file to integrate the update into the Windows installation image.
I'll tell you how to keep Windows 10 up to date. OS updates are especially important in a new system, because instead of releasing new versions, Microsoft provides all the important changes, including interface and security, by updating the current one.
Through the Support Center
Such an update is implemented by launching the “Support Center” using several methods.
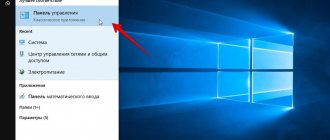
Launch via control panel
- Find the installation icon in the form of a white flag in the taskbar and click on it with the left mouse button.
- Click on the link with the appropriate name.
- The installation tool for Windows Update will launch.
- In the left frame, click on the link that says: “Search for updates.”
Ignorance is the cause of irritation
The PC reboots at the most interesting place in your favorite game or working on an important project. Too much bandwidth is being consumed. The Internet has become slow. After reading the guide on how to configure your operating system update settings, you will be able to fix this.
Automatically or manually
Most Windows 10 updates are installed automatically, but you can check the availability of updates yourself at any time.
By default, the following parameters are offered, which may not be combined:
- With a daily routine
- Work schedule
- Preferences for spending family leisure time
- Internet connection speed
- Network bandwidth load
The operating system provides software tools necessary to update it. No third party software is needed. It is enough to familiarize yourself with a simple list of actions available to the user.
Available update options
You can:
- Manually check for availability of updates and install them
- Troubleshoot problems that arose during an OS update
- Determine the conditions for updating other software from Microsoft
- Configure system reboot notifications
- Set the period of time during which the OS will not automatically reboot
- Limit the bandwidth and amount of traffic allocated for downloading updates
Limited connection
Microsoft is well aware that not all users have unlimited access to broadband Internet, so you can “metered connections” yourself.
By default, Windows 10 establishes unlimited connections for ethernet and wireless connections, and uses limited traffic for the mobile network. Therefore, by switching between these modes, users can control the speed of their updates, as well as download parts of updates from adjacent devices.
If you have a limited connection, then the Windows Update service will automatically download priority updates first, and you will have to download all the rest yourself. That is, using both connection options (to limit the amount of data being updated), the likelihood that Microsoft will roll out a major update without your consent is much less likely.
To set up a metered connection, launch the Settings app, Network & Internet tab, and then select Change connection properties.
In my opinion, installing limited connections will not provide any particular benefits, but some users may find it useful,” comments Jack Scofield.
Manual installation of updates
Click the Start button (with the operating system logo). Designed to enter the main menu. Located in the lower left corner of the display.
Go to the operating system settings by clicking on the button with a gear icon highlighted in the screenshot.
Scroll down the System Settings window to Update & Security. The title of the settings section contains an explanation: “Windows Updates”. Its icon is two arrows forming a broken circle. Enter it.
You are prompted to “Check for updates.” To do this, use the button highlighted in the illustration. It is located before the message about the current status of system updates.
If updates are available for your computer, they will be downloaded automatically. The progress of the process will be displayed on the screen. Do not close the window because after installing new software components, it will inform you when you need to restart your desktop or laptop.
Once the update process is complete, you will be prompted to restart your device. You have a choice: reboot immediately or defer the action to a later time.
I recommend doing this immediately after installing new system components. Save the current state of all files you are working on and close the programs. Click the reset button.
Using the switch, you can schedule a reboot at a convenient time. Use this approach only when you are working on an important project and do not think it is possible to interrupt your current computer activities.
In case of failure
If there is a problem during the Windows 10 update process:
- Make sure your computer is connected to the Internet
- Reboot your device
- Re-run the system update tool
If the actions did not lead to the desired result, in the current section of system parameters, click on the “Troubleshooting” item.
Click on the sub-item that helps you overcome factors that prevent you from updating your operating system. Follow the instructions displayed on the PC display.
Rules for updating software from Microsoft and downloading updates
Go to the update and security settings section of system settings. Above in the text of the article detailed recommendations are given on how to do this. Now you can set up a Windows 10 update scheme that is convenient for you.
In the search bar on the left panel of the settings section, type the word “additional” (without quotes). Go to "Advanced Windows Update settings."
This section offers you the opportunity to automate the update of additional software. Two switches allow you to configure software update options, one - the scheme for displaying update notifications.
If you want other Microsoft software to be updated when you update your operating system, turn on the first switch. As a result, the tool built into the system will check the availability of updates for:
- Microsoft Office
- Edge
- Visio
When you turn on the second switch, updates will be automatically downloaded even if you are using limited bandwidth connections. If it is turned off, the OS will notify you about the availability of new software components and ask you for permission to download it. Recommended for users of unlimited Internet, provided that the PC always works with this connection.
Setting up PC restart notifications, traffic and bandwidth limits
Turn on the third switch to be sure that your computer will not restart as a surprise. Sometimes this happens at the least convenient time for the user, when he is busy working on an important presentation or enjoying his favorite movie. Now, if you need to restart the PC, the system will show a message on the display about the upcoming action for its maintenance.
In the same subsection of additional options, click on the “Delivery Optimization” link.
If your Internet connection is unstable, leave the “Allow downloads from other computers” option enabled. By default, booting from other PCs on the local network is offered. In this case, the computer will receive parts of downloaded updates from other devices on the local network and transfer to them already downloaded fragments of software components.
There is also an option for exchanging parts of updates provided by the OS developer with computers not only on the local network, but also on the Internet.
Click on the “Advanced settings” link located below the settings discussed.
Determine an acceptable limit of bandwidth that you are willing to allocate for downloading updates:
- In the background
- In the foreground
After optimizing the settings in question, downloading updates will no longer lead to a significant slowdown of the Internet connection. It causes discomfort for users.
When choosing, consider the speed of your Internet connection and the load on it. Playing online games and watching high-quality streaming video content are tasks that require significant bandwidth.
Scroll to the "Transfer Options" settings block. Here it is proposed to set limits:
- Bandwidth that is used to transfer updates over the Internet to other PCs
- Monthly volume of downloaded updates
Force download completion
There are several ways to prevent your computer from downloading new updates. For example, you can activate the “Limited Connection” function, “Airplane” mode, etc. But there is only one method that allows you to prohibit, or rather, suspend indefinitely, the installation of already downloaded updates.
If you are in safe mode or know for sure that new versions have already been downloaded, then follow the steps described in the “Using the Command Line” paragraph. If you want to prevent the downloading of files that have not yet been downloaded, so as not to receive any updates in the future, use one of the instructions below.
Using the Command Line
- Launch Command Prompt with administrator rights.
Open a command prompt with administrator rights - Write and execute the following three commands one by one: net stop wuauserv, net stop bits and net stop dosvc. Done, the above queries will help you pause the update until you allow it yourself.
Execute the commands net stop wuauserv, net stop bits and net stop dosvc
When you want to get updates, run all the same commands, replacing the word stop with start in each of them.
Activating a metered connection
Since many users have a metered Internet plan, Windows 10 now has the “Limited Connection” feature, the activation of which results in downloading system updates and drivers only with the user’s consent. By turning it on, you can independently choose which updates are worth downloading and which are not:
- Expand PC settings.
Open system parameters - Go to the "Network and Internet" section.
Open the “Network and Internet” section - After scrolling to the middle, go to additional settings.
Click on the line “Advanced settings” - Move the slider in the “Limited connection” block so that the function is turned on.
Turn on the “Limited connection” mode
Activating Airplane mode
Enabling the “Airplane” mode disables all mobile and Wi-Fi modules, that is, using this mode, the computer is prohibited from any access to the Internet, and if there is no access to it, then updates cannot be downloaded. Of course, this method is only suitable for those who do not intend to use the Internet from a computer.
- To activate the mode, click on the system notifications icon located on the right side of the quick access panel. In the lower block of the expanded window there are buttons that allow you to enable and disable many modes. Find the “Airplane” panel among them and click on it.
Open notifications and click on the “Airplane mode” button - An alternative method is to go to the computer settings, go to the “Network and Internet” block, and then open the “On an airplane” sub-item and activate the function.
Go to your computer settings and turn on Airplane mode.
Time at which the PC does not restart
To restart Windows 10 not at any time, but only at a time convenient for you, on the left side of the window, go to the “Windows Update” section. Click the "Change activity period" link.
Indicate the time when you start working on the computer. Then the end time. The PC will not automatically restart during the specified time interval. Before restarting, the system will check whether the user is currently working with it.
To apply the changes, click the “Save” screen button.
Scheduled reboot
When your laptop's updates are pending a reboot, the Settings app gives you two options to control the process:
- "Restart now";
- “Schedule restart”: Enter a suitable date and time for the restart (you can postpone the process for up to six days).
Next, click “Advanced options” in the same settings tab and select the option: “Enable a reminder to restart the system (if you want to see a notification about this).” In this case, before the next reboot (the time and date of which you entered in advance), Windows 10 will again ask you about the relevance of the planned reboot (which will allow you to delay this process a little more).
Using Windows10Upgrade
Visit the Tens Update Utility download web page. Click on the "Update Now" button.
Save the executable EXE file of the software tool on the HDD or SSD of your PC. Open the directory with the downloaded files in Explorer or the file manager you prefer.
From the context menu of the executable file, select run as administrator.
Allow the program to make changes on your device (“Yes”).
The user will be prompted to update the operating system to the latest version at the time of launching the utility. To update, click "Update Now".
The software tool will check the compatibility of your desktop or laptop with the latest OS version. If successful, it will inform you that the update is sufficient:
- CPU performance
- Random access memory
- Free storage space
The screen will display the update progress (in percentage). The user can cancel the update and return to it at a more convenient time.
Windows Update Mini Tool
A small utility that does not require installation when used, it is considered a convenient alternative to Windows Update. You can download it here, using direct links posted by the developer.
Windows Update Mini Tool is distributed under a free license in the form of a ZIP archive. There are two executable files inside. We select the appropriate bit size and launch it.
Click the o icon to check for updates. The program will contact the Windows Update servers and display a list of available fixes in the main window. The number “3” in the screenshot shows a drop-down menu designed to configure the operating mode of the utility. By default, the system scheme with automatic verification is activated.
To install, check the selected updates. Click on the icon to start the download and installation process.
The utility is extremely simple, but in terms of functionality it is in no way inferior to the built-in tools of the operating system.