With the widespread use of routers, the need to distribute the Internet via wifi from a computer with the Windows 7, 8 or 10 operating system to a phone and other devices has disappeared. However, sometimes the access point function on a PC or laptop may still be needed. For example, when you are outside the city, you access the Internet via a modem from a cellular operator, and you urgently need to connect some additional gadget. Let's try to do without a connecting link in the form of a router and learn how to distribute a wifi signal with the Internet directly from a computer to another PC, laptop or smartphone.
What is needed to distribute wifi from a computer without a router?
First, let's look at the scheme by which we will distribute the Internet via Wi-Fi on the Windows operating system. If previously a router was used to access the Internet, now one of the computers will take over its function - which means it must be constantly turned on. A computer-to-computer wireless network will look like this:
- A constantly switched on computer with a wireless module connected via cable to the Internet, which emits a signal.
- Second computer, laptop or smartphone
WiFi in modern laptops or netbooks (small laptops) is 99% already available by default. But with stationary PCs there can be difficulties. And if you did not take care of its availability at the purchase stage, you will have to purchase an additional device called an “adapter”. Also note that the main PC that will broadcast the signal must be connected to the provider via cable - that is, in the most common standard way. We do not touch its settings.
Method 2: Third Party Programs
If the first method does not suit you for some reason, you can use software from third-party developers as an alternative. In most cases, you only need to enter the basic network parameters there and immediately launch it, then view the list of connected devices and manage them in every possible way. Find a detailed overview of all such programs in a separate article on our website at the following link.
Read more: Programs for distributing Wi-Fi from a laptop and computer
As for the correct configuration of such software, here you can also refer to our instructions, where one of the programs discussed in the review is taken as an example. This guidance is considered universal, and in other decisions the principle of action will remain the same.
Read more: How to use the MyPublicWiFi program
Windows 7 or 10 Command Prompt
So, let's try to set up Wi-Fi Internet distribution using the Windows command line. By the way, this option is also suitable for Windows 7 or Windows 8. But before you start setting up the access point, you need to make sure that the wireless module is connected and working properly.
Next, click on the “Start” icon in the lower left corner of Windows with the right mouse button and select “Command Prompt (Administrator)”
enter the command
netsh wlan show drivers
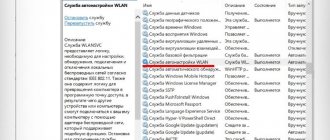
and look among all the text that appears as a result of its execution for the line “Support for a hosted network” - if the computer is ready to distribute wifi through the built-in Windows tools, then the value “Yes” should appear opposite it.
To enable this feature enter the following command
netsh wlan set hostednetwork mode=allow ssid=»wifika.ru» key=»111111″ keyusage=persistent
If you carefully read the text of this command, you have already guessed that the “ssid” value is the name of the future wireless network, I called it “WiFika.RU”, but you can set your own. And we also replace the value of the “key” tag - this is the password for connection.
As a result, we will receive a message about a successful network configuration. Now to launch the access point from your computer, enter the following line:
netsh wlan start hostednetwork
A message appears saying "The hosted network is running"
You can verify this by going to “Network and Sharing Center - Change adapter settings.” A new connection will appear here.
But that is not all. Now you need to give permission for this access point to use the Internet connection through which the computer is connected to the Internet. To do this, right-click on our main connection and select “Properties”
Switch to the “Access” tab and activate the “Allow other network users to use this computer’s Internet connection” checkbox.
Then we stop the Internet distribution with the command
netsh wlan stop hostednetwork
and run again - the one that was given above.
We distribute wired Internet through the application
If the above methods do not suit you or there is another reason, you can share your wired Internet connection in Windows 8 or 7 with other wireless devices using third-party applications. I recommend trying the free and open source app Virtual Router.
We install, launch, specify the network name (SSID), set the desired password, and select our wireless connection that we want to distribute. Click the Start Virtual Router , and you're done. Below you can see a list of connected devices. It just couldn't be simpler.
Setting up Internet distribution via Wi-Fi may seem like a hassle to some, but in reality it is not that difficult. It all depends on what version of Windows you are using. In addition, you can always use a third-party application, which comes down to an even simpler way to turn your computer or laptop into an access point.
Now you can always use this article to distribute your Internet channel via Wi-Fi, even if you don’t have a Wi-Fi router at hand.
Microsoft Virtual WiFi Router
Making a Windows 7 computer an access point and distributing Wi-Fi from it to other devices is also not difficult, since this mode is already built into the system shell and is called Microsoft Virtual WiFi. This technology turns your computer into a virtual access point and is capable of supporting up to 100 connected clients simultaneously.
So, let's start setting up. To begin, just as in the previous case, you need to activate the wireless network connection. After that, go to the command panel (Start - All Programs - Accessories - Command Prompt) and in administrator mode enter the request to activate the virtual adapter mode:
netsh wlan set hostednetwork mode=allow ssid=”MS Virtual WiFi” key=”123456″ keyUsage=persistent netsh wlan start hostednetwork
Here “MS Virtual WiFi” is the name or SSID of your network, and “123456” is the password for connecting to it. After that, press “Enter” and wait until the system configures it, after which a new virtual device will be detected in the device manager - “Microsoft Virtual WiFi miniport adapter” or “Virtual WiFi miniport adapter”.
At the same time, it must be taken into account that
The driver of the wireless adapter installed on the computer must support Virtual WiFi
Otherwise, the computer will not work as an access point - you will need to update the drivers.
Now let’s go to “Control Panel - Network and Sharing Center - Change adapter settings” and see the newly created wireless connection:
Now your Windows 7 computer has become a real wifi access point with the ability to access the Internet. The network is visible in the list of wireless networks and you can easily connect to it by double-clicking and entering the password we set:
Other commands for managing virtual wifi:
- netsh wlan show settings – show network properties and its status
- netsh wlan show hostednetwork settings=security – display hosted network security settings, including password
- netsh wlan start hostednetwork - start the network
- netsh wlan stop hostednetwork - stop the network
A method for automating this process from Evgeny Bogdanov:
- we do everything as written via the command line,
- create a .txt file and write “netsh wlan start hostednetwork” (without quotes)
- change the file format from .txt to .bat (right mouse button/rename)
- drag this file to autorun, and wireless Internet distribution starts automatically when the computer starts
Possible errors and difficulties
There are a number of errors that users encounter when trying to distribute wireless Internet from a laptop:
- The virtual router did not start, or this network is not supported. In such cases, try updating the drivers or go this way: click “Start” ‒ “Device Manager” – “Network Adapters”. In the pop-up window, find and update the adapter called “Wi-Fi” or “Wireless”.
- Devices connect, but cannot access the network. Check the router settings to see if there have been any changes to the name of the connected network. The name of the point must match it.
- Access is blocked by antivirus or firewall. In this case, you should set connection permission in the settings.
Connectify program
The practicality of distributing the Internet from a computer using Virtual Wi-Fi is obvious, but it is inconvenient to use the Windows command line every time you turn on the laptop. In order to facilitate the process, an application was developed - Connectify. It has a free limited version, and there is a full version, which today costs from a thousand rubles. After installation, the utility starts working simultaneously with the launch of Windows 7, and the settings are the same minimal - you just need to set the network name and password.
But before you start using it, you need to check several important settings that may interfere with its operation. In particular, I am often asked the question: “Why do I connect to a Windows hotspot but can’t access the Internet?”
- Make sure your network card is supported by this program. You can find out on this page of the official website of the developer. If you have a card, but the Internet still does not work on another computer, then you may need to update its driver that supports Virtual WiFi technology. You will find the “firewood” on the official website of the developer, and you can find out the version and manufacturer of your network card using the Speccy program, which I wrote about.
- Disable all antiviruses and third-party firewalls, and set the built-in Windows firewall to Auto mode. To do this, go to Win 7: Control Panel > System and Security > Administrative Tools > Services
- Run the program as administrator. To do this, go to “Start”, right-click on the program and select “Run as administrator” from the menu.
- The new wireless connection created by the program must allow access to the Internet connection of this computer. We have already entered this section above: Start > Control Panel > Network and Internet > Network and Sharing Center > Changing adapter settings > Right-click on the new connection created > Properties > “Access” tab. Check the boxes “Allow other network users to use this computer’s Internet connection” and “Allow other network users to manage shared access to the Internet connection” and select this connection created by the program from the drop-down list.
There are two more similar programs that you can use for free if it doesn’t work out with Connectify - Virtual Router Hotspot Manager, which I use myself, and mHotspot. The principle of operation is the same: open the program, enter the SSID and key and start it. It will save the settings and will be launched automatically with the operating system.
In the drop-down list in both programs, you can select which connection you want to share - cable (Local network), Wireless (if the computer is connected via wifi), usb modem or some other.
Thus, using Virtual WiFi technology and using the described utilities, you can easily distribute wifi Internet to any device with any OS.
Pros and cons of distribution without a router
You can share the Internet if you have it on your computer. It doesn't matter whether it comes through a cable or access is via a modem. But the distribution method without a router has its pros and cons.
One of the advantages is the savings on the router. Considering that budget models cost less than a thousand rubles, the savings are only so-so. In addition, the router can operate for several years without additional settings and changes.
Among the disadvantages, it is worth noting that the PC must have a module installed to provide wireless communication, through which the Internet will be distributed from the computer to Android phones and iPhones. This automatically makes the distribution available for most laptops. Such modules are rarely built into desktop computers, and external devices are comparable in cost to routers. There is a way to give Internet to your phone via USB, but then you will be literally tied to the computer.
Another disadvantage relates to the load on the computer itself. In fact, all information will pass through the computer, using its resources. Receiving data from one port and transmitting it to another device will take up part of the processor time and part of the RAM. If the device is not very powerful and there is active data exchange with the global network, there will be noticeable slowdowns.
How to distribute the Internet from one Windows computer to another laptop directly without a WiFi router?
Now let's look at another way to distribute the Internet via wifi, which only applies to those cases when you need to connect only two computers on Windows 7 - it is not suitable for smartphones and other devices.
Go to “Control Panel > Network Control Center > Manage Wireless Networks.” Click on the links “Add > Create a computer-to-computer network.”
Click “Next”, set the SSID, encryption type and password. I called it HomeWiFi. And don’t forget to check the box to save network settings.
Click “Next” again and wait until the network is created and its parameters are displayed on the screen. We look at the connections icon in the form of a graph in the lower right corner, where the clock is located. We left-click on it and see the new connection.
All that remains is to connect to it, enter the password and in the pop-up window select that this connection is the “Home Network”.
Now we go to the second computer and connect to our new HomeWiFi network in the same way.
After this, we return to the “Network and Sharing Center” on 1 computer, which distributes the Internet via wifi. We see that our connection between two computers is displayed there. Now in the left menu, click on the link “Change advanced sharing settings”.
And check the boxes everywhere to enable and allow unhindered use of files and folders. We save, then return to the previous page and select “Change adapter settings” from the menu. Where we see our Internet distribution HomeWiFi. Right-click on it and select “Properties”.
In the new window, select the “Access” tab and uncheck all the checkboxes here, if they are checked.
What is your opinion: is WiFi harmful?
Yes
22.92%
No
77.08%
Voted: 36456
Close and do the same with all the connections in the list, except for “High-speed Internet connection” or it may be called something else depending on the type - in any case, you need to choose exactly the one that works through the cable that is inserted into the computer and gives access to the Internet on all computers. Mine is called WAN Miniport (PPOE).
In it, we again go to “Access” and check the box “Allow other network users to use this computer’s Internet connection” and select “Wireless network connection” as the source. And we remove all the other checkboxes.
After all this, you need to disconnect from the Internet connection and connect to it again on the computer distributing it via wifi and also disconnect and connect again to the wireless connection on the second PC, after which the Internet should work.
Similarly, you can distribute the Internet via wifi from a computer that connects to the World Wide Web not directly with a cable, but through one of the router’s LAN ports. In this case, we will need to share the local network connection, instead of a high-speed connection or PPOE, as I just did.
How to prepare a laptop?
The first question that may appear in your head is: “Can my laptop distribute Wi-Fi?” Yes. Any wireless adapter can receive/transmit data, which means that the laptop can both receive and distribute the Internet.
The first thing to start with is updating your network drivers. You can find and download suitable ones from the official website of your laptop manufacturer.
The next step is to set up sharing. Find the Wi-Fi icon in the system notification area and tap on it to go to Network Center. A window will open in which you need to select the “Change advanced sharing settings” section.
This opens a menu in which you can configure sharing for remote devices, after which all that remains is to enable it in all items. Immediately cancel shared access with protection, password and click “Apply”. From this moment on, you can configure Internet distribution.
Internet distribution via WiFi with Windows XP
To distribute the Internet via wifi from a computer with Windows XP installed on it, you first need to do all the same preparatory steps as on the top ten. After all the devices are installed and ready to work, first of all, turn on the wifi module - if you are using an external device, then launch the software that came with it on the disk and was installed by you.
So, go to “Start > Settings > Network Connections” - for convenience, we will perform all actions in parallel on both computers. You will see icons for wired and wireless connections. Right-click on “Wireless Network Connection” and click “Enable”. We repeat the same thing on the second computer.
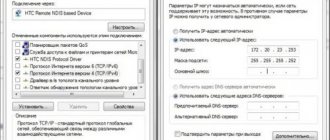
After that, in the same drop-down list (which appears when you right-click on the icon), select the last item - “Properties”. And we make settings for our future local network. To do this, go to the item “Internet Protocol (TCP/IP)”
On the host computer connected to the Internet and distributing it via wifi, set the settings:
- IP address: 192.168.0.1
- Mask: 255.255.255.0
On the second computer these are:
- IP address: 192.168.0.5
- Mask: 255.255.255.0
- Default Gateway: 192.168.0.1
- DNS server: 192.168.0.1
The main gateway is the IP of the first computer, which has access to the Internet via cable and through which we will receive it via wifi to the second computer.
OK! Now you need to set up a wireless wifi network computer computer. Namely, allow Internet access to a second device. We return to the first computer, in the “Network connection” section we find a direct connection to the Internet via cable - usually it is called “Local Area Connection”.
Right-click on it, go to “Properties” and go to the “Advanced” tab. Here we check the box “Allow other network users” and click OK.
After that, go to the “Wireless Networks” tab and click “Add” to create a new wifi network.
After that, go to the “Advanced” tab, click on the “Options” button and disable the firewall so that it does not block the distribution of the Internet from the main computer to another computer.
Now we return to the first tab “General”. Take a close look at the image below and copy all the settings. Please note that the “Key is provided automatically” checkbox is unchecked and vice versa is set to “This is a direct computer-to-computer connection.” The key is a password for connecting to wifi internet, which you can come up with yourself and remember. It will need to be entered on the second computer.
- Network name (SSID) – the name of our network.
- Authentication – choose joint
- Data encryption - WEP
- The key is provided automatically - uncheck this box, otherwise you will not be able to set your key.
- Network key – you must enter a fairly long key consisting of letters and numbers.
- Confirmation - repeat the key.
- Check the box “This is a direct computer-to-computer connection, access points are not used.”
After that, go to the next tab of this window and check the box “connect if the network is within range” - this will ensure automatic connection to our signal.
That's it, the network has been created, and now a second icon in the form of two computers will be displayed in the lower right corner of the Windows panel (the first was your connection to the provider).
This means that the first computer has connected and is ready to connect to the second. Go to computer number two, double-click on the icon with crossed out computers
or go to “Start > Settings > Network Connections”, right-click on “Wireless Connections” and select “Properties”
Go to the “Wireless Networks” tab and click on the button of the same name
A list of networks available for connection will appear. If there are several of them, then we find ours, connect to it by entering the previously specified password.
If everything went well, a corresponding indicator will appear in the lower Windows taskbar, and the client computer will be able to use the Internet connection of the first computer.
Now, after we have figured out how to distribute the Internet from a computer, you can follow all the same steps on an unlimited number of client machines and directly connect to it from any device when the basic first PC is turned on. At the same time, the main one does not have to be a stationary desktop PC - distributing the Internet from a computer is also not difficult and there is no difference in this. By the way, I advise you to follow new articles, as very soon I will tell you a lot of interesting things.
Distribute wifi from a mobile operator (MTS, Beeline, Tele2, Megafon, Yota, etc.)
The distribution occurs in exactly the same way. It doesn’t matter what network: 2G, 3G, 4G... However, some operators limit the ability to distribute Wi-Fi, so we consider all further actions related to bypass (firmware, TTL changes, etc.) to be illegal and dishonest. Only providers have the right to set rules, restrictions, and costs. That is why we have no right to describe further actions, even for money. This is our personal opinion.
In any case, we are looking forward to your comments, suggestions, questions, which you can leave at the end of this article.
Published: 2019-11-07 01:05:21
Creating a virtual router using additional software
If none of the above methods helped activate Internet distribution on your phone, you can try creating a virtual Wi-Fi router using special software. There are quite a lot of similar utilities on the Internet, but among them the most convenient are:
- MyPublicWiFi;
- Connectify.
Wi-Fi distribution using MyPublicWiFi
This application is absolutely free and has a user-friendly interface, although in a foreign language. With it, you can make a Wi-Fi access point in just a few clicks:
- Download and install the utility on your laptop. The latest version of the program weighs about 1 MB, so there will be no problems with downloading.
- Run the application as administrator.
- The utility itself consists of three tabs: Setting, Clients and Management. In the first tab, you can specify the connection name (Network name), set a password (Network key) and select the connection that the laptop uses. Be sure to check the “Enable Internet sharing” checkbox. To start the virtual router, click LMB Set Up and Start Hotspot.
- To have the program automatically load every time you turn on your PC, go to the Management tab and select the appropriate item. You may need to prohibit users of the created network from using the Download Master and mTorrent file hosting services. To do this, check the top checkbox as shown in the figure.
- To find out who is connected to your point, go to the Clients tab.
Creating a Wi-Fi hotspot using Connectify
The MyPublicWiFi utility may experience problems if the Internet is connected to the laptop not via a cable, but via a USB modem. In this case, it is better to use the Connectify application. There is a paid and free version of this program. For periodic use, the second option is sufficient. To enable Wi-Fi distribution from a PC to a phone using Connectify, you must:
- Download and install the software on your laptop.
- After launching the utility for the first time, you may need to select its version - Lite or Pro. We mark the first option, since Pro is only available to users who have paid about $45 for the program.
- The application menu is practically no different from MyPublicWiFi. Here you also need to enter the name and password of the access point, indicate the Internet source and the interface through which the mobile phone will be connected. In the Sharing Mode line, you additionally need to specify the type of network: open or closed with authorization.
- To start distributing the Internet via Wi-Fi, click Start Hotspot.
Windows 10: Share Wi-Fi using third-party tools
Examples of programs that organize Internet distribution from a computer are presented below.
Free MyPublicWiFi app. It can be downloaded from the official website https://www.mypublicwifi.com/publicwifi/en/index.html. After launching the file, you need to fill in the following fields: Wi-Fi name, password, connected connection, and check the Enable box.
Virtual Router Plus. Download resource: https://virtualrouter-plus.ru.softonic.com. Important data is indicated in the same way. A mark about the use of the Internet by other devices is placed in the Network adapters Properties - Access section.
Free Connectify Hotspot utility and advanced paid Pro and Max options. Its features:
- A clear installation process and quick activation of distribution: just click the Launch Hotspot button.
- Possibility of auto-start when logging into Windows.
- Different modes - Router or Bridged.
- Built-in ad blocker in the browser.
- Control over connected devices and consumed traffic.
You should not download programs from dubious sources or from unknown sites. Installation files may contain viruses.
Methods for creating a wireless access point
Any modern laptop is equipped with a wireless adapter that can be used as a Wi-Fi router. To do this, you need to create a kind of virtual bridge connecting network equipment (Wi-Fi adapter and network card).
To obtain such routing, you can use the following tools:
- using standard Windows OS tools (the graphical application “Network Center ...”, the command line or a bat file);
- additional software.
Whatever method is chosen, the following conditions must be met:
- The laptop must have Windows 7 or higher installed. In earlier versions of operating systems (for example, Windows XP), support for Wi-Fi networks is implemented at a low level. Therefore, it is not a fact that you will be able to enable Internet distribution on older operating systems.
- The laptop must be equipped with a Wi-Fi adapter. To find out whether a wireless adapter is installed on your PC, you can go to “Device Manager” and look at the required information in the “Network Adapters” tab. The Wi-Fi adapter is called Wireless 802.11.
- The PC must be connected to wired or wireless Internet.
Via USB to Android smartphone
You can use a special cable to transfer Internet traffic from a computer to a smartphone running Android OS. This connection has a number of advantages:
- You can quickly transfer a large amount of information from one device to another;
- The smartphone can be used as a webcam;
- You can view the internal directory of your smartphone.
But this connection also has a drawback: the user becomes tied to his computer. Connection is very simple. To do this, connect the smartphone and the computer port with a microUSB or USB cable. Next, select the desired operating mode. On your phone you need to activate the “Developer Menu” and enable “USB Debugging”. After this, connect your smartphone to your laptop via a USB cable and be sure to share Internet access on your computer.
In this case, there are usually no problems with installing drivers; they are loaded automatically. If a notification appears about attempts to connect a new device, you should check your Internet connection and then download the necessary drivers.
This option can only be used for Android devices; this solution will not work on iOS devices.
Possible problems and solutions
Organizing Internet distribution from a PC does not always go smoothly. Let's look at the most common problems and difficulties that PC owners have and give examples of how to fix them.
- Access problem. In this case, there is an active point, gadgets see it and connect, but do not have access to the Internet. Smartphones simply do not load the necessary pages, and the laptop shows the status “No access”. In this situation, you need to clarify and, if necessary, open public access to WiFi. The adjustment is made in the properties of the created point.
- Mobile Hotspot often gives an error. The user receives a notification that it was not possible to make the necessary settings due to lack of access to the network, but the PC is connected. This happens when using a PPPoE connection via dialing. Running via cmd.exe will help solve the problem.
- On Windows 10, the device cannot connect to the connection point; there is an error in authentication and obtaining an IP address. To fix the problem, you need to check the sharing option again; if it is open, then check the IP settings. To do this, open the properties of the new connection point, select IPv4 and open their properties. If IPs are specified, select automatic data retrieval.
- The hosted network cannot be started. This problem occurs most often among customizers. This means that the adapter is disabled or faulty. To check it, go to “Device Manager” and find “Network adapters”. You need to use the one that has WiFi in its name. Call the context menu and if it is disabled, click “Enable”. If the action does not solve the problem, reinstall the adapter driver.
Problems do not arise very often and the process usually goes smoothly.