Author of the article
Vitaly Leonidovich Cherkasov
System administrator, computer systems engineer.
To connect your computer to the Internet, you do not need to use a network cable; you can connect your computer to Wi-Fi. Using this wireless technology, it is easy to connect not only computers, but also laptops, smartphones, tablets, and other mobile devices into one network.
Why do you need a wireless adapter?
Wi-Fi is a technology for working with computer networks using a wireless radio signal. To connect a PC to the Internet, you need a special device - a Wi-Fi adapter or module.
Want to know interesting facts about Wi-Fi? Watch the video:
There are the following types of Wi-Fi adapters:
- Built-in. It is clear that they are there by default, from the factory. They require installation of programs and drivers, after which you can connect to an available Wi-Fi network.
- External. Purchased and installed separately. In most cases, they look like a small flash drive and are connected to a computer using a USB connector. The user also needs to install all the necessary programs and drivers.
Wireless adapters (both external and internal) provide connection to a computer, laptop, or any gadget to a Wi-Fi signal source. In everyday life, combined routers (for example, TP-Link, Asus and other models) are usually used as such a source, which operate according to the following scheme:
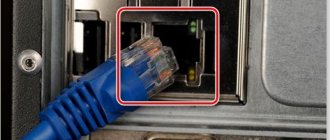
- The router receives an external Internet signal via an Ethernet cable .
- Converts it into a wireless Wi-Fi network.
- You and I use a wireless adapter to connect to the network via Wi-Fi.
Before setting up a wireless connection, it is recommended to make sure that your computer or laptop is equipped with a wireless adapter. If the module is not built-in, it must be purchased and installed separately.
Setting up a Wi-Fi module
A newly installed module requires configuration of its parameters. You need to start by checking the functionality of the local network, using devices that are already configured to work in it.
Preparing your computer
In order to set up Wi-Fi on your computer, you need to install the software necessary for its operation. It consists of drivers for a specific adapter model. A driver is a small program that allows the operating system (OS) to see the hardware with which it must communicate. If the driver is not installed, the OS will not connect to this device during operation.
Now about the drivers
In addition to the module, special programs called drivers are responsible for the operation and management of the Wi-Fi network. Most often, they are included with the operating system and are installed automatically when installing the OS itself. If the driver is installed and the Wi-Fi module is activated, then on the taskbar on the right you will see a special icon that looks like a white ladder.
However, in some cases, automatic driver installation does not occur or occurs with an error. This happens if, for example, the OS does not include third-party programs, an outdated version of the program is used, etc. What should I do? You will have to install the drivers manually. This can be done in various ways:
- Using the disk that comes with the computer. You just need to insert the disc into the drive, find the Wi-Fi driver and install it.
- With the help of technical support on the Internet. All medium and large companies involved in the production and sale of computer hardware have official websites where drivers are stored. You need to know the name of your computer and find the manufacturer's official website on the Internet. After that, indicate the device model, download the driver and install it.
- Using third-party sites and driver collections. On the Internet you can find portals where various programs are freely available. Developers make special universal collections where you can find a driver for your PC.
Regardless of the firmware installation method, you must restart your computer at the end. After turning it on, see if there is an icon in the form of a white ladder on the taskbar.
Wireless connection options
There are two types of adapters for connecting a PC to Wi-Fi - external and internal. If you don't have an internal adapter, you can buy a motherboard with a Wi-Fi module. We'll tell you about all the ways to make Wi-Fi on a computer.
External adapters
An external Wi-Fi adapter looks like a flash drive, sometimes with a small antenna. It connects to the USB connector of the computer.
Here are step-by-step instructions for connecting your computer to a Wi-Fi network.
- Insert the device into the USB connector and wait until the computer OS detects the new device.
- Insert the disk containing the Wi-Fi module drivers into the drive. If necessary, tell the computer where the drivers are located. The latest software for your equipment can be downloaded from the manufacturer's website. In this case, indicate the folder into which you downloaded the drivers.
- When all the software necessary for operation is installed, a Wi-Fi icon resembling a ladder will appear in the lower right corner of the toolbar, next to the clock. Click on it to select the desired network.
If you are still using Windows XP, the Wi-Fi icon will not appear. To connect Wi-Fi on a desktop computer, you need to go to “Network Connections”, find the name of the wireless network SSID and enter the password.
Internal adapters
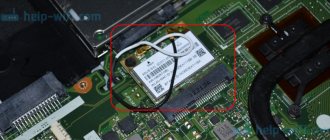
In addition to external modules, there are also internal adapters. They are installed inside the system unit.
This is not the easiest task for beginners, but if you do everything carefully and carefully, then you can cope with it. Here's how to install a Wi-Fi module on your computer:
- Disconnect the computer from the electrical network.
- Unscrew the screws securing the side cover of the system unit and remove it.
- Depending on the adapter connection type, select an unoccupied PCI or PCI-E connector and remove the plug opposite it.
- Install the Wi-Fi module into the selected connector. When connecting, the adapter connectors should be located exactly above the PCI connector of the motherboard and enter with little effort. Under no circumstances should you use excessive force to avoid damaging the contacts or the motherboard.
- We tighten the screw that secures the adapter to the computer case.
- We install the side cover of the system unit in its place, screw it on and connect the computer to the electrical network.
After the installation of the internal wireless module is completed, you will need to install drivers. This is done in the same way as for an external adapter. After this, the wireless connection management icon will appear in the taskbar. By clicking on it, you can easily connect to the desired network by entering the password.
Replacing the motherboard
To connect your computer to a wireless network, you can purchase a motherboard with a Wi-Fi module. Typically, such adapters are installed on elite motherboards belonging to the highest price segment. This is an expensive connection option, but it is worth keeping in mind when upgrading your personal computer globally. Installing and configuring a new motherboard is a complex procedure and is best left to a specialist.
Sequence of actions when replacing the motherboard:
- Disconnect the PC from the electrical network.
- We disconnect all devices that were connected to the computer (monitor, printer, USB devices, etc.).
- Remove both side covers.
- We take out the connectors going from the power supply to the motherboard.
- We remove all internal devices that were connected to the PCI and PCI Express connectors of the motherboard (for example, a video card).
- We unscrew the bolts that secure the motherboard to the case and remove it.
- Remove the back panel of the motherboard connectors.
- We install the panel that comes with the new motherboard.
- We install the new motherboard and screw it to the case racks. During installation, the motherboard connectors must coincide with the holes in the back plate, and the stands screwed into the case must be located strictly under the corresponding mounting holes of the motherboard.
- We screw the motherboard to the case.
- We install back all PCI and PCI Express devices.
- We connect the motherboard to the power supply.
- Screw on the side covers.
- We connect all external devices.
- We turn on the computer to the electrical network.
Then, if a similar motherboard was installed, you need to install drivers for those devices that were not on the old board. You may also need to enable Wi-Fi in your BIOS settings. If you installed a motherboard designed for a different chipset, you may need to reinstall the OS.
Enabling the module using the keyboard
Not on all PCs the wireless module turns on itself. On some models, after installing the driver, you need to enable the Wi-Fi adapter using the keyboard. To do this, different key combinations are used depending on the manufacturer.
| Manufacturer | Keyboard shortcut |
| DELL | Fn+F12 |
| ASUS | Fn+F2 |
| Acer | Fn+F3 |
| HP | Fn+F12 |
| Lenovo | Fn + F5 or special switch on the case (on some laptop models) |
| Samsung | Fn+F12 |
Alternative to buttons
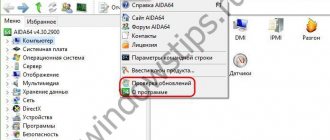
There is another method that you can use to enable the Wi-Fi adapter. It's a little more complicated, but worth knowing. I’ll tell you using the example of the “seven”:
- Click “Start”, then right-click on “Computer”. Next, click “Properties”.
- We need the "Device Manager" section. Found it? Press.
- A long list will appear in front of you. Don't be alarmed, just search for "Network Adapters".
- In the list, find the name with the word This is our Wi-Fi module.
- If it is not enabled, activate it. Just right-click and click “Engage”.
On other OSes the procedure looks the same. The names of the items may vary, but everything is intuitive and there shouldn’t be any problems.
MacBook with iOS
To connect to the router:
- Go to the main menu in the upper left corner.
- Next, look for the “Basic” section.
- There will be a wireless network connection. If the slider is in the OFF , move it to the right.
- Next, everything is as usual, select the network, enter the password for authentication.
NOTE! Some people confuse Wi-Fi with the Internet, but they are different things. So if you are connected to WiFi, but do not have access to the Internet, then the problem may be on the part of the provider or in the settings of the router. For settings, you can look for separate instructions on our website for your router model.
Run on different OS versions
Usually, after installing the drivers and restarting Windows, an icon for managing Wi-Fi appears on the taskbar. To connect to Wi-Fi, you need to click on the icon, select the network, enter the security code and wait for the Internet connection.
However, in some cases, a person may encounter various problems - there is no icon on the taskbar, after connecting there is actually no Internet connection, etc. In this case, you need to connect manually. But to do this you need to find the Wi-Fi connection settings.
Windows XP
We configure Wi-Fi on a PC with Windows XP as follows:
- Follow this path - Start, Network Places and Connections.
- Select “Wireless Connection”, right-click and select “Properties”.
- General -> Protocol -> Properties.
- Contact your provider and ask them how to fill out the window that opens. In most cases, technical parameters are automatically selected by the computer. However, sometimes you need to manually enter the IP address, DNS gateway, and other information. At the end, click the “Apply” button, but do not close the window.
- Open the "Wireless Networks" tab, click the "Apply" button, select "Wireless Networks" and the network you want to connect to. Enter your security key and wait 5-10 seconds.
Windows 7
Instructions in video format are available here:
Wi-Fi on Windows 7 is turned on as follows:
- Click the Start and Control Panel buttons.
- Select “Network and Internet” and “Control Center...”.
- Select the “Change settings” line.
- In the window that opens, find “Wireless network connection”, right-click and select “Connection”.
- In the window that opens, select your network and enter a password.
"Eight"
On Windows 8, the connection is as follows:
- Click the Start and Control Panel buttons.
- Select "Control Center...".
- Select the “Wireless Network” line again and select the “Connect” command.
- In the new window, select the network and enter the password.
Smartphones
All modern phones and tablets have a built-in Wi-Fi receiver. The connection principle is the same on iPhone, iPad and Android. I'll show you using my phone as an example.
- In the settings or the pop-up top menu, turn on WiFi.
- Click on connection and select ours from the list of available wireless networks and connect.
- To access, enter a password.
- If there is no specific network, then it may be hidden. To do this, click “Add network” . Enter the name of the SSID or Wi-Fi network and also the password.
Which of the proposals is better?
If we summarize all of the above in terms of preferences, it is better, I think, to purchase an external wireless adapter, although you can equally use a smartphone. True, you may need to keep it constantly plugged in, since if used for a long time as an access point, it will discharge much faster than usual. But this can have a very negative effect on the battery. So don’t spare money on some simple WiFi adapter with a minimum range, especially since such a device costs mere pennies.
The password doesn't work, what should I do?
It is possible to connect to the network using WPS. This is a mode when the router establishes a simpler connection. Our task is to connect to the router’s network, go to the settings and change the password.
- Find the WPS button on the router. It is usually located on the back panel.
- On the label under the device there will be a PIN code with the name of the wireless network.
- We make a connection from any device: laptop, phone, tablet, etc.
- Just enter this PIN code. If there is no password on the label, go to the router and press the same button.
- Now go to the IP address of the router. We enter it into the address bar of the browser. The address is also on the label, as is Login and Password for logging in. Standard addresses: 192.168.1.1
- 192.168.0.1
- 192.168.30.1
- There, change the password or login key and the network name (SSID), if necessary. Finally, save the settings.
NOTE! If the login and password from the router’s administrator panel do not work, then you will have to reset it to factory settings and configure it again. This is done very easily. For each router model on our website there is a separate instruction, which is written in understandable languages. Just enter the name of your router model in the search bar at the top and configure it yourself.
Main conditions for connecting to Wi-Fi
To connect to the Internet wirelessly, you must have:
- Special equipment from an organization providing internet services. It can be rented or purchased.
- A personal device from which the network will be accessed.
- Built-in or external Wi-Fi module (usb or PCI).
- Updated network drivers.
An agreement must be concluded with the selected provider, which specifies the operating conditions of Wi-Fi, that is, its speed, limitations, cost, etc.
Method 1: System tray
The simplest and most convenient method of activating Wi-Fi in Windows 10 is to turn it on through the so-called system tray area.
- Take a look at the lower right corner of the taskbar - the zone we need is located there. Left-click (or tap with your finger/stylus if your device has a touch screen) on the network icon - when Wi-Fi is turned off, it looks like this.
- Next, wait a couple of seconds until the required adapter turns on, which will be indicated by the blue backlight of the button.
- Now simply select one of the suitable networks (for example, from your home router), provide a password if required, and connect to it.
Done – the problem in question is solved.
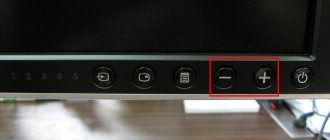
Method 4: Hotkeys (laptop)
The option with hot keys will also help laptop owners: as a rule, on some position of the F-row you can find an element with the Wi-Fi logo - it must be pressed in combination with Fn to activate the required function.
Some devices (for example, models from HP) have a dedicated button, also indicated by a wireless network icon.
Selecting, connecting and setting up a Wi-Fi adapter
After installing the equipment and technical connection, the user needs to perform a number of actions on the device in accordance with the instructions.
How to find Wi-Fi on your computer and start it:
- Launch the router installation wizard. Select Quick Install.
- After reviewing the characteristics of the modem, move on.
- Check the box: Wireless router.
- Determine the encryption type: static/dynamic IP.
- Enter your personal information. Apply.
- Reboot the router. Check for connection.
Most modern routers have a built-in Quick Setup Wizard.
How to connect WiFi if you already have Internet?
Another common question among users is how to connect a WiFi router if there is wired Internet to the computer? This problem arises if the apartment already has wired Internet, which you would like to distribute to other devices; there may be several solutions:
- If the network cable that is brought into the apartment is directly connected to the computer (without routers), then this cable must be disconnected from the PC and connected to the router.
- If the network cable is first connected to the router, and a LAN wire extends from it to the computer, then the router can be replaced with a router (if there are enough ports) or the router can be connected to the router using an additional cable.
As a rule, after such manipulations, re-configuration of the network and equipment is required. For settings, you should contact your provider - most large companies have a support service, whose consultants (by phone or chat) help clients consistently set up the Internet.
Cable or wireless signal, which to choose?
A question that users are increasingly faced with is whether it is possible to connect to a WiFi network on a computer (PC) without a cable? Such a connection is possible, but it is worth remembering its disadvantages and limitations:
- The wireless signal depends on factors such as the power of the router, the distance from the router, and the layout of the premises. This is especially true when you need to provide wireless Internet to a private home. But this is a topic for a separate article, so we won’t go into detail here.
- WiFi Internet speed is affected by household appliances and interference, including from other wireless networks.
Another option: connect the Internet using a cable (twisted pair) stretched from a WiFi router - this way the user will receive a stable Internet signal with less loss of speed. However, users often prefer to connect their desktop computer to a WiFi router wirelessly to avoid unnecessary and inconvenient cables.
Please note that if you connect yourself, you may need to crimp the twisted pair! You can find out how to do this in our separate article!