A huge amount of information is transferred from the computer to the Internet and vice versa. This is done using a service in which network-dependent processes look for free transport protocols TCP and UDP, and through them they access the network. That is, data is sent to remote ports at the destination or to the web resource to which the connection is being attempted, and then back to local ones. They are used by all applications to communicate with the Internet.
The operating system manages the ports and ensures that traffic is routed through the "correct" ones so that these processes can connect to the ones that need to.
Content:
Windows 10 protects your computer from viruses. External or internal programs and files that have been downloaded can cause harm: they can request access to certain system functions, and Windows 10 always issues notifications about this. Initially, most gateways are closed and prevent viruses from reaching vital functions. But in order to set up a VPN and work with certain applications, it may be necessary to open a port on Windows 10. We will tell you how to do this without endangering the system.
What ports are usually open by default?
There are a LOT of ports. The port number can be anything from 0 to 65535! This does not mean that any application can simply select any port. There are established standards and ranges that help us make sense of noise.
Ports 0-1023 are associated with some of the most important and fundamental network services. This makes sense since the lower numbered ports were assigned first. For example, SMTP for email is used exclusively on port 25.
Ports 1024-49151 are known as "registered ports" and are assigned to important common services such as OpenVPN on port 1194 or Microsoft SQL on ports 1433 and 1434.
The remaining port numbers are known as "dynamic" or "private" ports. These ports are not reserved and can be used by anyone on the network to support a specific service. The only problem occurs when two or more services on the same network use the same port.
While it is impossible to list every important port, these common ports are useful to know by heart:
- 20 - FTP (File Transfer Protocol)
- 22 - Secure Shell (SSH)
- 25 - Simple Mail Transfer Protocol (SMTP)
- 53 – Domain Name System (DNS)
- 80 - Hypertext Transfer Protocol (HTTP)
- 110 - Post Office Protocol (POP3)
- 143 - Internet Message Access Protocol (IMAP)
- 443 - HTTP Security (HTTPS)
Since there are so many thousands of common port numbers, the easiest way is to memorize the ranges. Which will tell you whether a given port is reserved or not. Thanks to Google, you can also instantly find out which services are using a specific port.
How to enable ports on Windows 10 for games
For online games, you need to allocate data channels, otherwise they simply won’t start or you won’t be able to play with friends in the same session. To solve the problem, just follow the steps given above. But there are slight differences. In the “Rule Type” window, you must select “For program”. The next sequence of actions is as follows:
- The Programs window will open. In it you need to select the “Program Path” section. In the blank line, write the address of the folder on the computer in which the program will be executed. After completing the actions in each window here and below, click the “Next” button.
- A new window will open. ABOUT.
- Another window will appear. Check the boxes next to “Domain”, “Private” and “Public”.
- In the last window, in the empty name line, just write the name of the game. You can leave an empty field under this line. It is not required to be filled out.
In the system firewall
If you're using Microsoft Defender and an application, game, or server requires one or more ports to be open, here are some simple steps to follow.
Important! Before you continue, you should check your application's support documentation to see what ports and protocol type you'll need to open. You can also quickly confirm whether a port needs to be opened by temporarily disabling the firewall, and if the application is running with the firewall disabled, that means a new rule needs to be created.
- Click on the Start menu and select system settings (gear icon). Or just press the Win+I key combination.
- Open the “Security” section.
- Go to the Windows Security tab. Click on “Firewall and network protection”.
- Select additional settings.
- Left-click on the rules for incoming connections in the left navigation panel.
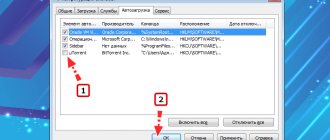
- In the “Actions” section in the right pane, select the “Create Rule” option.
- In the new window, click on the “Port” option. Click the “Next” button.
- Set the appropriate protocol (TCP or UDP) depending on the application. Typically this is TCP.
- In the “Specified local ports” field, enter a number. If the application requires opening several, you can enter as many as you need, provided that each of them is separated by a comma (4500, 4600, 5000). If you need to specify a range of ports, use a hyphen (3000-3100). Click "Next".
- Select the “Allow connection” option. Click the “Next” button.
- Specify the network type to apply the rule. Typically this option is left at its default settings. Click "Next".
- Enter a name for the rule. Click on “Next”.
- Click on the “Done” button.
After completing the above steps, incoming connections will be allowed for the application through the port opened in the firewall.
If the application requires a specific outgoing port, you can use the same instructions, but in step #5, select the rules parameters for outgoing messages.
When the user does not know which port needs to be used, it is necessary:
- After selecting the connection rules o. Click "Next".
- Specify the path to the program. Click “Next”.
- Repeat steps starting from step 10.
How to view ports on Windows 10
There are many ways to check ports and it can be done at any time. You don't have to be a professional user at all. For clarity, here are the two simplest methods that do not require installing third-party programs to open and view ports on Windows 10:
Via command line
Let's call her. To do this, press the Win and R keys simultaneously.
Next we perform the following steps:
- Enter only 3 letters into the empty line: cmd. Then simultaneously press the following keys: Shift, Ctrl and Enter.
- A window will appear with inscriptions on a black background. Enter the command netstat -a immediately after the inscription – C:\Windows\system32. We don't put a space. When the command is entered, press Enter.
- As a result, you will receive a list with all current connections. Their numbers will be separated by a colon in the Local Address column. You can view the statuses of all channels in the “Status” column.
Task 2 from the console
For hardcore players, I will give the second task in the form of console commands:
netsh advfirewall firewall add rule dir=in action=block protocol=TCP localport=1-79,81-442,444-3388,3390-65535 name=»Block_TCP» netsh advfirewall firewall add rule dir=in action=allow protocol=TCP localport= 3389 remoteip=192.168.0.0/24,xxxx name=”RDP” netsh advfirewall firewall add rule dir=in action=block protocol= UDP name=”Block_All_UDP”
Ultimately, in Guyovin it should look like this: For the RDP rule:
For the Block_TCP rule:
Via the Start command
After clicking on the “Start” button, a menu will open. In it you need to select the sections “Settings” – “Network and Internet” – “Status” – “View network properties”. A new window will open showing the parameters of the current connection. You can see all the connections and the functions they perform. The advantage of the method is that even a novice user can use it.
There are also many services on the Internet that allow you to see open data transmission channels.
Do you want to receive news regularly?
Leave your email and receive the latest articles from our blog. Subscribe so you don't miss anything
You have successfully subscribed!
Subscribe
5
(Votes: 2, Rating: 5)
Problem
The problem with Windows Firewall is not how to close all ports, but how to open only the necessary ones. And the main thing is that you’ll immediately understand how to limit connections to certain ports based on client IP addresses. Separately, solving these problems is not difficult, but to solve them together, I haven’t come across a single sensible guide, which is why this note was written. Also, the solution found does not involve installing a third-party firewall.
Disadvantages of Windows Firewall: - If you create a deny rule for all ports, and then allow for the necessary ones, then they will not be included in the white list, because prohibiting rules take precedence over allowing rules. Those. if a connection ban on a port exists, then permission for this port will no longer work. - There is no priority of rules, as in normal firewalls, to first specify open ports, and last to set a deny rule for all others.
Let's say there is a VPS on Windows, but the hoster does not have an external firewall to hide behind. Freshly installed Windows sticks out at least 135/tcp, 445/tcp, 49154/tcp and 3389/tcp (if RDP is enabled) ports even on the Public network, which requires fixing.
UPDATE
It turned out that the above command line syntax does not work on WS2008R2, and specifically enumerations in any parameter, so I had to split the two rules into eight:
netsh advfirewall firewall add rule dir=in action=block protocol=TCP localport=1-79 name=»Block_TCP-1″ netsh advfirewall firewall add rule dir=in action=block protocol=TCP localport=81-442 name=»Block_TCP- 2″ netsh advfirewall firewall add rule dir=in action=block protocol=TCP localport=444-3388 name=”Block_TCP-3″ netsh advfirewall firewall add rule dir=in action=block protocol=TCP localport=3390-65535 name=” Block_TCP-4″ netsh advfirewall firewall add rule dir=in action=allow protocol=TCP localport=80 name=”HTTP” netsh advfirewall firewall add rule dir=in action=allow protocol=TCP localport=443 name=”HTTPS” netsh advfirewall firewall add rule dir=in action=allow protocol=TCP localport=3389 remoteip=192.168.0.0/24 name=»RDP-1″ netsh advfirewall firewall add rule dir=in action=allow protocol=TCP localport=3389 remoteip=xxxx name =»RDP-2″
What is it for
It's no secret that the vast majority of programs use an Internet connection using special ports. By default, the computer (or antivirus software) independently determines which protocol to allocate to a particular application. Unfortunately, at this stage the software often makes mistakes, blocking access to the Internet for individual utilities. The problem can only be solved by forwarding the port using OS tools or using third-party software. Instructions for each individual method can be found below.
Important. To perform the operation, you first need to find out the number that is used by one or another program to access the Internet.
Online service 2ip.ru
And finally, we will use the simple online service “2ip.ru”, designed to display various useful information on the computer, including network ports.
To visit the service:
- Open an Internet browser and follow the link https://2ip.ru/check-port.
- In the empty line, enter the port number, for example, 25565 and click “Check”.
- As you can see in the screenshot above, tunnel 25565 is already occupied. This way you can check any channel to see if it is busy.
The advantages of this method are its accessibility and the absence of the need to install separate software. But it only serves as a complement to the previous two options.