The new tenth version of the Windows operating system includes a feature to check the compatibility of outdated programs. Before the user launches an application that is designed for older Windows operating systems, Ten automatically starts the compatibility check service
.
This service checks the application for compatibility and sets the optimal parameters
for him.
According to Microsoft, this launch method helps beginners use old applications without problems. For more advanced users,
this method is not entirely suitable, since it does not allow manual adjustment of program compatibility.
In this material we will look at disabling the mode
compatibility for legacy software, and also show how to run programs in this mode
manually
. It is also worth noting that disabling this mode involves disabling the service on Windows 10.
the Program Compatibility Assistant to become unstable
", which will cause some applications to not work properly. Therefore, this material is intended for experienced users.
Manually disabling the Program Compatibility Service
To disable compatibility mode, we need to get into the Services
"
To do this, you need to open it in Windows 10 using the Run
and the
Control
as shown below.
And the “ Run”
"runs when you press Win + R.
You can launch "" in one more way. To do this, right-click on the Start
in the lower left corner of the screen and select the required item there.
After these steps, "" will be launched. In the panel you need to go to the “ Administration”
"
To do this, follow the links in the following sequence: “ System and Security
”, “
Administration
”.
In the Administration
"Launch the "
Services
" shortcut, after which the equipment we need will launch.
Now we need to find “ Program Compatibility Assistant Service”
».
The list is not small, scroll down.
Once you launch it, the service settings window will open. To stop this service, click the Stop button. These steps will disable automatic support for older software
. To re-enable it, follow the same steps and click the Run button.
Permanent
The most effective way to get rid of CPU usage by the OneClickStarter application is to remove the TuneUp Utilities utility and all its components. You can find out how to do this in the article “How to quickly remove an unnecessary program in Windows 10?”
RMB on the Start menu → Programs and Features → RMB on TuneUp Utilities → uninstall/edit → follow the instructions.
Disable Program Compatibility Service using the Command Line
You can go to the Windows 10 command line using a search by typing cmd. It is also worth noting that the command line should be run as Administrator
.
After launching the command line, you can begin managing the service. Stop
service can be done with the command net stop pcaSvc
Launch
you can use this service with the command net start pcaSvc
As you can see, this method is more automated
. It will allow you to very quickly disable and enable legacy software compatibility mode. And also solve the task on a large number of PCs in a short time.
Manually launch an old application in compatibility mode
For example, we will set the support settings for the old operating system in a game released in 1998. To do this, we install the game on the computer and go to the shortcut properties
, which links to the game's executable file.
At this point, setting up the game for the old OS is complete. Now you can safely launch Need for Speed III: Hot Pursuit
and enjoy the great racing of that time.
Thus, in addition to old games, you will also be able to run old utilities
that only work on old OSes.
Video on the topic
How often have you discovered that after switching to a new operating system (for example, 10), your favorite game, which launched and worked perfectly on XP or 7, does not want to work at all. And it’s not that it slows down a lot, or there are lags - no, it doesn’t want to start at all, as if those DLLs or DirectX libraries are simply missing in the new system, or have been updated or replaced with such new versions that the system refuses them recognize by switching to new real-time data processing techniques or 3D graphics visual presentation systems. And it’s good if it’s just the game, even the best one, that doesn’t launch; But what if a critical old work application (say, for audio processing or editing), to which you are already very accustomed, does not work, and the developers have not acquired a new version?
There can be several means to solve such a problem, starting from a virtual machine and DosBox and ending with the means built into the OS itself, such as compatibility mode. It is this unique feature that will help you launch many of the old programs on the new operating system (in our case, “ten”) as if you had never installed the new system. It's important to note that not all programs will start this way. If the video card drivers, for example, have been heavily updated, then it is possible that the new graphics processing algorithms will conflict with older versions of DLLs that access their older counterparts. In this case, perhaps the 100% proven solution would be to install a VirtualBox, VMWare or Virtual PC virtual machine. But at the same time, quite strict requirements are put forward for the hardware of your test PC, on which you will run this very virtual machine, since not only will resources be needed to run the host operating system, but hardware resources will also be consumed when emulating the guest OS, and These are additional gigabytes of RAM and processor clock speeds. In this article I will talk about the simplest and most logical way to run archaic software on the new “ten”, namely, what is compatibility mode in Windows 10
, how to work with it, how to enable/disable it and configure it.
What is Compatibility Mode in Windows 10?
Compatibility mode is a function built into the operating system that allows you to recreate conditions for the operation of outdated applications that replicate the environment of the ancient OS, anything from the archaic old school Windows 95 to 8.1, which has not yet died in the annals of history. In fact, running programs in the presented mode will help you if you want to work with a program designed for XP or Vista. The time has not yet come when applications written for 7 or Win 8.1 would not run well in the “top ten”, since the period between the release of these application systems is very short, and the working environment has not changed so much that the work of such programs in Windows 10, any problems arose. But with older software, the opposite is true: the logic and architecture of such systems have undergone such significant changes that it is impossible to do without a compatibility mode.
Method 2: Using a troubleshooting tool
See also: “Local account in Windows 10: how to create, delete”
A tool called “Running programs created for previous versions of Windows” will help us here.
- We find the tool using the search bar, then click on the found option. It is recommended to run from an account with administrator rights, since in this case the system diagnostics will cover more factors that can lead to program failures.
- In the diagnostic window that opens, click the “Next” button.
- We wait for some time, which the system will need to display on the screen a list of all programs installed on the computer. Here we select the problematic application and click “Next”.
Note: If the desired program is not in the list presented, stop at the first option “Not in the list” and click “Next”.
Then set the path to the program file using the “Browse” button. - Next, two types of “Diagnostics” are offered, among which, to indicate a specific version of the operating system, select the second one – “Program Diagnostics”. If we want to leave the automatic choice to the system, we choose the first option.
- Next, we need to indicate the problems that were identified while working in the “top ten”. We put a tick next to the first item if we know for sure which of the earlier versions of Windows the program worked properly with. Click “Next”.
- Select the desired OS version and click “Next”. Or you can choose the “I don’t know” option and then the system version will be selected without our participation.
- So, the program and operating system version have been selected, now click the “Check program” button. If testing is completed successfully (the program should start), click “Next”.
- To use the program in the future with the selected compatibility parameters, click on the first item to save the settings.
- We wait until the tool performs diagnostics again, and if we no longer need to perform similar actions in relation to other programs, close the window.
Note: if the program does not work with the selected OS, you can try another version or use the recommended settings. Sometimes contacting Microsoft by reporting the problem or searching for a solution on the Internet can help resolve this issue.
How to enable compatibility mode?
To launch the application you need in compatibility mode, right-click on the program’s exe file and select the “Properties” option from the pop-up menu.
If you want to apply this mode not to the executable file, but to its shortcut, you are absolutely free to do this, since the shortcut will contain a link to the executable file, so go ahead.
So, the settings window opens, where we need the “Compatibility” tab. If such a tab is missing among others, which is also possible, then you cannot use compatibility mode in Windows 10 to run such software. In this case, again, think about a virtual machine. Open the specified tab.
To launch compatibility mode, check the appropriate box, and just below you need to select the operating system for which you would like to emulate.
A complete variety of all systems from Microsoft, without exception, is available here, with the possible exception of Windows 3.11. If you need to deal with such an old application, the DosBox emulator will most likely help you. The way it works is quite simple; it only requires preliminary configuration of mounting virtual disks in the environment using the command line. For detailed instructions, refer to the readme.txt file included with your product. In our case, we have a chance to run any software that supports work with any OS, starting with Win 95, and this will be enough for us.
Now let's talk about the compatibility mode auxiliary parameters. The first option we see in the list of additional settings is the minimum color mode. About 20 years ago, games ran in 8-bit (256 colors) or 16-bit (65,536 shades) color mode, so if you need to run just such a game, you can emulate such a color mode and ensure that the game runs even on a modern OS (such as Windows 10).
The next setting is to use a screen resolution of 640x480. In Windows 95, this was the native resolution, and if it needed to be raised to at least 800x600, significant brakes appeared, so we had to go back to 640x480. So, if you need to limit the number of pixels drawn horizontally and vertically, the screen resolution limit will come in handy.
Another parameter allows you to deactivate picture scaling when using a large display resolution. This setting will help you avoid unresponsiveness issues when running legacy apps on your tablet or PC. If you encounter such difficulties, enable this setting.
The last of the settings gives you the ability to use Compatibility Mode in Windows 10 as an administrator. If, after activating all the necessary settings, the program still does not start, try using this mode. In this case, additional system resources will be drawn onto the process, and as a result its priority will be higher than when launched in normal normal mode, which can also decide the success of launching the old game in your favor.
These are all the settings that accompany the compatibility mode in Windows 10. After playing with some of them while setting up the software to launch, there is a chance that you will be able to achieve the effect you need when working with old programs in the latest OS from Microsoft.
How to disable compatibility mode?
To disable the mode, just uncheck the top item on the “Compatibility” working tab. In this case, the remaining settings that you specify in the fields below will not have any effect, since the mode itself will already be deactivated.
Another key element of emulating old software in Windows 10 is a special tool that can resolve the difficulties of launching outdated software in an automated manner by asking for answers to several questions. At its core, this wizard includes all the same options that you set manually on the corresponding tab, but it does it more efficiently and automatically, so don't take the opportunity to use this high-quality and detailed tool.
So we talked about such an important and necessary element of the environment as compatibility mode in Windows 10. It is important to say that success when running old software using compatibility mode is not guaranteed. You can only make an attempt to succeed. If all else fails, you can always turn to a virtual machine (fortunately, this method is 100% reliable and is worthy of being discussed in).
Compatibility mode in a laptop/computer on Windows 10 solves problems with launching applications or drivers.
If you do not use this function, you can disable it. This will slightly increase your PC's performance.
There are several options to disable Program Compatibility Mode in Windows 10: through Group Policy, Local Services and Administration.
These settings should also be disabled for those for whom they cause malfunctions, irritate a constantly pop-up window, or generally interfere with the correct installation of programs.
Conclusion
If a program stops working on Windows 10, use the Compatibility Assistant to start it. If necessary, it can be disabled. But it is not recommended to do this if it does not interfere with the operation of the computer.
With the introduction of new operating systems, technologies and the like, everything old and good is gradually falling out of IT life. However, what should those who love nostalgia and prefer old games, where the emphasis was not on graphics, but on logic, do? What should we do for those for whom analogues of applications whose development ended at the Windows XP stage have not been invented? It turns out that the “top ten” has a special mode that allows you to run programs that are not intended for the new OS.
Disable Compatibility Assistant in Windows 10 through Administration
To disable the parameters using this option, uncheck the box in the appropriate place - this service will no longer start at boot.
That's all - all three methods are fully functional - a minute of time and the service is disabled.
True, I always leave it - I have to use programs that are not yet specifically for Windows 10.
You can, of course, do all this manually, although you still have to make edits.
This assistant himself does not always correctly select the appropriate mode. Good luck.
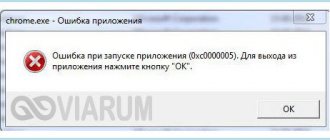
Hello admin! I have Windows 10 installed on my laptop and several times a day the message appears: “Oneclickstarter. The program is launched in compatibility mode. Compatibility settings should be disabled as they may cause unwanted effects. Still running the application? » How can I get rid of this message?
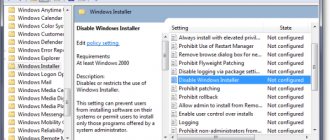
Via Group Policy
To disable it using Group Policy, you need to enter the gpedit.msc command into the “Run” tool we already know (Win + R). After clicking “OK”, a new window called “Local Group Policy Editor” will open in front of the user. Here you need to find the “Administrative Templates” section, where you open “Windows Components”. Then you need to click on the names in the sequence (highlighted in the screenshot):
- Application compatibility.
- Disabling the assistant.
- Disabled.
After this change, you will need to save it - and a more automatic selection of settings for launch will not bother you.
(Visited 5,609 times, 1 visits today) Published in Windows 10 Sources used:
- https://winda10.com/rezhimy-windows-10/rezhim-sovmestimosti-v-windows-10.html
- https://geekon.media/kak-ispolzovat-ili-otklyuchit-rezhim-sovmestimosti-v-windows-10/
- https://windowsprofi.ru/win10/otklyuchenie-rezhima-sovmestimosti-v-operacionnoj-sisteme-windows-10.html