A message like “Inaccessible boot” in Windows 10 when starting a computer or laptop indicates the inability to read data from the installed boot drive.
Reasons for the appearance of Inaccessible boot:
- Due to incorrectly installed Windows OS.
- Hard drive damage.
- Damaged or unconnected cable connecting the hard drive and the motherboard.
In this article we will look in detail at how to fix inaccessible boot device Windows 10
Can you tell a cringe from a crash? Take this fun test and find out!
Inaccessible_boot_device after resetting Windows 10 or installing updates
Inaccessible_boot_device is the simplest error. Windows 10 has a pre-built algorithm for automatically restoring the operating system to its last working state. That is, the computer will attempt to roll back the updates and restore to the previous version.
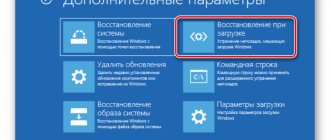
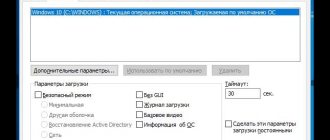
- If the Inaccessible boot error occurs after resetting Windows to factory settings, then after the notification the boot options window will be displayed, click on it.
- Next, select “Enable Safe Mode”
- After successfully starting Windows, just restart your computer again.
In 99% of cases, no problems should arise if the hard drive is healthy and its boot record is not damaged.
What instrument are you? Take the test and find out
Windows 10 stopped starting after BIOS update or power failure
If the Inaccessible boot device error when loading Windows 10 occurs precisely after updating the BIOS, then the user will only need to manually specify which hard drive is bootable (that is, on which Windows is installed).
In most cases it works like this:
- When you turn on the PC, press the Del button on the keyboard. (Methods for entering the BIOS may differ on all PCs. All methods for entering the BIOS and Boot-menu can be found here)
When you turn on the PC, in this window you should have a key written that takes you to the BIOS
The divide key is located on the keyboard - After entering the BIOS settings, you need to find the “Boot” section.
- In the “1st Boot Device” line, indicate the hard drive on which Windows is installed. In most cases, this device is referred to as HDD.
- Press F A dialog box will appear prompting you to save the new settings. After this, the computer will automatically restart.
The same thing can happen after a power outage. That is, the BIOS settings are “reset” to factory settings, the program simply cannot independently determine from which device the computer needs to be booted.
Super test on the topic “Money” and how can you be friends with it?
Method 5: Reset BIOS Settings
In some cases, resetting the BIOS settings is effective, even if you have set the boot priority correctly and checked the SATA configuration mode. Revert to default settings, after which try to start the computer, repeating Method 2 and Method 3 if necessary.
Read more: What are Restore Defaults in BIOS What are Load Optimized Defaults in BIOS Resetting BIOS settings
Make sure the boot disk is connected and accessible
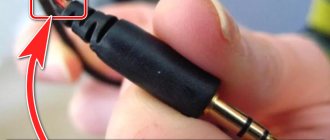
The Inaccessible boot device error can also occur due to the fact that the motherboard itself cannot connect to the hard drive. In this case, the Windows diagnostic window does not even appear to troubleshoot problems. The computer simply either freezes on a window with an error or reboots cyclically.
Therefore, to restore the Windows system, you should check whether the drive is connected to the motherboard at all. To do this, you will need to remove the side wall of the system unit. And then reconnect all the cables connecting the hard drives to the motherboard.
The procedure should only be performed if you have proper experience in disassembling a PC. Otherwise, it is better to seek help from technical specialists.
Method 8: Replacing the battery on the motherboard
All motherboards have a coin cell battery that supports CMOS memory. When it starts to discharge, the user is faced with various symptoms of this phenomenon: the time on the computer is reset, the BIOS settings become default, the PC may not start, the cooler does not rotate, various types of failures appear for no apparent reason. The battery does not run out quickly - depending on the model, it can last 3-4 years or much longer. Therefore, it makes sense to change it only when you are faced with clear indicators of its discharge.
Checking the integrity of the boot configuration database
The Inaccessible boot device error may occur due to damage to the boot executable files of the Windows operating system itself.
In this case, the “System Restore” diagnostic window also does not start, since the files responsible for the operation of the service are also included in the list of primary ones. In this situation, you will definitely need a Windows installation drive (either a USB flash drive or a DVD).
Next steps:
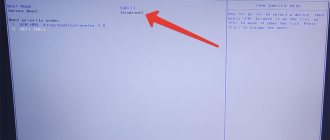
- Immediately after turning on the computer, press F11 on the keyboard several times (even before the error message or Windows logo appears). This will open the boot drive selection menu.
- Select the installation drive (CDROM or USB).
- Next, select “Troubleshooting”.
- Use System Restore.
In this case, the installation application will automatically search for OS files on your hard drive. If they are found, it will be proposed to restore their integrity.
DLL libraries on the installation drive itself are used as a backup copy. And the recovery process also fixes boot database errors.
Take the test on the topic “Legends of the 90s”, remember which of these you had?
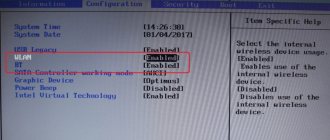
Method 3: Changing the SATA operating mode
Almost all modern drives are connected via the SATA interface and the BIOS is set to AHCI mode for their operation. After resetting the BIOS settings (either on your own or for other reasons) on motherboards that are not entirely new, the SATA connection option can be changed to IDE. The same thing happens when a user, trying to configure the BIOS manually, changes this mode out of ignorance. You cannot do this with an already installed operating system: it will simply refuse to boot, and an error in the set SATA configuration will be indicated by either a blue screen of death when trying to boot Windows, or a “No Bootable Device” error. The solution is very simple - go to the BIOS (how to do this is written in the previous method) and edit the option.
Read more: Enable AHCI mode in BIOS
Running sfc and chkdsk
Using these commands, you can check the integrity of the hard drive and, if possible, eliminate them. This method also, in some cases, allows you to get rid of the Inaccessible boot error.
You must enter commands into the command line interface. There are 2 options:
- If an error message appears when you boot your PC, and then the recovery service opens, you need to select “Troubleshooting”
- Then "Others"
- "Command line"
If the recovery service does not open, you will need to use the installation disc. That is, boot from it and run “System Restore”. And then as in the previous paragraph.
The next step is to enter the commands:
- Command chkdsk /f /r A: (A - replace with the system drive letter, in most cases it is C). Wait for the verification to complete, which may take more than an hour.
- Enter the command sfc /scannow /offbootdir=A: (A - replace with the system drive letter). Wait until the check is completed.
- To restart a computer.
Damage to the hard drive or change in its logical structure
The essence of the message “Boot device unavailable” speaks for itself: the BIOS, while transferring control of further startup of the computer to the boot loader, was not detected (or it was damaged). The reasons for this can be both physical level problems (damage to the hard drive) and logical level (defects in the file table, unsuccessful HDD partitioning).
In any case, you should boot into the Tens recovery environment using “Advanced options” or an external bootable drive with the Windows 10 distribution.
1. In the recovery environment, go to the “Troubleshooting” section.
2. In the “Diagnostics” subsection, call the command line.
3. Find out the letter label of the system volume.
This is done through a set of sequentially executed commands:
- diskpart – call a utility for working with disks and their partitions;
- list volume – visualization of data about all volumes and non-volatile storage media connected to the computer (it is in the table after calling the command that we pay attention to the letter designation of the system partition and disk, with a volume of about 300-550 megabytes, where the operating system loader is located);
- exit – termination of the utility.
4. Launch the program to search for damaged system files.
To do this, run the command “chkdsk c: /r”, where C is the label of the system partition, and /r is the argument to launch the application to check the integrity of system files with the function of restoring them.
If you need to run the scan in the operating mode of the system, agree to launch the scanning application the next time you restart the computer.
If the disk is large and/or has a significant number of bad sectors, the scanning and recovery procedure may take several hours.
If you suspect that installing a second operating system or partitioning a hard drive, one of its partitions, or making changes to the drive’s file system by any other method was a factor in the problem, use the “bcdboot” system tool. It is designed to form system partitions and restore Windows boot.
To fix the problem, enter “bcdboot.exe C:\Windows /s F:”:
C – system volume;
/s – an argument that tells the application that the system disk will be manipulated;
F – letter label of the partition (its size is in the range of 300-550 MB) with the bootloader.
After executing the commands, close the command line and reboot.