Most likely, you ended up in this guide because your system did not detect XINPUT1_3.dll, that is, the file is missing. All Windows operating systems, starting with “seven”, with any bit depth, are susceptible to a similar problem. Typically, the XINPUT1_3.dll error appears when trying to launch a particular program or game, including GTA 5. The system reports that it cannot process application commands due to a missing library. Now we will figure out how to fix the problem ourselves.
File XINPUT1_3.dll – what is it?
To understand what this XINPUT1_3.dll error is, you need to find out which utility this file belongs to. In this matter, everything is simple, because this component belongs to DirectX, or more precisely, the Microsoft Common Controller API. This software processes the controllers and converts their signal into code that the game can understand. You cannot do without this file; it must be installed in the operating system.
You just need to know that for Windows 10 64 bit you need a special element designed for the “ten” with 64-bit architecture. The file is not suitable for Windows 7 or the x86 system.
What is this file for?
Dear readers, today we will learn about what this error is when xinput1_3.dll is missing and how to fix it. Let us warn you that this is very easy to do and you can do it yourself. Therefore, you should not panic and call all service centers in the city and talk about the breakdown of your computer or laptop.
Before we talk about troubleshooting, you need to learn more about this file itself. You will learn about the reasons a little later. So, xinput1_3.dll is a Microsoft DirectX environment library file that is involved in the correct loading and launch of the game on your computer or laptop. That is, if it is missing, it means that you will not be able to enable the game or other application that requires this document in any way. The error often occurs on new devices when the main part of the components for the correct operation of the system is not installed. It can also occur when system files fail, utilities are installed incorrectly, and so on.
To fix this problem, you will need an active Internet connection, since we will be downloading a certain amount of data from the World Wide Web. If you do not have this opportunity, then we recommend trying to connect to some wireless network and distribute the Internet through your mobile device. In the second case, pay attention to the downloaded traffic: most mobile operator tariffs provide a limited amount of memory that can be downloaded from the Internet. For example, if the traffic provided by the operator runs out, then you will have to pay separately for each additional megabyte of memory. If all these issues are resolved, then we will proceed directly to the main problem of today's discussion.
Why does the XINPUT1_3.dll error appear?
By default, when starting games, XINPUT1_3.dll is checked in its default directories. It should be located in the Windows/System32 folder. The fallback option for 64-bit operating systems is Windows/SysWOW64. If XINPUT1_3.dll is missing in both locations, the system will display an error. Which is most likely what happened.
In more or less recent operating systems, starting with Windows 7, the DirectX component is already installed by default. However, it is presented in a cropped version, which the user later supplements when installing the game. If the entire set of a given library is missing, errors may appear. However, the described file could disappear from the OS for other reasons.
How to install
So, you are missing xinput1_3.dll and you don't know how to install it. You have two ways to solve this problem. It is recommended to use the first method, which will not only fix this problem, but also solve the subsequent ones: to launch games and programs, you need not only this file, but also others that are also part of the library.
- As you might guess, after analyzing the information received, we will reinstall the Microsoft DirectX component using a web installer, which can be downloaded from the company’s official website. The installer will automatically download the latest version specifically for your operating system. Please note that after installation you may need to restart your device. Therefore, if you worked in Microsoft Office Word, for example, then be sure to save the file you are editing, as you may lose it.
- If for some reason the previous method did not help (very unlikely) or does not suit you for certain reasons, then you can install the xinputdll file separately in the system folder. If you are using a 32-bit version of the Windows operating system, then the file will need to be placed in the system32 folder, which is located on the local disk where your OS is installed, in the Windows folder. By default, the system is located on the local drive C. Then the path to the location of your file will be as follows: C: Windows/system32. For users of the 64-bit version of the OS, the SysWOW64 folder will serve instead of system32.
It was mentioned earlier that the first method is recommended to be used as the main means of solving this error, now let’s look at why. For example, Windows 10 comes pre-installed with DirectX12, which does not include older library components. And some games require it. Then you’d better download not just a separate file, as in the second method, but install all the missing library components using the official web installer. This will help avoid other problems when some other component of the DirectX environment is missing.
Were you able to fix this error using the methods we described, did you encounter any difficulties? Leave your comments in the form below.
How to fix XINPUT1_3.dll error?
The XINPUT1_3.dll error code can occur when launching any games, from all manufacturers and from different years of release. For this reason, troubleshooting skills are extremely valuable. As always, the first thing we recommend is to restart the system. After this, we begin to perform the next set of actions.
Method 1: Reinstall DirectX
The most effective, simple and safe way to fix the XINPUT1_3.dll error is to run the DirectX installer. Its advantages are that everything happens automatically, the software is distributed free of charge and it selects the correct version of the software without user intervention. Most likely the installer will find the missing file and overwrite it (along with the others).
What to do:
- Go to the official Microsoft website, where DirectX is distributed, and click on the “Download” button.
- After downloading the web installer, run the file and agree to the user terms of use.
- We wait for the installation to complete, reboot the PC and check the result.
Important! If the installer window displays a message that a newer version of DirectX is installed or the current version of the program is already installed, you should manually remove XINPUT1_3.dll. This will help if the file is modified incorrectly. The installer sees that it is there and does not replace the element, although it does not work. Uninstalling and reinstalling may help.
There is an alternative option - installing DirectX, which comes bundled with the game. On the one hand, this version is exactly suitable for this software, and also does not require downloading a file, that is, the Internet is not required. On the other hand, this DirectX may not be enough to run other games and you will have to go through the installation procedure again for a more recent version. Usually the installer is located in the game folder called redist. It is also enough to launch it, confirm your intention to install and wait a little.
Installing DirectX
Go to the Microsoft Executable Library Installer site.
After logging in, a window will appear with the file name dxwebsetup.exe. Confirm its download with “OK”.
Run dxwebsetup.exe and follow the on-screen instructions until the installation is complete. Then try launching the application and check if the problem is resolved.
What is this file?
So, let's take a closer look at what this component is and why it is impossible to run some applications, as well as games, without it. As already mentioned, this is part of the Microsoft DirectX software package. It is mainly used to run games as well as 3D programs. You can install the component together with the official application or separately, manually.
Accordingly, in our article you will find 2 stages, the first of which involves automatic installation, and the second will allow you to learn how to work with manual installation, as well as registering components in the Windows registry. Each method is discussed in the form of detailed step-by-step instructions, accompanied by screenshots. Therefore, you will definitely not encounter any difficulties during the work process.
Download the package
So let's install our file. We will do this, as we have already said, in two ways.
Why is it better to install DirectX completely?
The fact is that even if you install the component separately, it is not a fact that it will be able to be successfully registered in the system. In addition, no one can guarantee that this is the only component that is missing. Perhaps the application will throw an error again, and you will go looking for another file. So we will start by installing the entire library from Microsoft. Let's get started.
Download DirectX
First, we need to download the library itself. You can do this using the button below. We took the WEB installer from the official website and added it here for your convenience.
Next, follow our step-by-step instructions:
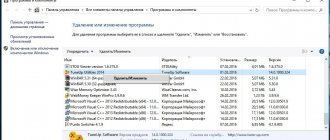
- Extract from the archive and run the installation file (it is better to do this as an administrator). At the first stage, we will need to accept the license. To do this, check the box next to the item marked with the number 1 and click Next.
- Microsoft is trying to sell us additional software, we refuse it by unchecking it, and click Next again.
- That's all. The installation is complete and all we have to do is click the Finish button.
DirectX, and along with it the file, are installed. Be sure to restart your computer or laptop before relaunching the game.
Download the file separately
For exotic lovers and those who, for some reason, do not want to download the entire package, we will describe a method for downloading and installing it separately. Let's get started.
You can download the file, depending on the bit depth of the system, using the buttons below. We extracted the dll from Microsoft DirectX, so it is completely original.
Now let's start the installation:
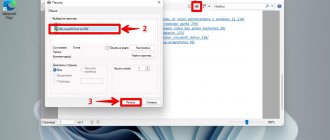
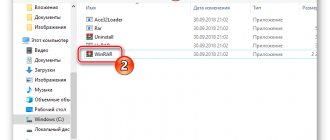
- First, unzip the file from the archive and place it in the system directory, depending on the bitness of Windows. We show the process using the example of a 64 Bit system, so we put the component along the path: C:\Windows\SysWOW64. If you have a 32 Bit PC, copy the file to: C:\Windows\System32.
- You can also copy the component to the folder with the game causing the error. Exactly where the executable file is located.
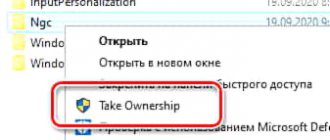
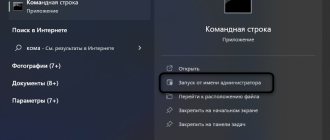
- Next, you should register the dll. To do this, open a command prompt with superuser rights. It can be found through search.
- Enter the operator in the black window: regsvr32 xinput1_3.dll and press Enter.
All operations, including copying files to the system directory, must be performed exclusively as an administrator.
That's all, you can try running the problematic program. If the result is negative, go to the first method and completely install DirectX.
Video card driver updates
An outdated and corrupted driver can also cause the problem. To update it follow these steps:
Open Device Manager with the command devmgmt.msc from the Run window (Win + R).
Expand the "Video Adapters" tab. Right-click on your graphics card and select Update.
Select the automatic search option and wait for it to complete.
If there are updates available, they will be installed after downloading. Check if the error has been fixed.
If automatic updating doesn't work, try doing it manually. Go to your graphics card manufacturer's website and download the latest software.
Run the file and follow the system prompts until the installation is complete.
DirectX update
It is possible that when you “drop” the missing file into the required location and try to start the game, a new warning will appear indicating another missing library. In this case, it is better to immediately update the DirectX set by downloading the installer from the official Microsoft website:
Download
Run the installer and follow its instructions. There are a couple of simple steps; you just need to click “Next”. Although, at one stage it is suggested to install the “Bing” search bar - it is better to uncheck the box so as not to waste time cleaning browsers later.
After completing the manipulations, be sure to restart the laptop and check the result.