In this article we will talk about how to increase the sensitivity of the microphone on an Android phone.
[toc]
Many users have encountered a situation where, when talking on the phone, the interlocutor has difficulty hearing, asking one after another. Thus, if this situation is very familiar to you, it means your phone has a low microphone sensitivity.
It is worth noting that this problem is very popular and occurs on phones from different manufacturers, including famous brands such as Samsung, LG, Nokia, Huawei, etc. Therefore, the only thing left for you to do is to increase the sensitivity of the microphone using the instructions that we will describe a little further.
Reasons for a non-working telephone microphone
The causes of problems with the microphone on a smartphone are divided into 2 types:
- hardware (hardware problems);
- software.
In most cases, the breakdown can be fixed at home; this does not require special knowledge.
At home, the latter are easier to “treat”, so the search begins with them.
Software error
The following may cause the problem:
- Lack of timely updates, leading to a conflict between the OS and applications.
- Installation of unlicensed programs.
- Low sensitivity level of the sound receiver specified in the settings.
- Accessing the microphone from many applications at the same time.
- The program of interest does not have access to it or the Mute mode is set in its settings.
- Memory full.
- Software installation failed.
To check, connect the headset. If her sound catcher doesn’t work either, then the reason most likely lies in a software error. They start with a reboot. This is enough to eliminate a minor glitch. If this does not help, more significant measures are required.
Microphone contamination
This element receives sound through a small hole in the device body. Over time, it becomes clogged with dust and dirt. This may not block the audio waves completely, but the sound is significantly distorted, making it difficult to hear you.
Poor contact
If the sound receiver turns off and then functions again during the operation of the same application, then the reason lies in poor-quality electrical contact. It can be:
- manufacturing defects;
- a consequence of poor soldering of connections during repairs.
For the purpose of miniaturization, electronic communicators use small-sized components, so only a person who is fluent in a soldering iron can fix such a malfunction. You will need a low-power tool, otherwise you can burn through thin contact pads.
Departure of the plume
The microphone is connected to the board via a thin cable. It sometimes comes off, mostly as a result of the gadget being dropped. The contact is broken and the signal from the sound receiver does not reach the processor.
Moisture getting into the hole
The sound receiver hole is not sealed, and water that gets on it quickly penetrates inside. This leads to the following effects:
- Oxidation of contacts. As a result, the electrical signal passes between them worse, as a result of which the operation of some components is disrupted.
- Short circuit. In the worst case, some elements burn out, in the best, local failures are observed. For example, if water gets into the jack for a wired headset, the phone will mistakenly consider it connected and block the standard microphone.
Attempts to dry the gadget with a hairdryer can lead to the opposite effect: the air flow will push the moisture even further. Requires disassembly, cleaning of contacts, qualified inspection of the condition of all components and, possibly, repairs.
Mechanical problems
If the microphone malfunctions in any applications, it may be clogged or faulty.
Note! We are now talking about the main microphone. However, one of the additional microphones, which is most often used to implement active noise reduction, can also fail.
How to clean the microphone on a smartphone
If you have difficulty hearing due to dust accumulation in the microphone hole, try cleaning it.
Note! You must act extremely carefully so as not to damage the microphone.
Take a thin needle and carefully, slowly, remove the debris that has accumulated near the hole. Do not force the needle or insert it too deep.
But what if water gets into the microphone? In this case, you will have to disassemble the smartphone. Since the back cover of modern smartphones cannot be removed, there is a possibility of further damage to the device. Therefore, it is best to contact a service center, where a specialist will clean the contacts from oxide and, if necessary, replace the microphone with a new one.
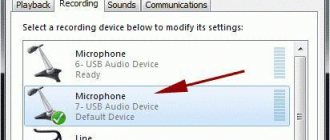
How can you test your microphone?
On Skype, testing can be found in your contact lists.
This component is tested for functionality in the following ways:
- Using the voice recorder function. It is available in any modern communicator. You need to record your speech and then listen to it.
- Calling someone nearby. Ask the person to move away, dial him and check if he can hear you.
- By calling a special service. For example, in Skype it is Echo. The user speaks for 15 seconds, then the service calls him back and plays the recorded speech.
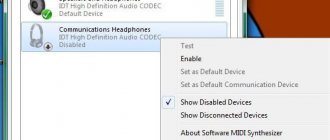
Turn the microphone on or off on your phone
Owners of budget models often turn off the microphone by accidentally touching the screen with their ear during a call. In expensive gadgets, the touch display is partially blocked during a call. If the interlocutor has stopped hearing you, check whether the sound receiver icon is crossed out.
The Mute function is also available in instant messengers and other video communication programs. It allows you to switch off during a conference so that extraneous noise does not disturb the speaker. If the audio receiver does not work, you should first check if Mute is turned on.
To turn on the microphone on your phone, you need to tap on its crossed out image.
Why does the headset icon light up when there is no connection?
The headset will be displayed if there are malfunctions in the phone's operating system, regardless of the model (android, fly, honor, huawei, lg, meizu, texet, xiaomi, zte, iPhone, Alcatel, light, Nokia, Philips, Samsung, Asus). Before starting repairs, it is necessary to determine the reason why the icon is displayed on the display.
The headphone symbol is constantly lit
This software glitch often causes negative emotions among smartphone users. Unauthorized appearance of a symbol is an incorrectly working program that interrupts the normal functioning of all applications, including affecting the operation of the phone’s microphone. Don't be surprised if, while talking on the phone, the other person says that he can't hear you well.
For example, a message appears indicating that calls have been put on speakerphone.
If the icon does not disappear, although it should disappear, this is evidence of serious problems with the phone. There are many reasons for the failure.
The microphone on the headphones stopped working
It is preferable that the headphones and gadget are made by the same manufacturer.
The reasons why the headset's sound receiver began to hiss or went completely silent could be:
- Microphone failure.
- Connector faulty.
- Incorrect headphone volume settings.
To check, connect the headset to another, known-to-work communicator. If it works, then the problem is in the connector or settings.
If the microphone sound just became quieter
The presence of sound indicates that the microphone is working. If it becomes quieter, you may need to change your volume settings. A special feature of Android gadgets is the ability to set different levels for audio files, video, call signals and headsets. Parameters are adjusted using standard and third-party tools.
Changing the volume through the engineering menu
This menu is intended for service employees, and to activate it, you need a special code. Each brand of smartphone has its own. For most Chinese models, for example “Honor” from, the following sequences are suitable:
- *#*#54298#*#*;
- *#*#3646633#*#*.
You can find the option for your device on the Internet. The code is dialed instead of a phone number by first pressing the “Call” button. Then they tap on the call button and get to the engineering menu.
The names of the items may vary depending on the Android version. You need to go to the one that contains the word audio. A submenu will open with the following lines:
- Normal Mode – adjusts the volume in the standard speaker.
- Headset Mode – the same for headphones.
- Loud Speaker Mode – speakerphone settings.
- Headset_Loud Speaker Mode – sound settings for the headset.
- Debug Info – restore factory settings.
Convenient indicators can be configured yourself.
Each line shows the current value of the parameter and the most possible one. Please note that setting the volume to maximum is not recommended. In this case, the components operate at their limit, which negatively affects their service life.
For the changes to take effect, press the Set button.
There are third party apps that allow you to access special settings. For example, Mobileuncle MTK Tools.
Sensitivity Setting
In the engineering menu you can also adjust the microphone sensitivity. To do this, you need to understand the meaning of the abbreviations:
- SIP – Internet communication parameters.
- MIC – microphone settings.
- SPH/SPH2 - speaker parameters.
- SID – setting the sensitivity to voice during a conversation (it is recommended to leave it unchanged).
- Media – sound settings in media files.
The microphone sensitivity is adjusted in the following order:
- Go to the MIC section.
- In the Level item, click on the 6th position and write down the Value indicator.
- They go through the other levels and enter the recorded value in each.
After this, the sound in the smartphone becomes loud, clear and intelligible.
How to adjust microphone sensitivity in headphones:
- In the engineering menu, select Hardware and then Earphones and MiC.
- Find the line Speech Enhancement.
- Adjust sensitivity.
You can also add sensitivity using one of the special patches developed by enthusiastic programmers. But this method is only suitable for experienced users, because... The patch may conflict with the operating system.
Microphone Amplifier
The easiest way to increase the volume is to use a special Microphone Amplifier program. Install it through the Play Store, and then do the following:
- Launch the application.
- Issue all permits.
- Click the Enter Amplifier button.
- Adjust the sensitivity sliders opposite the “Input filter” and “Audio Grain” items.
- Save the settings by pressing the center button.
Unlike previous configuration options, you do not have to manually enter parameters. All adjustments are made using convenient sliders.
How can I solve the problem with the microphone on my phone?
In the event of a malfunction, manipulating the settings will not help. Other methods are used.
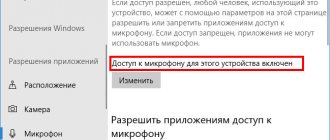
Checking microphone permissions
Unsatisfactory performance of the audio receiver may be caused by the fact that too many programs have simultaneous access to it. However, some access the device unnecessarily. These are mainly voice assistants - “Alice” from Yandex, Google Assistant, etc. It is necessary to temporarily revoke their permission to use a microphone:
- Go to the Settings section of your phone.
- Select “Applications”, then “All Applications”.
- Find the program you need in the list by typing the name in the search bar.
- Tap "Application Permissions".
- Select Microphone and then Disable.
- In the window that appears warning you that the program is not working, click “Block anyway.”
- Reboot your gadget.
Disabling permissions may look different on different phone models.
Before you disable access, complete all planned actions that require this voice assistant.
To find out which programs have access to the audio receiver, do the following:
- Select Settings and then Apps.
- Tap on “Permissions”, then on “Application Permissions”.
- Select Microphone.
A list of all programs with access to this component will open. You can select any one and cancel the permission by clicking the “Deny” button. This is recommended, for example, in relation to instant messengers used only for correspondence.
Closing recent tasks
Another way is to close applications running in the background:
- Tap on the button with the image of a square.
- In the list of tasks that appears, click “Close All.”
- Launch Messenger and call someone to check if your microphone is working.
Cleaning the microphone
Cleaning is carried out in 2 stages:
- Use a needle or pin to destroy the dirt plug in the sound trap hole. Proceed with caution, otherwise the part may break.
- Blow out the hole.
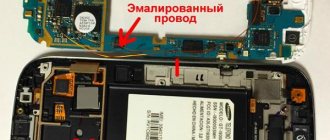
Replacing an element
In some models, the component is removable and therefore easy to replace. You can find a new part at online flea markets or at an electronics repair shop.
Procedure:
- Remove the back cover of the gadget. For example, on a Samsung Galaxy, to do this you need to pry off 2 narrow grooves near the charging connector with your nails and at the same time press the cover in the middle.
- Remove the battery, flash and SIM cards.
- Unscrew the screws with a Phillips screwdriver and remove the part of the case that blocks access to the board.
- Remove the microphone from the groove and use a soldering iron to disconnect it from the cable.
- Carefully solder the new one.
- Reassemble the communicator in reverse order.
Warning
What to do if the headset connection icon does not disappear. In this regard, the phone begins to “glitch”. The problem can be solved as follows:
Important! If you are not sure that you can handle it yourself, it is recommended to contact a workshop.
Modern devices are over-equipped gadgets. Push-button devices, assembled and disassembled like a construction set, are disappearing into oblivion. Practice shows that opening the smartphone case, performed outside the workshop, leads to failure of the device, irreversible mechanical damage, and malfunctions.
Using a hair dryer is not safe for the device. Modern smartphones are stuffed with plastic parts, so there is a high chance of melting when “blowing” with a hairdryer in one direction from above.
It is better to trust any manipulations with the software to professionals. If the phone is created on the Android platform (the principle of an open software cipher is used), most users do not know how to perform the initial OS setup.
The principle of open architecture is a convention, since the device contains a large number of systems and applications, there are numerous nuances that must correspond to each other to ensure correct operation.
An untrained user will not be able to install the settings.
If the microphone does not work only during calls
This often happens after installing a custom (unofficial) version of the operating system. Android users proceed like this:
- Go to the Recovery section.
- Launch the wipe data/facroty reset procedure (resetting current settings).
- Clear cache.
- Activate the Installzipfromsdcard service.
- Specify the path to the archive folder with the official firmware on the memory card.
After reinstallation, the device is sent to reboot.
Android tablet solutions
Finding the causes of a malfunction and eliminating it on a tablet is carried out using the same methods as on a smartphone. The difference is that it is not recommended to open this gadget yourself, because... it is more complex. If changing settings, canceling permissions and other software methods do not give a positive result, it is better to contact a service center.
The author invites readers who have encountered a similar problem to share their experience. Were you able to find out why the microphone stopped working and how was the problem fixed? Leave your comments.
Method 5: Reset your device
This solution is best used as a last resort, as it will initiate a formatting procedure that will delete all data and software you have installed. Although notes, contacts, email and other information can later be restored if you first link it to Samsung or Google accounts. More information about the “hard reset” function, as well as setting up data synchronization, is written in separate articles on our website.
Read more: How to enable data synchronization with your Samsung account How to enable data synchronization with your Google account Resetting Samsung smartphones to factory settings