Equipment » Digital » Laptop
You can format a hard drive via BIOS on a laptop in different ways:
- using the command line;
- when reinstalling the laptop system;
- via a USB drive as a bootable means;
- using third party applications.
Note! To load Windows OS correctly, a flash drive of at least 4 GB in size is required.
To clean the HDD, the user will need:
- USB flash drive;
- working laptop BIOS;
- a recorded Windows OS image (ISO format) on a flash drive or CD.
You can set the drive as bootable for BIOS UEFI as follows:
- Turn off your laptop. Insert the flash drive.
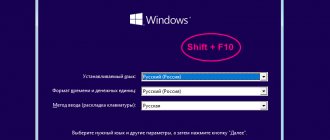
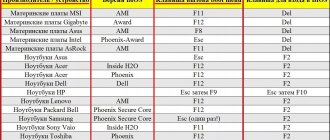
- Press the power button. When the manufacturer icon appears, press the Del button. Can be launched via F2.
- Go to BIOS Features and then Boot Options.
- Place the USB drive in its original position. So the system will start loading initially from the external peripherals of the laptop.
- Press F10 to exit BIOS. Make sure your changes have been saved.
Guide for AMI BIOS version (for Lenovo laptops):
- Go to the Boot tab.
- Select the Boot Device Priority line.
- To the right of 1st Device, select USB drive. Press Enter to confirm your selection.
- Go to the Exit tab. Press F10 to accept the changes.
Instructions for BIOS AWARD/Phoenix:
- Go to Advanced BIOS Features.
- Click on First Boot Device.
- Select the external drive with the ISO image from the list. To boot the laptop correctly, you need to select the USB-Flash line. If it doesn't work, then USB-HDD. Enter to confirm.
- Go up one line and press ESC to exit.
- Select Save & Exit Setup to save and exit the BIOS.
Guide for H2O BIOS version (on older Asus laptop models):
- In the BIOS menu, go to Boot.
- Opposite the External Boot Device line, set the value to Enabled.
- A little lower, go to the Boot Priority tab - press F5 to go.
- Click on the External Device item to return it to its original position.
- Then use the Exit – Save and Exit Setup path to exit. Make sure all changes are saved.
Note! In Windows 8, 8.1 and 10, booting from external drives without using BIOS is available. Find the “Update and Recovery” section in the settings. On the right is the “Restart” item. Follow the instructions to create the correct image.
How to format your hard drive before installing windows 7
Formatting your hard drive (hard drive) before installing the operating system is a necessary measure for the correct operation of Windows 7 on your computer. Neglecting this condition leads to system malfunctions or complete failure. How and with what to format the hard drive, you will find in the article.
1
To format something is to completely delete files from the device and return the internal parameters to the original value set by the manufacturer. If you are installing the operating system for the first time, that is, on a “bare” hard drive, formatting is not necessary. If you are reinstalling Windows 7, “then cleaning” is necessary. Let's get started. Insert the operating system media and run the installation file. A window will appear where we click the “Install” button.
2
In the new window, select “Full installation”.
3
The next step is to select the partition on which the system will “become” and format the hard drive. Click on the local drive opposite which it says “System”. Click the "Format" button, select the "NTFS" file system and begin the operation. The duration of the process depends entirely on the power of the computer and the clutter of the logical disk. Be careful when choosing a section. By formatting the main drive, you will lose absolutely all files on your computer forever. After the operation is completed, follow the prompts to install Windows 7.
4
Good to know. Formatting the Logical Disk (C:) leads to the loss of files located on the Desktop, in Libraries (Video, Music, Documents, Images), in the “Downloads” folder. All drivers on the computer, installed programs, and game saves are deleted. Root files of computer games and PC settings are also subject to cleaning. We recommend that you write important information contained in the sections listed on removable storage media or transfer it to the main partition of your hard drive.
5
Some sources offer the option of formatting directly from Windows 7. There will be no damage to the hardware itself, that is, the disk. But the fact that the operating system will provide access to such interference is unlikely. However, you can try. Open the window with logical drives by clicking on the “My Computer” shortcut. Select the system disk, next to it is the Windows icon, and right-click on it. In the dialog box, select Format. If your OS is well built, it will prohibit such actions. Otherwise, specify the NTFS file system, quick format and confirm the operation. When finished, the computer will shut down. To return it to working condition, install the operating system.
6
The Acronis Disk Director 11/12 program will help you clean the disk and partition it without harming your computer. Download the trial version from the official website and follow the installation instructions. The program will require you to enter your first name, last name and e-mail, enter any data. At startup, Acronis automatically recognizes all logical drives. Select the system volume - marked with a red flag - and click the Format button. In the window that appears, confirm the action without changing the settings. Wait for it to complete. Restart your computer and start installing windows.
Make sure that the file system of the local disks is NTFS. Choose full formatting. If you are not sure that you can cope with such a task, take your computer to a service center. We wish you success!
SovetClub.ru
Sources
Advertising
Formatting a hard drive is the process of creating a file system on its partition, accompanied by deleting data and creating a new file system structure. Functionality for formatting hard drives and solid-state drives is contained in almost all modern operating systems, but the standard mechanism is not always optimal and applicable. This material will tell you in more detail how to format a hard drive in several ways.
Formatting a hard drive on a laptop
Formatting a hard drive is usually done in order to delete all information that was stored on it. In some cases, this procedure is done to get rid of viruses and other garbage that clogs the disk, causing the computer to work slower and freeze. In fact, formatting a laptop hard drive is not a very difficult task, so let's see how you can handle it yourself. The main thing before formatting is to save all important data on removable media, so restoring data after formatting is quite difficult.
Formatting with windows 7 or 8 distribution
Many users are interested in how to format a hard drive on a laptop via BIOS. By such a problem, users usually mean formatting without logging into the operating system. This procedure may be necessary if a message appears in Windows itself stating that this volume cannot be formatted.
So, we need a bootable flash drive or disk with a distribution kit. You will learn how to create a bootable USB flash drive in this article. Next, insert the removable drive into the CD drive or USB connector. Usually the disc opens automatically. If this does not happen, open My Computer. Right-click on the disk icon and follow the Autorun link.
Now a menu appears in front of the user, prompting you to select the desired installation option. Click Complete installation. After this, you will need to follow the prompts that will appear on the screen. It is recommended to confirm the default settings that are installed on the laptop. Before formatting a hard drive on an HP laptop or laptop from another manufacturer, you need to keep in mind that the desktop will be completely clean after the process is completed. To save information on your laptop, you should back up important documents in advance.
In addition, make sure that you have discs with all the drivers needed for the device on hand. After installing the new operating system, you will need to reinstall them. First of all, you will need to install the chipset driver. All other utilities are installed in any order. Usually this procedure does not cause difficulties, since many of the disks that come with the laptop are designed for beginners, and they can do almost everything themselves. The user will only need to confirm some points.
Formatting in the operating system
Another way to format a hard drive on an asus laptop or a model from another manufacturer is to go to My Computer. Here we select the name of the desired disk. By right-clicking on it, we will see that a menu appears. In it you should click on the Format link.
The Format window will appear in front of the user. The top line contains information about the disk capacity. You can also find information about the source file system here. In the Format window you can change the cluster size, hard drive name, etc.
Before formatting begins, you can select a procedure option. This is a quick format or using compression. The first option clears the file system tables, leaving the physical data untouched. After you have chosen the required method, click the Start button. Typically, a message will then appear in front of the user, warning that information from the hard drive may be lost during the formatting process. But we have already taken care of this by creating a backup copy of the necessary information, so feel free to click OK.
As you can see, formatting a hard drive is not that difficult. Well, if it happens that you have erased important files, then it is still possible to recover data from your hard drive without loss. An easier way to do formatting is directly in the operating system using the Format command. However, if for some reason this procedure is not possible, try running the process during or before installing a new OS.
computerology.ru
In what cases is reset not possible?
If you purchase a laptop without an operating system, you should not expect that there will be a recovery partition on its disk. It is not possible to restore factory settings on such a laptop; in such cases, other methods are used to reset the system to its original state.
It will be impossible to roll back to the original settings even if there was a recovery partition, but during the manual reinstallation of Windows, the wizard or the user himself deleted it, wanting to get more free space on the hard drive. The solution in this case may again be to reinstall or search for an image of the system partition for a given laptop model on torrents or the manufacturer’s official website.
How to format a laptop or computer hard drive
Of course, modern users of personal computers and laptops are much more advanced in terms of IT technology than they were 10 years ago. Much has already become part of everyday life and a normal way of life. In my practice, I have encountered computers where the Windows operating system has not been reinstalled for about 7 years. Nowadays, of course, you almost never see this - people are constantly installing some kind of programs, updates, games, with which a bunch of other necessary and not so necessary software gets into the system. A lot of movies and music are downloaded from torrents, as a result of which there is no more space left on local disks. Therefore, sooner or later the user faces the question of how to format a hard drive to reinstall Windows or free up free space. This simple action can become a serious obstacle for an inexperienced user. Therefore, in this article I will try to talk about how to format the system drive (usually the C: drive), local computer drives, as well as an external removable hard drive. I want to warn you in advance that as a result of these actions you will lose information on the selected logical drive. The second point is that when using third-party programs, you can completely “kill” the partition table on your hard drive and lose everything on it, so you must do everything carefully and consciously. If you don’t understand something, read articles on this topic and try again.
Format a disk in Windows
I'll start, perhaps, with the built-in tools of the Windows operating system. I remember a few years ago, a friend contacted me with a problem that the system would not allow him to format one of the partitions. As it turned out, he was trying to completely erase the windows system partition from under it. Of course it didn't work out. The fact is that a modern operating system - be it Windows 7, 8 or the newfangled 10 - will not allow you to format the system disk on which it is installed. Thus, only additional partitions can be formatted from the operating system - as a rule, this is the drive D:\, E:\, etc., as well as an external removable drive or flash drive. There are three simple ways to do this, which I will discuss in detail below:
The first one is straight from Windows Explorer. Right-click on the logical drive. A context menu will open in which we select the “Format” item:
In response to this action, you should see this window:
In the case of Windows, it is best to choose NTFS as the file system - it has no restrictions from FAT32, it is more reliable. Leave “Cluster size” at its default value. If you just need to quickly clean up the disk, check the “Quick (Table of Contents Cleanup)” checkbox.
Click the “Start” button and wait. Be patient. This process will take longer the larger the disk size and can sometimes take several hours.
The second is the Disk Management system console:
Here you can also see the hard drives installed in the computer and how they are divided into logical ones. Right-click on the desired disk and select “Format” to open this window:
Despite the fact that the window is slightly different from the same one in the first method, the fields and items are completely identical.
The third is the windows command line. To do this, you need to run it with Administrator rights by right-clicking on the icon: Now we write the command for formatting:
format X:
Here X is the name of the logical drive. Those. for example format E:
If you need to specify an additional file system, you need to add the /FS:{file system} argument. Example: format E: /FS:NTFS
For FAT 32 respectively:
format E: /FS:FAT32
In case of quick formatting, put the /q switch, i.e. the command will look like this: format E: /q
Press the Enter button. The system will ask Proceed - Yes or No? Press the Y button and wait for the process to complete.
How to format a system disk with windows (via BIOS)
For this purpose, you will need a Windows 7 or Windows 8 installation disk, or a bootable USB flash drive. Moreover, this will be necessary to install a new system. You will also need to set the computer's BIOS to boot from this media. And then there are 2 ways.
1. Using the built-in installer tools.
Everything is simple here - we go through the stages of installing the Windows 7, 8 or 8.1 operating system and stop at the stage of selecting the system drive:
Click on the old system disk, then on the “Disk Settings” icon. This will display a panel of available actions. Click on the “Format” button and wait for the process to complete, after which you can continue installing the operating system.
2. Using third-party programs.
Many builds of Windows 7 and Windows 8 have additional tools for working with your computer. In the old fashioned way they are called LiveCDs, although they have long migrated to USB drives. They also include utilities for working with the hard drive. The most popular and most frequently encountered are Acronis Disk Director Suite and Paragon.
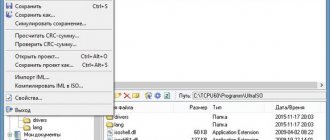
Acronis Disk Director Suite is a very convenient tool, present in probably 75% of builds and LiveCDs. After loading the application, in the main window select the system drive (usually C:\) and right-click on it:
Select the “Format” item.
Select the file system and click OK. All that remains is to click on the “Run” icon with the finishing flag and wait for completion. In Acronis, the entire procedure will take a few minutes - this is hundreds of times faster than under Windows. You can reboot.
Paragon Hard Disk Manager is another one of the best and oldest programs for working with a hard drive. The principle is approximately the same as in Acronis - select the disk and right-click:
Select the “Format Partition” item and get the following window:
Select the file system type, click on “Format” and wait for the result. After the process is completed, we reboot.
nastroisam.ru
How to format a hard drive on a laptop: methods
The most frequently asked question: “How to format a hard drive on a laptop or desktop computer?” Why is this necessary? This article will describe how to perform this procedure and its purpose.
Format the internal hard drive using built-in software tools
The Windows operating system already has built-in utilities that allow formatting without the use of third-party software. This process can be done in two ways:
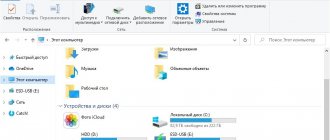
- Formatting using Disk Control Panel. In this case, you need to call the context menu by hovering the cursor over the “My Computer” icon on the desktop and clicking the right mouse button. Next, select “Manage”, after which a new window will open, which will display all available functions. On the left side you need to select “Storage Devices”, and then “Disk Management”. On the right side of the window, all storage media, their file system will be displayed, and the ability to work with them will be provided.
- Formatting using Explorer. To complete the task, just move the mouse cursor over the “My Computer” icon and left-click on it to open a new window. All information storage devices will be displayed on its left side. Select the required disk, hover the cursor, right-click, and in the context menu that appears, select the “Format” function. Next, set all the necessary parameters and click on the “Start” button.
Formatting a hard drive from BIOS
This function is performed in the following cases:
- Software installation. It is performed both through the built-in capabilities of any distribution kits, and using third-party programs such as Acronis. It should be remembered that if this operation is carried out with a drive that has already been in use, then before formatting the hard drive on a laptop or desktop computer, you need to make a backup copy of all the information located on it.
- When replacing HDD. The essence of the work performed is to divide the new hard drive into logical partitions and then install the software. In this case, you can get by with the standard features of the installed software and not use other programs.
View media files
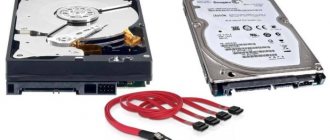
Many people want to repeatedly watch their favorite films, listen to music, or rummage through the family photo archive, using a large TV screen and a DVD player or any other device that supports reading information from external media via USB. However, standard plastic media (CDs) sooner or later become scratched and, as a result, fail. And the amount of information recorded on them is negligible. And what way out of this situation can be found? Ordinary hard drives for laptops and so-called “pockets” (special devices for connecting hard drives to other devices) come to the rescue.
But that's not all. It is worth remembering that a DVD player or the same car radio only supports one external drive format, and in order for everything to work correctly, you must format the hard drive to fat32 before recording multimedia files. So, the device will recognize the external source and normally read all the information.
What should you do if your hard drive asks you to format it?
During the operation of hard drives, situations arise in which the operating system may suddenly ask you to format the internal hard drive. This can be due to a number of different reasons, the main of which is a failure of the drive. Special attention should be paid to the fact that it is not recommended to carry out the procedure using built-in software tools, since all information stored on the drive will be deleted. Before formatting a hard drive on a laptop or desktop computer, you should use a third-party utility that will allow you to backup the information. In this case, many experts recommend using Acronis or GetDataBack. How to use these applications is described quite clearly in the instructions for working with them. This method is also good in cases where a flash drive or external hard drive asks to format it.
In cases where this method does not give positive results, you should immediately stop further actions and contact a certified service center.
Removing information during pre-sale preparation
There are situations in our lives when we have to part with our beloved PC. And for this it is necessary to carry out pre-sale preparation and remove all information unnecessary for a potential buyer. In such cases, a logical question arises: “How to format a hard drive on a laptop or desktop computer so that it is not possible to restore erased files and folders?”
To do this, you need to make a backup copy of all information, format all-logical disks, then write any kind of files to them and then format them again. At the last stage of preparing your PC for sale, you need to replace your old operating system with a new one. This procedure is carried out directly from under BIOSa using the installation disk.
Can frequently formatting a hard drive cause any harm to it?
Contrary to the prevailing generally accepted opinion, I would like to note that even the most frequent formatting of the hard drive of a laptop, desktop computer or external drive cannot cause any harm. This procedure does not in any way contribute to demagnetization of the surface of the platters, the appearance of damaged sectors, premature wear of the HDD drive, or any other failure that could lead to failure of the drive. These are all myths that are not supported by facts. The surest way for a hard drive to end up in a landfill is through improper use, overheating, or shaking.
fb.ru
Instructions
Formatting is a responsible process and only strict adherence to the recommendations below can guarantee the subsequent normal functionality of Windows 7 and the preservation of user information stored in the computer’s memory.
Depending on the goals set, the user can immediately begin performing the described actions from the paragraph he is interested in (1st or 2nd).
It should be noted that difficulties rarely arise in following the instructions from section 1 and even beginners can easily cope with them, but in order to format the system volume of a computer without uninstalling Windows 7 (part 2), you will need to show much more diligence and care, so how failure to comply with the requirements described below is likely to lead to subsequent system inoperability.
Preliminary activities
Before the procedure, you should copy all important information that the PC owner wants to save from the formatted disk.
If the amount of information being stored is small, then copying can be done to external media, for example, to a CD or flash memory.
If the volume of stored information amounts to gigabytes, then it is recommended to use an external hard drive or cloud storage.
Part 1: Working with logical partitions and additional disks
To format a volume that is not a system volume or a connected separate physical hard drive, you must perform the following sequential steps:
- In the window of Explorer or any other file manager, open the contents of “Computer”;
- Call the context from a logical partition of a hard drive or a separate connected physical hard drive (not from the system volume, which is usually designated by the letter “C”);
- Click on the line with the inscription, “Format”;
Attention: We remind you that after formatting the files will be erased, so if the user does not intend to delete them permanently, then you must first copy them to another disk, external storage device, or to the cloud (as already noted in the preliminary steps section).
4. Next, check the box indicated by the red arrow (see figure below);
5. Click “Start”;
7. Done. The disk is formatted.
In a similar way, you can format using third-party applications, for example, Acronis Disk Director.
If it is impossible to use the methods described above, “KS” (Command Line) will come to the rescue. With its use, it will take even less time to complete the task.
On a Windows 7 PC, you will need to complete the following sequential steps:
- Launch “KS” by typing only three letters in the “Run” menu: “cmd” and clicking “Ok”;
Note for beginners: You can open the Run menu through Start.
2. Then the format command containing the drive letter (which needs to be formatted) before the colon performs formatting;
3. In the example shown in the screenshot above, after pressing “Enter” the disk will be formatted under the letter “H”.
Note: In this way, you can format any disk in a PC, and after the command you can specify the file system in which you want to perform the operation.
Using the above methods, you can format all computer disks except the system one, i.e. without uninstalling Windows 7.
It is advisable to completely remove the system volume from the OS partition by formatting it only during a clean reinstallation of the system.
But what to do when you need to format a volume on which “Seven” is installed without subsequently reinstalling the operating system? In the second part of this manual, Windows 7 users will find the answer to this difficult question.
Part 2: Formatting the system volume on which the OS is installed without removing Windows 7
It will not be possible to carry out the operation using the above methods, and the system itself simply will not allow this.
The success of the operation can be ensured by the presence of the following two things:
- Availability of PC access to the World Wide Web for uploading information to cloud storage or availability of an external storage device with sufficient memory capacity;
- You will need bootable media with Acronis True Image.
Note: If there is no user data on the PC or it is not needed, then the first point can be ignored.
- Start the PC from an external device with True Image;
- Click on the icon pointed to by the red arrow in the picture below;
- Next, select the source, as shown in the screenshot below;
- Show the program which disk needs to be formatted;
- If there is no need to save data from the PC, you can only specify the system partition;
- Specify the location where to save the image;
- Click “Create now”;
- Wait;
- Start the PC from an external device, for example, “Acronis DiskDirector”;
- Perform formatting and analysis of the presence of bad sectors on the disk;
- Start again from the external media and click “Backup”;
- Specify a copy of the disk and system volume and click “Recover disks;
- Select the image and click “Restore Now”;
- Click “Restart”;
- Wait;
- Ready. The PC will restart with Windows 7 installed.
Sometimes, for one reason or another, users may need to format their hard drive. If you carry out the procedure as usual, the OS with all user settings will be lost. However, there is a way to clean the hard drive without removing the operating system.
How to format your computer
The hard drive is the most important place on any computer or laptop, because it is where all user information, files and folders with documents, multimedia files and installation programs are stored. However, every user at least once in his life needs to clean his car. As a rule, this is done before taking the computer to a service center for another problem, but just in case, the data is re-saved and the hard drive is cleaned. Sometimes the question of how to format a computer arises when the machine starts to work slowly or the operating system crashes. And, of course, if your working device is transferred to a new owner, then you also need to know how to format the laptop completely so as not to cause trouble either to yourself or to the new user. In any case, computer literacy in this matter will obviously not be superfluous.
As you know, any computer has two types of disks - system and non-system. In addition, you may only need to format one logical partition in the windows operating system.
This operation is quite simple. Using Explorer (or by clicking on the “My Computer” icon), select the disk you want to clean, for example, D, right-click and select “Format” from the drop-down list. The system will ask for additional parameters, which can also be specified if desired: volume label, formatting method. As a rule, by default the file system is specified as NTFS, and formatting is specified as fast. If you do not have any special requirements, then it is better to leave everything as it is by clicking “ok”. If you decide to format your computer, you should be prepared for the fact that it will take some time.
In order to clean up a non-system drive, you can use the command line by writing in it: “format /FS:NTFS D: /q”. D in this case is the disk to be erased. You must have administrator rights for this operation.
How to completely format a laptop
If the task is to completely clean the PC, then you will need to format the hard drive too. In any case, before clicking the “Format” button, you must save all data and installation files. Otherwise, they will be deleted, and you will have to spend time restoring the necessary programs and documents.
The next step on the path to how to format a complete computer is a change in the BIOS settings. After rebooting the machine, you need to enter the BIOS and change the settings in the Boot menu to start from a disk or removable storage device (the “Boot from CD” or “Boot from removable storage” items). The computer will restart again, saving the changes in the settings.
After turning on again, according to the instructions, the machine will require a boot disk to start the operating system. Insert the disc, wait until all the files download, then select the necessary options following the prompts of the installation wizard. You need to choose a full installation, because when formatting disks, absolutely all information is deleted from them. This is also something to keep in mind when wondering how to completely format a hard drive.
Next, you will need to delete the existing partition or multiple partitions and allow all windows files to install. This will last approximately 30 minutes. After this, the machine will reboot again, and all you have to do is wait for it to turn on and set the latest settings - computer name, date and time, product key, update settings, etc. Next, enter network settings for future work on the Internet; the computer will establish a connection automatically according to the specified parameters. Now the formatting is complete, and you have a completely clean laptop, all systems of which work without failures.
strana-sovetov.com
Use of third party programs
There are many service utilities, both paid and free, that can also be used to perform formatting. Among the best developments it is worth noting:
- Acronis Disc Director;
- Paragon Partition Manager;
- EASEUS Partition Master;
- Aomei Partition Assistant;
- MiniTool Partition Wizard.
All these programs can create and resize logical partitions without formatting, that is, while preserving all user data. It is irrational to use them only for formatting; the tools from the basic Windows set do an excellent job with this task.
The article aims to provide all the steps to format a laptop so that anyone, even a non-computer owner, can perform this operation without much difficulty. This way, you can get a clean laptop without any programs, viruses or spyware that can reduce your system resources as this will affect the speed of your computer. To format your laptop PC, you will need an external hard drive or USB drive (for backing up information). Disk with the operating system, since after formatting you will need to reinstall it. Before you start formatting, you should know that some sites specializing in notebooks recommend that you pay close attention to certain points, for example, knowing the resources of the PC, so how each operating system has its own minimum requirements to perform any operation; – download the drivers required for your PC; If you do not have an installation CD, just go to the official website of the computer manufacturer. It is in the “Support/Downloads” section and find your computer and the model of the operating system that you are going to install.
The formatting procedure is valid for any version of Windows.
If you're going to save documents, be especially careful because often you don't know which folders contain important ones, and there's often not much time to switch between folders. If yes, what you should do is: Open "My Computer" or "Computer" and double click on the C: drive. The Users folder contains subfolders Documents, Pictures, Videos, Desktop, etc. Make sure you have copied all the important documents completely , otherwise they might get lost. If there is more than one user session on your computer, it will probably tell you that you don't have permission to copy certain files. In this case, you will have to go into other sessions and back up your files in each of them. Also check the Program Files folder to see if there is anything you want to keep; then insert the installation CD containing the operating system you are about to install and turn off the computer. Then turn on the PC and enter the BOOT MENU: the access key may vary depending on the PC, but the most common are F1, F2, F8, F9, F10, F11 and F12. Simply, when it lights up, it usually appears which key to press; it lasts for a couple of seconds, so pay attention before starting Windows. Select the CD drive or USB slot from which the system is designed for Windows. Windows will download the installation files and guide you through a series of steps and processes to set up your PC. Since you are about to format the hard drive, you will have two options on the screen: Click Custom (Advanced). This will open a screen listing installed hard drives or partitions if your the hard drive is partitioned. If you have more than one hard drive, I recommend that you select the drives one by one and wipe each drive to get a completely clean installation of the system without any old files. There will only be one hard drive listed because you'll remove all the sections, so select the only item you have left and call it NEW. A field will appear that says SIZE - leave it as is and click APPLY. You will see a warning message: click ACCEPT and you will see that you have two partitions again; select the largest section and click NEXT . At this point, a process will start that will restart your computer several times. If computer recovery starts the formatting process from the beginning, you will have to wait until the name of the installed operating system appears on the screen. Then close the window. The computer will restart again; here you need to quickly remove the installation CD and the process will be completed. When the above process is completed, configuration windows will appear in which you will need to select your country, region and keyboard layout. Now that formatting the laptop is complete, you will need to install drivers, programs and all previously saved documents. To find out which Windows drivers are missing recognized, open the Start menu, type Device Manager in the search bar, and press ENTER : A yellow warning triangle will appear on components that you will have to install manually. Avoid using programs such as DriverEasy or DriverGenius, as all they will do is add advertisements to your laptop, not to mention bombard you with constant erroneous notifications about computer problems. It's always better to do a manual installation.X
This article was produced by our experienced team of editors and researchers, who reviewed it for accuracy and comprehensiveness. wikiHow's content management team carefully monitors the work of its editors to ensure that every article meets our high quality standards. This article has had 131,419 views.
If your laptop has been attacked by a virus and something strange is happening to it even after you got rid of the virus, it may be worth formatting it. Because formatting completely erases the contents of your hard drive, it is the most reliable and effective way to clean your computer. The procedure for formatting a laptop is very simple today. Manufacturers provide the owner with a copy of the operating system (OS) along with drivers and utilities, or create a recovery partition on the hard drive. However, before you start formatting, be sure to write all the data to an external hard drive, CD or DVD, otherwise you will lose it.
Method 1 of 2: Format the laptop from the installation CDs
- {“smallUrl”:”https://www.wikihow.com/images_en/thumb/7/72/Reformat-a-Laptop-Step-1-Version-2.jpg/v4-460px-Reformat-a-Laptop- Step-1-Version-2.jpg”,”bigUrl”:”https://www.wikihow.com/images/thumb/7/72/Reformat-a-Laptop-Step-1-Version-2.jpg/ v4-728px-Reformat-a-Laptop-Step-1-Version-2.jpg”,”smallWidth”:460,”smallHeight”:348,”bigWidth”:728,”bigHeight”:551,”licensing”:”
”}1 Back up your hard drive.
Formatting your laptop will result in the loss of all information stored on it, so if you want to save it, you should copy the contents of the hard drive to an external hard drive, CD or DVD.
If you were given installation CDs along with your laptop, then you need to use them. If you did not receive any disks with your laptop, then most likely it contains a recovery partition, in which case you should use the second method.[1]XInformation source
It usually starts automatically and opens a menu or window with options to choose from. Select the option to install a new operating system.
- If the disk does not start automatically, double-click on “My Computer,” right-click on the icon of the OS disk and select “Autorun.”
If you step away from your computer for a while, the process will pause at the moment when a user selection is required. Follow the prompts, be patient, and avoid the temptation to interfere with the process. This may take a few minutes.[2]XInformation source
- If you are formatting your laptop's hard drive, when prompted by the installation disk, confirm the default settings.
When the installation of the operating system is complete, a completely clean desktop will appear on the monitor. Advertising
Method 2 of 2:Format the laptop using the recovery partition
- {“smallUrl”:”https://www.wikihow.com/images_en/thumb/a/a6/Reformat-a-Laptop-Step-6-Version-3.jpg/v4-460px-Reformat-a-Laptop- Step-6-Version-3.jpg”,”bigUrl”:”https://www.wikihow.com/images/thumb/a/a6/Reformat-a-Laptop-Step-6-Version-3.jpg/ v4-728px-Reformat-a-Laptop-Step-6-Version-3.jpg”,”smallWidth”:460,”smallHeight”:348,”bigWidth”:728,”bigHeight”:551,”licensing”:” ”}1 Restart your laptop.
While the computer is booting, press the F10 key on your keyboard several times in a row. As a result, a menu will appear in front of you that will offer you a fix or recovery (formatting and rebooting). - {“smallUrl”:”https://www.wikihow.com/images_en/thumb/a/ac/Reformat-a-Laptop-Step-7-Version-3.jpg/v4-460px-Reformat-a-Laptop- Step-7-Version-3.jpg”,”bigUrl”:”https://www.wikihow.com/images/thumb/a/ac/Reformat-a-Laptop-Step-7-Version-3.jpg/ v4-728px-Reformat-a-Laptop-Step-7-Version-3.jpg”,”smallWidth”:460,”smallHeight”:348,”bigWidth”:728,”bigHeight”:551,”licensing”:” ”}2 Select the option to install a new operating system.
The advantage of this method is that you don't need to do anything else. The recovery partition will format itself, reboot the OS, and install the necessary drivers and programs that come with your laptop. - {“smallUrl”:”https://www.wikihow.com/images_en/thumb/c/cb/Reformat-a-Laptop-Step-8-Version-3.jpg/v4-460px-Reformat-a-Laptop- Step-8-Version-3.jpg”,”bigUrl”:”https://www.wikihow.com/images/thumb/c/cb/Reformat-a-Laptop-Step-8-Version-3.jpg/ v4-728px-Reformat-a-Laptop-Step-8-Version-3.jpg”,”smallWidth”:460,”smallHeight”:348,”bigWidth”:728,”bigHeight”:551,”licensing”:” ”}3 Wait for the installation process to complete.
Typically it lasts about 30 minutes. Advertising