In this article we will look at several effective methods that explain how to disable updates in Google Chrome. Any application requires regular updates to function properly. The browser is no exception. Chrome constantly checks itself and, if new patches are available, downloads and installs them. Previously, the user could disable auto-updates, but in the latest versions of the web browser this function is missing. Let's look at how to disable automatic downloading on Windows in different ways.
Instructions on how to disable updates in Google Chrome
The first method involves using parameters, provided that you are using one of the older versions of the program. Instructions:
- Open your browser settings.
- Open advanced options.
- In the personal information category, click on “Content Settings.”
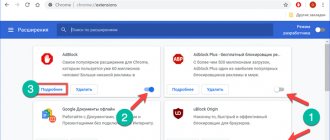
- In the window that opens, click on the highlighted item that allows you to disable some plugins.
- Find Google Update in the list and click “Disable”.
Is this necessary?
Auto-update is used to receive the latest information on the site. Relevant for news portals where new information is added in 5-10 minutes. For sites that are not updated that often, this feature is a hindrance. For example, you fill out a form or watch a movie online. I had to take a break, and the recorded data was updated. On the other hand, auto-update helps to rationally use PC memory. Once disabled, the browser's system resource consumption will increase, resulting in slower performance.
Disabling Google Chrome auto-updates via Registry Editor or gpedit.msc
The next solution to disabling Google Chrome updates is a little more complicated than the one presented above. The procedure is carried out through the registry editor:
- Follow the link and download the Google Update policy template - www.dl.google.com/update2/enterprise/GoogleUpdate.adm.
- Open the archive and extract it to the folder – C:\Windows\PolicyDefinitions\.
- Click on the button combination – Win+R. This will open a command prompt where you need to enter – msc. The following window will open.
- Open the Computer Configuration tab.
- Go to “Administrative Templates”, where you should find Google and Google Update in the list.
- Select the subsection – Applications. In the list, click on our browser – Chrome.
- On the right side you will see an additional window where you need to double-click Allow installation and select the “Disabled” option.
- Go to the next item – Update Policy Override, and enable it.
- In Policy, set the value to Updates disabled. Click "Apply" and "OK".
How to enable Flash Player in Google Chrome
This way you will prevent downloading of patches. You can also disable updates using the Registry Editor:
- Open the command line by pressing the Win+R buttons.
- Enter the command – regedit.
- The Registry Editor will open. Go to the HKEY_LOCAL_MACHINE tab, then the SOFTWARE section and Policies. In this category you need to create a Google subsection, open it and create another category called Update.
- Open the created section and set commands with specific values: AutoUpdateCheckPeriodMinutes - value 0 DisableAutoUpdateChecksCheckboxValue - 1 Install{8A69D345-D564-463C-AFF1-A69D9E530F96} - 0 Update{8A69D345-D564-463C-AFF1-A69D9E5 30F96} — 0.
If you are using a 64-bit system, then do the same steps, but in the next category - HKEY_LOCAL_MACHINE\ SOFTWARE\ WOW6432Node\ Policies.
Disabling scheduled tasks and services
To periodically check for updates, the Chrome browser uses services and rules created at the time of installation.
Call the “Run” dialog box using the keyboard shortcut “ Win + R”
"
Enter “ taskchd.msc
” into the text field and launch the Windows Task Scheduler.
In the selection area, click on the “Library” icon. After selecting it, scheduled tasks will be displayed in the upper half of the central part of the scheduler window. The two shown in the screenshot are created by Chrome. The first task is activated when the user logs in and is responsible for checking for new versions when the browser is launched. The second runs while the user is using Chrome and is designed to periodically, hourly search for updates. We select each task sequentially and disable it using the button marked “3”.
Call up the “Run” dialog box again. Enter “ services.msc”
and click “OK”.
The MMC console section intended for managing system services will open. In the general list we find two Google Update services shown in the screenshot. Double-click to open the Properties
».
On the General
» Expand the drop-down menu indicated by the arrow. Set the startup type to “Disabled”. Click the “Apply” button to record the changes made.
Renaming the Update.no folder
The third option, answering the question - how to disable automatic updates of Chrome, is quite simple. You need to rename one folder. For this:
- Go to your web browser folder. It is usually located along the path – C:\Program Files (x86)\Google.
- Find the Update folder in the list and rename it, adding a tail at the end - .old.
This way the system will no longer be able to install new updates. Moreover, even manually downloading the latest program patches will not work. When you try to install a new patch, the browser will show an error.
Additionally, you can go to the scheduler and turn off the GoogleUpdate options there. To open it, type “Task Scheduler” in the start search bar.
How to update your browser manually
If you have disabled the auto-update function in Google Chrome, everything worked out for you and the browser always works in a non-replaceable version, then sooner or later you may want to improve its quality by updating. If irregular and selective updating suits you quite well, then you can continue to disable this function, but also, if necessary, update the Google browser manually. The update procedure is similar to the installation process. You just need to download the installation file of the desired new version of the browser and unpack it, without deleting the old version. When the new package is unpacked, the system itself will make the necessary changes to the Google folder on hard drive C, and the browser will work as an updated version.
Removing update files
To remove all update files, do the following:
- Call up an additional menu by right-clicking on the browser shortcut and select “File location”.
- Pay attention to the address bar that is located at the top of the open folder, and go to the Google category.
- Log in to Update.
- Find the GoogleUpdate file and delete it. But, if you simply rename the folder, as described in the instructions above, then you won’t have to delete anything.
Don't forget to restart your computer. If you want to return the updates again, you will have to reinstall the browser.
Limiting updates to the current version
Another setting of installed administrative templates allows you to limit the receipt of updates to only the current version of the browser.
Launch Chrome and check the build number in the settings. In the screenshot it is shown with a frame. For further actions, just remember the first two digits.
Follow steps 4 and 5 above by opening the Group Policy Editor and going to Chrome Settings. Double-click to call up the settings for the “ Target version prefix override”
».
Switch to the “ Enabled”
» about the switch. In the "Options" section, the text field is activated. We enter the build number into it, which we looked at in the Chrome settings. If you specify the first two digits, as shown in the screenshot, the browser will receive all intermediate fixes, but will not update to version 75. When the full number of the current build is entered in the field, Chrome stops downloading updates, perceiving it as the latest allowed. We record the changes made by clicking “Apply” and closing the editor.
Why is the contact page updated?
If the VKontakte page is constantly updated on your computer, then it’s time to check it for viruses. Found malicious objects must be treated using an antivirus program. After this, the computer must be restarted.
Interesting materials:
What forms can be put in the oven? What forms of algae do you know? What fruits are there in Turkey in June? What fruits should not be mixed in smoothies? What functions did the princely squad perform? What are the functions of the police? What functions does Rosstat perform? What functions does the core perform? What functions does the server perform? What functions does a PLC perform?
How to check that everything is done correctly
You can verify that the actions performed were correct in your browser settings. There you can also disable auto-update if the installation of the extension described above was unsuccessful. To do this, enter chrome://discards/#automatic-tab-discarding into the address bar of your browser, press Enter and study the information that appears.
To refuse auto-refresh of tabs, select the “Disable” option in the drop-down list at the top of the window. Saving the specified settings will disable the option.
Getting rid of auto-refresh tabs
New versions of the browser have introduced one not very convenient option: auto-refresh tabs. When inactive, background browser tabs begin to reload automatically. This eats up traffic, and when you leave a video in one tab for a while, the entire loading of media content may fail due to a page restart. You also often have to scroll through news feeds again. How to solve a problem? You just need to disable tab refresh:
1.Enter chrome://flags/#automatic-tab-discarding.
2.In the drop-down menu, select “Disabled”.
There are at least four ways to disable auto-update, including manually deleting the file that helps update the browser. Before the procedure, make sure that you really need it and get down to business.
Source
Should I disable auto-updates?
Automatic updates are an important feature, so you should disable it only when absolutely necessary. If, for example, you need a certain version of a program or in order to temporarily free up Internet traffic for more urgent actions.
Only an updated browser can guarantee the high level of protection promised by the developers.
Please note that all further manipulations are carried out only at your own peril and risk. In order to correct situations if Google Chrome or your PC begins to work incorrectly, create a restore point in advance that will allow you to perform a system rollback.