06/28/2018 windows | for beginners
In some cases, you may need to format a flash drive or hard drive using the command line. For example, this can be useful when Windows cannot complete formatting, as well as in some other situations.
This instruction details several ways to format a USB flash drive or hard drive using the command line in Windows 10, 8 and Windows 7, as well as explanations about when which methods are more suitable.
Note: Formatting deletes data from the disk. If you need to format drive C, you won’t be able to do this while the system is running (since the OS is located there), but methods nevertheless exist, as described at the end of the instructions.
Formatting the system partition
To do this, you will need a bootable USB flash drive or disk to install the operating system - and it doesn’t matter which one: Windows 7, 8, 10 or even XP. Basically, you need to launch the bootable media, select installation, and during installation the system will ask you to format the volume with the OS already installed.
- Making a bootable flash drive - read the instructions here.
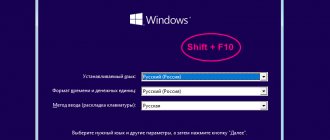
- Reboot the computer and launch the “BOOT Menu” or go into the BIOS and set the boot priority as your flash drive. For convenience, you can see the sign below. Some laptops have their own ways of launching these partitions - so it might be worth googling this information.
- As soon as the disk is launched, select the language.
- Click on the “Install” button.
- Next, you will be asked to enter an activation code, click “I don’t have a product key.”
- Select any version of Windows.
- We agree to the license agreement.
- And here we come to one of the main steps - you need to select “Custom” installation.
- You will see all your partitions, again they will not be displayed by name as in the OS. Therefore, we focus on size. Select the partition with the system and click on the “Format” button. Here you can also format all partitions and repartition the disk - to do this, select all partitions and click “Delete”. And after that, “Create” the sections again.
ATTENTION! Do not click on the "Next" button if you do not need to install this system.
Using the FORMAT command on the command line
Format is a command for formatting drives in the command line, which has existed since the days of DOS, but works properly in Windows 10. Using it, you can format a flash drive or hard drive, or rather, a partition on them.
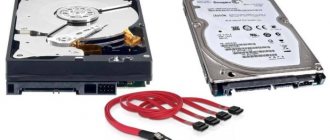
For a flash drive, this usually does not matter, provided that it is detected in the system and its letter is visible (since they usually contain only one partition), for a hard drive it may have: using this command you can format only partitions individually. For example, if the disk is divided into partitions C, D and E, using format you can format D first, then E, but not merge them.
The procedure will be as follows:
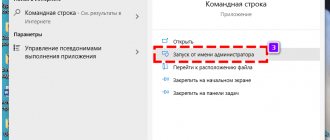
- Run Command Prompt as an administrator (see How to run Command Prompt as an administrator) and enter the command (the example is for formatting a flash drive or hard drive partition with the letter D).
- format d: /fs:fat32 /q (In the specified command after fs: you can specify NTFS in order to format not in FAT32, but in NTFS. Also, if you do not specify the /q parameter, then not a quick, but a full format will be performed, see . Quick or full formatting of a flash drive and disk).
- If you see the message “Insert a new drive in drive D” (or another drive letter), just press Enter.
- You will also be prompted to enter a volume label (the name under which the drive will appear in Explorer), enter as you wish.
- When the process is complete, you will receive a message indicating that formatting is complete and the command line can be closed.
The procedure is simple, but somewhat limited: sometimes you need to not only format the disk, but also delete all partitions on it (i.e., merge them into one). Format won't work here.
FAQ
What to do if the operating system does not boot and you need to format the media?
You can use a Windows boot disk by specifying it as a boot device through the BIOS. Read more here.
The flash drive is formatted in exFAT, is it possible to convert it to FAT32 via the command line?
Yes, use the format command for this (the method is described above). There are also various GUI formatting applications, see all methods for converting from exFAT to FAT32.
When formatting via cmd you have to wait a very long time.
The fact is that when using format K:/FS:FAT32, normal formatting is applied, it takes up to 10 minutes or more. You can use DiskPart or use the “quick” switch for the format command, then the quick method with clearing headers will be used.
How diskpart works
Creating a bootable flash drive through the diskpart is a fast and affordable way. Due to the fact that this utility works in text mode, every personal computer user can easily cope with this task.
With the rapid development of technology, everyone has access to the Internet, where you can find free versions of various programs for creating a bootable flash drive. However, it also happens that there is no access to the Internet due to some circumstances, so it is important to know a few simple alternative ways to create a bootable flash drive.
Diagnostics
In the case where the drive you are having problems with is not a solid-state technology, its functionality is achieved through the interaction of electronics with mechanics. It is this symbiosis that ensures the correct functioning of your hard drive, as a result of which you can capture the special sound that is produced by one or more rotating plates.
It should be noted that in some cases, such noise is also mixed with the resonant clicking sounds of the positioning device.
All of the above indicates that the drive is working properly. If we take into account the fact that the OS works without any failures or defects, except that the hard drive is not formatted, then replacing the hard drive is absolutely not necessary.
Changing disk partitions.
Let's say there is a need to split the currently existing drive C: into two drives C: and D: without losing data. In fact, you need to free up part of the disk space of the partition that corresponds to the C: drive and create a new partition in the freed area. Procedure:
list disk - if necessary, view the list of disks and select the one with which we will work. The selected drive is marked with an asterisk:
list partition — view the list of partitions to select the one from which you want to “take away” disk space. For example:
In this case, the disk has 3 partitions, two service and one corresponding to the C: drive with a size of 59Gb. If necessary, you can clarify information about partitions using the DETAIL PARTITION command (after SELECT)
select partition 2 - select the partition from which we will cut off free disk space.
To shrink a partition (volume), use the SHRINK command, a hint for which can be obtained by running:
In order to free 10000Mb (approximately 10GB, it is more correct to use 1024 instead of 1000 in calculations) from the selected partition, run the command:
shrink desired=10000 — free up 10000MB.
When the command is executed, the amount of freed disk space is displayed (of course, not quite 10GB):
Now you can create a new partition adjacent to the one from which disk space was taken, which will be occupied by the new partition:
create partition primary
You can see how the list of disk partitions is now presented:
The newly created partition does not have a file system, which will be created by executing the format command. Select a section:
select partition 4 The selected partition (focus) is marked with an asterisk in the list. When you issue the CREATE command, focus is automatically moved to the created section. However, to avoid trouble, it is worth making it a rule to select and check the selection before performing dangerous operations, such as formatting. A hint on using the FORMAT command can be obtained using the standard HELP FORMAT:
To quickly format a partition using the Disk_D volume label and the NTFS file system:
format fs=ntfs label=”Disk_D” quick
Waiting for the operation to complete:
The partition is ready for use and can be assigned a letter with the ASSIGN command:
assign letter=d — assign the letter D:
If the specified letter is already assigned to another partition, the utility will display an error message:
You need to either reassign the letters taking into account the new partition, or use the first free one, which is done using the ASSIGN command without parameters:
If a letter is successfully assigned, a corresponding message is displayed:
The problem of combining two adjacent sections into one is solved in a similar way. For example, the D: drive created in the above case needs to be deleted and the space it occupies should be attached to the C: drive. Naturally, the DISKPART command does not save user data and this issue must be taken care of by the user himself, and before the partition is deleted. To solve the problem, you need to delete partition 4 (Disk_D in the example above) and expand partition 2 (Disk_C) to the free space. To delete a partition, use the DELETE command, and to expand it, use the EXTEND command. A hint for use can be obtained in the standard way:
Thus, to solve the problem, you need to execute a sequence of commands:
select partition 4 - select the partition to delete.
delete partition — delete the selected partition.
Typically, the partition is in use by the system and the delete command may fail with an error:
delete partition override - delete the selected partition regardless of its use by the system.
After deleting, you need to move the focus to the section that needs to be expanded:
select partition 2 - select partition 2.
extend — extend the partition to cover the entire amount of adjacent free space.
It often happens that many modern computers do not have a disk drive. This often causes difficulties, especially when you need to install a program from an installation disk. Most often, the problem occurs when installing or reinstalling the Windows operating system on such a computer. To avoid such problems, it is proposed to create a bootable USB drive that will perform all functions exactly like the installation disk.
To create a bootable USB drive or sometimes it is also called a bootable flash drive using the “cmd” command line, you need to perform a simple two-step algorithm. The first step will involve using a standard utility called diskpart .
Script support
In the simplest version, selecting a partition in DiskPart is quite simple. To split the selected partition, use the line create partition logical size=XXXXXX
, where
XXXXX
is the size of the created logical disk in megabytes.
Naturally, the system should see a partition marked with a certain letter in the file manager. To do this, use the command assign letter=X
, where
X
is an unused character.
This means that if you assign a new partition, for example, the letter F
or
E
, under which the OS recognizes a removable USB drive and a DVD/CD drive, then either they will not work later, or the created partition will be inactive.
Cause of malfunction
As a rule, the culprit in a situation in which the system refuses to clear a certain area of the hard drive is the user himself. Due to limited knowledge, a novice user is not always able to predict the result of his actions. The desire to optimize the operation of a hard drive using any of the utility programs often ends in disastrous consequences. As a result, unknowingly made changes to the operation of the HDD have an effect literally immediately. Again, not every user will notice such metamorphoses. Only later, when the operating system needs to be reinstalled or the experimenter has a need to permanently delete data from the drive, completely or partially format one of its partitions, the user will most likely be incredibly surprised by the message: “Windows was unable to format the disk.” However, even an old woman can have a problem.
Obtaining information about capabilities and attributes
To use this toolkit, you will first need to call the command console. Whether you like it or not, this utility built into the system works exclusively in this way.
In the command console, as with all other system tools, you can simply enter the name of the command itself, then enter a question mark separated by a space and a right slash ( diskpart /?
). All attributes available for use will be displayed on the screen. But in this case we are only interested in some of them.
Preparing a bootable flash drive.
You need to format the flash drive and create an active partition on it.
At the prompt, enter the command to display a list of drives:
select the desired flash drive for subsequent operations:
select disk 3 - if the flash drive was displayed in the list of disks as “Disk 3”. If there are several disks in the system, it is usually enough to know the size of the flash drive used. However, an error in selecting a disk can lead to the loss of data stored on it, and as additional information you can use the data obtained using the detail subcommand (after selection with the select disk command):
detail disk. Example of information displayed:
clear the contents of the flash drive:
It is advisable to use the clean command to remove any formatting previously applied to a given disk. After the command is executed, the disk goes into an uninitialized state. On MBR disks, only MBR partition structure information and hidden sector data are overwritten. On GPT disks, information about the structure of GPT partitions, including the protective MBR, is overwritten. Additionally, the first and last megabytes of disk space are reset to zero.
General information
DiskPart
is a command line utility for managing disks, partitions and volumes. Included in Windows distributions, including Windows PE, which means that after booting from these live-CD/DVD/USB, it can be used to partition a disk, change partition letters, format a hard drive, etc.
Having launched DiskPart in the console, we get into the command interpreter:
X:\> diskpart DISKPART>
The execution of commands can be automated by writing them to a text file cmd.txt and running the command:
diskpart /s cmd.txt