Addendum 2.05.2019
Very often, while using your computer, “brakes” freeze and slow down, in this case it is necessary to check the hard drive for errors , fortunately in Windows there are many opportunities to do this check. Read this article carefully and follow the recommendations.
If, while working on the computer and performing any manipulations, the PC begins to slow down or freeze, this may mean that there are some errors on the hard drive. In this case, you need to check the hard drive for errors and try to fix them. This is quite easy to do.
It is worth noting that the manipulations described below will not help solve all problems with computer slowdown. However, for those cases where the “brakes” are caused by errors on the hard drive, these actions are quite suitable. In addition, correcting errors and maintaining the hard drive in good condition will extend the life of the HDD, so it is advisable to perform this procedure regularly.
What can cause errors on a hard drive?
Errors on the hard drive can occur for various reasons. For example, while working on a computer, the electricity suddenly went out, and some files or programs were open. Additionally, some users turn off the computer by pressing the power buttons rather than by shutting down. Such actions are equivalent to a sudden power outage. In this case, the computer shuts down incorrectly. In addition, there are a large number of reasons why errors appear on the hard drive.
Checking your hard drive for errors in Windows
There are several ways to check your hard drive for errors. This can be done using the integrated command line utility CHKDSK or third-party programs, as well as a graphical tool. For novice users, the last option is perfect, as it is the simplest of all. Checking in this way is the same on Windows “seven” and “eight”.
This procedure can take quite a lot of time, depending on the size of the hard drive and the number of errors detected. Working on a computer at this moment is not recommended. If you are checking the system disk on which the operating system is installed, it must be done after restarting the computer.
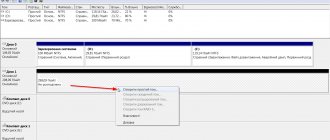
- The first thing you need to do is go to “My Computer” . If there is no such shortcut on your desktop, then you can do this through the Start . If you need to place this shortcut on your desktop, you can search the Internet for how to do this.
- Then you need to select the disk that you want to check and right-click on it . In the drop-down menu you need to select “Properties” .
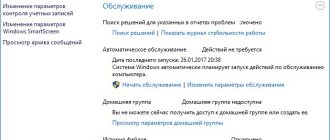
- By going to the disk properties, you need to go to the “Service” , where the “Run check” . It must be pressed. A window will appear on the screen with the “Check Disk Options” . In this window, you need to check the boxes next to the items “Automatically correct system errors” and “Scan and repair bad sectors” . This will allow you to identify file and physical errors on the hard drive. After this, you need to click on the “Launch” button.
- Then the hard drive scan will begin, during which the user’s presence is not required, so you can go about your business. Upon completion of the scan, a window will appear on the screen indicating that the scan was completed successfully, and will also display the number of errors identified during the scan, if there are any on the hard drive.
That's basically it. The method is quite simple, so any novice user can use it. If necessary, you can use other verification methods, however, they require some experience with a computer. Beginners can also try using third-party programs to check the hard drive, which can automatically resolve all errors on the hard drive.
Clean up your computer
There are usually warning signs that your computer is on the verge of a serious error that you may not notice at the time. When your computer starts to slow down and load up as you age, it's a sign that something is wrong.
If you can boot into Windows after receiving the error, you can quickly fix the situation before it becomes more serious. One of the things you can do is to clean up your computer and clear your hard drive of unnecessary files by removing both useless files and unnecessary applications:
- Use Programs and Features in Control Panel to remove apps and programs that you no longer need.
- Remove unnecessary files from your desktop. You can also organize them into folders to clear your desktop and free up RAM.
- Remove all temporary files, Windows installation files, and program caches from the system.
You can certainly do all of this yourself. However, if you need a complete solution to reduce the thickness of your PC, Auslogics BoostSpeed is recommended. The software comes with a set of tools designed to clean up junk and temporary files. It can remove unwanted applications including system bloatware and malware. With this tool, you can also get rid of hidden temporary files, old Windows files, and installation files downloaded through Windows Update.
A thinner hard drive will definitely speed up your PC and reduce the chances of the disk read error occurring again.
Check your hard drive using the chkdsk utility
How to make sure that your hard drive is free of errors and bad sectors? The chkdsk utility can help with this : we'll show you how to run chkdsk on Windows and the basics of working with it.
chkdsk is a utility built into Windows for identifying errors on your hard drive; in short, it is a disk check (the ensuing errors, bad sectors, and other “irregularities”).
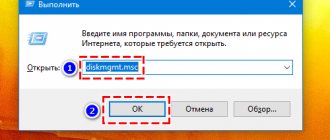
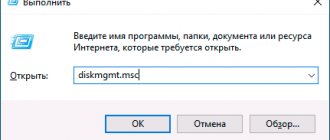
Press Win + R -> cmd -> OK Enter the chkdsk command with: /f In this case, C: is the letter of the drive being checked, and the /f specifies error correction. The utility may issue a warning: “The Chkdsk command cannot be executed because the specified volume is in use by another process...” Just answer in the affirmative by pressing Y. The check will be performed the next time you restart the computer.
Replace or move Memory Stick media
Disk read errors can be caused by RAM problems, as already explained. You can troubleshoot memory problems on your PC to resolve the disk read error. Open your PC and check the RAM for physical wear or damage. If you notice any indentations or other signs of physical damage, you may need to replace it with another memory card in good working condition.
If your memory needs replacing, make sure you only select a memory card that is compatible with your computer model and type. Your system's motherboard can only accept a few generations of RAM, so keep that in mind. Also, find out how many memory slots are available and the capacity of each slot so that you can replace the memory with a RAM card that matches the capacity of your system.
If you have multiple memory cards on your PC, there is a good chance that one of them may be at fault. Remove one of the sticks and leave the other one inserted. Turn on your computer and check if the disk read error occurs. Alternate steps if necessary. You can also put memory cards in different slots and see if that makes a difference.
CHKDSK console commands:
Command: CHKDSK
[volume: [/F] [/V] [/R] [/X] [/C] [/L[:size]]
checks the specified disk using the Check Disk program; when called without arguments, the check is performed current disk. Type into the console without parentheses. Example: C: /F /R
- volume—defines the volume label of the disk being checked, the mount point, or the disk name with a colon (for example, C:);
- path, filename—name of the file or group of files to check for fragmentation. Used only in the FAT/FAT32 file system;
- /F - checks for errors and automatically corrects them;
- /V—during the disk scan process, display the full paths and names of files stored on the disk. Disks containing NTFS partitions also display cleanup messages;
- /R - search for bad sectors and restore their contents. Requires the mandatory use of the /F switch;
- /X — if necessary, disable the volume before scanning it. Once unmounted, all current descriptors for that volume will be invalid. Requires the mandatory use of the /F switch;
- /I - Do not perform strict checking of index elements. Used only in the NTFS file system;
- /C - do not check for cycles within the folder structure. Used only in the NTFS file system.
- /L:size—during the scan, change the size of the log file to the specified size (in kilobytes). If no value is specified, the current file size is displayed. Used only in the NTFS file system;
Actually, that's all. Now you have an idea of what chkdsk and why it is needed.
There are special utilities for diagnosing hard and modern solid-state drives. Some of the applications allow you to promptly detect surface damage and other errors; some of the programs can even correct problems in the operation of drives.
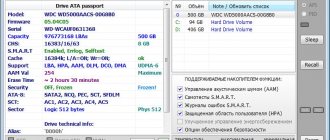
- DiskCheckup - A good tool for diagnosing media. The highlight of the application is the ability to not only generate a report with SMART disk parameters, but also compare them with indicators obtained during an earlier analysis. If problems are detected in the operation of the drive, the program immediately sends a letter to a pre-specified email address.
- Crystal Disk Mark - The utility allows you to find out the real speed of reading and writing information to the disk, using four different testing methods. One of them, the “Seq” sequential recording algorithm, is used by drive manufacturers, so the user can compare the obtained figures with the indicators declared by the device developer.
- CrystalDiskInfo - A program for diagnosing a computer’s hard drive with a Russian version of the menu from the creator of the popular speed tester Crystal Disk Mark. Like DiskCheckup, the utility can keep a history of SMART indicators, the only difference being that it has more visualization tools. Thanks to this function, you can graphically build a history of the “health” of the drive and promptly identify deterioration in the condition of the disk.
- HDDScan - A utility for viewing information about storage devices and testing disks using different algorithms - SMART and linear processing mode. There is a function to display the temperature of the drive, as well as the ability to generate a report containing information about “slow” sectors.
- HDD Regenerator - To briefly describe this program, it can be called “a modern version of MHDD.” The utility uses its own methods for resuscitating broken areas, while it not only denies access to the problem area of the surface, but also tries to restore it with a special combination of high and low level signals. This algorithm is more efficient than the low-level formatting method. The application supports all popular drive connection interfaces.
- Western Digital Data Lifeguard Diagnostic - The basic analysis capabilities of this program are comparable to Seagate SeaTools, but we recommend the Western Digital application for more advanced users. The reason is the presence of a function of permanent deep formatting of the drive, after which there is no way to recover deleted files. In the menu it is called “WRITE ZEROS”.
- MHDD is a “veteran” program, familiar to all experienced users since the days of single-core processors. Using the application's tools, you can perform a low-level scan of your hard drive, identify damaged areas, and repurpose them. The utility also allows you to control the noise level of the hard drive and has the function of setting a password on the storage device. Due to the lack of support for Windows Vista, 7 and later, this utility is most often used in the form of a boot image as a portable option for diagnosing the HDD without starting the operating system.
- Seagate SeaTools is a proprietary utility from a well-known hard drive manufacturer. The application allows you to determine the status of the drive using the SMART algorithm. However, it is not possible to obtain detailed information about each indicator. At the user's request, using Seagate SeaTools, three types of analysis can be performed - the so-called short selftest, an express test using the method of short reading of sequential arrays, and a complete diagnostic of sequential reading.
Here's what you need to do to fix the boot sector:
- Corrupt or misconfigured boot configuration data (BCD) must be repaired.
- You need to repair a damaged Master Boot Record (MBR).
If you can boot into Windows, you can try repairing the boot sector via the command line. If you are unable to do this, you can use the recovery media to go to the Windows Recovery Environment and select Troubleshoot > Advanced Options > Command Prompt.
In the Command Prompt window, run each of the three commands below. Paste or type each command and press Enter:
bootrec/fixmbr
bootrec/fixboot
bootrec/rebuildbcd
The fixmbr command replaces the master boot record with a new copy. The fixboot command writes a new boot sector partition to replace the damaged one. The rebuildbcd command restores boot configuration data, which contains information about how Windows will boot when the system is turned on.
After running these commands, reboot your system and your problem should be resolved.
Disk diagnostics with Victoria HDD program
Victoria HDD is the simplest, but very powerful program for complete diagnostics of a hard drive. The application was created as a tool for assessing the performance of the HDD, testing all its parameters, eliminating identified problems, as well as correct and clean formatting of the HDD.
The interface of the Victoria program is very simple, however, the program is designed for advanced users, or at least with an average level of knowledge and skills. The program is flexible and can be adjusted (configured) to your level of technical literacy/training. This changes the scanning and output algorithms. The data structure will be whatever suits you best. The program provides all the details on your disk that is scanned, from the model, overall size to functions.
Victoria also scans the physical surface of the disk plates, that is, it conducts a test using read heads. If any problems or malfunctions are detected, it issues a warning and marks where this malfunction is located. These may be bad/damaged sectors. A detailed report is then issued. The user can reassign all bad sectors, thus isolating the bad block so that the disk can continue to be used without fear of losing your data. The program is the development of Sergei Kazansky. Although there hasn't been an update for a long time, the application still does its job at a very high level of efficiency.
The main advantage of Victoria HDD is the program's operation at the grassroots level, scanning the surface of the disk and analyzing its structure through the ports. In this case, the efficiency cannot be low, like with programs that use virtual crutches. But to fully use the program, the user will need skills higher than the average user. We can say that this program is for HDD recovery professionals.
I am sure that this article will help you prevent frequent hard drive failures and fix the Windows slowdown problem , good luck!
Sources:
https://lp-digital.ru/articles/598-proverka-zhestkogo-diska-na-oshibki-utilita-chkdsk.html
https://commentarticle.xyz/programmy/instrukcii/5164-proverka-zhestkogo-diska-kompjutera-na-nalichie.html
https://ww.epicm.org/rtfm/chkdsk
https://www.softhome.ru/article/programmy-dlya-diagnostiki-vinchestera
More from my site
- How to check your computer's performance without third-party programs
- The flash drive is not formatted, there is a solution.
- Black screen in windows, there is a solution
- The screen driver has stopped working correctly - how to fix it?
- How to find out which programs are slowing down your computer
- How to reset a forgotten password in Windows
Update your BIOS
Instead, you can update the system BIOS. If the reset doesn't work and a UEFI or BIOS update is available, this may be a great option. Updating the BIOS can add additional features that make it more capable of handling tasks.
Visit your PC manufacturer's website to check for BIOS updates for your system model. Compare the available update to your current BIOS version. Go to System Information on your PC using "msinfo" and find the BIOS version/date on the System Information screen. Compare the BIOS version there with the version on the manufacturer's download page.
If a newer BIOS version is available, download it and extract the file. Read the Readme if available and follow the instructions to install the BIOS update.
If the update file is in EXE format, you can install it directly on Windows 10. Simply click on the file you want and follow the installation wizard. Make sure your battery is fully charged or your computer is connected to a power source throughout the entire process.
You may need to consult the BIOS update guide for your device if a specific method is used. Some BIOS files require a boot device, such as a USB or disk, to successfully install.
Once you are done with the update and the system reboots into Windows, log back in and make sure that the hard drive read issue is no longer present.