A modern smartphone can do a lot: control smart devices in the house, launch games, wake you up in the morning, turn on the kettle on a timer... But it will instantly lose all meaning without just one function - the phone itself. If the user is hard of hearing or has to whisper during a conversation so as not to deafen the interlocutor, the pleasure from the stylish design and sophisticated options will be lost.
Good news: almost everything can be fixed if your device is Android. More precisely, if its software is Android and its processor is MediaTek. Moreover, the situation can be improved in different ways.
Here we will look at the most fundamental, risky, but almost fail-safe - setting up a microphone on Android through the engineering menu. Let's find out what it is and how it works.
What is the engineering menu and how does it configure the microphone?
Engineering menu is a service for developers. By default, a user without special knowledge is not allowed to enter it. But, as usual, if it’s not possible, but it’s really necessary, then it’s possible.
Especially with knowledge of the safety rules, with which everyone can make the necessary microphone settings on Android through the engineering menu, without turning it into a piece of hardware. In fact:
- engineering menu is a system utility that is a priori closed to the user;
- the menu must be activated before settings;
- Activation is performed differently on different phones;
- the utility is available in almost all Chinese and Korean gadgets as part of the OS software;
- Each version has the ability to reconfigure the phone through the “engineer” (the first thing service people enter is when we bring in a phone with complaints about the incorrect operation of devices built into the device - microphone, speakers, camera, etc.).
To configure the microphone for Android 10 or 11, in particular, you need to go to this menu. Let's figure out how to do this step by step.
What to do if nothing helps
Don't despair if after setting up the microphone continues to malfunction. Perhaps the problem lies in external factors. You can try the following:
- Reboot your mobile device. Sometimes it gets tired. This happens due to high loads or overheating of components. In this case, you should simply turn off your smartphone for a short time and give it a little rest.
- Clean your device from unnecessary files. There may be some third-party programs installed on your phone that are preventing the microphone from working properly. Experienced users can perform deep cleaning manually. Everyone else can use file managers or take the device to a service center.
- Clean from dust. In the warm season, especially when it rarely rains, an incredible amount of dust accumulates on the street. With constant use, the device begins to collect dirt particles. It is worth noting that dust gets into all the small holes of the phone - connectors, cracks between the case and the back cover. It also settles in the microphone, causing the latter to lose its functionality. A thorough cleaning of the device can solve the problem. To do this, the user can use regular cotton swabs and special wet wipes for office equipment. Just be extremely careful when working with small contacts. It is strictly forbidden to use water.
- Remove the cover. Very often, the microphone can work quietly due to the fact that it is covered by a protective case. This happens in cases where the cover is not chosen to fit.
- Turn off noise reduction. This feature is supported on Apple mobile devices. Typically, noise cancellation reduces ambient noise during a call. It is worth noting that in some cases this function completely blocks the microphone. The only way out is to turn it off.
- Reinstalling the OS (flashing). This method should be used last. In addition, not every user can handle flashing. First, you should make sure that the smartphone’s microphone has stopped working due to system problems. Only after this can you reinstall the software. If you haven’t done this personally yet, you should entrust the “mission” to the service center professionals.
How to enter the menu where the microphone settings are on Android
Even before trying to enter the “engineer”, you need to perform several manipulations: go to the usual user settings menu, click “About phone” and click on the “Kernel version” line 7-10 times (in some models - “Build number”). The operation can be considered successful if the message “You have become a developer” appears on the screen.
Second step: the developer menu must be activated. To do this, select the “For Developer” item in the same place (in the smartphone settings) and move the slider to the “on” position.
An important point: obtaining superuser rights (root or developer) is not required in all models. Sometimes these rights give access to only part of the settings, sometimes to all. But, as a rule, to change the microphone sensitivity to “Android”, this is enough.
You can enter the engineering menu in one of two ways:
- using a standard USSD command (by analogy with requesting an account balance, you must enter a code with numbers and asterisks and hash marks);
- using an application for setting up a microphone on Android, which will launch the engineering menu with one touch.
Codes
USSD codes for different models, brands of smartphones and even generations may differ. On the Internet it is easy to find a table of the most common combinations for the most popular devices. We will also present it below.
There is also a certain universal “key” that works for all devices with an MTK processor. More precisely, there are two of them: *#*#54298#*#* and *#*#3646633#*#*. If the device does not respond to them, you will have to choose the second method or look for your code on the Internet (in the settings, look at the information about the model and enter it into the search).
Programs
If the codes are not found or nothing happens on the screen when you enter them, you can use a special program to configure the microphone on Android. It can be downloaded from PlayMarket, again for a specific model. There are both free and paid utilities. The most common option among free applications is MTK Engineering Mode.
Modes and commands
Once in the menu, we follow the path: MTK Settings (Samsung Settings for setting up the Samsung microphone on Android) – Hardware Testing – Audio. Here we will see modes in which you can change the characteristics of the microphone, there are eight of them:
- Normal Mode – the main mode (normal operation), it’s worth starting with;
- Headset Mode – microphone settings when connecting a headset;
- LoudSpeaker Mode – sound characteristics during a speakerphone conversation;
- Speech Logger – conversational mode;
- Headset_LoudSpeaker Mode – combining speakerphone mode and headset options;
- Speech Enhancement – microphone operation when using cellular communications;
- Audio Logger – characteristics of devices when recording a conversation;
- Debug Ingo is a debugging service (it’s better not to go into it, these are fine settings that should be left to professional programmers).
In each mode, we can set two indicators - the value of the volume parameter (Value is) and the maximum sound level (Max Vol). These are the speaker volume and microphone sensitivity settings, which are closely related. Because the sensitivity of the microphone on Android is determined by the volume - the higher the latter, the lower the first, and vice versa.
In addition, in the Type line of each mode, you can change the settings for cellular communication (Sip), sensitivity (Mic), speaker volume (Sph and Sph2 for each device), file playback volume (Media), ringer (Ring) and radio sound (FMR). It is also possible to change the noise reduction and echo settings, but it is better not to touch them without special knowledge (item Sid).
Via the mixer_path.xml editor
This is a more complex option, requiring the user to first obtain root rights, which in turn entails many consequences, from removing the device from warranty to blocking transactions. If this doesn't stop you, follow the instructions:
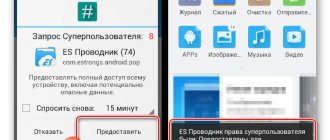
- Install ES Explorer.
- Open the application settings by pressing the button in the form of three stripes.
- Activate the “Root Explorer” and “Hidden Items” options.
- Go to the /system/etc directory.
- Open the mixer_path.xml file.
- Set the desired values opposite the “Voice” items.
The mixer_path.xml file uses the same values as when using the engineering menu. As with the previous method, it is not recommended to immediately set all parameters to maximum. Start with averages.
How to increase microphone sensitivity
Having received the input data, you can proceed to direct actions. How to increase microphone sensitivity on Android:
- launch the engineering menu;
- go to Hardware Testing – Audio – Normal Mode – Mic;
- in the Level 0 field, change the Value is value - set it 5–15% higher if the sensitivity needs to be increased, or lower relative to the indicator that is already entered if it needs to be reduced;
- remember the settings with the Set button;
- you can increase the maximum value (Max), but this is usually not required;
- we check the result, if everything is satisfactory (Level 0 is the sensitivity at maximum volume, which is set by the side rocker button), you can move on to the next levels (usually there are 6 of them - Level 0, 1, 2, 3, 4, 5, but maybe and more);
- Once the sensitivity is adjusted at all levels, you can exit the menu and use your smartphone for your pleasure.
By the way, for those who do not use different call volume levels (but often accidentally reduce it by clicking the button on the side of the phone), you can set one Value value for all Levels.
Adjusting the sound using the tools of the device itself
All devices have a standard key for volume control - usually located on the side panel. By clicking on it you can set the desired parameter. But if this does not suit you, then you can do this from the main settings menu. Here you can make settings for any application, set a ringtone for a particular contact.
To change the default sound, you need to do this:
- Open the main settings menu and go to the “Ringtones and Sound” section;
- In the right corner, click on the gear icon - you will find yourself in the desired settings section;
- Set the desired sound parameters.
This will result in the same pitch for all apps and calls. But if you need to change specific values, for example, for incoming voice calls or messages, then you need to do this in the “Sound Profile” section in each of the desired applications.
How to set up a microphone in the engineering menu and not turn your smartphone into a brick
Now you know how to make subtle, almost professional settings on your budget phone. But here you need to understand: you are operating with factory parameters, for which the rule “if it works, it’s better not to touch” applies. Therefore, we must act carefully. Three rules that will greatly reduce the chances of getting scrap metal at the exit:
- before changing the characteristics, take a photo or write down what is set by default (if something goes wrong, you can return to the original position and try again);
- check the results of the reconfiguration on the built-in melodies, and not on downloaded ringtones, sometimes their volume is their own characteristic, and not the work of the speaker;
- do not put maximum values in the Value is and Max Vol fields (working for wear, the device will serve its life faster).
Experiment to make the phone perfect for you. And tell your friends how to change the microphone sensitivity on Android through the engineering menu. After all, the better we know our gadget, the better we can adapt it to our habits. And the most favorite smartphone is the one that is customized individually for the owner.
Partner promotional materials: Personal proxies proxy-seller.ru
About this article
In other languages English:Boost Microphone Volume on Android Bahasa Indonesia:Meningkatkan Volume Mikrofon pada Perangkat Android Español:subir el volumen del micrófono de un dispositivo Android Deutsch:Unter Android die Lautstärke des Mikrofons steigern Português:Aumentar o Volume do Microfone no Android Italiano: Alzare il Volume del Microfono di un Dispositivo Android Nederlands:Je microfoonvolume verhogen op Android Français:augmenter le volume du micro sur un Android Advertising
Modern phones, in addition to the basic call function, have many additional features. These include shooting, network access, alarm clock, loudspeaker function, microphone function and many other built-in applications and programs.
In our article we will talk about such an interesting built-in function as a microphone. Depending on the smartphone model, the quality and volume of voice playback may vary significantly. If you wish, you can independently change the basic parameters of the microphone and ensure its excellent performance. The main characteristics that the user can adjust independently include volume and sensitivity.