Sooner or later, every user comes to the decision to increase computer memory. The main reason is that you can speed up your PC and its performance without changing the entire device. RAM has two important characteristics:
- operating frequency;
- volume.
It is these two functions that need to be expanded in order for a personal computer to increase its performance significantly.
How to increase memory on a computer
Why do you need to increase RAM?
It's worth adding RAM to increase your computer's performance. Clear signals that it’s time to add more memory:
- The PC itself reports the shortage;
- after the update, the desktop or laptop became much slower;
- all device parameters meet the system requirements of heavy software (software), but it does not start.
Before upgrading, you should remember: 32-bit OS (operating systems) accept a maximum of 4 gigabytes of RAM. If you need more, you should reinstall the operating system.
Educational program: What is computer RAM, what does it affect: answers to 6 popular questions
Memory installation process
Adding a new module is very simple. Each slot is equipped with special clips on each edge. These clips should be moved to the side, after which you will need to insert the purchased module until it stops. The clamps snap into place and the memory is then ready for use. You can configure the frequency, voltage and other parameters of the RAM in the BIOS.
Computer technology is an essential assistant in solving many problems, so it is not at all surprising that users place increased demands on it. However, it should be understood that over time, installed devices become outdated and computer equipment needs to be modernized. Quite often, PC owners feel an urgent need to increase RAM, so for many it is important to know how to increase RAM on a computer.
Many new programs require more computer power
How to increase computer RAM
There are 2 ways for this:
- insert larger RAM;
- use a flash drive.
This section describes the first option.
Determining the number of free slots
This can be done using classic OS tools: “Task Manager” (DZ) → “. Below you will see how many slots the computer is designed for. Another option is to use free software like CPU-Z.
But these methods have disadvantages. The first method will only work if the user has the tenth system. The special program sometimes makes mistakes.
You can disassemble the PC and see how many slots are on the motherboard. The second option is to use the Internet: specify the exact model of your PC or laptop and look at the characteristics. If the user assembled the computer himself, he needs to enter the name of the motherboard into the search bar.
Find out: What are timings in RAM, which are better - educational program in 4 sections
How to find out the RAM version
This information about RAM is displayed in the “Performance” section, which can be found in the DZ. You will need to find “Speed” in it. The RAM type will be displayed here. The version can also be viewed on the box or sticker located on the modules themselves.
Selecting RAM
In order not to make a mistake when choosing RAM for a PC or laptop, you need to know the maximum possible amount that the motherboard can handle. For example, a user has 8 gigabytes, but the motherboard can have 32 GB.
In this case, you will be able to double the RAM by installing a pair of 8 GB modules, or quadruple it by installing 2 16 GB sticks. If the motherboard has 4 slots, there is an option to install a 4x8 GB kit.
Other things to consider:
- Mismatched characteristics such as timing, frequency, and volume reduce performance. Therefore, it is better to choose complete strips.
- In 2-channel mode, the speed increases, so the strips are installed in 2 slots. Or through one, if the user installs two modules, and the motherboard has 4 slots.
- The maximum amount of RAM is the total for memory slots. In a device that supports 32 GB of RAM, one stick with that amount will not work.
- RAM for desktop and laptop differs in form factor.
Increasing virtual memory
Starting with Windows XP and subsequent versions, the company's developers equipped the system with the ability to swap virtual memory. In principle, this function is launched by default, but it is worth checking its parameters and adjusting them if necessary. This task takes only a few minutes, and even a novice user can handle it. To do this, you only need to perform a few manipulations:
- select the “Computer” icon from the menu;
- open the “Properties” window;
- open “Advanced options”;
- "Advanced" tab;
- in the “Performance” section, click “Options”;
- tab "Advanced" click "Change".
After this, the “Virtual Memory” window should appear, where the automatic virtual memory (VM) paging mode is disabled, and the parameters are entered manually. It is recommended to install no more than 2-3GB of virtual memory with 2GB of RAM. For efficient operation of the system, it is recommended that the VP volume be no more than 2 times larger than the built-in one. To avoid fragmentation of the volume allocated for the VP on the HDD, it is worth entering the initial and maximum parameters that are the same in value.
What to do if the laptop does not see the new RAM
How to fix the situation:
1. Check to see if the RAM sticks are inserted correctly. Try inserting them again.
2. Make sure the memory and board are compatible. Mismatches rarely occur: usually, unsuitable modules are simply not installed in the motherboard.
3. Test the RAM for malfunction. This can be done using the free software Memtest86.
4. Clean the contacts. You can use a simple eraser, but better - a cotton rag soaked in isopropyl alcohol. When everything is dry, blow the dust off the bar and place it in the motherboard.
5. Testing on another PC. If you have a computer with a suitable board, try installing the bracket there. Works? Perhaps on the first desktop the motherboard itself is damaged. Does not work? It's definitely a matter of RAM. If there is no additional PC, then you can try inserting other compatible modules into your device.
Usually, if the RAM is chosen correctly, there are no problems.
Configuration setup
For operating systems Windows 7 and below, the problem of boot settings that are present in the configuration is often described. There is usually a limit set with a certain value.
If the computer does not see RAM for this reason, you need to do the following:
- Call the configurator (msconfig).
- On the boot tab, go to additional settings and uncheck the box for setting the maximum RAM.
- Then completely reboot the system.
A few final words
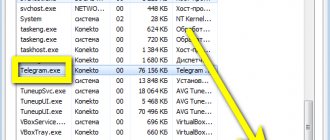
It remains to add that in the case when the full and available volumes of RAM are approximately at the same level, you can try to terminate unnecessary active processes, disable some startup items, or deactivate even unused or unnecessary background services and components of Windows systems, which will significantly reduce the load on the operating system. memory and processor, and it will also add speed.
Installing additional random access memory (RAM) modules is the easiest and most affordable way to improve your computer's performance. When a PC is running, each running process uses a certain amount of RAM. The module is a temporary data storage that ensures system performance. The larger the amount of RAM, the faster the system copes with assigned tasks. Problems in this unit rarely occur. If Windows does not detect new hardware after installation, there are several important system parameters to pay attention to.
Conclusion
So, if you are in trouble and the computer does not see all the information, do not rush to get upset. There are many reasons for this behavior of the system. By performing all possible tests, checking the motherboard and operating system features, you can solve the problem.
If our advice did not help, then a thorough check of the RAM stick itself and whether it is installed correctly in the slot is another way to eliminate the problem.
Even simply cleaning the contacts and RAM slot from dust can help you. Therefore, as you can see, there are plenty of methods to solve the problem when the system does not see your RAM, completely, or some part of it.
We hope this article helps you troubleshoot problems.
Resetting and updating BIOS
However, it also happens that the computer does not see the RAM solely for the reason that it is not recognized at the BIOS level. There are only two options: either the settings are set incorrectly, or the outdated firmware of the primary system itself is not designed to work with new equipment.
In the first case, it will be enough to simply perform a complete reset of the parameters using the appropriate item (Load Setup Defaults or something similar), after which an automatic restart will follow.
The second option is somewhat more complicated, since quite often it is difficult for the average user to update the firmware on their own. The installed firmware must fully correspond to the primary system itself, and the update must be done as carefully as possible, since one wrong step can lead to the most unpredictable consequences. With UEFI systems everything is much simpler, since updates for them can be installed directly in the Windows environment. But, again, the updated firmware must meet all installation requirements (version, chip manufacturer, software developer, etc.).
Testing different memory operating modes
Now let's test the memory in different operating modes. The main goal of the tests will be the difference in performance in single- and dual-channel modes and overclocking.
Test system:
- Processor: Ryzen 5 1600 overclocked to 4000 MHz
- Motherboard: MSI B450-A PRO MAX
- Memory: two dual-rank CRUCIAL Ballistix Sport LT BLS16G4D30AESC modules, 16 GB each. XMP profile - 2933 MHz. Overclocking – 3400 MHz with customized timings and subtimings
- Video card: GeForce GTX 1060 6 GB
Let's start by testing the RAM read throughput in AIDA64, in MB/sec. In the graphs, the single-channel operating mode is marked as (S), and the dual-channel operating mode is marked as (D), along with the memory operating frequency.
Dual-channel RAM wins quite a bit.
Testing in the WinRAR 5.40 archiver brings the first surprise. One memory stick overclocked to 3400 MHz is faster than two at 2933 MHz.
Archiver 7-Zip 19.0, final unpacking speed in MIPS. Again, one overclocking bar outperformed two at 2933 MHz.
The speed of the archivers is of great practical importance - the faster it is, the faster programs and games will be installed.
For games I chose Assassin's Creed Odyssey and Shadow of the Tomb Raider. To minimize the impact of the video card on the results, I turned off anti-aliasing and set the resolution to 720p.
In Assassin's Creed Odyssey, even at 50% resolution, in some places the performance was limited by the GeForce GTX 1060, its load reached 99%.
A faster video card would make it possible to see the performance gains from RAM operating modes even more clearly.
Assassin's Creed Odyssey, average FPS. One stick of overclocked RAM managed to outperform two sticks in a dual channel, at a frequency of 2400 MHz.
Shadow of the Tomb Raider, DX12, average FPS. The picture repeats itself, and one memory stick is faster to overclock than two low-frequency ones.
Shadow of the Tomb Raider Demonstration of smooth gameplay with one 3400 MHz RAM module. It should be taken into account that the recording ate a couple of frames of the result.