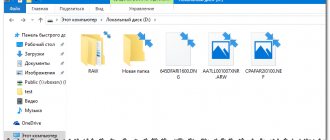
The Windows 10 operating system has a built-in application for working with Microsoft cloud storage - “OneDrive”. If synchronization of the Desktop folder is enabled in the settings of this program, green checkmarks in a white circle appear on the desktop shortcuts. They talk about successful synchronization of the folder with cloud storage.
Green checkmarks indicate that synchronization with OneDrive was successful
If your desktop contains not only program shortcuts, but also documents and folders that need to be accessed from other computers, then such synchronization makes sense. Also, backing up to the OneDrive cloud will save your desktop data if your computer fails.
However, if the desktop contains mainly application shortcuts for quick launch, there is no need to make a backup copy of the “Desktop” folder, especially since many users are confused by such icons with checkmarks. In this article, you will learn how to disable synchronization of the Desktop folder with the OneDrive cloud and get rid of green checkmarks on desktop shortcuts in Windows 10.
Solving the problem with green checkmarks on shortcuts in Windows 10
The most obvious reason for the appearance of green checkmarks on individual files is the active synchronization mode, which operates through the standard OneDrive tool in Windows. This tool is almost always activated manually by the user, for example, after completing the installation of the operating system, and is responsible for synchronizing objects with cloud storage and other connected computers. In the image below you can see the little footnotes that OneDrive tags the files that are being synced.
There are two ways to solve this situation - by disabling the display of checkmarks and deactivating synchronization. Each user himself determines which method to choose, and we will analyze them in detail, presenting the appropriate instructions. However, first we will focus on the remote method, which applies to owners of a well-known antivirus.
Method 1: Disable Norton Online Backup
If you have a Norton solution installed on your computer, it's likely that Online Backup is currently active. It is responsible for creating backup copies of certain files with the subsequent ability to restore them. All those objects, copies of which have already been created, are marked with green checkmarks. The only way to solve this situation is to disable the function itself if you don’t need it. Read more about this in the official instructions by clicking on the link below.
Method 2: Disable green checkmarks
This method is suitable for all those users who do not want to disable synchronization, but want to get rid of the green checkmarks that appear from time to time next to shortcuts on the desktop. In such a situation, you will have to manually set several important personalization parameters, which happens like this:
- Open Start and go to Settings.
Here select the “Personalization” section.
In the “Related Settings” section, click on “Desktop Icon Settings”.
In the window that appears, uncheck “Allow themes to change desktop icons” and apply the changes.
After that, close the current window and through “Start” find the “Control Panel” application.
Go to File Explorer Options.
Go to the "View" tab.
Scroll down the list, where you uncheck “Show sync provider notifications,” and then click “Apply.”
Close the window and right-click on an empty space on the taskbar. From the context menu that appears, select "Task Manager".
Find “Explorer”, right-click on this line and restart this process so that the desktop is updated.
Now synchronization via OneDrive will still be active, but notification pictures on icons and folders will no longer appear. If restarting Explorer does not help, create a new operating system session by restarting the computer. This way all changes will definitely take effect.
Method 3: Disable Sync in OneDrive
The last method in our article today is suitable for those users who are interested in completely disabling synchronization in OneDrive. Accordingly, after this procedure, the green checkmarks next to the files will automatically disappear.
- Find the OneDrive icon on the taskbar and right-click on it.
In the context menu that appears, select “Options”.
Go to the "Account" tab.
Click on the “Select folders” button.
Uncheck Desktop and other locations where you want to disable syncing.
Now it is recommended to restart your computer or Explorer as shown in the previous method.
Today we dealt with the appearance of green checkmarks next to icons on the desktop in Windows 10. You were introduced to three methods to get rid of these icons. Use the appropriate instructions to complete the task.
We are glad that we were able to help you solve the problem.
Add the Lumpics.ru website to your bookmarks and we will be useful to you. Thank the author and share the article on social networks.
Describe what didn't work for you. Our specialists will try to answer as quickly as possible.
How to restart OneDrive?
Reset OneDrive on Android
- Open settings.
- Select Applications.
- Click Manage Applications.
- Find and select OneDrive
. - Click Force Stop and tap Erase Data and Clear Cache.
- After that, delete the application.
- Reinstall the application from Google Play Store.
Interesting materials:
Where should a horseshoe hang in the house? Where should a husky live? Where do they eat jellyfish? Where are there white nights in the world? Where are the white nights? Where are gold deposits in Ukraine? Where is the geographical center of Europe? Where is the geographical center of Russia? Where does the cuckoo nest? Where did Gogol burn Volume 2 of Dead Souls?
Green checkmarks on shortcuts in Windows 10
The Windows 10 operating system has a built-in application for working with Microsoft cloud storage - “OneDrive”. If synchronization of the Desktop folder is enabled in the settings of this program, green checkmarks in a white circle appear on the desktop shortcuts. They talk about successful synchronization of the folder with cloud storage.
Green checkmarks indicate that synchronization with OneDrive was successful
If your desktop contains not only program shortcuts, but also documents and folders that need to be accessed from other computers, then such synchronization makes sense. Also, backing up to the OneDrive cloud will save your desktop data if your computer fails.
However, if the desktop contains mainly application shortcuts for quick launch, there is no need to make a backup copy of the “Desktop” folder, especially since many users are confused by such icons with checkmarks. In this article, you will learn how to disable synchronization of the Desktop folder with the OneDrive cloud and get rid of green checkmarks on desktop shortcuts in Windows 10.
Possible reasons
The appearance of green checkmarks on the Desktop shortcuts means that synchronization with the OneDrive cloud storage is enabled on the computer. This service is designed to synchronize various files, objects and documents stored on a computer with a virtual space hosted on a Microsoft server. This synchronization cannot be enabled automatically, which means that some user or operating system administrator intentionally enabled this tool.
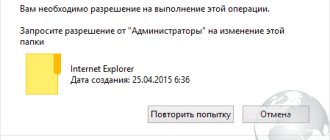
The reason for the appearance of red crosses on the labels is another software product - Norton Online Backup. Red symbols indicate that Norton is performing the function of creating backup copies of files on the user's computer. By storing these files in the cloud, the service can ensure secure storage, recovery and transfer of files from one device to another.
Disable synchronization of the Desktop folder in the OneDrive application
To disable synchronization of the Desktop folder with cloud storage, we need to go to the OneDrive program settings. See also: how to disable OneDrive in Windows 10.
- To do this, click on the cloud icon on the right side of the taskbar (if this icon is not visible, click on the arrow), then click on the button with three dots “Other”, and then select the “Options” command.
Click on the cloud and open the “OneDrive” options
- In the “Microsoft OneDrive” window that opens, go to the “Account” tab and click the “Select folders” button.
Click the “Select folders” button on the “Account” tab
- A window will appear with a list of folders. There will be check marks next to the folders whose data is synchronized with the cloud. Find the “Desktop” folder and uncheck the box by left-clicking.
Uncheck the box next to the “Desktop” folder
- If we had turned off synchronization of a regular folder, that would have been the end of it. However, the Desktop folder is a Windows 10 system folder, so to change its synchronization settings, the program will prompt you to open backup options. To do this, click on the “Open settings” button in the warning window “Folder synchronization cannot be stopped.”
Opening backup options
- A new Manage Folder Backup window will open. We need to click on the “Stop backup” link under the first “Desktop” icon.
Click on the link “Stop backup”
- In a new window, we confirm our intention by clicking the “Stop backup” button.
Confirm that we really want to stop backing up this folder
- A window will appear telling you that this folder is no longer backed up. Click the “Close” button.
Desktop folder backup disabled
- You will notice that all program shortcuts, folders and documents previously stored on the desktop have disappeared. But no need to panic! They are in cloud storage, and now we will tell you how to get them back.
- Please note that a shortcut has appeared on the desktop in the form of a blue cloud with the self-explanatory name “Where are my files.” If we double-click on it, we will be taken to the Desktop folder in the OneDrive cloud storage.
Double-click on the “Where are my files” shortcut
- To return the contents of a folder to its original location, select all the objects in it and drag it to the desktop.
Returning shortcuts to the desktop
- Now these objects will be stored only on your computer, and no green checkmarks will be displayed on them, and you can delete the “Desktop” folder from “OneDrive”.
Method No. 1. Using the program
The easiest way to remove arrows from icons is to use applications. After launching them, you will only have to choose whether to indicate the shortcut icon or not.
Windows 7 Manager utility
This program helps you remove the blue arrow in Windows 7 in a few clicks. By the way, there is an application for the tenth version - Windows 10 Manager. Both are produced by the same developer and are paid. Thanks to the 20-day demo version, you don’t have to buy the program.
How to disable the arrow:
Important! A working analogue of applications in Windows Vista, XP, 7 and 10 is Vista Shortcut Manager. The advantage of the utility is its ease of setup - immediately after launch, a window with “Arrow” and “No arrow” is shown. Select the second option, which will eliminate the arrow.
Remove arrows from shortcuts using Aero Tweak
This is a popular application that is available for free. It is distributed by numerous sites on the Internet, but the official page is here. The second advantage, in addition to free distribution, is that the utility does not require installation.
Use the Windows Shortcut Arrow Editor program
This is a specialized application for removing arrows. Its second purpose is the ability to replace the standard shortcut icon with your own. The utility can’t do anything else, but it does the minimum required quickly and without unnecessary difficulties.
To set your own icon, you need to select the last item “Custom” and specify the path to the image file.
Important! The program works on all Windows, starting with Vista.
Enable synchronization of the Desktop folder in the OneDrive application
If you again want to enable synchronization of the Desktop folder with Microsoft cloud storage, open the OneDrive application settings again by repeating step 1 of our instructions. And then in the Microsoft OneDrive window, go to the Backup tab and click the Manage Backup button.
Click the “Manage Backup” button
In the window that opens, check the box and click the “Start backup” button.
Alternative Method: Use the Folder Options Window
You can also turn off item flags using the Folder Options in File Explorer. To do this, open an Explorer window and click View on the toolbar. Click the "Options" button and you will see the "Folder Options" window.
Go to the View tab. Scroll down the list until you see “Use checkboxes to select items.” Uncheck the box, then click Apply.
After that, close the Folder Options window and the checkboxes in File Explorer will disappear.
Source
Green checkmarks on win 10 shortcuts
Windows Explorer is an integral part of users. All the time we copy, cut, paste information into different places on our hard drive. Selecting information for copying while holding down the additional “Ctrl” button; for some, this may not be convenient if you need to copy a lot, while scrolling down the meters and getting the “Ctrl” button pressed every time. What if we need to copy a lot of information or select it every other time? Yes, there is a way and I will tell you how to select files and folders with check marks, and how to enable fields for selecting files and folders in Windows 10 Explorer.
How to enable item checkboxes to select folders and files with checkmarks in Windows 10
To enable item checkboxes so that files and folders are displayed, open File Explorer (this computer):
- Go to the “ View ” tab.
- Check the “ Element checkboxes ” option.
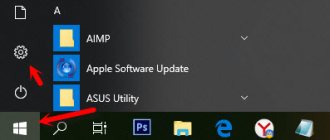
Sometimes green checkmarks appear on the Windows 10 shortcuts on the desktop, indicating that the synchronization of these files was successful. These checkboxes can be disabled, but first you need to open the Control Panel by clicking on the Start button - Windows System Tools - Control Panel. In the Control Panel , go to the Appearance and Personalization and there find and click on the item Show hidden files and folders .
Disable sync provider notification display
A window called File Explorer Options will open. In this window, you need to go to the View and find there the line Show synchronization provider notifications . Uncheck this item and click OK or Apply.
After that, open Settings through the Start button. In Settings , go to the Personalization , which will be divided into left and right parts. On the left side of the window, find and click on Themes , and on the right side, find and click on Desktop Icon Settings .
How to remove a check mark from a Windows 10 shortcut
A window will open in which you need to uncheck Allow themes to change desktop icons and click OK or Apply.
Restart Explorer in Task Manager
After completing the settings, you need to restart the computer or open the Task Manager and on the Processes , find and click on Explorer and on Restart . After rebooting Windows 10, the checkmarks on the shortcuts will not appear.
Disable checkboxes via File Explorer
You can remove these checkboxes from File Explorer itself.
First, open File Explorer. To do this quickly, press Windows + E or click the folder icon in the taskbar if File Explorer is pinned there. You will also find File Explorer in the Start menu.
In the ribbon panel at the top of the Explorer window, click the View tab.
Find "Element Flags" in the View toolbar and click on it.
If this feature has been enabled, the checkbox next to each file will disappear. Once files are selected, they will no longer appear next to them.
If you want to turn this feature back on, go back to the View toolbar in Explorer and check the box next to Item Checkboxes again. Select this option when you want to hide and show checkboxes.
Checkmarks on Windows 10 icons
Sometimes green checkmarks appear on the Windows 10 shortcuts on the desktop, indicating that the synchronization of these files was successful. These checkboxes can be disabled, but first you need to open the Control Panel by clicking on the Start button - Windows System Tools - Control Panel. In the Control Panel , go to the Appearance and Personalization and there find and click on the item Show hidden files and folders .
Disable sync provider notification display
A window called File Explorer Options will open. In this window, you need to go to the View and find there the line Show synchronization provider notifications . Uncheck this item and click OK or Apply.
After that, open Settings through the Start button. In Settings , go to the Personalization , which will be divided into left and right parts. On the left side of the window, find and click on Themes , and on the right side, find and click on Desktop Icon Settings .
How to remove a check mark from a Windows 10 shortcut
A window will open in which you need to uncheck Allow themes to change desktop icons and click OK or Apply.
Restart Explorer in Task Manager
After completing the settings, you need to restart the computer or open the Task Manager and on the Processes , find and click on Explorer and on Restart . After rebooting Windows 10, the checkmarks on the shortcuts will not appear.
No duplicates found
Content synchronization with Microsoft servers has been successfully completed. Law enforcement officials will contact you to discuss further actions.
These checkmarks are a sign that the files have been synchronized (OneDrive). To get rid of them, you need to remove/disable OneDrive (Settings>System>Storage>Remove OneDrive>Apply)
Press F5 on the desktop and All.
I’ll subscribe, similar garbage, Google didn’t turn up anything clear. Sometimes instead of checkmarks there are crosses, it is treated using F5 (update).
Well, at least I'm not the only one.
Did you figure out what was going on?) I switched to ten a couple of days ago, the same nonsense appeared. Search engines still don't help.
Press the F5 BUTTON and that’s it! they wrote
It may be late, but it’s still OneDrive. After turning it off, everything became normal.
More precisely, even this way: I untied my Microsoft account from the computer. Accordingly, OneDrive went down.
It's late, but thanks for that)
In the top ten, such checkmarks are green in the OneDrive folder when something is successfully saved to the cloud.
Win10 on board. I don’t use oneDrive, I’m not even logged in. I came to pick up the PC and look at the ticks, wtf.
Just rename the required Ondrive folders one by one until you get to the one you need, or simply save a backup reg file first.
It's called Overlay Icons.
and you can turn it off
I thought this was a recommendation for deletion
These are fucking shortcuts
these daws indicate a shortcut
I didn’t guess, if you don’t use Win 10, don’t even try to seem smart. Sorry.
label is gray. left.
You are not worth 5 minuses, give me ten more comments. =)
And according to the subject, these are the files you selected.
Highlighted. Who are you scratching? xDD
Highlighting in Windows colors the background of the icon in a light blue tint.
Well, blah, okay, you have enabled the display of selected elements, with this very “tick”.
Go to Control Panel => Folder Options => View, and disable the “Use checkboxes to select items” option.
No, not that, this “flag” is on the top left. and it appears when selected, this one appeared just like that.
To begin with, I apologize for the incorrect information (I don’t use Win 10 and don’t plan to use it for at least a year).
In general, find articles on the Internet about “Analysis and configuration of security”, they will clarify the situation.
Green checkmarks appear on Windows 10 shortcuts
Sometimes green checkmarks appear on the Windows 10 shortcuts on the desktop, indicating that the synchronization of these files was successful. These checkboxes can be disabled, but first you need to open the Control Panel by clicking on the Start button - Windows System Tools - Control Panel. In the Control Panel , go to the Appearance and Personalization and there find and click on the item Show hidden files and folders .
Disable sync provider notification display
A window called File Explorer Options will open. In this window, you need to go to the View and find there the line Show synchronization provider notifications . Uncheck this item and click OK or Apply.
After that, open Settings through the Start button. In Settings , go to the Personalization , which will be divided into left and right parts. On the left side of the window, find and click on Themes , and on the right side, find and click on Desktop Icon Settings .
How to remove a check mark from a Windows 10 shortcut
A window will open in which you need to uncheck Allow themes to change desktop icons and click OK or Apply.
Restart Explorer in Task Manager
After completing the settings, you need to restart the computer or open the Task Manager and on the Processes , find and click on Explorer and on Restart . After rebooting Windows 10, the checkmarks on the shortcuts will not appear.
I was playing Solitaire they added back to Windows 10 and when I closed it I noticed that there were these green checkmarks on my desktop icons:
What are those green ticks on my desktop? How can I get rid of them?
Method number 3. Manual work
The last option has similar results to the previous one, but you will have to edit the registry yourself. It's a little longer and more difficult, but it allows you to gain OS skills that may come in handy in the future.
How to remove arrows from shortcuts using Registry Editor?
In the Windows library there is a special section “Shell Icons”, and in it the parameter is 29. It is responsible for displaying the arrow. If you set the value to empty, the standard designation from the label will disappear.
Don't forget! It is recommended that you create a restore point before making changes to the registry. This is a potentially dangerous procedure, as is any editing of this section. If something goes wrong, a backup will help restore Windows functionality.