Some users are interested in how to remove icons from the Desktop in the Windows operating system so that nothing is displayed on the computer screen except the Control Panel. For many users, this proposal sounds strange due to the fact that it is convenient to place icons and shortcuts on the desktop to quickly launch programs, or to navigate to settings and functions of the operating system.
The Windows desktop looks different: on some computers it is literally filled with shortcuts, icons, folders and files, on other computers the screen has an ascetic appearance, on the desktop there is only the most necessary for working on a PC.
I prefer not to have many elements on my computer screen. In my opinion, it is much more convenient and productive to work when there is nothing unnecessary on the desktop. To do this, you will need to clean up your computer.
On my computer's desktop there are two system icons: Recycle Bin, This PC (My Computer), and an Applications folder with shortcuts to mostly portable programs that I frequently use on my PC.
What should those who want to apply a radical solution to the desktop of their computer do: remove all icons temporarily or permanently? There are options to solve this problem.
The methods described in the instructions in this article work the same in different versions of the Windows operating system.
For example, I placed several system icons, shortcuts and a folder on the Desktop. To make it easier to see, I applied the setting to display large icons.
How to remove icons from the Windows Desktop - 1 way
Now we will try to remove icons from the desktop in Windows 10. In a similar way, you can remove icons from the desktop in Windows 7, Windows 8, Windows 8.1.
To clear the Windows Desktop of all elements, do the following:
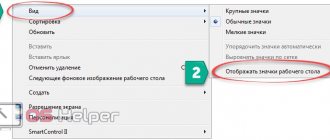
- Right-click on an empty space on the screen.
- In the context menu that opens, click on “View”, and then uncheck the box next to “Display desktop icons”.
All elements (icons, shortcuts, folders, files) that were there will disappear from the Windows Desktop.
How to get icons back on your Windows desktop
Most users will not be very comfortable working on a pristine computer screen. In order to restore the previous convenience, you need to re-enable the display of icons, shortcuts and other elements on the Desktop.
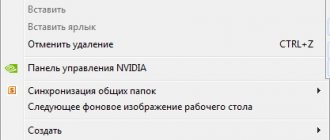
- Right-click on an empty space on the Desktop.
- In the context menu, first select “View”, and then check the “Display desktop icons” checkbox.
All icons, shortcuts and files will return to their original place.
You may also be interested in:
- How to return My Computer to the Desktop in Windows
- How to change the size of Windows desktop icons
How to remove shortcuts from the taskbar
There are also annoying extra icons on the taskbar. Often, some programs arbitrarily add their icons to the panel in order to constantly loom in front of the user’s nose. But they can also be removed and this is done quite easily.
- Use the function key to click on an empty space on the taskbar and go to “Properties”.
Right-click on an empty space in the taskbar and go to “Properties”
- In the window that appears, you need to go to the “Taskbar” section, then find the “Customize” button and click on it.
Go to the “Taskbar” section, then find and press the “Customize” button
- You will see a screen that lists absolutely all the icons displayed on the taskbar. Of course, some of them are needed for comfortable work, but many can simply be removed so that they do not get in the way.
Window for customizing icons and notifications displayed on the taskbar
- The display of icons is adjusted in three positions, depending on whether you want the icon to be displayed, not displayed, or displayed only when you receive notifications from the program.
Next to the desired icon, click on the arrow and select the desired option from the list
- After you have placed the position you want next to each icon, click “OK”.
To confirm the changes, click “OK”
The note! It is better not to remove all icons from the taskbar and not even turn off notifications. Know well which ones you need and which ones you don't. For example, it is better not to disable antivirus notifications.
How to remove icons from the Desktop - method 2
The method in question only works in older versions of the Windows operating system: Windows Professional and Windows Enterprise, which have a system tool - Local Group Policy. Users of home versions of Windows can use the first method described in this article.
To disable the display of desktop icons, follow these steps:
- Press the key combination “Win” + “R”.
- In the “Run” window, in the “Open” field, enter the command: “gpedit.msc” (without quotes), press the “Enter” key.
- The Local Group Policy Editor will open on your computer.
- In the “Local Group Policy Editor” window, in the left column, follow the path: “Local Computer Policy” → “User Configuration” → “Administrative Templates” → “Desktop”.
- Find the option “Hide and disable all desktop elements”, double-click on it with the left mouse button.
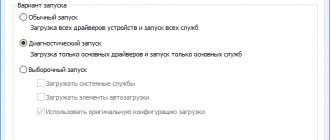
- In the “Hide and disable all desktop elements” window, activate the “Enabled” option, and then click on the “OK” button.
- Restart your computer.
As a result of changing the local group policy setting, icons, shortcuts, folders, files, and other elements will be removed from the Windows Desktop. While programs are running, if specified in application settings, files will be saved on the desktop, but they will not be visible. The user can open File Explorer to view icons or files that are on the Desktop but not visible on the computer screen.
How to quickly hide and return the contents of the Desktop using the utility
Using the Free Hide Folder program is a more convenient way to hide the content displayed on the screen of a ready-to-use computer. What you should remember when working with it is not to forget to save backup data. Free download link – https://www.cleanersoft.com/hidefolder/free_hide_folder.htm.
Experts recommend not to confuse it with the Hide Folders application, which also allows you to clear the graphical environment window of shortcuts and folders, but is paid.
Algorithm for hiding icons:
- After downloading, installing and launching the utility, the user is prompted to enter a secret combination and then confirm the password.
- The program asks to enter a registration code (provided to the user free of charge). But you can skip this point by clicking on “Skip”.
- To hide a folder, you need to click on the “Add” button in the main program window and specify the path to the secret file.
- To save backup information, click on the “Backup” button and then click on the “OK” button.
After these manipulations, the hidden folder will no longer be displayed in Windows. The only way to return the file to the table is to launch the Free Hide Folder program, enter the secret combination, click on the folder that you want to show, and click on the “Unhide” item.
How to show desktop icons again using group policies
After removing icons from the Desktop in the Local Group Policy Editor, we will have to change the policy settings again in the user configuration to return all the elements to their original place.
- Launch Local Group Policy Editor.
- Go to the desktop policy settings: “Local Computer Policy” → “User Configuration” → “Administrative Templates” → “Desktop”.
- Right-click on the option “Hide and disable all desktop elements”, in the context menu click on the “Change” item.
- In the “Hide and disable all desktop elements” window that opens, enable the “Not configured” option and click the “OK” button.
- Restart your computer.
All elements that were on the Desktop will become visible again.
Restoring icons through task manager
Windows Explorer or explorer.exe is responsible for Windows graphics. If this utility process fails, desktop icons suddenly begin to disappear. The same thing happens if Explorer is not running. If it doesn't work correctly, you can correct the situation like this:
- Enter the “Taskbar”.
- Open "Task Manager". This is done using the key combination “Ctrl + Alt + Esc”, “Ctrl + Alt + Del” or using the “Start” menu.
- Find the “Explorer” tab in the “Processes” section.
- Select “Explorer” and give the “Restart” command. Button at the bottom of the window.
How to start a new task in the task manager
If such a process does not exist, the issue can be resolved differently. You need to use a new task.
Procedure:
- Open file".
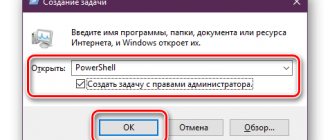
- Select "Run new task".
- Paste the command “explorer” or “explorer.exe” into the window that appears.
- Click on “Ok”.
Next you need to wait for the command to be executed.
Note! Using “Win + R” at the same time gives the same effect. You need to insert one of two commands (“explorer” or “explorer.exe”) into the drop-down tile.
How to remove system icons from the Desktop
In some cases, you need to remove only some or all system icons from the Desktop, without affecting the remaining shortcuts or files and folders located there at a given time. This problem can be resolved by applying changes to the Windows Desktop Icon Settings.
On the Windows 10 operating system, follow these steps:
- Click on an empty space on your Desktop.
- Select "Personalization" from the context menu.
- The “Settings” application will launch, in which you need to open the “Themes” tab.
- Under Related Options, click the Desktop Icon Options link.
- In the “Desktop Icon Settings” window, in the “Desktop Icons” tab, uncheck the boxes next to the system icons that you want to hide.
- Click on the “OK” button to apply the settings.
On operating systems Windows 7, Windows 8, Windows 8.1, do the following:
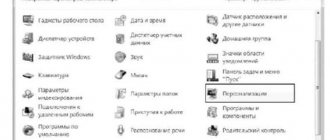
- After right-clicking on a free space on the screen, click on “Personalization”.
- In the Personalization window, in the right menu, select Change desktop icons.
- In the Desktop Icon Options window, clear the check boxes for the icons you don't want to display on your computer screen.
Turning off tablet mode in Windows 10
When a user’s Windows 10 shortcut images have disappeared when the “Tablet Mode” option is enabled, they can be restored in another way.
“Tablet mode” often changes some properties of the system. If it is active, then the icons will not appear on the PC screen when it is turned on. To return the icons to their place, the mode must be disabled. To rule out other causes, you should first check the status of Tablet Mode. This can be done by simultaneously pressing the “Win + A” buttons.
Tablet mode may turn on on its own
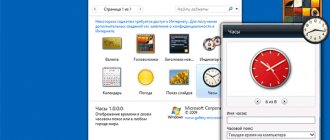
Clicking these buttons will open a menu with a list. The first one in it will be the desired mode. If the line is bright, then the mode is turned on. You need to deactivate it by selecting the left mouse button. The inscription should fade. After these steps, you should follow the path one by one: “Start” - “Settings” (gear sign) - “Windows Settings” - “System” - “Tablet mode” - “Use desktop mode” - “Always ask permission before switching modes.”
Important! Both sliders must first be set to the “On” position, then to “Off”.
Next, you need to refresh your computer desktop using the “F5” button. Such simple steps should help return the normal screen.
Of interest is an unusual way to return icons - turning off the computer using the power button. The “Start” item is not involved in the process. Just close all open programs and turn off your PC. When it is turned on again, the icons will most likely begin to unfold in their places.
Also, the removal of icons can be caused by damage to the explorer.exe file. In Windows 10, he is responsible for window design. In such a situation, you need to check the file using the appropriate commands. To do this you should:
- Simultaneously press the “Win + R” keys.
- Paste “sfc /scannow” into the pop-up window.
- Confirm the command by clicking “Ok”.
Next, you need to wait for the scan to complete and enter another command, that is, insert the command “sfc /scanfile=C:\Windows\explorer.exe” into the same window. After confirming the command by clicking “Ok”, the icons should return to their place. If this does not happen, you need to find out whether explorer.exe is present on the Windows system disk.
Note! If the OS is uploaded to another disk, then instead of the letter “C” there will be the name of the corresponding disk (with the downloaded OS).
You can easily solve the problem by creating a new element on the desktop. The process also occurs in the context menu. To get your screen back to working optimally, you need to:
- Enter the context menu.
- Click on the “Create” tab.
- Activate any object.
- Confirm the command with the “Enter” button.
Often this process helps solve the problem in its entirety. If unsuccessful, the newly created element should be deleted and another method used.
Any emergency circumstances affect work. The user gets used to the computer display interface and performs many actions automatically. The unreasoned disappearance of icons from it blocks the work process for some time. The risk of infection by viruses is very dangerous. To avoid this main problem, you need to protect your computer with a reliable antivirus. It doesn’t hurt to check the reliability yourself more often, especially in the case of a home computer. The corporate network is usually under constant technical support.
Working with other variants of the problem is also not difficult. There are many ways to return icons to their rightful place. The main thing is to carefully study the instructions and, if necessary, create a backup copy of the entire image or its individual sections (for example, the registry).