How to change the style of the Start menu in Windows 10?
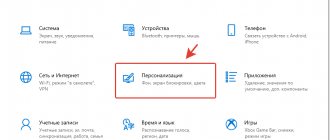
To do this, go to Windows settings and open Personalization - Start Menu. All features except full-screen mode are enabled by default to make the Start menu look like the famous Windows 8 Smart Screen. You can resize the menu by simply dragging it with your mouse and stretching it to the size you need.
Interesting materials:
What quantity is called the efficiency of a heat engine? What fables did Krylov write? What were the possible title options for the novel The Master and Margarita? What are the different email names? What are the names of rolls and sushi? What trees have names? Which two figures are called equal? What two lines are called? Which operational locomotive depots are called the main ones? What are the names of emails?
How to hide the taskbar
Despite the importance of this element, in some situations it only gets in the way. The line occupies a certain area of the screen, thereby distracting the user from solving everyday tasks. Therefore, the ability to hide the interface has been developed. The operation is performed through the “Options” of the Panel, which can be accessed in the following ways:
- via the Desktop by right-clicking and selecting the “Personalization” section.
- by right-clicking on the PZ and directly selecting “Options”;
- through the “Start” menu, simultaneously opening the “Settings”, “Personalization” and “Taskbar” sections.
To hide the interface, you will need to activate the slider responsible for automatically hiding the element. Now the PZ will be displayed only if you receive a notification from one of the pinned applications.
Adding icons
You can pin frequently used programs to the taskbar. Their icons will be sequentially placed to the right of the Start button.
To pin an open application, right-click on its icon on the taskbar. In the expanded list, select the “Pin” item, marked with a pin symbol.
You can do the same with program icons located on the desktop. It is not necessary to launch them. Having called the context menu, select the “Pin” line in it.
Some programs, for example Yandex services, like to register themselves in the taskbar. To remove unnecessary icons, use the “Remove” item in the context menu.
Typical settings problems
By changing the parameters of this element, users are not always able to return the element to the bottom of the Desktop. The most common problem is the random disappearance of the PZ, despite a change in its position. In this case, you should right-click on the Panel and then select the pin option. Now the PZ will not move from its standard positions.
If the interface has not moved to another location, but simply disappeared, you need to check “Settings” to see if you can activate the function to automatically turn off the Taskbar when inactive.
In addition, there are failures associated with the operation of specific programs, when the software disappears after clicking on certain icons. In such a situation, the solution to the problem is to gradually unpin individual applications until the moment when the interface begins to function stably.
How to secure
There is often a question on the Internet about how to unpin or pin the taskbar in Windows 11. In the case of Windows 10, you had to click on an empty space in the panel and select “Options...” in the task area. Here you could check the box next to “Pin…” and then unpin it later. There is no such option in Windows 11. Here you can pin the application, change the color, change the layout (including buttons), show logos on buttons, automatically hide information, etc.
Knowing how to install the taskbar on the top or side in Windows 11, you can customize the location that is convenient for you and avoid accidental clicks. In the comments, tell us which method you used and share your experience, which other method may be suitable.
Configure using the Classic Shell program
If you don’t have enough capabilities and such fine-tuning of Start in Windows 7, then you will need a small Classic Shell utility. With its help, you can customize the display of not only the start menu, but also Explorer, and return the classic look of IE 9. It is completely free. And its Russified version can be downloaded from the developer’s website. Need to do:
- Download the version of the utility for Windows 7.
- During the installation process, we indicate the elements that need to be changed.
- After installation, click on “Start”, and a utility window for detailed settings will appear in front of us.
- If you check the box next to “Show all options”, all possible Start settings will become available.
Returning the standard Start menu
You can make the Start menu like Windows 7 either using system tools or using third-party programs. You can return the Start menu using system tools or using additional utilities. In the first case, you just need to remove all the extra tiles from the right side of Start.
Open Start and right-click on the icons, selecting “Unpin from Start Screen”. The tiles will disappear and the menu will become more similar to version 7 of the operating system. You can also resize the menu so that the empty tile space doesn't take up too much space.
For quick access to programs, you can pin them to the left side. Right-click on any empty space in the menu and select Properties. In the window that appears, go to the “Start Menu” and select “Settings”. Next, another window will appear with a list of applications that can be placed in the menu. This could be the Control Panel, Documents, and so on.
If this method is not suitable and you want a standard Start menu, then only special programs will help. For example, you can use Classic Shell - this is the most popular utility.
Download any of the above programs, run the installation file and follow the program instructions. Many of them have flexible Start settings.
Windows 10 provides more opportunities to return to a familiar look than Windows 8. Users may like some innovations and decide to leave everything as is, some decide to completely redo the appearance.
How to work and solve Control Panel problems on Windows 7
The “control panel” is the holy of holies of everything that can be controlled. Whether it's a spacecraft or a personal computer, even a horse-drawn cart has its own control panel - the reins.
It’s good when this tool for interacting with the device is simple, but the further progress goes, the more buttons, switches, settings and modes the control interface has.
This means that understanding it may not always be easy.
How to get to the Control Panel in Windows 7
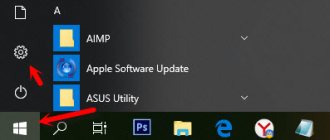
With standard settings in a freshly installed operating system, the Control Panel (CP) can easily be found in the Start menu.
- Press the Win button on the keyboard or the corresponding icon in the lower left corner.
- Then click on the link to the element you need in the menu that opens.
Through the “Start” menu, open “Control Panel”
But these are not all possible ways to open the Control Panel and interact with it.
How to run Control Panel as an administrator
Unfortunately, no way. Windows 7 does not provide this feature. It’s unclear whether it’s a whim of the developers or a mistake, since individual elements of the user interface can be opened with administrator rights, while the panel itself categorically refuses.
https://www.youtube.com/watch?v=AsL0eEjyVEs
To open a separate element (applet) of the Control Panel with administrator rights:
- Just go to the Start menu and enter the name of the corresponding file in the search for files and programs field - for example, appwiz.cpl (removing and installing programs).
- Then right-click on the found file and call up the context menu. In it, select the “Run as administrator” item.
Moving the taskbar through Registry Editor
You can also change the location of the Taskbar through the Registry Editor. This method should be used only if the previous ones do not work for some reason.
- Open Registry Editor. To do this, press the Win-R key combination and execute the “regedit” command.
- Go to the section below. Computer\HKEY_CURRENT_USER\SOFTWARE\Microsoft\Windows\CurrentVersion\Explorer\StuckRects3
- Open the “Settings” parameter and edit the value shown in the picture below.
- If you specify the value 00, the taskbar will be located on the left side, 01 - at the top, 02 - on the right, 03 - at the bottom.
- Open Task Manager (Ctrl-Shift-Esc) and restart File Explorer.
After these manipulations, the taskbar should take the position you selected.
What to do if the Start menu disappears on Windows 7
The language bar has disappeared in Windows 10 - recovery methods
The Start menu is part of the desktop navigation interface element in question, so all the steps described above to restore it apply to the Start menu and all elements associated with the desktop and Explorer. Running the process through the Command Prompt, Run window, or Task Manager should help resolve the issue.
If this does not help, then it is recommended to immediately check your computer for viruses and malware, and also go to the manager processes. If among them there are names of services that almost coincide with the name “explorer.exe”, you should end them, check startup and scan the operating system with any free antivirus and quarantine all found objects.
If two monitors are activated, you must select a different display mode
Via Control Panel
- The Start menu contains many items, but we are interested in the Control Panel.
- In the “Categories” viewing mode, we look for language settings.
- Go to the “Keyboards and Languages” tab and click the “Change...” button.
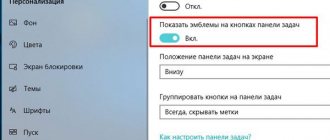
- A small window will open where you should check about. If it is “Hidden”, then change it to “Fixed...”. It’s also worth checking the box next to the “Display labels on panel” option. Here is a visual demonstration of these steps:
You have just learned how to display a language icon on the taskbar.
Efficient use of desktop space
Widescreen displays have become more popular in recent years and are now included on almost all laptops. Most standalone monitors are also widescreen. The vertical screen space in monitor resolutions has always been less than horizontal. Twenty years ago, 640x480 and 800x600 were probably the most common desktop resolutions.
Nowadays, many people use up to 1366x768 or 1600x900 on laptops, or perhaps 1920x1080 or higher on a desktop monitor. This means that the number of horizontal pixels (first number) has almost tripled, and the number of vertical pixels (second number) has doubled. Our screens are expanding faster as they get taller.
This UI element is about 60 pixels in length in Windows Vista, 7, and 8. In Windows XP and earlier, the length is 32−40 pixels. By keeping it at the bottom of your desktop, you're sacrificing about 5% of your vertical screen space. Moving left or right across the screen frees up that vertical space while still maintaining access to all buttons and information.
From this video you will learn what the taskbar is and how you can work with it.
Why did the Windows 7 taskbar disappear?
The Windows 7 taskbar makes it much easier to perform various operations on a computer or laptop (netbook).
Those who are used to it and it disappears immediately get upset, because there is quick access to the tasks being performed (programs, documents, games).
If the standard taskbar has disappeared and cannot be restored, then you can completely do without it.
To do this, you can download similar substitutes with a more beautiful design (there are free ones in Russian, for example “RocketDock”)
Still, it’s better to return it, and place the non-standard one at the top of the screen - it will be beautiful and convenient.
ATTENTION: if you have problems with the taskbar and startup, then here is a guide on how to solve them.
How to open, configure and repair the Control Panel in Windows 7
The Control Panel is present in all versions of Windows by default and allows you to manage a large number of settings, programs and processes occurring on your computer. You can open it in several ways, and for convenience, it is possible to change the appearance and interface.
Launching the panel
There are several ways to get to the Control Panel in Windows 7. Some actions in the Control Panel will require administrator rights, so open it from the main account to have full access to all features.
Through shortcut programs
- Using the search bar or the Win+R key combination to open the Run program.Hold down the Win+R combination to open the Run program
- Use the control task to open the panel. Execute the control command
How to call the panel via search
- Open the Start menu. Expand the Start menu
- Enter “Control Panel” into the search bar and open the program found. We are looking for the “Control Panel” program
- Or in the side menu bar, select “Control Panel”. Click on the “Control Panel” button in the “Start” menu
Through command execution
- Launch Command Prompt from the Start menu.Open Command Prompt
- Use the command explorer shell:ControlPanelFolder to open the panel. Run the command explorer shell:ControlPanelFolder
Via shortcut
- Right-click on an empty space on the desktop and create a shortcut using the menu that opens. Expand the “Create” section - “Shortcut”
- Open the created shortcut and write the value control for it.
Done, now double-clicking on the shortcut will open the control panel. Specify the control value - By opening the shortcut properties, you can set a key combination that allows you to open the panel via the keyboard.
Set up hotkeys to launch the control panel
Change your appearance
You can change the appearance of the control panel by selecting another option in the “View” line, located in the upper right corner of the window. The smaller the icon format you choose, the more sections you will have to fit on your dashboard home page. There are three options: categories, default, small icons, and large icons.
Change the appearance of the control panel by choosing a different icon format
What to do if the control panel is missing
Usually the administration panel disappears along with the desktop and quick access panel. This is due to the fact that the explorer process, which is responsible for system access to computer files, for some reason stopped working. To start it again, you need to do the following:
- Hold down the Ctrl+Alt+Delete key combination to go to a special menu.Hold down the Ctrl+Alt+Delete key combination
- In the menu that opens, go to the task manager. You can navigate through the menu using the arrows on the keyboard and the Enter key. Go to the task manager
- Expand the "File" menu. Expand the "File" menu
- Select the “New task” function. Select the “New task” function
- Run a task called explorer.exe. Done, if the explorer file is not damaged, then all elements of the system, including the control panel, will begin to appear stably. Create the explorer.exe task
- If you ever want to specifically “mask” the panel, then disable the explorer process, but this is strongly not recommended. Close the explorer.exe process
What to do if the administration option is missing from the Start menu
The easiest way to quickly access the panel is to use the button from the Start menu, but this button may not appear or disappear. To return or replace it, follow these steps:
- Right-click on the “Start” icon and open “Properties.” Select “Properties”
- In the window that opens, select the “Start Menu” tab. Go to the “Start Menu” tab
- Click on the “Configure” button.Click on the “Configure” button
- Scroll the list to the “Control Panel” block and select the “Display as link” mode. Enable the “Display as link” function
- Done, access to the Control Panel through the Start menu is back. The Control Panel button is back in the Start menu.
What to do if it doesn’t open
If, when you try to open the panel, nothing happens or an error appears, then most likely one of the broken files is preventing it from starting, causing an error and stopping the process.
- While on the main page of Explorer, go to the main partition of your hard drive, then to the Windows folder and from there to the System32 subfolder. Go to the System32 folder
- Sort all files by the “Type” column and move those that have the “Control Panel Item” value to any other safe folder. Then drag the files back one by one and check which of them the control panel stops launching again. Most often, the error occurs due to the Firebird2Control.cpl file, but other options are also possible. Check which file is damaged
What to do if the panel is empty or not working
If you encounter problems while launching the panel, and you have Windows “Professional” or “Ultimate” installed, then the problem lies in the Group Policy Editor:
- Open the “Run” program. Expand the “Run” window
- Use the gpedit.msc command. Run the gpedit.msc command
- Using the folder tree on the left side of the window that opens, follow the sections User Configuration\Administrative Templates\Control Panel. Go through the sections to the “Administrative Controls” folder
- In the destination folder, open the “Deny access to panel” option and set it to “Not configured”. Change the value of “Deny access to panel” to “Not specified”
- Restart your computer. Done, this should solve the problem. Reboot the computer
The Control Panel is a convenient tool for managing almost all settings and parameters of your computer and system.
If you lose access to it, you must restore it as quickly as possible, otherwise, when the panel is needed to solve other problems, a difficult situation will arise.
If you use the panel frequently, the fastest way to open it is to create a shortcut and assign hotkeys to it.
- Denis Dolgopolov
Source: https://dadaviz.ru/panel-upravleniya-v-windows-7/