Not only computers, but also TVs, smartphones, media boxes and other devices that support viewing multimedia content can exchange and access data on the same local network. This means, for example, that you can view a collection of images or video clips stored on your computer on a large TV screen without transferring the files via removable media.
This viewing is possible thanks to DLNA , a special set of protocols that allows compatible devices to exchange media content within a local network. With DLNA, a user can listen to music, view images and videos in real time on the screen of one device, while the content itself is physically located on another device. DLNA connection can be either wired or wireless.
In most cases, to pair a computer and a TV, it is suggested to use third-party software - a home media server, but in Windows 10 you can do without it, since this version of the system already has all the necessary components, namely a DLNA server and client, as well as a multimedia player.
Enabling DLNA on Windows 10 is not difficult.
Using the command control /name Microsoft.NetworkAndSharingCenter in the Run , open the Network and Sharing Center and click on the left “Change advanced sharing settings” .
In the next window, expand the “All networks” .
Click on the link “Select media streaming options” .
And click on the “Enable media streaming” .
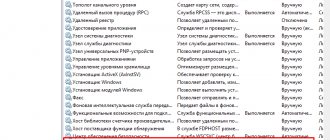
If at the same time you suddenly receive the message “Media streaming is not enabled” , go to the service management snap-in, find the setting “Windows Media Player Network Sharing Service” , open its properties, set the startup type to “Automatic” and run it.
After this, streaming should start without problems.
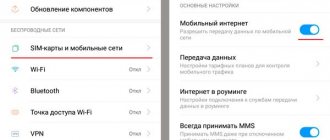
Almost everything is ready, all that remains is to make sure that the TV or other device is available in the media streaming options window and at the same time it has access to the computer. After applying the settings, the Pictures , Videos , and Music should be viewable on your DLNA-enabled device. The names of the sections in which the section responsible for viewing shared multimedia content on TVs and other devices is located may differ; it all depends on the model of the specific device. The setting may be called Smart TV , Network Neighborhood , UPnP , etc.
Unfortunately, streaming doesn't always work as expected.
In some cases, the TV recognizes a computer on the network, but does not see shared folders and files; files may not be played or played with errors. Problems may be caused by incorrect network settings, lack of appropriate drivers on the PC, or lack of device support for a number of multimedia formats.
How to connect a computer to a TV wirelessly?
First of all, make sure that your TV's Wi-Fi network is turned on and is discoverable by all nearby devices.
- Now open your computer and press Win + I keys to open the Windows Settings app. ...
- Go to Devices > Bluetooth & other devices.
- Click Add Device or Other Device.
- Select the Wireless Display or Dock option.
30 Sep. 2022
How to enable DLNA server in Windows 10
Not only computers, but also TVs, smartphones, media boxes and other devices that support viewing multimedia content can exchange and access data on the same local network. This means, for example, that you can view a collection of images or video clips stored on your computer on a large TV screen without transferring the files via removable media.
This viewing is possible thanks to DLNA , a special set of protocols that allows compatible devices to exchange media content within a local network. With DLNA, a user can listen to music, view images and videos in real time on the screen of one device, while the content itself is physically located on another device. DLNA connection can be either wired or wireless.
In most cases, to pair a computer and a TV, it is suggested to use third-party software - a home media server, but in Windows 10 you can do without it, since this version of the system already has all the necessary components, namely a DLNA server and client, as well as a multimedia player.
Enabling DLNA on Windows 10 is not difficult.
Using the command control /name Microsoft.NetworkAndSharingCenter in the Run , open the Network and Sharing Center and click on the left “Change advanced sharing settings” .
In the next window, expand the “All networks” .
Click on the link “Select media streaming options” .
And click on the “Enable media streaming” .
If at the same time you suddenly receive the message “Media streaming is not enabled” , go to the service management snap-in, find the setting “Windows Media Player Network Sharing Service” , open its properties, set the startup type to “Automatic” and run it.
After this, streaming should start without problems.
Note: If you are unable to start the Player Network Shares service, check to see if your
Windows Search .
Almost everything is ready, all that remains is to make sure that the TV or other device is available in the media streaming options window and at the same time it has access to the computer. After applying the settings, the Pictures , Videos , and Music should be viewable on your DLNA-enabled device. The names of the sections in which the section responsible for viewing shared multimedia content on TVs and other devices is located may differ; it all depends on the model of the specific device. The setting may be called Smart TV , Network Neighborhood , UPnP , etc.
Unfortunately, streaming doesn't always work as expected.
In some cases, the TV recognizes a computer on the network, but does not see shared folders and files; files may not be played or played with errors. Problems may be caused by incorrect network settings, lack of appropriate drivers on the PC, or lack of device support for a number of multimedia formats.
Starting a home media server
Individual settings according to preferences and needs have been completed, and now let's get to the fun part - demonstrating the capabilities of your media server. The program window is divided into 3 parts:
The top right is a tree of folders with content. Upper left – list of files located in the selected directory from the right side. Bottom part – your devices to which the stream is directed are displayed here.
Launch the home media server:
On the main panel, click “Launch”;
if the firewall is enabled, the security system will display a message to which we respond “Allow access”;
your TV will automatically appear at the bottom of the program window;
on the right side of the screen you can select which files to exclude from broadcasting;
in an already well-known way, we launch the “SmartShare” function on the TV using the remote control → in the “External Memory” category the number of available devices and their type is indicated;
When you start navigating through the directories, you will notice a complete match in structure on your computer, but pay attention to the additional filtering options
Let's look at the images/photos: select the desired folder and press the “OK” button on the remote control to open the file in full screen;
Built-in ability to view images with a selection of other images at the bottom of the screen, within a few seconds the image opens to full screen and the navigation bar disappears.
Folder navigation is identical, select the desired file and start viewing, below is a screenshot. Tz_mediasrv/screenshot_058 Tz_mediasrv/V002.mp4 Upon completion of work with the home media server, you need to stop the stream transmission: in the main menu, select “Stop”;
click on the cross - close the main window → the system will display a dialog box with the question “Unload the program?” → “Yes.”
Enjoy watching!
Installation
After successful loading of the distribution kit, it will proceed to installation: on the first installation screen you will be prompted for the directory into which the unpacking will be performed; you can leave it unchanged, or you can change it;
Next, the program installation directory will be indicated, which can be changed if desired, and you will also be prompted to “Create a shortcut to launch the program...” on the desktop → after selecting, click “Install”
installation is complete and the program will ask you to launch the program → click “Yes”.
Settings
Let's move on to setting up a home media server, below are the complete instructions: upon first launch, the “Initial Settings” will open. Here you will be asked to select a device from the list, or check the “Automatic” box; in addition, you can select the color of the main form from the palette;
When you click “Next”, an information window with changes in versions will appear.
Going to the main program window, select “Settings”.
Select from “Category”
"Media resources":
here we check the boxes according to the content that is located either on local drives or on removable media;
“Add” button → select directories to add media resources and click OK.
"Devices":
in this settings window, you can add or exclude devices by IP addresses, depending on your preferences, leave or uncheck the “Automatically add new devices” and “Allow access for new devices” checkboxes;
if you add a new device using the “+Add” button → a new settings window will appear with fields for indicating the name, IP address, setting a time interval to limit access, the ability to configure parental controls, according to content stars;
When you click on the “Settings” button → an extended settings window will open with the ability to:
- instructions “Media resources”;
- fine-tuning file formats with video extension and number of image pixels;
- transcoder client settings; After making changes, click “OK”
"Server"
Only for advanced users and system administrators: on the “Basic” tab - indicate the computer name, port, set the obstacle for the machine to go into sleep mode when the server is running;
in the “Advanced” tab - you can specify the root folder of the HTTP server, as well as the use of a specific address to receive UPnP messages about discovering and managing devices on the network;
in the “Web - navigation” tab - you can manage the default script or make changes to it;
when you click “+Add”, a dialog box will appear with the ability to specify the name, IP address of the device, MAC address and server name, you can immediately check the IP address for a conflict in the network.
"Transcoder" is exclusively for advanced users. “Temporary Files” section: allows you to intelligently distribute the storage of temporary files and set a limit on the total volume in Gb, as well as enable an alert when a certain amount of data is reached;
specify the buffer size excluding disk space;
parameters for performing transcoding with fine-tuning profiles indicating priorities, the maximum number of threads, as well as resources of executable files; you can create your own profile;
here the paths of the source and finished files with the transcoding profile are indicated.
Other sections with many additional settings that can be changed depending on the job.
"Events"
For advanced users:
here you can record different actions for different events.
"Additionally"
The name speaks for itself, this includes customizable parameters without a category.
Allowing other devices and computers to control the player
You can allow other computers and media devices on your network to stream media to the player on your computer . Thus, the computer turns into a playback device. This can be done if you want a certain type of camera to use the player to play back your images and videos.
To do this, follow these steps:
Attention! It is recommended to allow remote control of the player only on secure networks. When connecting to a new network, remote management is disabled by default.