Network problems are common in Windows 10, and now the problem seems to be affecting Windows 11 users as well. One of the common problems with Network Discovery is that users are unable to access other network devices on the same Wi-Fi network. Users are complaining that Windows 10/11 gives the error “Network discovery is disabled” and turning it on does not solve the problem. So, today we have put together a step-by-step guide to fix the “Network discovery is disabled” issue in Windows 10 and Windows 11. Let’s dive in and find a possible solution.
What is network discovery?
“Network” is the connection of different devices and “Discoverability” is the ability to be discovered.
So in its simplest sense, network discovery is “the property of being visible to other devices and having the ability to discover other devices on the network.” To create a network, devices must find other devices on the same network and connect to each other. This is exactly what network discovery does. This is useful in certain cases, but not in some situations. For example, you should disable network discovery on a public network. Because in public places you cannot trust networks and allow unknown people to track your visibility. Whereas, when you are working on a private network, such as at home or at work, you can enable network discovery.
Internet connection optimization
There are several reasons for a slow connection, some of which you can solve on your own. Here are the main ones: 1. Damaged cable - only replacement will help here and you need to contact a specialist. 2. Outdated drivers for the router - you can update them automatically. 3. Enabled speed limits - this applies more to file hosting services, in the settings of which you can remove the limit on the file transfer speed. 4. Incorrect settings - carefully check all steps for setting up the local network. If at least one is not made according to the instructions, we correct it.
If everything is done correctly, file sharing and joint editing will be available on all computers connected to the network.
Source
How does network discovery work?
When you enable network discovery for your device, it sends messages across the network and finds discoverable devices. On Microsoft computers, the browser service performs network discovery. You can discover the network device you want to connect and share network resources.
The problem with keeping network discovery is that it drains the battery very quickly. If your device is discoverable, it means it is constantly looking for other devices to connect to. Another point is that turning it on opens up a lot of Windows Firewall ports for connections. Therefore, it may lead to security issues and affect your computer.
After installing 1803, the PC disappears from the network
MS developers didn’t stop there and removed support for home groups in the next update. As a replacement, they suggested sending data to cloud services or opening resources for a specific user.
As a result, after upgrading to 1803, the computer becomes invisible, but at the same time it regularly responds to the network.
For correct operation, you need to configure the launch in the machine:
- DNS Client;
- Function Discovery Resource Publication;
- Function Discovery Provider Host;
- UPnP Device Host;
- SSDP Discovery.
Otherwise, it’s easy to find yourself in a situation where the machine doesn’t even see itself over the network, or your laptop turns out to be invisible to the computer.
Run the services.msc command using Win-R.
Switch the above services to automatic or delayed start automatic.
Restart the machine to apply the settings.
Everything about the Internet, networks, computers, Windows, iOS and Android
How to disable network discovery in Windows 10?
Luckily, you can easily turn network discovery on or off in Windows 10. Follow the step-by-step procedure below to turn network discovery on or off.
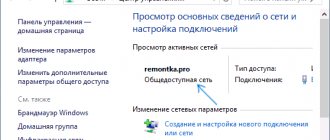
- Type "Control Panel" into the Windows search box and open Control Panel. Organize your browsing by “Category” and open the “Network and Internet” option.
Network and Internet in Control Panel
Change settings
- You will now see “Change sharing setting across different network profiles.”
Change access settings
For private networks
- Click Private to expand.
Privacy settings
- Enable or disable network discovery according to your requirements. If you want to enable it, you have an additional option. Click "Enable automatic configuration of devices connected to your network." This will automatically enable network discovery on connected devices, such as a printer or hard drive, on the same network.
For public networks:
- Click "Guest or Public (Current Profile)."
- Just like a private network, turn network discovery on or off to suit your needs.
- Click "Save Settings" to save your changes.
SMB protocol v.1.0
It often happens that problems are associated with the SMB v1.0 protocol being disabled by default. This applies to computers running Windows 10 version 1709 and higher. It is this service that is responsible for compiling a list of computers on the network and displaying them.
Enable SMB v.1.0 protocol:
- Go to the old “Control Panel”,
- Find "Programs and Features"
- On the left, select “Turn Windows features on or off”
- In the list we find “SMB 1.0/CIFS File Sharing Support”,
- Check the box next to this item or select all internal sub-items.
But keep in mind that this is an old and insecure protocol , which is full of vulnerabilities. Several years ago, vulnerabilities in SMB v.1.0 were the cause of major virus attacks.
It is advisable to reboot after this.
Using the Command Line to Disable Network Discovery
You can also enable or disable network discovery through the command line.
Follow these steps:
- Type "CMD" into the Windows search box. Right-click the Command Prompt option and select Run as Administrator.
Run as administrator via search bar
- Alternatively, press the Win + R keys to display the Run prompt. Type "CMD" and press "Ctrl + Shift + Enter" to launch Command Prompt in Administrator mode.
- Enter the following command to disable network discovery.
netsh advfirewall firewall set rule group = "Network Discovery" new enable = No
Shutdown command
- Enter the following command to enable network discovery.
netsh advfirewall firewall set rule group = "Network Discovery" new enable = Yes
Power on command
Setting up shared access to folders and files
We just need to right-click on the desired file and call up the context menu. In it we go to the section for providing access and selecting specific people. Next, we determine the person who will be able to view and work with them. You can leave it All, then any member of the local network can use it.
With password protection enabled, you will need to create users and assign them names and passwords.
Access rights can also be customized. By default, only reading files is possible, i.e. users will only be able to view them. To be able to edit, delete and add new ones, you need to select Read and Write.
To receive a link to the desired document, just click Share. In the window that appears, you need to select the link and forward it to any member of the local network. We paste it into the address bar in Explorer and the desired document will open. Another option: from Explorer you need to open the machine that has the document we need.
We find the folder we need and also call the context menu. Select the access section in it and click Make inaccessible.
Troubleshooting network discovery issues
If your device is invisible to other devices after enabling one of the above methods, use the following options to troubleshoot.
Windows Firewall restriction on network discovery
To resolve the firewall issue, you need to do the following:
- Go to Control Panel and open System and Security.
- Click Windows Defender Firewall.
Windows Defender Firewall
- In the left pane, click Allow an app or feature through Windows Defender Wall.
Allow apps through Defender
- Scroll down to find network discovery and check the box if you want to enable it.
Allow network discovery
- In the left pane, click Windows Defender Firewall On. Or Off.” You can disable or enable Windows Defender Firewall for both private and public networks.
Configure settings for each network type
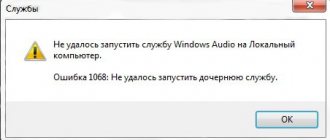
Problem with Network Discovery Dependency Services
Follow the steps below to resolve this network dependency issue.
- Press the Win + R keys and open the Run window. Type "services.msc" and press enter. This will open the Services pop-up window.
- Check and ensure that the following services are in the "Running" status: DNS Client
- UPnP device host
- Publishing Feature Discovery Resources
- SSDP detection
For example, search for "D" to check the status of the "DNS client" and make sure it is "Running".
DNS Client Service Check
Working group
First of all, we check that all computers on the network are in the same workgroup. To do this, go to the computer properties:
If the workgroup of all computers is the same, but one of the computers still does not want to be displayed correctly, try adding this computer to the workgroup again.
To do this, perform the following steps:
- Go to the old “Control Panel”,
- Go to "System"
- On the left select “Advanced system settings”
- Switch to the “Computer name” tab
- Click on the “Identification” button.
In the setup wizard window that opens, select:
- Select “The computer is part of the corporate network”
- Select “My organization uses a network without domains”
- Next, enter the name of your workgroup,
- Click “Finish.”
It is advisable to reboot after this.
Conclusion
Network discovery allows the device to communicate with the outside world. For example, with this feature you can connect your computer to a network printer. While you can easily turn network discovery on or off, there's a lot going on behind the scenes. It depends on many services to function correctly, and these services must be up and running. It also makes the device vulnerable to hackers when turned on on a public network. So make sure to only enable this feature when you're on a home or private network and you know what you're doing.
Basic Concepts
To connect a LAN, you need a router, which is also called a router. It is needed in order to combine all devices on the home network into one LAN, which makes it possible to exchange data and files between them.
To adjust the LAN, you need to connect the necessary devices to the router or combine them into a wireless network. Modern routers provide wireless and wired connections, as well as communication between several networks at the same time. Therefore, the router can be with a cable connection or mobile. If you use a cable connection, then the router should be selected with a WAN connector, if a telephone line, then with an ADSL connector. A mobile router is different in that it has antennas.
Important! Windows 10 OS has the necessary tools for successfully regulating and using LANs, but the process of creating a local network is not easy.
There are two ways to create a drug using:
Ways to solve the problem
The reasons why Windows 10 does not see the network are always different, so there is no universal solution. Below are several methods. Each of them can be useful, but without identifying the cause, it is impossible to choose an effective method. If one doesn't help, try the next one.
First, you should look at the list of connected devices if Windows 10 does not see other computers:
- Use the Win + R combination to open a window and enter “cmd” without quotes.
- At the command line, type “net view” also without quotes.
- A list of connected devices will appear in the window. If they are not there, the problem really exists.