Kuleshov Vyacheslav
The Android mobile operating system is widely used all over the world. Smartphones with this platform are fast and stable. However, some problems arise quite often. One of them is the question of why Android does not connect to the WiFi network. In the platform itself, almost nothing can be configured, since this is a mobile version and everything is already configured in it. This is done to simplify the use of the smartphone.
To connect to a WiFi network, you just need to turn on the module and select the required network from the proposed list. If the connection is not password protected, the connection will occur automatically. If the key is installed, you will need to enter it. But what should you do if the WiFi adapter on the Android platform does not turn on? This means that the operating system (firmware) has failed. Since we do not have the opportunity to configure the network manually, we should perform a general reset to factory settings.
There are also errors when the wireless module turns on and finds available networks, but cannot connect to them. What to do in such cases? It's simple.
Finding out the cause
So, your device cannot detect the existing network or cannot connect to it. There are many reasons why Android does not connect to Wi-Fi:
- Entering an incorrect password.
- Unsupported security type.
- Non-functional access point.
- A network standard that is not supported by your device.
- Problems with the phone or router system.
- Incorrect router settings.
- Limited number of connected devices.
- Specifics of the device firmware (custom installed, need for update).
Correct DC client network settings
If you don't have a direct connection
computer to the network, and through
a router
(router), the settings may differ.
And if you have a wire from your provider plugged directly into your computer, then check that you have active
file transfer mode enabled (
File - Settings - Connection settings
):
The remaining DC++ settings do not affect network connections in any way. So if you have everything selected here as in the picture, then the problem is probably not in the client settings (that is, read on).
How to solve a problem
Now let's look at what to do when your Android device does not connect to the Internet via Wi-Fi.
- If you are trying to connect to a new access point, first make sure you enter the correct password.
- If you are convinced that all the data entered is correct, change the protection type in the router settings.
- If you can't find the network you need, reboot your router or check if it's working.
- If Android stops connecting to Wi-Fi, restart both your device and router. I also recommend installing the application from Google Play, for example. This application will help when the device shows that the network is connected, but the Internet does not work. The program detects problems and suggests ways to solve them.
- Reset WIPE settings on Android.
- Check for firmware updates and update if necessary.
- If you tried the above options and they did not help you, it may be a problem with the firmware of your smartphone or tablet. There will be a need to reflash the device.
You can read about other reasons and solutions for Android not turning on Wi-Fi here.
Operation timeout: what to do? The simplest way to fix the situation
It is believed that the easiest way to get rid of error 118 is to simply close the unresponsive page and reopen it after ten minutes. Sometimes you may need to close and restart the Internet browser itself (for some reason, such situations are often observed in Google Chrome and other browsers based on it).
If this option does not help, and the message “Error: Operation timed out...” is displayed again, you can simply reboot your computer or laptop (or better yet, all routers such as routers or ADSL modems).
A solution to the problem that involves adding, for example, a gaming site to the list of permissions (exclusions) of the antivirus and firewall, may be quite effective, especially since in both cases it is not so difficult to do this in the settings.
Problem in Android when receiving IP WI-FI: Video
Setting up the router
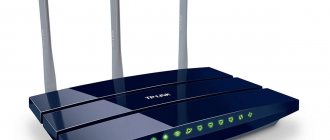
So, perhaps the problem is in the router settings. We will try to change them experimentally. First, make sure your access point is actually working. It's very easy to check: connect to the network from another device, for example, a laptop. If the connection is successful and you can use the Internet, try changing the router settings to connect a new device. Let's consider these steps using the TP-LINK router as an example.
- In your browser, go to your router settings. To do this, you must enter the IP address.
- Go to “Basic Settings”, change the existing channel to any other.
- Change “Wireless mode”, it is set according to the standard of your device. There are three modes: N, B, G. After each shift, check the connections.
- Set the region that matches your location.
Experiment with different channels and standards. After each change, do not forget to apply them. If the problem is not solved, you need to change the settings on your smartphone or tablet.
Firewalls, antiviruses and their impact on DC++ operation
The following are things that can negatively affect the operation of DC++.
- Software firewalls (firewalls, firewalls, firewalls) are programs for protecting against attacks from the network.
- Windows Firewall.
- Anti-viruses, anti-rootkits and other similar programs
- Hardware firewalls - “hardware” network protection built into network cards, etc.
If you don’t know what this is, below is a list of popular programs of this type: Antivirus
: Kaspersky (Anti-Virus, Anti-Hacker, Internet Security), Eset NOD32, Symantec (Norton AntiVirus, Internet Security), Trend PC-Cillin, Avira Avast, DrWeb, McAfee Antivirus, Panda.
Firewalls
: Outpost, WinGate, UserGate, WinProxy, WinRoute, ZoneAlarm, Comodo.
As for hardware firewalls, so far we know only nVidia firewall
, built into motherboards based on
nVidia N-Force
. How to disable it, read the motherboard manual.
What if you have the listed programs or similar ones? To begin with, you can try disabling them completely
or configure them so that they do not block network connections (either all of them, or those created by the DC++ application. Even if you are afraid to disable the protection, you can do this
temporarily
and check that the reason that DC++ does not work was precisely this program.And approach the issue creatively, experiment with the settings of your firewall or antivirus and make sure that it does not block the DC.
Unfortunately, experience suggests that antiviruses such as NOD32 and Norton (Symantec) Internet Security have the following unpleasant property: even completely disabling them (and in some cases, uninstalling) is actually not complete and still creates interference in DC++ operation. We don’t yet know how to combat this (except for the most radical ones, like reinstalling a clean system). The reasons lie in the incorrect operation of these programs and/or their uninstallers, which the user has no ability to influence.
To connect to the hub in DC++, TCP port 411
(depends on the settings of the hub itself, but on most hubs it is exactly like this). In active mode, DC++ uses many ports to connect to users; in manual redirection mode - only the port specified in the settings.
If NONE of the above helps:
There are only radical measures left: reinstalling “clean” Windows without unnecessary security programs. By the way, it will not harm many users at all. Believe me, spending even three hours on a complete reinstallation of the system is faster than three days looking for the cause of the inoperability in God knows what program. However, we do not recommend using “self-assemblies” of Windows - they can also be very “crooked”, and no one will guarantee the uninterrupted operation of the DC on these systems (fortunately, again, there are sad experiences of users stepping on this rake).
Setting up a Wi-Fi connection on a smartphone or tablet
Let's look at two very simple options. In the first case, you will need to change the proxy server installation type; if this does not help, in the router options we will add the MAC address of the device that does not access the Internet. Read more about how to find out the MAC address of a device in this article.
Option 1
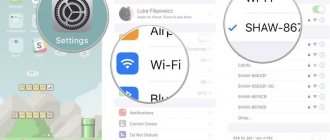
- Turn on Wi-Fi.
- In the “Networks” list, press and hold your finger on the access point.
- Click on "Change Network".
- Check the box next to “Show additional options”.
- In the “Proxy server settings” field, set the value to “No”.
Changing proxy settings
The situation with the proxy settings in the system is somewhat more complicated. Let's take standard Internet Explorer as an example. In your browser, you need to use the “Internet Options” section and the “Connections” tab.
At the bottom there is a “Network Settings” button, after clicking on it you will enter the window for setting up local network parameters. Here you just need to uncheck the box “Use a proxy server” and save the changes (sometimes you can disable proxies for local addresses).
But if the connection is made using a proxy, it is better to contact your provider to set the correct settings.
Setting up Wi-Fi on a tablet or smartphone with Android: Video
Option 2
- Make sure Airplane mode and Offline mode are turned off.
- Go to the menu and turn on the Wi-Fi module.
- Go to Wi-Fi settings, possible access points will be displayed.
- Select the one you need and connect to it. If the access point is secured, you will need to enter a password. If the connection does not occur, most likely the MAC addresses to which the Internet will be provided are manually specified in the router settings. If the MAC address of your device is not specified, then even if you enter the correct password, you will not be able to connect. This can be encountered in some offices that use additional protection so that no outsiders can use the network.
To add your device, do the following:
- On Android, follow the path “Settings / About phone / hardware information / WI-FI MAC address” to find out the MAC.
- On the router (using TP-LINK as an example). Using a browser on a PC, dial 192.168.1.1.
- Go to Whireless/Whireless MAC Filtering - in our case, the filter (Wireless MAC Filtering) will be enabled (Enable). To remove restrictions, you can simply disable it (Disabled). But if you just need to add your, say, phone, do the following:
- Make sure it's worth oh.
- Select the “Add New” key.
- Enter the address of your Android in the “MAC Address” field. – Write the Description at your discretion. – Leave Status “Enabled”. – Save the setting by tapping “Save”.
Note: these settings may differ on routers from other manufacturers, but the entire logic of actions will remain the same.
We have analyzed many reasons and options for action when your Android device sees Wi-Fi, but does not connect or does not see the required access point at all. We hope that one of them suited you and you easily dealt with the problem.
Fixing the system Hosts file
Now let's move on to a more complex method of correcting errors when an operation may time out.
First, in the menu for displaying files and folders (in standard Explorer this is the “Tools” menu with the line “Folder Options”) on the view tab, you need to set the display of hidden folders and files.
After the above operation, you need to open the “Run” menu and enter the command “notepad %windir%system32driversetchosts” (of course, without quotes), in the field of which the Hosts file will be opened in Notepad. Please note: at the bottom there is a line “::1 localhost”. In theory, it should be the last one, so everything below it should be deleted, and then the file should be saved with the original name and location. Now all that remains is to restart the computer terminal. Then, as a rule, the error disappears.
How can I fix my connection without internet?
To solve the problem of no internet access on your phone, there are a few things we can try. ... 2. Reset network settings.
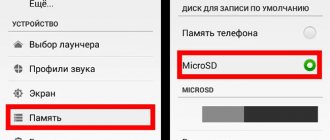
- Open settings.
- Scroll down to System and open it.
- Tap Advanced.
- Tap either Reset or Reset Options.
- Click "Reset Wi-Fi, Mobile and Bluetooth" or "Reset Network Settings".
- Confirm this and your device will reboot.
5 Jun 2022
Solving a problem with a gadget that has an Android system
Even the most reliable phone systems don't always work correctly. Failures in their work occur periodically.
Correcting an incorrect Wi-Fi password
If the user sees “Invalid Authentication” on their screen, the user must re-enter the network password, as it is most likely incorrect. Owners often do not complete symbols or change their places. You'll have to disconnect and find your home network again.
Infinitely obtaining an IP address
Sometimes the reason why Wi-Fi on your phone does not connect can be a glitch in the Android system. Suddenly the phone display starts to show the line “Obtaining an IP address.” Then it is enough to reboot the faulty Samsung or other device.
Interesting! You can leave your phone on and activate airplane mode. After a few minutes it is removed and the settings are restored.
Restarting Android
The Android operating system is constantly being improved. Manufacturers are trying to improve the performance of the gadget in this way. This may cause failures and unexpected errors. To eliminate them, just restart the device by turning it off or removing the battery.
Reconfiguring an Android device
Setting up new programs on your phone may not be safe for its performance. Sometimes the reason why your phone won't connect to Wi-Fi can be due to improper installation of applications. Often they simply fill up the phone's memory, preventing it from working normally.
But there are applications that improve signal reception. For example, Wi-Fi Fixer, which can be found on Google Play. Installing it is simple. The downloaded program will start automatically.
Checking Wi-Fi functionality on Android
If Android cannot connect to the network, you just need to check all the settings and if they are correct, reboot the device to fix the problem.