Home » How to use
Category: How to use
- 1 How to connect AirPods to iPhone
- 2 Connecting headphones to iPhone 2.1 How to connect headphones to another iPhone
- 2.2 Connect to two different devices at the same time
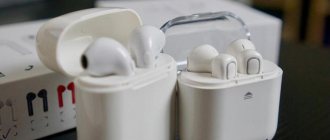
How to connect new airpods to your phone
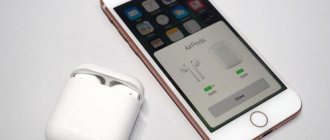
New headphones connect to the phone almost without the participation of the owner. All you need to do is go to the home screen, move the case with airpods closer to the iPhone and open it. A dialog box with a picture of headphones will appear on the screen. Click "Connect". After a few seconds, the headphones will connect to the phone, and a window will appear on the display showing the headphones and case separately and their charge. Click on “Finish”. Now you can use Airpods.
If you bought headphones that were already connected to the device under a different Apple ID, the connection algorithm will be different:
- On iPhone, open the home screen.
- Place the case with the headphones closer to the phone.
- When the message “Not your headphones” appears, click “Connect”.
- The device will ask you to press and hold a button on the case.
- After this, the headphones will begin connecting.
Further actions are performed in the same way as in the case of a new device.
If you have more than one Apple device with the same account, then the headphones will be available on any of them.
Remember that almost all further adjustments are carried out with AirPods inserted into your ears.
What to do if AirPods do not connect
1. Check the IOS version, it must be at least 12.2. And it’s best to immediately update to the newest one, because... They fix most of the problems that may arise when connecting.
2. See if Bluetooth is turned on on your phone by swiping from the bottom to the top of the screen.
3. Place the plugs inside the case and close it for 15 seconds. Also see if it is charging at all. Read more about this in the material - how to charge AirPods.
4. After the headphones have been in the case for 15 seconds, when you take them out, the indicator should light up white. This means they are ready to connect.
5. Open the case with the AirPods inside and place it next to the unlocked iPhone. Next, follow the instructions on the smartphone screen.
6. You can try removing the headset from the list of Bluetooth devices in your phone settings. And then add again.
7. Reset your AirPods, to do this:
- Place the plugs inside the case for 30 seconds
- Open the case and place it next to the iPhone. Go to the bluetooth settings on your phone and delete the headset by clicking on “Forget device”
- With the case open with headphones inside, press the button for 15 seconds until the indicator starts flashing yellow
- Close the cover for 15 seconds, open it and place it near the phone, then follow the instructions on the screen
Finally
This is how easy it is to connect headphones from Apple. Everything is done as simply and quickly as possible. Long operating time for your gadgets and high-quality tracks.
tell friends
Related posts How to connect AirPods to Android - easy
How to connect wireless headphones to iPhone
AirPods: how to use and manage - instructions
AirPods: how to charge correctly and quickly
Comments - 0:
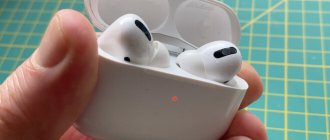
Why do you need an indicator?
Looking at the case for the airpods headphones, you might notice only one indicator. It can be used to determine the state of the device.
The indicator type can be as follows:
- Orange without a picture - there is not enough charge in the case to recharge the headphones.
- Orange with headphones - the case is charged along with the headphones.
- Flashing orange - There was an error connecting the airpods. You need to reconnect by pressing the back button on the case.
- Green without a picture - the case is charged and this is enough for one or several recharges of the headphones.
- Green with headphones - charging headphones from the case.
- Flashing green—the headphones are being removed or inserted into the case.
- Flashing white - waiting to connect to the phone.
If the indicator is not lit, then the airpods are completely discharged and need to be connected to the network.
How to distinguish originals from fakes
Here are some tips to help you distinguish original Apple headphones from fake ones:
- Price. The first thing you should pay attention to when purchasing. Obviously, original AirPods cost much more than those made by a third party;
- Packaging and case. Look carefully at the case; it should be pure white, made of high-quality plastic, and smooth. If this is not the case, you can be sure that you have a fake in your hands;
- Headphone color. This is the easiest way to distinguish the original from the fake. The original AirPods only come in white;
- Build quality. The original headphones consist of three parts that are precisely connected to each other without unnecessary plastic. Also, compared to a fake, they look stronger, higher quality and heavier (due to the premium build quality);
- Comfortable to wear. Try inserting AirPods into your ear. Apple headphones should fit neatly under the ear cavity and should not fall out;
- Headphone control. The original ones do not have buttons. For control, they have built-in optical sensors and motion and voice accelerometers;
- Company logo and other designations. The original Apple case does not have their logo. There should also be no other inscriptions. On the headphones themselves there should only be the letters L and R, which indicate which earphone is right and which is left;
- Sound quality. The headphones are designed to produce the best sound using their own design. This design ensures deeper lows and crisper highs when listening to music. If the sound quality seems low to you, then this is a direct indicator that the headphones are fake;
- Microphone quality. Among other things, checking the quality of a microphone is an easy way to understand whether your product is original or not. Usually people don’t pay attention to such a detail, but it’s enough just to call a friend and ask if he hears your voice loudly and clearly, if there are any extraneous noises.
If you're not buying AirPods from an official Apple store, these tips will help you make sure you get the original headphones and don't lose your money.
Touch control
You can configure the actions that the gadget will perform when double-clicked. For this:
- Go to the "Settings" section.
- Open the "Bluetooth" item.
- Click on "AirPods".
- Go to Double Tap AirPods.
- Tap on the earphone for which you want to select an action.
- Choose an action.
By double-clicking on one of the headphones, you can:
- Start playing audio;
- Pause the song;
- Switch to the next or previous track;
- Launch Siri.
Each earbud can be set to a specific action to optimize control.
First step: overview of appearance and characteristics
It's no secret that Apple's headset includes a number of useful features. These are, for example, speech recognition (do you use Siri?), noise reduction. First of all, let’s unpack our Airpods.
It is worth noting that if you use a headset with a lightning connector, you will not be able to charge your phone at the same time. Charging uses the same port as wired EarPods. Let's look at the control panel.
As you can see on the slide, we can adjust the volume with two buttons and answer calls with the key in the middle. On the back of the panel there is a microphone, which is used to record voice.
There are markings on the headphones - R and L (right and left).
So, let's start solving the question of how to disassemble the EarPods.
How to turn off automatic ear detection
With Auto Ear Detection turned on, the headphones will automatically recognize when you put them on and start a sound playing on your iPhone. If you remove one earphone, the playback will immediately stop and the sound will switch to the iPhone speaker. After disabling the function, music will play in the connected headphones even when you remove them.
To turn off automatic ear detection:
- Open Settings in iPhone.
- Find the “Bluetooth” item and go to it.
- Tap "AirPods" to open the menu.
- Drag the Auto Ear Detection slider until it becomes inactive.
After this, the function will be disabled.
Noise suppression
This feature is only available on Airpods Pro. It can operate in active and transparent modes. Typically, the user only has the ability to switch between two modes. But we know how to turn them off or replace them.
To do this you need:
- In the “Settings” section, find the “Bluetooth” item.
- Open the “Air Pods Pro” menu.
- Find the item “Press and hold”.
- Select the earphone whose settings you want to change.
- If it has Noise Control mode active, you can choose between Noise Canceling, Transparent, or Off.
- Selecting "Shutdown" will disable all other options.
If both headphones are set to Noise Control, the following settings will automatically be applied to them together.
How to change the name of the headphones
The name of the headphones can be changed to any other. This does not require resetting the device or re-configuring it. You can change the name as follows:
- Open Settings on your iPhone or iPad.
- Go to "Bluetooth".
- Select “AirPods” from the list of accessories.
- Click on the "i" next to the name.
- A settings menu will appear, in which you need to click on the “Name” line.
- Enter the desired name."
- Click on the "Back" button.
The headphones will now be given a new name. It will appear in the phone's connection list. If AirPods are linked to a Mac PC, then the name can be changed through the computer settings.
If you are afraid of losing your headphones, then write your phone number in their name. The person who finds the AirPods will try to connect to them, see your phone number and may even call you to return the device.
Scheme
A few words about the scheme. Or how to start an earphone without a base.
Power from the BMS is supplied through the negative switch to the amplifier and Bluetooth board. Sound from Bluetooth is sent to the amplifier. Now let's talk about how to make the headphone board work. Just work. If you do not do the manipulations, then it is not detected by the phone. But everything turned out to be simple.
In simple words, we apply plus power to the contact through which the earphone was charged. It is the positive contact.
Baby monitor
When there is a small child in the house, he needs constant supervision. Thanks to baby monitors, it has become possible to do household chores and watch your child at the same time. The baby monitor transmits sound from the room in which the baby is located to the response part.
AirPods headphones can be considered a universal gadget, since they can also be used to make a baby monitor. For this:
- Go to "Settings".
- Select the "Control Center" line.
- Click on “Customize Element.” management".
- In Control Center, add the Hearing option.
- Return to Control Center and enable the added feature.
- Turn on Live Listening.
- In the room with your child, put your iPhone down and put on the headphones yourself.
You can go about your business while hearing through your headphones what is happening next to your iPhone at a distance of more than 10 meters.
How to find airpods
No one is protected from losing expensive devices. You may drop the case with your headphones while walking or forget it in a cafe. If this happens to you, do not rush to get upset. Your Air Pods can still be found. To do this, you need to activate the “Find iPhone” function. This is done according to the following algorithm:
- Open the Find My iPhone application.
- Enter your username and password for Apple ID.
- In the “My Devices” list, find the name of the headphones and click on it.
A map with the last location of the device will appear on the screen. You can also click on “Play Sound” so that the headphones can be heard.
If the headphones are nearby and connected to the phone, they will be circled in green. If the AirPods are circled in gray, it means they have already disconnected from the device.
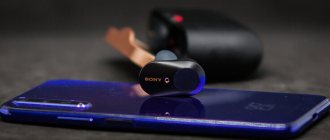
Compatibility and supported devices
AirPods work with iPhone, iPad, iPod touch, Mac, Apple Watch, and Apple TV, but all devices are expected to have the latest software installed. The connection takes place via Bluethoth. The headphones are compatible with the following devices and software versions:
- iPhone (4, 4s, 5, 5s, 6, 7, 8, X), iPad, iPod touch, starting with iOS 10 and later;
- Mac running macOS Sierra 10.12.3 and later;
- Apple Watch with watchOS 3;
- Apple TV with tvOS11.
Essentially, they are compatible with all modern versions of Apple software. If the device is brand new, then it will work with these headphones, and even older devices can be easily connected if they have the software listed above installed.
Microphone settings
The headphones need a microphone to make calls and use the Siri voice assistant. Microphone settings are set automatically. It works on both headphones. If you use only one of the headphones, then only it needs to be turned into a microphone. For this:
- Go to Settings on your iPhone.
- Open the "Bluetooth" item.
- Find your headphones in the list of connected devices.
- Click on the "i" next to the name.
- Tap on "Microphone".
- Choose one option out of 3.
If you select “automatic”, then the microphone will be any of the headphones. To make one of your AirPods the microphone, choose Always Right or Always Left.
Hidden settings
For Airpods Pro wireless headphones, you can change additional settings that are responsible for the speed and delay time between pressing the sensor. To access these settings:
- Go to Settings.
- Open the Accessibility tab.
- Find the “PhysicalandMotor” section and click on “AirPods”.
You can now change the following settings:
- “PressSpeed” is the speed at which you press the sensor. You can choose from three options: “Default”, “Slow”, “Slowest”.
- “Noise Cancellation with One AirPod” - noise reduction with one Airpod. If you activate this function, noise reduction will work even with one earphone inserted.
- “Press and hold Duration” - duration of pressing. You can choose between “Default”, “Short”, “Shorter”.
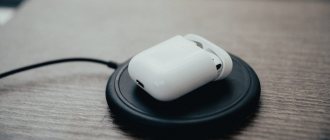
Playing music through AirPods
Apple's wireless headphones adhere to a number of concepts when playing music, audiobooks, and viewing media content. If you take the wireless headphones out of the case and insert them into your ears, the sound will begin to be automatically transmitted to the accessory, bypassing the standard speaker. The signal is intercepted almost at lightning speed, without additional visits to the settings, and even between different mobile devices - Mac computers, iPad tablets or Apple Watches.
If you take one AirPods earphone out of your ear during playback, the current audio track or even video will remain paused. If you take both out, playback will pause, but will resume again if you return the accessory to your ears within 15 seconds.
To manually control the sound source, the developers suggest using a special icon:
Found both in the native music player on the iPhone, iPad or iPod Touch, and in third-party entertainment services such as YouTube or Twitch.
When you access the icon, you will be able to select the playback source - accessory or speaker.