DLNA - allows compatible devices such as a computer, TV, laptop, phone, tablet to transmit, receive or play various media content files. The function provides enormous opportunities for playing media content. A video file downloaded to a PC can be watched on the TV, and music downloaded to the phone can be listened to on the audio system. It is very comfortable. You just need to create a DLNA network.
- 2 Equipment for building a home network with DLNA
- 3 Connecting a DLNA-enabled TV to a wi-fi router
- 4 Add other DLNA-compatible devices to your home network
4.1 Laptop or other PC
4.1.1 Video: how to connect a laptop to a wi-fi network
- 5.1 Video: instructions for installing and configuring the Home Media Server program
- 7.1 Table: errors that occur when playing media content and methods for eliminating them
Equipment for building a home network with DLNA
To create a DLNA network, you will need a computer or laptop with a media server configured on it. Using a wired or wireless Wi-Fi connection, it connects to a router, which, in turn, distributes a signal to other devices.
DLNA network turns your home into a media center
Such devices can be: TVs, laptops, tablets, phones, stereo systems. If you don’t have a router, you can configure signal distribution directly from your computer, but in this case you will need a Wi-Fi adapter for your computer. The principle of building a DLNA home network is similar to the Internet.
In the end you will need:
- computer or laptop;
- Wi-Fi router or adapter;
- at least one other device that supports DLNA.
It is better to connect the TV to the computer via a cable connection. Wireless communication is convenient and modern, but when viewing powerful media content files, streaming data may be lost and, as a result, the TV may malfunction.
We broadcast video from computer to computer without a server
Even before setting up a DLNA server, you could stream content to compatible Windows devices and computers. In the Microsoft operating system this is quite conveniently arranged:
- We are looking for a media file that we want to stream to another device.
- We right-click on it.
- We move the cursor to the “Bring to device” item.
- In the list that appears, select the computer or TV to which we want to relay the video or audio. It's simple.
Here's the item you need
Post Views: 2,133
Connecting a DLNA-enabled TV to a wi-fi router
You can connect a TV to your DLNA home network; this step will make it possible to fully use the installed server. First of all, you need to connect the TV to your Wi-Fi router. You can do this in one of two ways.
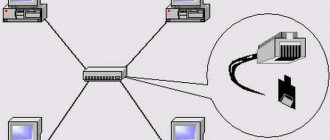
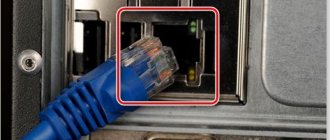
Simply connect the TV and router with an Internet cable with LAN connectors:
- Connect one end of the cable to the TV socket.
An internet cable is connected to the LAN socket of the TV.
- Connect the other end of the cable to the LAN connector of the router.
The wire connected to the TV with the second end is connected to the LAN connector of the router
The location of the LAN sockets on different TV models is different, but they are labeled everywhere and cannot be confused with outputs for other purposes.
You can connect your TV to your router via a wireless wi-fi network. New TV models, as a rule, already have a built-in adapter. If the model is older, you will have to use an external wi-fi adapter. It needs to be inserted into the USB connector of the TV, and the system itself will detect it and put it into operation.
The Wi-Fi adapter must be connected to the TV via a USB port
Next you need to proceed to the procedure for setting up the TV:
- Pick up the TV remote control and press the Menu key.
- In the menu that opens, click “Network”, then “Network Settings” and select “Wireless (General)”.
- In the list that opens, select yours and click “Next”.
- In the window that opens, enter the password for your home network.
- If everything is done correctly, the connection will be established.
Equipment synchronization methods
There are two options for supporting DLNA technology on a TV - built-in and external . In the first case, we have a wired connection organized via a USB interface or via a wireless Wi-Fi module. Codecs in the local firmware are responsible for playing content here, which significantly reduces the list of readable formats, because in a good half of cases standard players have modest functionality.
External DLNA support is provided using third-party devices: terrestrial, cable or satellite TV receivers, multimedia players, game consoles, etc. This option significantly expands the capabilities of content visualization and eliminates any conflicts of standards and problems with codecs.
Adding other DLNA-compatible devices to your home network
By setting up a DLNA server on your PC, you can connect other devices to your wi-fi router. Connecting to your home network, possibly via a wireless connection or via cable.
Laptop or other PC
To add a laptop to your home network, you need to configure its connection to the router. In the case of a wired connection, it is enough to connect the LAN connectors of it and the router. When connecting wirelessly, you need to pay attention to the bottom right corner of the monitor. There you will find an icon in the form of gray sticks of different heights.
The icon on the panel indicates that the laptop is currently disconnected from the Wi-Fi network
By clicking on it, you will go to the network connection settings menu; all networks with connection capabilities are displayed here. Select the desired network, click the mouse.
On the “Sharing Center” tab, connect the desired wi-fi network
If the network does not have a password, the connection will occur automatically. Otherwise, a window will pop up in which you must enter a password.
X
Enter your home network password and click “Done.”
Video: how to connect a laptop to a wi-fi network
Before you can transfer media content to other devices, you need to configure the media server.
To add a laptop to your home network you need:
- Go to the “Start” menu, then “Control Panel” and go to the “HomeGroup” tab.
- If a home group has already been created on one of the devices, the system will prompt you to join it, click “Join”.
To connect the device you need to click the join button
- In the next window, enter the password generated by the system when creating the homegroup.
To connect to a homegroup you need to enter a password
Media player
To integrate a media player into your home network, simply connect it to your router. The player automatically connects found DLNA resources. It is enough to open shared access to folders for homegroup devices on the device acting as a media server.
DLNA server for home and family
Somehow it happened that the DLNA server
is more common in question posts than in answers. And if some user experience has been accumulated regarding installation on a home Windows PC, then deciding on the choice of software for a home server/NAS/media center turned out to be difficult. Distributed among sandboxes, people separately solve the problems of each program separately. But I personally failed to understand which of them is worth what and whether it is needed at all. And so, armed with a link from Wikipedia How to choose a DLNA server for Windows, Mac OS X or Linux, I tried almost everything that is available for Linux.
DLNA - its place in the home network
Most people have probably already gone down this path - new media devices appear in the house, the number of family members consuming media content grows, and the database of films, music and photographs itself swells. At the same time, everyone builds media infrastructure in their own way. For some it is a computer with TV-OUT, for others it is a netbook or HTPC. Someone shares folders from a NAS via NFS, someone connects an HDD to a media player, someone uses the capabilities of Sony PS... There is confusion in storage locations, formats, codecs, etc. So, in my case it turned out:
- Plasma in the living room is better served at 720p than FullHD
- It’s better not to feed a Sony TV in a child’s room connected via Wi-Fi more than 15Mbit/s, H.264 it needs a maximum of Profile 4.1, and it doesn’t see files on network storage at all
- The Openbox satellite receiver cannot play audio tracks in DTS, it does not support more than 30Mbit/s via SMB, and it does not display Cyrillic via NFS
- Nokia Lumia and iPhone are generally limited everywhere
In general, the only option to connect this entire menagerie with each other is to use a DLNA server. Theoretically, it will bring content from different places into one folder tree, and adjust the resolution and check codec compatibility and, if necessary, re-encode. Beauty…
What to bet on
A home computer
is usually a Windows machine.
Watching a re-encoded film while someone else is playing won’t work; There is no 24/7 mode at all. Not suitable for the role. That's why I didn't even consider the Windows versions of the programs. Router flashed with DD-WRT/OpenWRT
- there are packages for these firmwares and they work.
Hardware resources are very limited - transcoding is unrealistic, the speed of access to the USB port and network folders is severely limited. Nevertheless, this suits many people. NAS or home server with Linux
is the most versatile solution. There are many programs. There are no protocol restrictions. The performance of x86 processors from 5 years ago (in my case, the Athlon X2-6000) is enough to simultaneously transcode two films of any format on the fly.
Personal experience, program evaluation
MiniDLNA, uShare and xupnpd
These are different projects, but in essence they are the same thing. Lightweight and fast. The only function they perform is to provide network access to media files via the DLNA/UPnP protocol. The player or TV should be able to do everything else themselves. DLNA is not fully supported and many devices simply cannot be seen by these servers. Very massive. They work everywhere. Packages exist for all kinds of Linux distributions, routers with DD-WRT/OpenWRT firmware and NAS. The installation procedure is simple and well described on specialized forums. There are no GUIs If you, and only you (otherwise complaints from family members are inevitable):
- watch/listen only from one omnivorous device (such as a Samsung TV)
- Your device cannot directly retrieve files from network folders or is too slow (such as a Sony Bravia TV)
- store movies/music on an inexpensive NAS or router with a USB drive
- select content in advance in the required format or don’t be lazy to re-encode it manually
- media files are already well sorted into folders or this does not bother you at all
- then you can limit yourself to such a DLNA server. Choose from them the one that is in the packages for your hardware and will be seen by the renderer.
MediaTomb
The developers clearly write that “this is not a DLNA server, it only supports part of its functions.” And although there may be some compatibility issues, this is quite a project worthy of attention. There is already a GUI running through the built-in http server - you can manage folders with content in it. Add new ones, create shortcuts to existing ones, set scanning intervals, etc. It is well distributed - there is no problem installing it on any Linux distribution, it does not entail heavy dependencies. Configured with a single text file. Very stable in operation, not resource intensive. Transcoding can be used, but it is implemented in a simple form. Thus, profiles are linked to the input file format, and not to the output device. The server does not distinguish at all who connected to it. Accordingly, there are no ready-made profiles for devices - everything needs to be configured manually:
- which formats to transcode and which to transfer directly
- set the encoder according to the situation: ffmpeg, vlc, mplayer or something else
- set bitrate, number of audio channels, H.264 profile and other encoding options
- apply a video filter such as crop or crop
In my case, I had to write a separate script to set ffmpeg arguments based on the audio track format (DTS or AC3). At the same time, when viewing a transcoded stream on a TV, rewinding and selecting an audio track will not work. Attaching subtitles is also a separate matter. In general, MediaTomb is a very brutal tool for true Linux users. You can’t call it universal, but you can customize it perfectly to suit you and your hardware.
Rygel
Massive, available almost everywhere. But it is very crooked to put it in daemon mode (you need to write an init script yourself, create folders and a user). It is part of the gnome project and pulls gstreamer (or even pulseaudio). If anyone has KDE or something else on their computer, it’s completely inconvenient. Icons for videos are generated via tumbler from the XFCE project, and even then with nuances. Falls regularly. I didn’t get around to studying the features of transcoding. My verdict is “no good”.
PS3 Media Server
A very old project. And although from its initial application: “Distribute movies/music from your home Windows PC to Sony PS,” the project has evolved greatly. But the JAVA code and the requirements for running the X server turned me away from it.
XBMC
It has a DLNA server. But keeping this combine for the sake of just one module is stupid. Moreover, it was from XBMC that a separate Plex media server project was born.
Universal Media Server
He's kind of crooked. Showed me the entire directory tree instead of the selected folder. I opened only a few files and regularly threw errors into the console. I haven't figured out transconding at all. Very heavy due to JAVA code. You definitely need a running X server - you can’t make it a daemon. "Unfit."
GMediaServer
The project has been abandoned. Not worthy of attention.
LXiMedia
Simple and convenient implementation of a DLNA server. All you need to do is select folders with files, strictly set transcoding parameters, audio track, subtitles. No profiles, settings. Moreover, this is a GUI application, it cannot be installed as a daemon. In my opinion, it is useless in this form - one of many and far from the best.
Serviio
Perhaps the fastest growing project right now. Updated regularly. It is actively acquiring plugins, profiles and applications for mobile OS. It is a JAVA application running as a daemon. DLNA protocol support is complete. Quite skillfully scatters content into folders and categories. Can create previews for films. It is easy to connect different on-line broadcasting channels. Transcodes using ffmpeg. The database of device profiles is already quite large (and continues to grow) - the server correctly selects encoding parameters for any of the home hardware. What I didn’t recognize is that it’s not difficult to choose a profile or write your own. Due to the fact that ffmpeg is used - the same problem as in mediatomb - there is no rewinding in the transcoded stream and the audio track does not change. All this is controlled either from a JAVA client, or a web interface written in PHP, or a smartphone (there are applications for Android and WP). Unfortunately not available as a .deb or .rpm package. You need to install it manually: create folders, create a user, unpack it, get the init script from the support forum, add it to autorun.” There is a ready-made package for Synology NAS. In general, it may well become a single point of access to media content at home. He can do everything you need.
Skifta
Not included in Linux repositories and therefore rare. But it has a graphical installer and carries jre with it, and therefore will work on almost any system. It is inconvenient because it is launched in two steps - first the utility in SystemTray, then the media-server itself. Without X's it won't work as a demon. Very simple and concise, but heavily loads the system (JAVA code).
TVMOBiLi
Costs $30 (or subscription fee $1.5/month). Available as .deb and .rpm packages. It is quite difficult to install not in Ubuntu/Fedora - the built-in vlc and ffmpeg will probably find the missing libraries and refuse to work. I couldn't find USE flags for vlc in Gentoo. It didn’t work at all, I had to redo the profiles so that only ffmpeg would be used. Overall, transcoding profiles are its strong point. You can set any logic and any parameters. Managed through a nice WEB-face. Has a rich database of transcoding profiles. It is possible to play files via the built-in http server. Can't generate thumbnails. It works quickly and beautifully. Good candidate.
TwonkyServer
Installed by unpacking tar.gz. or through the installer. It is not available in Linux repositories. Very fast code, instant launch, convenient web interface. Well and competently distributes content into folders. There are ready-made init scripts. Can extract meta data from files and generate thumbnails. All liked it. One problem - $19.95. And yet: “I recommend.”
Plex
As the developers write - “A complete Media Solution”.
I confirm. This monster grew out of XBMC and can do everything and even more. Find movie posters, ratings and a bunch of data. The series will also be divided into seasons and episodes. The music collection can be organized from any source type. Transcoding makes everything possible. Settings can be controlled directly from the TV's OSD menu. For smart devices like LG Smart TVs and Apple TVs, support goes well beyond the DLNA protocol. There is support for its own cloud service, which allows you to watch home videos remotely - the server will adjust the parameters of the sent video to the capabilities of the device and communication channel. There are separately written clients for mobile OS and Windows 8 tiles. There are ready-made packages for Ubuntu, Fedora, CentOS and mass NAS models. Under everything else - installed by simple unpacking. Of the dependencies, only Avahi-daemon is required. Unfortunately, the transcoding mechanism does not allow interference with the work - profiles can be corrected, but the possibilities are very limited. It is capable of solving any problems within the framework of the topic, while it is free, stable and, oddly enough, fast.
I would really like someone to add to this list and/or make changes.
Setting up DLNA on your TV
TVs connected to the home network automatically find the server and folders with content allowed for viewing. On LG TVs, folders of available media servers appear alongside pre-installed programs and features.
There are many alternative programs for creating a media server. The LG TV comes with a disk with a program called Smart Share, which can also be downloaded on the Internet. This program allows you to create a media server without using Windows tools. Just download it to your computer, click on its launch shortcut and wait for the installation to complete.
pp
A folder with the Smart Share logo will appear in the TV's programs and connections panel. On your computer, in the program settings window, you can assign folders for playing content. You can view photos and videos located in these folders on your TV.
Smart Share is a good program for those who are too lazy to delve into the Windows settings. It loads the system quite heavily. Even with the TV turned off, on a weak computer, its presence can be felt. For some reason, it does not always update the folder with added files. Sometimes you have to do this manually. It is better to set up a normal server using Windows.
There is a universal program that allows you to connect any TV that supports DLNA to a computer. It's called Home Media Server.
Video: instructions for installing and configuring the Home Media Server program
Managing DLNA Folders
Thanks to folders, you can make DLNA settings in Windows 10. There are a lot of possibilities through which files are transferred. The program window is divided into 3 sections.
- Right, top. Contained in the content folder.
- Left, top. Contains files from folders.
- Lower. List of devices to which broadcasting is carried out.
How to set up DLNA on Windows 10 using the following folders:
- In the top menu, click on the “Launch” button.
- A new window pops up, where you click on the “Allow access” button, which will display the TV.
- The contents of folders appear on the right side, from which you can select files for broadcast.
- On the TV, press the Smart TV power button.
- Find the “External Memory” item, which displays the device for interaction.
- The TV monitor begins to display identical content as on the computer.
- Select a folder, click on it with the “OK” button, which leads to the activation of the image, video, photo.
If you want to stop the transmission, go to the main menu, where you click on the “Stop” button. This causes the broadcast to stop.
The system will ask the user to close the main window by asking “Unload the program?” It must be answered positively.
Adding folders
Video slows down and other problems
Sometimes annoying interference and malfunctions interfere with watching your favorite movies and prevent you from appreciating all the benefits provided by using the DLNA network. See the table provided for possible problems and methods for solving them.
Table: errors that occur when playing media content and methods for eliminating them
| № | Errors and malfunctions. | Causes of errors and malfunctions. | Possible Solution. |
| 1 | Devices cannot discover the network. | The wi-fi router may have malfunctioned. | Try rebooting your wi-fi router. |
| 2 | Low data transfer speed on a wired connection. | The cable is damaged or poorly secured in the LAN connectors. | Check the integrity of the cable and the tightness of its fastening in the connectors. |
| 3 | The media server is unavailable. | Errors in the operation of the media server. | Reboot the media server. |
| 4 | Media device is not available. | Errors in the operation of the media device. | Reboot your media device. |
| 5 | The video is slow. | The data transfer speed is insufficient to watch the movie. | Temporarily stop watching the movie to download enough data to watch it. |
| 6 | The system stops watching movies and indicates the reason - insufficient disk space. | There is not enough space to store temporary files. | Choose lower quality videos with a smaller frame size. |
| 7 | A message appears - the movie format is not supported by the media device. | The media device does not support this movie format. | Find a movie in a supported format. |
Often the reason why the TV slows down when watching movies is easily eliminated small details. The main reason lies in the unstable operation of the media server. For normal operation, periodically optimize and clean the system. Don't overload your computer with unnecessary programs.
Anyone can set up DLNA-enabled devices at home. It's not difficult at all. A TV connected to your home network gets a second wind. After spending half an hour connecting to the DLNA network, you can view any content from your devices on the big screen. Movies, photos, videos shot on your phone, now you can watch all this just by pressing a couple of buttons.
How DLNA works
DLNA standards use UPnP protocols to receive and transmit files, as well as render various content on all connected devices. A local IP network is used as a base, allowing all actions to be performed in real time.
For correct synchronization of devices, equipment must have the appropriate protocols. Devices are connected to a common network via either a router or a Wi-Fi module.
Advice! Finding out if your TV has DLNA is very easy. The box should display the technology logo - DLNA Certified.
Detailed setting
Let me remind you that there are separate programs for TVs that you can also use:
On the other hand, why install something unnecessary if everything runs smoothly using standard tools. Plus, on my personal LG there were problems with Smart Share.
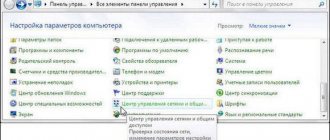
- We go to the “Start” menu, click on the magnifying glass and enter the name in the search bar: “Media streaming options” - you don’t need to enter it completely, since the system will quickly find this item.
- We activate this function to enable the media server on the home network.
- Next, this window with settings will open. First, enter the name of the server - it’s better to do this right away so that you can definitely open your PC or laptop on the TV and not make a mistake. Below is a list of devices running the DLNA client. You can click the Allow All button or allow access only for certain devices.
NOTE! If you don't see your TV in the list, restart streaming. If this does not help, then restart the computer and turn off the TV and turn it on again. Also make sure that both devices are connected to the same router. If this does not help, then see the last chapter of this article.
- By the way, you can allow the device to use only certain content (music, images, TV recordings, videos) by clicking on the “Customize” button next to the TV.
- Finally, confirm the parameters by clicking “OK”.
- You can already open shared files on your TV. This item is called differently on all TVs, but most often it is in the connections section. If you don’t find the photos, videos or music you need in the list, you need to add them.
- We launch the standard “Windows Media Player” - it can also be found in a search engine or in the “Standard - Windows” folder.
- The program will open, where the necessary items will be displayed on the left. I’ll show you using “Video” as an example. You can select any item with the right button and then go to the management section.
- Then there’s nothing complicated - just click “Add” and select the folder that you want to share for the TV.
From here you can launch the video directly to the TV - right-click on the desired video and select “Play”, now select our TV. By the way, if you have the sleep mode function enabled on your computer or laptop, then you may encounter a problem when the device turns off after some time and playback is interrupted. To solve this, go to the “Power Options” section and set the parameter as in the picture below.
Devices do not see each other
In more rare cases, if configured correctly, the TV or other devices still do not appear in the list. This may indicate that the UPnP function is disabled on your router - it allows you to quickly configure DLNA and transfer media files without port forwarding. About activating UPnP on a router is written in this article. You can try turning media streaming off and on again. Also try turning off the router for a while and turning it on again.
To enable UPnP on your computer, certain services must be running. Click on “Win+R” and enter the command:
services.ms c
We check that these services are enabled (they are necessary to run the media server in Windows):
- “Application Level Gateway Service” – it is necessary for the Windows Media application to work stably.
- “Network connections” - here I think everything is clear, without it the computer will not be able to work with LAN.
- “Service of information about connected networks (NLA)” – used for Stream transmission in a local area.
- Plug and Play is exactly the UPnP we need.
To activate, right-click and then select “Run”. To start automatically, go to settings and set the startup type to “Automatic”.
As part of this article, I will write how to create a home media server for Windows 10. Creating a DLNA server will allow other devices to use the media library located on the PC. This is primarily useful for those who have a Smart TV.