Microphone on Windows 10
A microphone is a device that transmits sound through a computer in its pure form. After purchase, it is important to understand how to turn on the microphone on a Windows 10 or other OS laptop. If you use stationary devices, the sound will be of poor quality. Therefore, many personal computer users purchase a professional device. It comes in the following types:
- wired;
- wireless.
Volume mixer on desktop
A regular device is cheap and has average quality. If you need a device for professional activities, buy a more expensive device. It has the following characteristics:
- simple devices absorb the sound that reaches them;
- professional devices have a condenser type microphone, which transmits cleaner sound;
- presence of a stand for convenience;
- USB cable, plug for connecting to a computer.
Note! A professional device operates at a higher frequency than a regular one. Before you buy it, it is important to make sure that the device is suitable for the Windows 10 operating system.
Features of microphones on laptops
Every laptop has a built-in microphone. It is used for the following purposes:
- calls via Skype, WhatsApp or other applications;
- negotiations with other users during games;
- sound typing.
Speakers on a laptop
For your information! Although sound is transmitted, it is often of poor quality. The microphone is positioned so that it is only partially absorbed. Therefore, errors occur during its transmission. Another person cannot understand the words; letters in documents are written incorrectly.
Troubleshooting Possible Problems
Possible errors and ways to fix them:
- The system does not see the newly connected device. Make sure it is working properly by connecting it to another PC. Check if it is connected to the right socket. Make sure you have the latest sound card driver installed on your system.
- The microphone is recognized, but does not work. Check if its use is enabled by default in the properties window. Make sure the level slider is not set to zero and the Mute mode is disabled (there is no red crossed out circle on the speaker icon to the right of the slider).
- The microphone is recognized and works, but incorrectly. In the properties window, uncheck the “Allow applications to use the device in exclusive mode” checkbox. Check if the desired program is allowed to access it (Settings > Privacy > Microphone).
- A working telephone headset does not want to work on the computer. It shouldn't work because its plug is of a different format. It combines input and output contacts, and therefore their surfaces are offset relative to those in the sound card socket.
- The microphone on the USB headphones is not recognized by the system. Most likely, the issue is that either the port being used is disabled in the BIOS/UEFI, or it is running on an outdated protocol. Connect the headset to another port (preferably on the rear panel).
If the problem cannot be solved, you need to contact a specialist for diagnosis.
How to connect your device to PC
First you need to find out how to connect a microphone to a Windows 10 computer. Then the setup will fail without failure due to an incorrectly installed driver. The physical microphone is connected to the virtual one.
Special entrance
How to set up a microphone on Windows 7 - step-by-step instructions
Every laptop or computer has an input in the form of a round hole where the device wire is installed. It should be located in an area where there is a hole for a flash drive, HDMI, headphones.
Note! Some manufacturers have simplified the design of computers by combining holes for headphones and a microphone into one.
Device drivers
Not everyone knows how to set up a microphone on Windows 10 after purchase. To make it work, you just need to insert the wire into the hole on the laptop. The sound will be transmitted automatically. The first time you connect, the driver installs itself. It downloads to your computer.
Important! If old drivers were previously installed, they will be updated.
If the PC does not see the device
There are cases when the user inserts a wire into a special hole, but the sound is not reproduced or is transmitted poorly. It is recommended to go to the “Microphone settings” item. If the Windows 10 operating system is installed on your computer, you can determine how to turn on the microphone on a laptop using manual mode.
Device setup
Settings
How to set up a microphone on Windows 8 - ways to check
After installing the device, the quality of the audio recording is not always satisfactory. To change its resolution, go to settings. When the criteria and parameters are set correctly, clear sound can be achieved even on the cheapest device.
Note! If you need a professional device, it is better to immediately buy a high-quality device that is more expensive. It is more expensive, but better in all respects.
Standard Windows tools
In the standard settings of Windows 10 there is information for installing a microphone. You can achieve the following:
- optimize recording volume;
- enhance the sound;
- use the connected device.
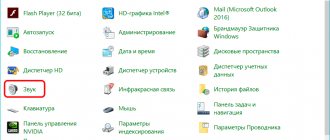
To select settings, you need to open system search. In it, click on “Control Panel” located at the top of the menu. There you need to open the “Sound” folder and then the “Headphones” tab.
Control panel selection
“Control Panel” - “Sound”
In the control panel, press the “Sound” button. It contains microphones that were previously connected to the device. If anything is currently enabled, it will be marked with a green checkmark.
Note! If the device is connected, but the computer has not activated it, you need to click on it with the mouse to make adjustments. After opening the window, in the “Device Application” tab, indicate the “Use” parameter.
Volume levels
In properties go to the next tab - “Levels”. It contains 2 divisions. The first indicates the capabilities of the microphone, and the second indicates the amplification of sound through the computer.
Level adjustment
Properties
Open the “Advanced” tab. Here you can improve the quality with which the audio is played back. To do this, increase or decrease the number of hertz and select the number of connected devices.
Standard volume levels are determined for each device. To do this, go to the “Selecting bit depth and sampling frequency” section. It is necessary to determine the optimal parameter. After this, they check how well the sound is transmitted.
Microphone mixer: how to turn it on
Sometimes the mixer for the unit is not configured correctly or is missing. This degrades the quality of the audio recording. To fix, do the following:
- Click on the “Start” button in the main menu.
- Go to the “Control Panel”.
- Select the “Sounds and Audio Devices” section.
- Go to the “Realtek HD Audio” tab.
- Find the “Mixer” tab.
- In the window that appears, click the check mark on the microphone.
For your information! The regular mixer menu is available on all Windows 7, 8, 10 platforms.
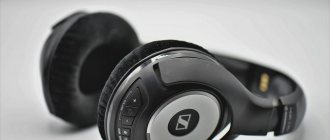
Our top headset recommendations
HyperX Cloud Alpha
Solid build and sound quality
HyperX has made sure that Cloud Alpha is great for PC gamers with a dual-chamber driver design for optimal audio performance. They're also built to last. In fact, you could throw them all over the place and they would still sound just as good. Multi-platform compatibility and price are just the icing on this sweet cake.
The Cloud Alpha has a detachable noise-canceling microphone and braided cable with some mediocre on-board controls. The controls are a bit wobbly, but at least they're there for quick access while playing. Overall, a good headset for the price.
SteelSeries Arctis Pro + GameDAC
Amazing sound and comfort
The Steelseries Arctis Pro + GameDAC isn't the most affordable headset, but it's worth it. The excellent amplifier module makes it easy to control the device, and the exceptional sound quality allows you to truly immerse yourself in the game
The drivers housed inside the SteelSeries Arctis Pro + GameDAC cups are more than good for gaming, and the microphone ensures communication with teammates. This is a quality Hi-Res certified headset for gamers and is worth considering.
Configuration using additional programs
Setting up additional programs is required for users who use the device for professional purposes. For example, vocalists or people reading text.
Program options
How to mute the microphone on a Windows 10 laptop
There are many programs that can be used to customize sound quality. Below are the most popular:
- Audacity. Using the program, you can record sound, create your own tracks, and control their functions. For example, they speed up, trim, or slow down audio recordings. There is a function to overlay another track to create a better effect;
- Free MP3 Sound recorder. The program records quickly and easily. It is intended for non-professional use. The interface is intuitive;
- Sony Sound forge. A professional program that processes audio recordings at a complex, studio level. To use it, they undergo preliminary training.
Note! Before choosing a program, get acquainted with its functions. Some of them provide opportunities for beginners to improve audio recordings, while others are used at a professional level.
Possibility to improve sound settings
Thanks to the standard program, you can improve sound settings, enable effects, and also:
- record new audio tracks;
- speed up or slow down audio recording;
- increase performance;
- reduce or turn off noise;
- add complex music tracks with specific effects.
Audio recording program
After going through the program, you get a high-quality melody or clear speech.
Why do you need a stereo mixer?
So, a stereo mixer allows you to mix system sounds and sounds coming from a microphone. Thanks to this, we can record audio casts, screencasts, and conduct live broadcasts with both system sound and what we say into the microphone. We can record a video of the game with its voice acting and our comments. We can make a video lesson with pleasant background music from our playlist. Or we can shoot a video on YouTube discussing some other YouTube video, film or TV show. And play the latter in a browser or player, and not make your own voiceover over the original video sequence, so as not to get a strike.
Almost all more or less functional programs for capturing monitor screens and streaming provide the ability to select a sound recording source:
• System sound only, • Microphone only, • System sound + microphone.
Even modern Skype, when choosing the function of showing your interlocutor your desktop, offers us to launch this function with or without system sounds turned on. But, alas, not all even functional programs allow you to fine-tune the volume levels of different sources. Movavi Screen Capture Studio allows you to do this .
System sound can, if not completely drown out the sound from a weak microphone, then at least clearly contrast against the background of our quieter speech. Of course, you can boost the microphone in the system settings, but even at +20 dB, devices (especially budget ones) can hiss, wheeze, hum, or produce other distortions. Whereas the stereo mixer will output system sound in the background for recording or streaming at a volume level that we will adjust using the usual volume slider in the Windows tray. We make a couple of test recordings “One-two, one-two, check the equipment” with different system sound volumes. And we will be able to choose the optimal ratio of the signal from the microphone and the system voice acting.
A stereo mixer can be used for transcription - deciphering video and audio recordings. Thanks to the stereo mixer, the video or audio files played by the player will be perceived by human speech recognition programs as a signal from a microphone. And such programs will convert into text everything that is said by the participants in the video or audio sources.
Noise reduction methods
When audio is recorded in normal mode, it contains external noise. To eliminate them, programs are used. You can buy a microphone in advance that eliminates noise yourself, but it will cost more.
Standard settings
If you need to rid the audio recording of extraneous noise, reduce the sensitivity of the device. It will become quieter, but extraneous noise will disappear. To do this, perform the following steps:
- Go to the “Toolbar” in the “Start” menu.
- Open the “Sound” tab.
- Click on the microphone, going to its “Properties”.
- In the “Properties” window that appears, select the “Levels” tab, where you reduce the microphone gain below average.
Note! Third-party programs also remove noise, for example, Audacity is quite simple, but effective against unnecessary sounds.
Type of noise reduction
Physical protection
The user cannot always eliminate noise using programs. Then physical protection comes to the rescue. This is a black attachment that is placed on top of the metal base of the grille. Only clear sound without extraneous noise penetrates inside it.
Important! To make audio recordings clearer, extraneous noise is eliminated during recording. For example, they close the window, turn off the TV.
Using standard Windows tools
Let's choose the simplest option first. If your friends say that the voice volume is too low or too high to the point that the sound is distorted, you should increase or decrease the sensitivity accordingly.
- Click the Start menu
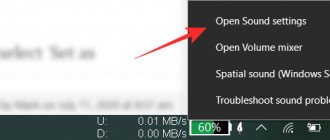
- Open Settings and select System > Sound
- Scroll the slider down and o.
- In the window that opens, go to the “Recording” tab and double-click the device.
- The properties window will open. Go to levels.
- The default level will be 50% (or +6.1 dB). Increase or decrease as necessary and click Apply.
Try calling someone to inquire about new opportunities. If it improves but still doesn't meet your expectations, go back to the previous tab and adjust the settings again.
Examination
Even when using special programs or standard settings, the audio recording may remain poor quality or noisy. To avoid this, you need to know how to check the microphone on Windows 10 and test it.
“Standard Tools” - “Listen”
To check the quality of audio recordings, use standard settings. Perform the following actions:
- Click on “Start” in the main menu.
- Go to the “Control Panel” tab.
- Click on the “Sound” button.
- Select the desired device.
- Go to the “Listen” tab.
- They start saying something into the microphone, listening to the quality of the audio recording.
Note! Thanks to preliminary listening, all problems are resolved in a timely manner.
Through "Voice Recording"
Go to the search menu, where you type the name of the application - “Voice Recording”. Open it and start recording. Then they listen to the result and edit it if necessary.
Resetting all microphone settings step by step
If the microphone is not configured correctly, additional features can be reset. To do this, perform the following steps:
- Open the “Control Panel” tab through “Start”.
- Select the “Sound” folder.
- Right-click on the selected microphone and select “Remove device”.
- The computer is rebooted. Only after this can you install the microphone driver again.
Not everyone knows how to set up a microphone on Windows 10. To do this, connect the device to a laptop or computer. Drivers start automatically. Next, edit the microphone functions if the auto settings are not enough. When you need professional recording, you buy a high-quality microphone with noise reduction, high performance and sensitivity, and high-quality internal content.