Easily identify the file type by turning on the file extension to show next to the name in File Explorer in Windows 11.
File extensions allow any operating system to recognize a file and run it with the appropriate program or application already installed. However, since most users don't really care what type of file they use, Microsoft Windows doesn't display file extensions by default.
From a security perspective, it is recommended to always check the extension of a downloaded file from the Internet before running it to protect your computer from malware or ransomware attacks (for example, PDF files and image file formats that contain viruses - may have an .EXE extension).
In addition to security, if you are switching to a Windows operating system from another (Linux or macOS). Showing file extensions can also help you become more familiar with the file types used by your operating system.
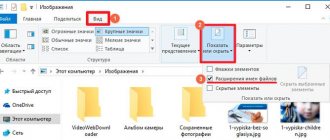
Enable file name extensions in the File Explorer command bar
This is one of the most convenient ways to show file extensions in File Explorer in Windows 11.
- Open Windows 11 File Explorer by clicking the folder icon on the taskbar. Alternatively, you can also press the Windows E key combination on your keyboard to open it.
- Click the Layout and View Options in the File Explorer ribbon.
- Now hover your mouse over the “Show” and in the new context menu, click on the “File name extensions” to subsequently see the extensions for any file available on your computer.
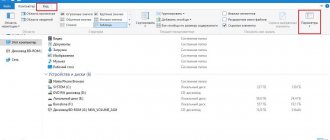
Show filename extensions using File Explorer Folder Options
Although this method requires a few more clicks from you than the previous one. However, if you need to change a few File Explorer settings, this is the way to go.
- First, launch Explorer by clicking the folder icon on the taskbar, or in any other way convenient for you.
- Then click on the ellipsis... (three horizontal dots) in the Explorer ribbon and click on the "Options" in the drop-down menu.
- In the Folder Options , go to the View .
- Then find the line in the “Advanced settings” : “Hide extensions for registered file types” , and check the box to disable the setting.
- Click the Apply to apply the changes, click OK to close the Folder Options window.
The file extensions will now be visible on your Windows PC.
Results and tips
Registered file types are all file types that are known to your version of Windows. Unregistered types will not be affected by enabling or disabling extensions. They will be displayed in the form in which you copied them to your computer.
Why is this being done?
For your and our safety. Inexperienced users or children may accidentally click and rename the file or remove its extension. And it determines the utility or program with which the file will be opened.
If you understand why file extensions are needed, then it is better to leave them visible . This makes it easier to navigate among a bunch of different data.
Add a File Type column in Explorer
Adding a Type works differently than all previous methods. Adding a column will display the file type in a separate column in Explorer. Many people choose this option purely for aesthetic reasons, since this method does not add extensions to the file name, but provides you with important information right on the screen.
Note: Adding a "Type" will not be able to display file extensions outside of File Explorer on your Windows 11 PC. While all other methods will be able to display file extensions directly on the desktop.
- To do this, navigate to the desired folder using Explorer.
- Right-click the title bar in File Explorer, located directly below the address bar. Then select the Type from the menu to display the column of the same name.
- You will then be able to see the file extensions for each of the files in a separate column on the screen.
Note: For some files, the file type appears in the column instead of an extension. For example: .EXE files will appear as "Application" .
Because this method does not display the extension of all files. It is best suited for users who are already familiar with the Windows system and have some knowledge about extensions and their respective types.
If for some reason none of the above options work for you and you don't see file extensions in Windows, Registry Editor is your best choice.
Solving problems associated with incorrect association
The problem is solved in a similar way when, after opening files, you receive hieroglyphs instead of an element code or text. You just need to change the extension to the correct one or download a program that can correctly interpret the code. There are application files that are deliberately compiled in a format that is only intended to be understood by a computer, thus protecting intellectual data.
You should know that extensions are already displayed in your system, but only unregistered ones, that is, when you open any file with the selected application, a corresponding entry appears in the registry. The next time you run the file, it will be automatically played by this program, taking the necessary entries from the registry.
This is where the following error occurs, related to an incorrect association; it is usually a consequence of viruses running on your system. Often failures occur with the launch of applications, the playback of which requires opening an element in .exe format - these are executable files that can be called the launcher of the entire application mechanism. This problem is solved first of all by removing the virus from the system, then you need to restore the correct file association, for this you can use the link https://helpmax.pp.ua/download/files/xp_exe_fix.reg.
No third-party applications are required to achieve this goal, and there is a special item to enable display of the file format, which will be discussed below.
Enable file extension in Explorer using Registry Editor
- Open Registry Editor
- Go to the following directory. You can also type or copy and paste the following path into the Registry Editor's address bar:
HKEY_CURRENT_USER\Software\Microsoft\Windows\CurrentVersion\Explorer\Advanced
- Then, in the right section of the Registry Editor window, find and double-click the HideFileExt .
- After that, change the value to "0" to always show file extensions and click "OK" to confirm. If you ever need to hide a file extension, change the HideFileExt to "1" .
Note: After editing the registry, you may need to restart Explorer or restart your computer for the changes to take effect.
Enable file extension in Explorer from Windows Terminal
Probably one of the fastest ways to enable display of file name extensions.
- Launch Windows Terminal as Administrator
- In the PowerShell or Command Prompt tab, type or copy and paste the following command to enable the display of file extensions:
reg add HKCU\Software\Microsoft\Windows\CurrentVersion\Explorer\Advanced /v HideFileExt /t REG_DWORD /d 0 /f
- To disable the extension, run the following command:
reg add HKCU\Software\Microsoft\Windows\CurrentVersion\Explorer\Advanced /v HideFileExt /t REG_DWORD /d 1 /f
Changes should be applied instantly.
You can also create a batch .bat file and use it when you need to show file extensions on multiple computers, or you can create one for your not-so-tech-savvy friends and family members.
What is a filename extension?
The first part of the file name (before the dot) is a proper name, selected by the user independently and usually understandable without explanation only to the author. The second part (after the dot, extension) refers to service information, talks about the type of data and how to work with the file.
The extension allows the system or a specific program to recognize stored information and use appropriate processing algorithms. For example, the ".txt" type is assigned to files containing text information, so when accessing them, Windows 7 loads a text editor. “.mp3”, “.wma” files contain music or other audio information, so the system uses the player for them.
List of some file extensions (table)
| Extension | File type |
| doc, docx, odt, rtf, txt | text, document |
| mp3, wav, wma | audio file |
| com, exe, msi | executable module, application |
| 3gp, avi, flv, mov, mpeg, mov, ogg, vob | video file |
| bmp, gif, jpg, jpeg, jpe, png, tiff | picture, photograph |
| pdf, djvu, fb2 | eBook |
| zip, rar, 7z | archive |
| html, htm, xml, asp, php, css | web page |
| csv, xls, xlsx, sxc | table |
The need to replace the current file name extension may arise for various reasons. The simplest of them is to correct an accidental or intentional error. For example, when saving, an incorrect extension was specified, or the virus encrypted the full name. In addition, sometimes different extensions can be used for the same data formats (most often text), and therefore documents are not perceived by editors unless they are corrected to be “related”.
Changing the extension can also be used to further protect information. For example, by changing the file type from archive to text or from graphic to archive, you can “hide” it from specialized applications and from prying eyes.
Using a .bat file
- To create a batch file, right-click on the desktop and select “Create element” → “Text document” . Then give the file an appropriate name that will help you identify the file later and press Enter.
- After that, double-click the created file. Copy and paste the following command into a text file to enable showing file extensions.
reg add HKCU\Software\Microsoft\Windows\CurrentVersion\Explorer\Advanced /v HideFileExt /t REG_DWORD /d 0 /f
- If you want to hide the file extension on your Windows PC, type or paste the following text.
reg add HKCU\Software\Microsoft\Windows\CurrentVersion\Explorer\Advanced /v HideFileExt /t REG_DWORD /d 1 /f
- Go to the "File" , select the "Save As..." and change the text file extension from .TXT to .BAT (<Your file name> .bat) . Then in the “Type” select “All files” and click the “Save” .
- Your batch file will be created in the directory you selected. Now you can transfer the file to another Windows computer and run it by double-clicking on it.
So now, you now know how to show file extension in Windows 11 Explorer and you can create a batch file for your friends.
How to change the file format by renaming?
Using the Context Menu The easiest way is to use the Context Menu. Select the desired file -> right click -> Rename
. Enter the desired extension and confirm the action when the warning window appears.
Interesting materials:
How much does Anti-gravel film cost? How much does anti-corrosion treatment for a car cost? How much does aviation fuel cost? How much does it cost to balance 1 wheel? How much does gasoline 92 cost in Volgograd? How much does unlimited cost on Velcom? How much does unlimited internet cost in America? How much does a ticket cost from Belorussky Station to Sheremetyevo? How much does a ticket to Kazakhstan cost? How much does a ticket to New York cost?