Windows 10 introduces a customizable option that replaces Favorites, which was present in previous versions 7 and 8. It is a list of frequently used folders and files. Thanks to this function, you can quickly switch to important information, without having to look for it in other places. You can go to it by opening any folder; at the top left there will be a link to the function we are considering. The names of objects that you have viewed more than once are added to the list automatically after each access to them. The section contains the names of the user's last 10 transitions to materials available on the computer.
How the feature is presented in Windows 10
Users who prefer to work with files manually do not use this option, calling it useless.
Below we will look at how it works and you can decide for yourself whether you need this function or whether it is better to disable it. We will also show you how to configure and safely remove it. Let's look at the options for the seventh and tenth Windows separately, since this option is in the latter by default, but not in the first, but it is possible to create it for free, without much effort and knowledge.
How to Remove Quick Access from Windows 10 File Explorer
Although Quick Access is a very useful feature, many people prefer not to have it appear on the screen every time they open File Explorer. That's why in this guide, we'll show you how to disable Quick Access in Windows 10 File Explorer or remove Quick Access from the Navigation Bar on your Windows 10 computer.
Here we have explained both the methods, now it is up to you whether you want to disable Quick Access mode or remove Quick Access in Windows 10. Let's take a look:
Method 1: Disable Quick Access in Windows 10
If you want to disable Quick Access view as the default view in File Explorer and restore the previous default view in File Explorer that displays a list of devices and drives instead of the Quick Access location, then disabling Quick Access view is a great solution for you.
Follow these steps and learn how to disable Quick Access in Windows 10 Explorer:
Step (1): First, open File Explorer and then go to View and click on Options.
Step (2). In Folder Options, select the default option to open File Explorer on This PC.
Step (3). Now in the Privacy section, uncheck both boxes:
- Show recently used files in Quick Access
- Show frequently used folders in quick access
Step (4): Next, click the Clear button to clear the File Explorer history.
Step (5): Finally, click the Apply button and then the OK button to save the changes.
Making these changes will disable Quick Access as the default view in File Explorer on your Windows 10 PC.
After disabling the Quick Access mode in Windows 10, if you also want to get rid of the Quick Access icon in the File Explorer sidebar, then follow the methods below.
Method 2: Remove Quick Access in Windows 10
If you don't want to see recently used files and frequently used folders on your computer and want to completely remove Quick Access from the Explorer sidebar in Windows 10, then you can do so. The process is quite simple.
Follow these steps and learn how to remove Quick Access in Windows 10 Explorer Navigation Bar:
Step (1): Press Windows + R keys together, then type regedit and press Enter.
Step (2): Once the Registry Editor window opens, navigate to the following key:
HKEY_LOCAL_MACHINE\SOFTWARE\Microsoft\Windows\CurrentVersion\Explorer
Step (3). Now in the right pane, right-click anywhere in the empty space and select New → DWORD Value (32-bit).
Step (4): Set the new value name as HubMode and then double click on it and change its data value to 1. Finally, click on the OK button.
Now simply close all Explorer windows open on your computer and then open Explorer again. From now on, the shortcut icon will no longer appear in the navigation bar in Windows 10 Explorer.
And in the future, if you want to enable the shortcut icon in the sidebar of File Explorer in Windows 10, simply follow the same steps and change the HubMode value from 1 to 0 or simply delete the HubMode DWORD key from the Registry Editor.
Conclusion
So you can see how easy it is to disable Quick Access in the default browser and completely get rid of the Quick Access icon in the Windows 10 Explorer sidebar.
If you follow both the above methods exactly, you can easily turn off Quick Access mode and remove the Windows 10 Quick Access icon displayed in the navigation bar in File Explorer.
Feel free to let us know through the comment section below if you have any more questions regarding how to remove shortcuts in Windows 10 and we will be sure to provide you with a guide to help.
Read more about why you might encounter this error!
While there seems to be no concrete evidence as to why File Explorer keeps opening itself , the reason can be attributed to two main issues:
- The wrong File Explorer application can cause these random pop-ups. This is likely a bug in Windows that causes the process to behave incorrectly, and there is not much you can do to fix the problem. We assume that this is the main culprit as to why you are encountering this error and will fix it first.
- Corrupted system files can also cause this error to appear on your display. If some important system files
- A weak connection with your peripherals may cause File Explorer to open randomly » error. If your device has AutoPlay enabled and is set to open files on your device by default, a weak connection may result in frequent reconnections, causing the file explorer to open randomly on its own.
- If your device is infected with a virus or malware that may also cause random pop-ups from File Explorer.
Basic panel settings
If the user is interested in the possibilities of setting up quick access in Windows 10, then this section is for him.
Adding folders
If you want to constantly see a folder pinned to the panel, then you can pin it using the appropriate item. Just right-click on it and select the desired item in the menu; the same can be done with files.
Enabling/disabling display of elements
You can hide the display of files or folders when you start Explorer, it is possible to disable both, then only pinned items will be shown. This setting is discussed in more detail in the section above. You can do this in your privacy settings.
Selectively deleting folders and items
If the user does not like specific data on the panel, he can simply delete it from there. Just right-click on them and select “Remove from quick access”.
Reset item display
You can also clear the Explorer log completely, which will also clear the desired panel. To do this, you need to go to Explorer, then go to the search section, then click on the icon for previous search queries and select “Clear history”.
Replacing the panel with the This PC folder
This function will allow you to completely get rid of the panel, and This Computer will start instead. How to do this was written in the initial sections. Everything can be done through the standard settings, which are called up through View - Options.
Create a custom "Toolbar"
"Toolbar"
on
the “Taskbar”
is an outdated function from earlier versions of the operating system, available, including in
Windows 10
.
Toolbars
that are personalized to your personal needs and customize your
Taskbar
, giving you instant access to additional features or shortcuts.
For example, users can create their own "Toolbar"
on
the "Taskbar"
to quickly jump directly to all your files in one of your personal favorite folders.
To create a custom "Toolbar"
on the system
“Taskbar”
, right-click on the empty space of the designated panel and open the pop-up context menu.
In the list of system allowed actions, find and hover your mouse over the “Panels”
.
Users will be shown a submenu in which they must select from the options provided and click the “Create toolbar”
.
In the file explorer pop-up window "New Toolbar - Select Folder"
Find and mark one of your preferred folders that you want to have instant access to, and then click on the
“Select Folder”
to confirm your operations.
Instantly on the “Taskbar”
in the right corner of the screen, in front of all the preset shortcut icons, a new custom
“Toolbar”
, the name of which fully corresponds to the name of the selected folder.
Click on the control button, presented in the form of double, schematically depicted arrows ( “>>”
) next to the name of the toolbar.
A list of all subfiles and folders in a given folder will be instantly presented for quick access and direct navigation.
Users can also take a more advanced approach to organizing their important folders and combine all their popular and favorite folders into a single folder with shortcuts, and then create a separate “Toolbar”
.
Now custom shortcuts to the marked folders will be available on the “Taskbar”
.
Unlike the limited Jump List, which only contains twelve items, a custom "Toolbar"
can contain many more nested components.
Windows 10 taskbar options
Despite the fact that this option rarely turns out to be the actual cause of what is happening, I will start with it. Open the Windows 10 taskbar settings; you can do this (if the panel is missing) as follows.
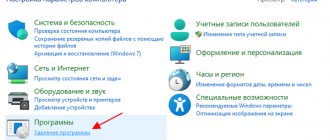
- Press the Win+R keys on your keyboard and type control and then press Enter. The control panel will open.
- In Control Panel, open the "Taskbar and Navigation" menu item.
Explore the taskbar options. In particular, whether “Automatically hide the taskbar” is enabled and where on the screen it is located.
If all the parameters are set “correctly”, you can try this option: change them (for example, set a different location and automatic hiding), apply and, if after that the taskbar appears, return it to its original state and apply again.
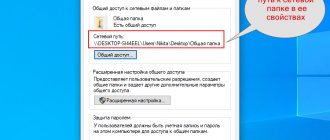
Quick Access Folder in Explorer
Some users really don't like the Quick Access folder and want to remove it from Explorer. Others, on the contrary, actively use it and are interested in how to add something to it. Now we will deal with it in detail.
This item is located in the explorer on the left, and it is this item that opens when it starts. In it you will see those files that you personally pinned there, those that you use often, and those that were opened when using the system to the extreme. Of course, many people are not happy with this option, so a common question is how to remove a folder from quick access. But first things first.
In order to add a folder to the Quick Access Toolbar, you need to select it and right-click on it. Then select "Pin to Quick Access Toolbar."
The selected folder will be added to the corresponding section. By the way, if there is a button under it, it means the user added it to this list. If there is no button, it means it was added automatically.
To remove a folder from this list, right-click on it and select “Remove from panel...”.
Once deleted, the folder will no longer appear here, no matter how often it is used.
To ensure that only what the user has pinned is displayed in quick access, right-click on the item and select “Options.”
On the “General” tab, in the “Privacy” section, uncheck the boxes next to “Show recently used files...” and “Show frequently used folders...”. You should also “Clear” the explorer log. Save the changes with the “OK” button.
If you turn off the display of frequently and recently used folders and files, and then turn them on again, then what you deleted from there may again appear in quick access.
If it is not appropriate that when you open Explorer, this item is shown, in the “Open Explorer for” field, select “This computer”.
Also, a list of recent files is shown when you right-click on the shortcut of a running application on the taskbar.
To prevent them from being displayed there, go to “Options” - the key combination Win + I. Then select the “Personalization” section, go to the “Start” tab and in the “Show recently opened items ...” item, drag the slider to the “Off” position.
If this folder bothers you at all and you need to disable quick access in Windows 10, or rather remove the folder itself from Explorer, then you can do this by changing a setting in the registry. To avoid going into it, let’s create a *.reg file and insert special code into it.
To create a file, right-click on the desktop and select “New” – “Text Document”.
Don't change its name, go into it and paste the following:
Windows Registry Editor Version 5.00
"HubMode"=dword:00000001
Please note that the second line must be empty
Then click "File" - "Save As".
To save, select "Desktop". "Name" can be anything. Just be sure to add “.reg” at the end. In the "File Type" field, select "All...". Click "Save".
Double-click on the created .reg file to run it. In the warning window, click “Yes”. After this, you need to restart the computer and the “Quick Access” folders will no longer be in Explorer.
Before performing these steps, I recommend creating a restore point in Windows 10. So that later you can return to the moment when the point still existed.
Popular folder shortcuts
The easiest way to quickly access important and frequently used favorite folders is to directly create the corresponding shortcut. Microsoft operating system
allows you to create a shortcut to any folder in
Windows
. If you double-click a shortcut, it will immediately take users to the location of the folder they are looking for, bypassing the standard step-by-step path.
After creating a shortcut for a desired folder, users can place it in the most convenient location for later access, such as the desktop or in a third-party folder containing other ready-made shortcuts.
To create a shortcut, right-click any suitable folder located on your desktop or in Windows
, and open the pop-up context menu, in which, from the list of available action options, select the responsible section
“Create a shortcut”
.
This operation allows you to create a shortcut in the same location as the marked folder, but you can manually move it to any other location of the user's choosing using standard moving methods.
You can also place a shortcut to an important folder directly on your computer desktop. To do this, select the “Send”
, which displays an additional hidden submenu, and click on the
“Desktop (create shortcut)”
to perform the required operation.
This action will instantly create a ready-made shortcut that links to the selected folder, and it will immediately appear on the desktop.
Removing the Network icon
If you need to get rid of the Network icon, which is located, like everyone else, in the Explorer window, then you can use any of the two methods described below.
Method one: edit System.IsPinnedToNameSpaceTree
- We open the registry editor window in the way already familiar to us (see above);
- On the left side of the window, follow this path: HKEY_CLASSES_ROOT\CLSID\{F02C1A0D-BE21-4350-88B0-7367FC96EF3C}.
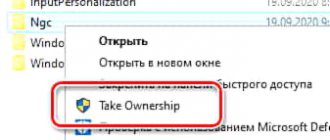
- Changing the owner for the subkey {F02C1A0D-BE21-4350-88B0-7367FC96EF3C}
- Now on the right, in the editor window, right-click and click on create parameter, type DWORD. Write the following name for it: System.IsPinnedToNameSpaceTree and specify the number 0 (zero) as the value.
If one day you want to restore this icon, then simply enter the number 1 instead of zero in the value field.
Method two: editing Attributes
- Open the registry editor window;
- On the left, follow this path: HKEY_CLASSES_ROOT\CLSID\{F02C1A0D-BE21-4350-88B0-7367FC96EF3C}\ShellFolder;
- Change the owner for the ShellFolder subsection;
- Now on the right side of the window we find Attributes. Indicate the following text in its value field: b0940064;
- For all these settings to work, restart your PC.
To return the “Network” icon, specify the following set of characters and numbers for Attributes as a value: b0040064.
Note. As in previous cases, when using the 64-bit version, this icon may appear in various windows that are associated with 32-bit applications
To get rid of this icon, you can use the following recommendations.
Those who used the first method need to create a parameter named System.IsPinnedToNameSpaceTree and set its value to 0 (zero). This parameter must be created in the registry at this path: HKEY_CLASSES_ROOT\Wow6432Node\CLSID\{B4FB3F98-C1EA-428d-A78A-D1F5659CBA93}.
And those who used the second method can specify the value b0940064 for a parameter named Attributes, which is located in the registry at the following path: HKEY_CLASSES_ROOT\CLSID\{B4FB3F98-C1EA-428d-A78A-D1F5659CBA93}\ShellFolder.
Complete removal of the Quick Access Toolbar
In this method, first you will need to open the registry editing utility, the user will need to press win+r and enter regedit. In the left half of the menu, you need to follow the route HKEY_CLASSES_ROOT\CLSID\{679f85cb-0220-4080-b29b-5540cc05aab6}\ShellFolder. Next, you should go to the Attributes variable and set a0100000 as the value.
If the user has a 64-bit system, then it is worth going along the same route, but starting with HKEY_CLASSES_ROOT.
However, if the system does not allow you to change the parameters, then you will need to do a few more steps. You should right-click on the required parameter and select permissions. In the menu that appears, go to the additional section.
In the menu that opens in the top line, where the owner is displayed, you will need to click Edit, after which you must enter Administrators in the next window.
Then you will need to click OK. After which the user will be in the list of permissions. Here you should select the Administrators group and give them full access, if it doesn’t already exist.
After all the actions carried out with the registry, you should restart the computer. However, Explorer will try to access the panel, which is now missing, in order not to receive error reports, you should follow the steps from the previous paragraph and set This computer as the start window.
How to Edit, add, remove items from the New context menu in Windows 10.
Right-clicking on an empty space on your desktop or open folder will open a context menu. The New menu item provides additional functionality by offering you various actions.
The Create context menu allows you to create new documents, folders, and shortcuts. But over time, you may realize that you don't actually use most of the New context menu items, and decide to remove some items or add a few entries that are necessary for your work. In this article, we'll look at how to edit, add, or remove items from the New context menu.
Introduction
Developers of the Windows
have always paid special attention to the ease of use of the system and offer users to facilitate the process of daily interaction by introducing functional additions that reduce time and resource costs. One of the possible mechanisms for increasing the functionality of the system is the individual organization of space, based on arranging your own user folders in such a way that the most important of them are always nearby, and it would not be difficult to find them. For example, users can bookmark their favorite folders for quick access. And later in our guide we will present several simple methods.
Other reasons why the taskbar may disappear
y http-equiv=»Content-Type» content=»text/html;″>le=»text-align: justify;»>And a few more possible causes of problems with the Windows 10 taskbar, which are very rare, but they also worth considering.
- Third-party programs that affect the display of the panel. These could be programs to design the system or even unrelated software. You can check if this is the case by performing a clean boot of Windows 10. If everything works fine with a clean boot, you should find the program that is causing the problem (by remembering what you installed recently and looking at startup).
- Problems with system files or OS installation. Check the integrity of Windows 10 system files. If you received the system through an update, it may make sense to perform a clean install.
- Problems with the video card drivers or the video card itself (in the second case, you should also have noticed some artifacts, oddities with the display of something on the screen before). Unlikely, but still worth considering. To check, you can try to remove the video card drivers and see if the taskbar appears on the “standard” drivers? After that, install the latest official video card drivers. Also in this situation, you can go to Settings (Win + I keys) - “Personalization” - “Colors” and disable the option “Make the Start menu, taskbar and notification center transparent.”
Well, one last thing: from individual comments on other articles on the site, it seems that some users accidentally switch to tablet mode and then wonder why the taskbar looks strange, and its menu does not have a “Properties” item (where you can change the behavior of the taskbar) .
Here you should simply turn off tablet mode (by clicking on the notification icon), or go to settings - “System” - “Tablet mode” and disable the option “Enable additional Windows touch capabilities when using the device as a tablet.” You can also set “At logon” to “Go to desktop”.
And maybe this will be interesting:
Disabling panel elements
If the user simply does not like the files and folders that are shown when Explorer starts, then they can be hidden. First you need to go to Explorer and go to the View tab, then select the options section. Here, in the general section, at the bottom there is a privacy section. You can make Explorer not show files or folders. In the same section you can completely clear your browsing history.
If the user does not want certain data to be displayed on the panel, they can be deleted from there. Just right-click on them and select “Remove from quick access”.
Hiding the navigation area
The easiest and most effective way to get rid of shortcuts is to simply hide the entire navigation bar. However, it can be very useful and many actively use it; if this item is not suitable for the user, then you should immediately move on to the next section.
The user simply needs to open Explorer, after which he needs to go to the View tab in the top menu; in the panel that opens, all he has to do is click on the navigation bar and uncheck the box.
You can return it to its place by doing the same steps and checking the box again.
Restarting Explorer
The most often described problem with the missing Windows 10 taskbar is just a “bug” and can be solved very simply by restarting Explorer.
To restart Windows 10 File Explorer, follow these steps:
- Open the task manager (you can try through the Win+X menu, and if that doesn’t work, through Ctrl+Alt+Del). If Task Manager doesn't show much, click More Details at the bottom of the window.
- Find "Explorer" in the list of processes. Select it and click Restart.
Usually, these simple two steps will solve the problem. But it also happens that after each subsequent turn on of the computer it repeats again. In this case, sometimes disabling Windows 10 fast startup helps.