Operating systems developed by Microsoft use special paging files to increase PC performance and speed. In Windows 10, of course, they also apply. And in certain cases this is simply necessary, since the OS requirements for a PC have remained at the level of earlier versions, and “top ten” can be installed on “old” hardware, but applications and programs, on the contrary, require more powerful computer components.
In this regard, Windows 10 may periodically freeze and run slowly on a computer with weak hardware, and the paging file is intended to at least slightly correct this situation.
What is a paging file
See also: “Updates are not installed on Windows 10 x64”
A paging file is a document located in the root folder of the system drive where the operating system is installed (most often, drive C). The file name is pagefile.sys .
It is also called a swap file, or PC virtual memory. The size of this file directly depends on the size of the device's random access memory (RAM).
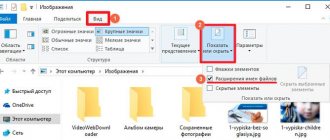
If you cannot find the required file on the disk, it means it is hidden in the settings. To display it while in a folder, switch to the “View” tab, click on the down arrow next to the “Options” button and then click “Change folder and search options.”
A window with parameters will open, in which we switch to the “View” tab and, scrolling down the area with additional parameters, uncheck the box next to the “Hide protected system files” option. Confirm the settings by clicking OK.
Disable swapfile sys
It is impossible to disable the swapfile using standard means. But this can be done by editing the registry. Required:
- Press Win+R and type "regedit".
- In the editor window you need to go to this path HKEY_LOCAL_MACHINE\SYSTEM\CurrentControlSet\Control\Session Manager\Memory Management (you can copy and paste from here)
- In the right section of the window, you need to right-click on the free area and select “New”, specify “DWORD value (32 bits)”.
- Enter the parameter name “SwapfileControl”.
After this, you can close the Registry Editor. All that remains is to restart the PC. From the next OS boot, the swap file will not be used. But instead, the amount of permanently used RAM will increase by about 25 - 200 megabytes (depending on the number of installed applications from the store).
Super test on the topic “Money” and how can you be friends with it?
What is the paging file for?
Essentially, this is an area on the hard drive that is reserved for temporary data storage. It is into it that all data relating to currently unused programs and applications are downloaded. Thanks to this process, RAM is unloaded and space is freed up for running active programs.
That is, when there is not enough RAM, all data that is not currently in use is moved to the page file for temporary storage. Of course, this slightly reduces system performance, but thanks to this it is possible to continue working.
If the RAM size is small, and there is no swap file, problems may arise while working on the PC, namely, a window will pop up with information that the PC does not have enough memory, and to continue working you need to close all open tabs and applications .
“Ten” is configured to automatically determine the required size of the swap file. The system evaluates the characteristics of the PC, RAM and sets the size of the pagefile.sys at its discretion. But the system does not know exactly how the user will work and use the PC, with what applications and in what quantity. Therefore, manually changing this setting can often significantly improve system performance.
There are also situations on the contrary, when disabling the paging file gives positive results. It all depends on the specific case.
So, let's take a closer look at how exactly you can configure swap files or turn it off to speed up your PC.
Two swap files in the top ten
Windows 10 introduced a second swap file called swapfile.sys . It is located in the same place as the pagefile.sys , and has the same functions. But it only applies to data related to Metro applications.
Ten has developed its own algorithm for working with RAM. New applications created for the “ten” use a swap file to store the current state and further quickly call the program. It's like sleep mode, but in relation to programs. Thanks to this, they load quickly since they are already stored in RAM. However, they take up space, and if there isn't enough of it anyway, it's not very good.
Note:
You can remove the swapfile.sys file from the system in the same way as the main swap file pagefile.sys. However, when pagefile.sys is deleted, swapfile.sys will disappear automatically, since it cannot exist separately from the main one.
Changing the paging file size
Now that we have figured out what a swap file is and why it is needed, let's start changing its size.
- Open the search bar by clicking on the magnifying glass next to the Start menu icon. Enter the phrase “performance” and click in the results found on the item “Setting up presentation and system performance”.
- In the window that appears, switch to the “Advanced” tab, where we click on the “Change” button.
- As a result, another window with settings should appear. Initially, it will indicate the automatically specified size of the paging file. But here you can change this size manually. To do this, uncheck the corresponding item responsible for auto-detecting the volume of the swap file.
- After this, check the box next to the “Specify size” parameter and enter the required value. Here you can follow the system's recommendations. We complete the setup by clicking the “Set” button, then OK, after which you need to restart the computer.
Note: If you want to remove the swap file from the system, check the box next to “Without swap file”. Next, click the “Set” button, confirm the action by clicking OK and reboot the PC.
Disable pagefile sys
But you can disable this paging file using standard Windows tools; you do not need to use registry settings. You need to do the following:
- Right click on “My Computer”
- Select "Properties".
- In the window that opens, click “Advanced system settings”.
- In the “Advanced” tab, in the “Performance” section, go to “Settings”
- In the next window, go to the “Swap File” tab, click “Change”.
- The "Virtual Memory" window will open. Select “No file” and click “Ok”. There you can set any other value for it or even move it to another disk.
- After disabling pagefile, the system will automatically prompt you to restart your PC.
- You can create a paging file in the same menu by selecting “Specify size” or “By system selection” and clicking “OK”. Below is detailed
Volga or Pobeda? Are you familiar with the Soviet automobile industry? Test yourself in a fun test!
Moving a swap file to another drive
In some cases, it becomes necessary to transfer the paging file to another hard drive. For example, when there is a lack of space on the system disk, and an additional one is installed on the PC, which can be used for these purposes. Moving to another physical drive, such as an SSD or external USB, will be considered, since this is the measure that often produces positive results.
- The first thing you need to do is get into the virtual memory parameters. How to do this was described above.
- Uncheck the box next to the option that automatically determines the size of the swap file.
- Check the box next to the “No paging file” option, click the “Set” button and confirm the changes by clicking OK, then restart the computer.
- We return to the virtual memory settings again after restarting the PC. We select the disk where you want to place the paging file and set its parameters (specify the size manually or select the “Size by system choice”) option, then, as usual, confirm the changes by clicking the “Set” button, then OK and reboot the computer again.
Note: After restarting the PC, it is a good idea to make sure that the changes have taken effect. To do this, go to the same settings and check whether the swap file has been created on the previously selected disk.
Additional Information
In cases where an SSD is installed on the PC, it is best to move the swap file to a regular hard drive in order to reduce wear and tear on the expensive SSD drive. But the hard drive should not be old and full of files, as this can significantly reduce system performance. The service life of the SSD, of course, will be slightly extended, but such a solution will significantly reduce PC performance. In this case, it is better to spend money on purchasing additional RAM memory cards. They are not that expensive compared to SSD drives.
Some users even prefer to delete the page file if there is enough RAM to perform the required tasks. And this makes some sense, despite the fact that many dispute this method. After all, in fact, why do you need a swap file if there is already enough space? The system has to constantly access temporary storage on the hard drive to obtain the necessary information. This reduces the life of the disk and, naturally, slows down the entire system.
Here, of course, everything is individual and depends on the user’s preferences and the tasks he performs on the computer. If your main focus is watching movies, listening to music, or browsing the web, the RAM installed on your computer may be sufficient.
However, when working with complex programs and the need to simultaneously open several windows with running applications, a page file is necessary. By complex programs we do not mean ordinary office programs. Various applications for video processing, photo processing, charting, animation, 3D modeling, etc. require a lot of memory. Many modern video games require huge amounts of virtual memory.
Also, please note that you must specify the same file size for the optimal (initial) and maximum values. This is necessary to prevent fragmentation of the pagefile.sys . And it is best to set the volume immediately after installing the system or fragmenting the disk. Otherwise, system performance may be reduced.
Optimal size
The amount of virtual memory used is determined by the system. You are allowed to manually resize it and set the maximum (minimum) limit. However, first it is advisable to check the amount of used and free RAM.
How to check RAM size:
- open various programs on your PC;
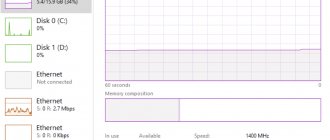
- activate Task Manager;
- open the “Performance” tab;
- find the line “Memory”;
- see how much is “Used” and how much is “Available”;
- double the "Used" memory value;
- subtract the amount of “Available” RAM volume from the doubled value;
- the optimal size will be obtained (virtual memory can be increased by this amount);
- If the calculation results in a negative number, then nothing needs to be changed.
For example, if with 8 gigabytes of RAM only 5 GB are used, then the optimal size of virtual memory is calculated as follows: 5 x 2 = 10, 10 – 8 = 2. With this result, you can add several megabytes up to 2 GB. It is not advisable to increase the virtual machine by more than 3 times the preinstalled amount of RAM.