Now these global parameters can be transferred to any program (game). To do this, go to the “Program Settings” tab and select the desired application in the drop-down list (1). If the game is missing, then click on the “Add” button and look for the corresponding executable file on the disk, for example, “worldoftanks.exe”. The toy will be added to the list and for it we set all the settings to “Use global parameter”. Don't forget to click on the "Apply" button.
Set up NVIDIA for gaming in a few clicks
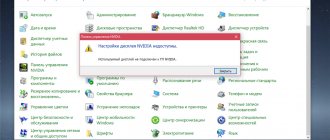
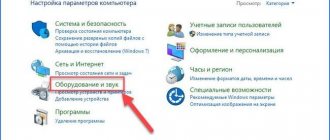
To quickly set up NVIDIA for games, right-click on a free area of the desktop. In the pop-up context menu, find the “NVIDIA Control Panel” item and launch the program.
In the window that opens, in the left list of options, find the “3D Settings” item. He is responsible for setting up the picture in three-dimensional applications (which are games). The “Adjust image settings with viewing” item allows you to adjust the balance between picture quality and performance.
If games are slow, set the switch opposite “Custom settings with emphasis on:” and go to the slider. By moving it, you can see how the rendering quality of the object changes, so you need to set it to minimum by selecting “Performance”.
Save the settings by clicking "Apply" at the bottom. Launch a game that was previously running poorly. If the FPS has increased, the game runs more smoothly and clearly - the NVIDIA setup for games is complete. If not, move on to the next instruction.
Main panel window
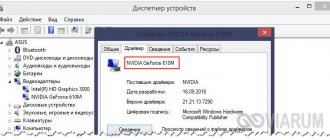
The main window is shown in the illustration:
The navigation panel is located on the left and allows you to navigate through the desired settings with one click. The View menu allows you to enable an advanced view, which gives you the most complete access to all driver settings options, or configure a custom panel view, leaving only those items that you intend to use. Also, in the lower left part of the panel, access to the control panel help system is provided (link “System Information”):
from which you can find out about the versions of files, installed drivers and other NVIDIA software, as well as the characteristics of the video card.
Configure 3D settings for all games
The next sub-item, “Manage 3D parameters”, allows you to manually set the settings for processing 3D images by the video card. The “Global Settings” tab is responsible for the operation of the GPU with any game or program. Let's start with it.
The “DSR – Smoothness” item is responsible for improving the quality of the picture by rendering at a higher resolution. It must be disabled, since a higher resolution means a higher load on the GPU and more memory consumption. You also need to remove “DSR - Degree”, since there is no improved rendering - degrees are also not needed. The “Anisotropic filtering” item is responsible for improved texture processing. Detailed textures take up more memory, so we disable this option.
“Vertical sync” is also not needed, since with vertical sync the frame rate is adjusted to the monitor frequency. For example, if the monitor has a frequency of 60 Hz, and the game produces 37 FPS, the video card will reduce the frame rate to the nearest monitor scan divisor, in this case 30 FPS, the picture will become less smooth.
The next point (“Pre-prepared personnel…”) can be left untouched, since virtual reality is not interesting in our case. But “Background lighting shading” should be turned off, since the better the shadow processing, the higher the load on the GPU, but the image quality does not increase much.
“Shader caching” is a useful thing, since with it the most frequently used shaders are stored in the cache, and, if necessary, are simply read from memory, rather than re-encoded by the processor. The same applies to the “Maximum quantity in advance...” parameter. In it you need to select the highest value so that the central processor prepares more frames for the graphics.
How does a video card work?
A video card is an electronic device whose function is to display a fragment of computer memory as an image on the monitor screen. The area of memory that stores the graphics data of the currently displayed image is called image memory or frame buffer.
The job of the video card is to process the read contents of this memory and transmit it digitally to the monitor using a digital connector or convert this digital signal into an analog RGB video signal. The monitor is then connected to a DVI or HDMI digital connection and outputs this signal as an image.
Setting up NVIDIA for individual games
The Software Settings tab allows you to set video card parameters for specific applications. Go to it and select the desired game in the pop-up list. Click on it and go to settings.
All parameters that will open in the menu are identical to the previous subsection. Which one is responsible for what is written above. Accordingly, set the settings values in the same way and click “Apply” to save the settings. After that, launch the game again and try to see if it runs faster.
If none of the instructions above helped, first update your video card drivers to the latest version. After this, try the settings again and check the changes.
If all else fails, unfortunately, you won’t be able to do anything using software. This indicates that no setting for games will help your NVIDIA video card. If you have a desktop PC, you should think about changing the GPU to a more modern one. If it’s a laptop, you’ll either have to put up with it or buy a model with a more powerful video card.
How to properly overclock a video card for a beginner
Overclocking a graphics card is simple and achievable for everyone, but it can be easy to overdo it. Particular care should be taken when determining the core, memory, and voltage timing output parameters. The easiest way to adjust frequencies is in MSI Afterburner, which simply and clearly displays all the necessary information. This program works with any video card, it is the most popular overclocking application.
But before you start overclocking, it’s worth answering a number of questions related to overlocking.
Which video cards can be overclocked and which cannot?
In fact, you can overclock any video card, but there are a number of conditions under which it is better to abandon this idea.
- Life time. If the video card has already worked for more than three years, then overclocking can “kill” the device after a short period of use.
- Budget video cards. There are usually no problems with overclocking such video adapters, but, as a rule, outdated models are less amenable to overlocking.
- Video cards after repair. If the device has been repaired due to some malfunction, then there is no need to overclock it.
- Mobile devices. You should also avoid overclocking the video card on a laptop, since any mistake can lead to failure, and replacement will become problematic.
Expected performance gain
It is difficult to give a definite answer to this question. The result will depend on many factors, for example, the performance of other components, the overall success of overclocking, and the specific video game.
As a rule, in the best case the increase will be from 30 to 40%, in the worst case – from 5 to 10%.
Overclocking methods
There are three types of overclocking a video card - through software, through BIOS, through mechanical modification.
- The easiest way to overclock a video adapter is with the help of programs; any beginner can do it if he follows the instructions.
- Overclocking via BIOS is more difficult, but for experienced users it will not be difficult.
- Mechanical modification is carried out only by professionals who have special equipment and have skills and experience in working with electrical equipment.
Required software
Next, we will talk about the necessary programs that will help you correctly carry out the overlocking procedure.
For overclocking
Individual manufacturers often have their own GPU overclocking software (such as NVIDIA Inspector and AMD GPU Clock Tool), but the most popular tool today is MSI Afterburner, which is universal and works with all models on the market. Therefore, beginners should use this program.
For monitoring
The same MSI Afterburner is equipped with tools for monitoring the video card, but it is also a good idea to use the GPU-Z program, which shows all the parameters in one place, without any unnecessary configurations, in a very accessible form.
For testing
Popular heating pads such as FurMark are not suitable for checking the stability of an overclocked video card. GPU manufacturers install protection in drivers that reduces card performance when heated in Furmark. This makes the application not a very good stability test.
It is better to check an overclocked video adapter in 3D games. In this case, equipment manufacturers do not set any restrictions, and the cards always work at one hundred percent of their capabilities.
Overclocking algorithm with explanations
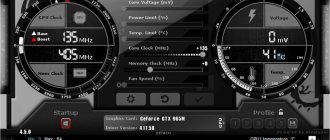
Overclocking is recommended using MSI Afterburner. The interface of this tool is easy to understand and use. Therefore, it is necessary to discuss only the most important parameters that will regulate the operation of the entire video card.
- CoreVoltage (mV). Setting to change the voltage of the video card. The scale is in millivolts, and different models have different limits, so raising the value won't do any harm. For example, in the GTX970 the voltage can be increased by a maximum of 87 mV, and in the Radeon R9390 by 100 mV.
- PowerLimit (%). This slider can be used to increase the graphics card's power limit and therefore allow it to consume more power to maintain a certain performance or clock speed. For example, increasing the value of this parameter by 50%, at a standard clock speed, will allow the Radeon R9 to maintain its core clock speed at 1000 MHz.
- Temp Limit (C). The parameter is available for GeForce series video adapters with GPU Boost technology, which by default is associated with the card's power limit. This avoids reducing the actual clock speed if the temperature exceeds the set limit.
- CoreClock (MHz). A setting used to determine the core clock speed of the video card. GeForce owners can choose how many megahertz to boost the base clock (for example, +50 MHz), while Radeon owners specify the clock speed directly (for example, 1100 MHz).
- Memory Clock (MHz). This option, similar to that described above, allows you to speed up the memory frequency.
- FanSpeed (%). Option for fan rotation speed in the video card cooling system. Manual settings are available, for example, increase the speed by 45%.
After increasing these settings, changes must be saved and restarted. Then you should conduct tests in video games. If after 20 minutes of playing critical errors appear, for example, artifacts or emergency overheating, then you need to slightly lower the parameters in MSI Afterburner. And so continue until the optimal settings are identified.
Overclocking example
An example will be overclocking the GTX 1080 Ti. The base memory clock speed is set at 1530 MHz. We will overclock in MSI Afterburner.
First, we increase the processor core voltage and chip temperature. To do this, you need to increase the Core Voltage parameter by 3-5%, which will increase the range of permissible voltages for the video card core. The layout itself will adjust the specific value.
After checking the TDP of the card and power adapter, switch the Power Limit and Temp sliders to the maximum limit. The video card will be able to draw more current when it needs it. Then we raise the Memory Clock and Core Clock to 20 MHz and 10 MHz, respectively. That's all, save the changes and restart the computer.
Now we check the stability of the card using any computer game that has high hardware requirements (for example, “Witcher 3”, since the game heavily loads the GPU). If after several minutes of continuous operation everything is in order, the image continues to be displayed and there are no artifacts, you can proceed with further enlargement. The core clock speed for the GTX 1080 Ti is capped at 2037 MHz using the boost feature. It is advisable to reach this indicator.
Proper preparation for overclocking
Before you start speeding up your video card, you need to follow a few basic steps that will make the procedure safer and more effective.
First step: Software update
Drivers have a direct impact on video card performance. Because of them, the image can change beyond recognition, both for the better and for the worse.
You can download the current version of the software on the video card manufacturer's website.
- Link to Nvidia website.
- Link to AMD/ATI Radeon website.
After this, you need to remove the old software. This is done to prevent future update failures.
And only after that install a new one. They are removed in the “Control Panel” - “Programs and Features”.
But I recommend using special utilities to remove them; they find and erase everything to the root, this increases the chances of correctly installing new drivers.
Second step: Cleaning the cooling system
Next comes cleaning and lubrication of the cooling system. During acceleration, the video card begins to load more, and therefore heats up. So, in order to avoid further overheating and failure of the board, it is necessary to carry out preventive maintenance first.
Disassemble the video adapter, clean it from dust and dirt, change the thermal paste (it is better to use Arctic MX-4, but KPT-8 will do). Also replace thermal pads if they appear to have outlived their usefulness. If the fans aren't spinning well or are noisy, it's time to lubricate or replace them.
An important point is the ventilation inside the computer or laptop case. If at least one of the fans is not working well, replace it.
Third step: Pre-testing
Now you need to check the video card in an unoverclocked state. Find out the current performance and check the stability of operation at maximum load.
It is important that there are no problems (including artifacts, overheating), otherwise the performance improvement procedure will finish it off.
Read more about diagnostics, capacity testing and performance.
Hardware methods
Overclocking a video card
When thinking about how to speed up a video card, sooner or later most gamers come to the option of overclocking the card. Overclocking is a process in which the user increases the clock speed of the GPU to improve the performance of the card. Gamers gain access to these settings using special programs. Some nvidia or amd video cards are already designed in advance to be overclocked. Such cards are equipped with powerful fans, their firmware allows overclocking, and software for it is included in the kit.
But when thinking about how to improve a video card, you need to remember the possible consequences. Overclocking takes the graphics processor out of the recommended operating frequency range, which can lead to overheating and failure, and the manufacturer's warranty, if overclocked, is void. If after overclocking the video card lags, you should immediately return the settings to their original state.