Due to the presence of viruses, driver or software mismatches, the OS may malfunction. If your Windows crashes, don’t rush to panic. The situation can be corrected by returning the state of files and programs to the moment when the PC was working properly.
While running OS Windows 7, 10 or 8, certain errors and problems may occur. As a result of such failures, starting the operating system again in operating mode becomes impossible. In this case, it is not at all necessary to do a time-consuming reinstallation of the OS. All you need to do is perform a system restore.
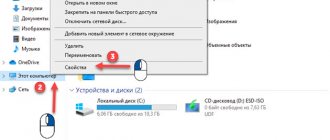
Windows 7 System Restore
There are several methods you can use to get your OS running again. Some of them rely on rolling back to saved settings. Others simply clear the data.
You can “reanimate” the OS in one of the following ways:
- by selecting restore points;
- using the command line;
- through safe mode;
- using a recovery environment;
- using an image/boot disk.
Restoring the operating system using checkpoints to “reanimate” the system is one of the most affordable, effective and popular options. To apply it, you need to make a series of clicks:
- Start panel;
- "System Restore";
- "Further";
- “Select a restore point”;
- "Ready".
With such an operation, problems with the computer will be corrected, changes will be canceled and the system will be returned to the operating state that allowed the PC to boot normally. There is no loss of data, files and documents with this type of recovery. All data is saved. The operation is reversible. You can roll back the system to a previous computer state and use a different restore point.
Many people wonder how to make a recovery point on their own (manually) in order to choose it in the future? To do this, in the same menu “Start” - “System Restore” you can create such a point yourself at any time convenient and suitable for you. It will be saved indicating the current date, which you just have to remember.
From restore point
In computer engineering there is such a thing as a recovery point. These are saved PC settings. As a rule, saving occurs automatically with each successful OS boot. The easiest way to restore Windows 7 is to use this data.
Press F8 when your computer boots. This command will bring up a menu of system startup options. Next, you need to select the Last Known Good Configuration option.
Another method can be used. Go to the properties of the My Computer folder. Find the line System Protection, clicking on which will open the dialog box of the same name. Click Recovery – Next. We set a target date, indicate the disks that need to be fixed, and confirm the actions. After rebooting, the PC should work normally.
No restore points
You can fix problems with the OS even without restore points. To do this you will need to resort to the LiveCD program. You need to download it and burn it to a flash drive with an .iso extension. Further all actions will take place in the BIOS. You need to configure booting from a flash drive. To do this, in the Boot section, select USB-HDD in the First boot device line.
Before proceeding directly with the recovery, copy all the necessary files to a removable disk. The LiveCD program provides a special menu for these purposes.
We will fix the system error using an archived copy. Connect the USB flash drive, open the Windows\System32\config\ folder. Files with the names default, sam, security, software, system must be moved to any other folder. In their place, transfer similar files from the RegBack folder and restart the computer.
The described method will only help if the problem is related to the registry.
Command line
You can resort to “reanimating” Windows 7 from the command line if the PC begins to freeze or works slowly, however, the system still boots. Go to the Start menu and use the right mouse button to launch Command Prompt as an administrator. Run the rstrui.exe command, which will open the system restore program. Click Next. In the next window, select the desired rollback point and click “Next” again. Once the process is complete, the PC should work normally.
There is another way to access the utility. We go to “Start”. To open the command line, click “Run” and enter the CMD command. We click on the found CMD.exe file and wait for it to launch. Next, enter rstrui.exe in the command line and confirm the action with the Enter key on the keyboard.
It is not always possible to play it safe and create OS restore points in advance. Problems may arise that block the option of such “reanimation” of the PC. Then you can use another, no less effective and easy option - restoring the Windows system using the system itself.
We rely on the diagram:
- “My Computer” icon – right-click “Properties”;
- "System protection";
- In the new window, click “System Protection”, restore button;
- "Further";
- Select a restore point according to the date;
- Specify the system disks to be restored;
- We confirm the operations and reboot the system.
Restoring Windows 7 using Safe Mode
This method is preferred if the usual system boot is impossible. Then, after pressing the PC power button on the system unit, hold down the F8 key to bring up the “Startup Menu”. One of the “Menu” options is “Safe Mode”. Select it and press Enter on the keyboard. As soon as Windows boots, we carry out the algorithm of actions that we described earlier.
Method 9: Error “BOOTMGR is missing”
When loading, you may see this message: “BOOTMGR is missing. Press Ctrl+Alt+Del to restart." As I already said, the system has a so-called MGR boot file, which is called “BOOTMGR”. It weighs, as you understand, only 100 MB. Sometimes this file can break or even be deleted by viruses. Then you see the error that the “BOOTMGR” file was not found.
There are two options here. The first is that it is so broken that it cannot start the system. The second is that it has been deleted or moved to another section. Alternatively, the system could select another partition, disk or device as boot. To solve this particular problem, see the instructions at this link.
Source
System recovery Windows 8/8.1
If you were able to start the OS, you can resume Windows 8 through Settings. Hover over the top right corner and enter them. Click on “Change computer settings” – “Update and recovery”. The “Recovery” section will offer several options:
- "Normal recovery with preservation of information."
- "Deleting data and reinstalling the OS."
- "Special option."
Decide what exactly needs to be done. Next, follow the menu prompts.
If you choose the latter method, in the window that opens, click on the diagnostics item. You will be offered the following options:
- "Restore";
- “Return to original state”;
- "Extra options". This item includes the ability to roll back to the desired resume point.
To resume Windows 8.1, press Win+R and call sysdm.cpl. In the system properties window, in the “Protection” tab, specify the required system drive. Click "Restore". By clicking "Next", you can see a list of rollback points. Select the one you want and click “Search for affected programs.” Changes that have been made to the PC since the selected moment will be deleted. Complete the process by clicking "Finish".
If you work with Windows 8, problems may occur, the Internet may not work correctly, etc. To fix this, you can use the classic recovery method through restore points.
Another option is a system rollback. To do this, open the “Start” menu - “Control Panel” - “Windows Update”. Select the item “Remove updates”. The same can be done using the command line.
So, in the list of updates that opens, we delete those from the moment of installation of which (we look by date) problems and malfunctions began. We delete unnecessary files and reboot.
You can perform a factory reset on Windows 8.1. Important files will not be affected during this operation. The method is effective, but to implement it, the OS needs to boot without problems. We use the algorithm:
- The right side of the monitor is “Settings”;
- "Change settings";
- “Update and recovery” - “Recovery”;
- "Recovery without deleting files."
If you cannot log into the system in the usual way, you must use the disk with the system. Load the installation disk and select “System Restore”. Click the “Diagnostics” button and “Restore”.
Method 8: “NTLDR is missing” error
If, when loading the system, you see this window: “NTLDR is missing Press ctrl+alt+del to restart,” then do not rush to panic. This error occurs quite rarely on the “seven” and usually the NTLDR file is located on other versions of “windows”. But let’s not go into the essence of the problem and start solving it. As you may have guessed, it can also be solved through the console. You’ve already learned how to run it, so I won’t write about it.
After launch, enter the commands:
diskpart list volume
Here we need to again find the letter to which the system drive is assigned. In my case, this is again the letter “D”.
Exit bcdboot. exe D:\ Windows
Again, you need to enter the letter of the system drive - look at your volume.
So, we have created a loading module. Now you need to activate it. To do this, enter the commands:
The command displays all connected physical media. I only have one, but you can have two - you need to choose the one on which the system is loaded.
sel disk *HARD DISK NUMBER* list partition
The partitions of the hard drive you selected will be displayed here. Select a partition with a capacity of 100 megabytes and enter the number in the following command:
sel part 1 active exit
Windows 10 System Restore
If you have problems with Windows 10, press Windows + Pause. Go to “System Protection” and click “Restore” - “Next”. Select the desired indicator and click “Next” again. When completed, click “Done.” The computer will automatically restart and the changes will take effect.
One of the advantages of the “ten” is the ability to return the settings to factory settings. This helps avoid having to install the system all over again. To reset the data, go to “Computer Settings” – “Update and Security” – “Recovery” – “Return the computer to its original state”. Click "Get Started."
You can take care of the possibility of a rollback in case of failure in advance. You can create resume points yourself or configure their automatic creation at the desired frequency. To do this, in the settings, in the Update and security item, select Backup service. Specify where to save copies, click Add disk. After selecting the device, the function will be activated.
You can restore your Windows 10 system again by using restore points. In this case, the system will be rolled back to the moment when it loaded smoothly and worked without failures. This recovery method is described at the beginning of the article.
If the OS does not boot, a warning table appears on the screen with the “Additional recovery options” button. Click it and select “Diagnostics” - “System Restore”. We select a Windows restore point, wait for the system to roll back and reboot.
If such operations do not help and the computer continues to work incorrectly, you can roll back to the basic settings. Some programs and utilities, personal PC settings will be reset, and personal data will be deleted.
This technique is used extremely rarely if the other options described above do not help. The algorithm of actions is as follows:
- “Start” - “Select options” - “Updates and security” tab;
- “Recovery” item – “Start” button;
- We choose to delete all files or keep some of them.
Recovering the system after this will take 40-90 minutes.
Error 0x81000203 - how to fix it and the reasons for its appearance
Windows 10 recovery error 0x81000203 usually indicates problems during shadow copy creation. The most common cause is the enabled “ Turbo ” mode in the “ TuneUp ” program. Less commonly, the reason is the antivirus.
TuneUP program is installed on your computer , turn off the Turbo , and then disable (or better yet, remove) the antivirus . After this, it is recommended to scan the Windows registry for errors using CCleaner.
Then restart your computer and try restoring Windows .
Let's sum it up
Well, friends, the large and informative article Windows 7 restore point has come to an end.
Today we learned what restore points are, why they are needed, what you need to know before starting a system restore, we figured out how to view and create restore points in two operating systems Windows XP and Windows 7, we learned how to restore through safe mode, as well deleted old checkpoints and analyzed possible causes of problems when creating restore points.
Perhaps you have questions related to Windows 7 restore points. You can ask them below in the comments to this article, and also use the feedback form with me.
Thank you for following me on Twitter.
Stay connected - my You Tube channel.
If the above information was useful to you, then I recommend subscribing to my blog updates to always be aware of the latest and relevant computer literacy information.
Don't forget to share this information with your acquaintances and friends. Click on the social buttons and thank the author.
Sincerely, Dmitry Sergeev August 4, 2013
Blog navigation