This article will teach you how to download, install, and update DirectX to the latest version.
DirectX is a software package in the Windows operating system that allows computer games to interact directly with video and audio equipment. Games that use DirectX can make more efficient use of the video and sound card's features and resources. Now I will show you how to update DirectX on Windows operating systems, but first, some useful information.
Why update DirectX?
DirectX is a key component of Windows operating systems, and all Windows operating systems come with DirectX pre-installed. So why update it? There may be various reasons for this, such as:
- DirectX may conflict with video and sound card drivers
- Errors related to the dsetup.dll file
RECOMMENDED: Here's where themes are in Windows 10
How to Update DirectX
DirectX update
procedure
is automatic
in most cases .
So, in Windows 10, no special actions are required: updating pre-installed DirectX 11.2 or DirectX 12 is carried out through the “ Update Center
”.
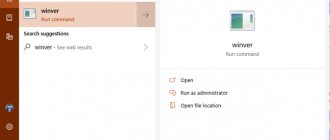
The user can only monitor the current version using the built-in diagnostic tool, which requires using the dxdiag
in the search field
of the Start menu
.
Manual DirectX update
For manual update,
necessary .
Further actions:
1). run the executable file; 2). accept the terms of the license; 3). Uncheck or leave the option to install the Bing toolbar.
After clicking the “Next” button, the DirectX installer will begin the installation process. When an installed version is detected, the program will detect missing updates and install only them.
In the future, if you need to update DirectX in the absence of a constant connection to the Internet and auto-update mode, you need to download the official distribution package from the Microsoft website to any removable media. Files from it are simply copied to the computer.
Loading DLL Files
Sometimes updating the program does not produce results and when launching multimedia applications, the user sees a system error message related to the absence of any dynamic library files (files like *.dll). In this case, the dynamic library can simply be copied from a boot disk or flash drive or downloaded from the Internet, having previously made a backup copy of the existing folder. Destination path:
- for 64-bit system: C:\Windows\System32
- for 32-bit system: C:\Windows\SysWOW64
After replacing the DLL files, you will need to restart your computer.
DirectX FAQ
- How to remove DirectX
- How to find out or check the DirectX version
- How to Update DirectX
DirectX versions
DirectX 9.0c
Russian version
We recommend installing this version of DirectX only if you understand why you need the outdated version of DirectX 9.0c, otherwise it is better to use the auto installer.
DirectX 10
The Russian version of
DirectX 10 is not just a program, it is a whole set of drivers necessary for the computer to work correctly with graphics. Every person who is interested in computer games knows about the purpose of the API set.
DirectX 11
Russian version of
DirectX 11 - we recommend installing this version because it is suitable even for weak computers, which will allow you to play performance-demanding games without a drop in FPS
DirectX 12
The Russian version
of DirectX 12 is a component of the application programming interface. Provides functions for the operating system and applications to interact with video card drivers. These features are specific to the Windows operating system and are available in Windows 10.
DirectX update history
Here is the DirectX update timeline:
- DirectX 1.0 is the first version, released in 1995.
- DirectX 2.0 supports several third-party applications and was released in 1996
- DirectX 3.0 supports Windows NT and was released in 1996.
- DirectX 4.0 is a newer release where its features are merged with version 5.0
- DirectX 5.0 supported Windows 2000 and was released in 1997
- DirectX 6.0 supports Dreamcast and was released in 1998.
- DirectX 7.0 supports Windows 200 and was released in 2000.
- DirectX 8.0a ended support for Windows 95 and was released in 2001
- DirectX 9.0 is one of the most popular releases, released in 2002. It supports 64-bit version.
- DirectX 10.0 supports Windows Vista and was released in 2006
- DirectX 11.0 supports Windows 7 and Windows Server R2 and was released in 2009
- DirectX 11.1 supports Windows 8, Windows Server 2012 and was released in 2012.
- DirectX 12.0 supports Windows 10, DirectX Raytracing, Programmable MSAA and was released in 2015.
What you need to know about updating Direct X on Windows 8
The eight already has 11.2 and 11.1 installed. It is not possible to download the library package on the Internet. He can't be found. This data has been verified by me personally and taken from the company’s official website.
In this case, the update will occur automatically from the Windows server. This method will provide you with the latest version of the DirectX library.
Read how to disable advertising on a Xiaomi phone. It's very simple.
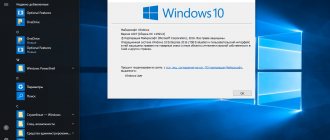
How to find out the DirectX version?
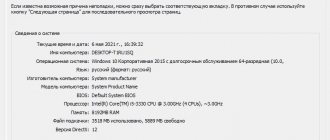
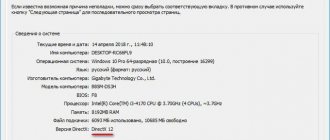
Before installing an update for DirectX, you must determine which version of DirectX is installed on your computer. You can find out the DirectX version using the DirectX diagnostic tools. To do this, launch a command prompt and enter the dxdiag command.
The same can be done using the Run window. To do this, press the keyboard shortcut “Win + R”. In the Run window that appears, enter the dxdiag command and press Enter.
This command will open the DirectX Diagnostic Tool.
The DirectX version will be displayed at the end of the screen with a DirectX version line, in my case it is DirectX 12.
This DirectX version detection method will work on all major Windows operating systems such as Windows XP, Windows Vista, Windows 7, Windows 8, Windows 10, Windows Server 2003, Windows Server 2008, Windows Server 2012, Windows Server 2016, Windows Server 2019
Uninstalling DirectX
To install an older version or reinstall DirectX, you must first uninstall the version installed on your PC. This cannot be done using standard methods, since Windows does not have the ability to erase the library, so you will have to use third-party programs. But before that, you need to prepare your computer by following these steps:
- Open your computer's properties.
Opening properties - Go to the System Protection section.
You will need administrator rights for this action. Open the “System Protection” section - In the window that opens, open the “System Protection” tab.
Open the “System Protection” tab - Select your primary drive and click the Configure button.
Click the “Configure” button - In the “Recovery Options” block, select the “Disable protection” option.
Select the option “Disable protection” - Apply and save your changes by clicking the Apply and OK buttons.
Click the “Apply” and “OK” buttons - Download and install the DirectX Happy Uninstall program (https://www.softportal.com/software-3940-directx-happy-uninstall.html), it will help you erase everything related to the library.
Click the “Download” button - After opening the program, go to the Backup section and click on the Start Backup button to create a backup copy of the library stored on your computer.
You will need it if you want to restore some items after deletion. Click the Start Backup button - Go to the Unistall section and click on the Unistall button to start uninstalling the program.
Click the Uninstall button - Restart your computer for all changes to take effect.
Done, now you can install the new version of DirectX on a completely clean platform. Reboot the computer
DirectX is a very useful program that is essential for games and applications. Do not delete it from your computer permanently; you can only do this if you intend to restore it immediately. Don't forget to update the library, but keep in mind that not every video card will run the latest version of the program.
Update or install the latest version of DirectX using Windows Service Pack
DirectX can be updated in various ways. Let's start with Windows service packs.
Updating with Windows Service Packs
We can install and update DirectX using Windows Update packages. Since different versions of Windows come with different versions of DirectX, we have to use different Windows update packages.
Here's how to update different versions of Windows using a Windows Service Pack.
Windows 10 and Windows Server 2016
Windows 10 and Windows Server 2016 ship with DirectX version 11.3 and DirectX 12. There is no separate service pack for these operating systems. Updates can be obtained using Windows Update.
Windows 8 and Windows Server 2012 and R2
Windows 8 and Windows Server 2012, R2 ship with DirectX 11.0. There is no separate service pack for these operating systems. Updates can be obtained using Windows Update.
Windows 7 and Windows Server 2008 R2
Windows 7 and Windows Server 2008 R2 ship with DirectX 10. It is possible to upgrade DirectX to version 11.1 using the following service pack.
https://www.microsoft.com/ru-ru/download/details.aspx?id=36805
RECOMMENDED: How to find all photos on your computer
Windows Vista and Windows Server 2008
Windows 7 and Windows Server 2008 R2 ship with DirectX 10. You can upgrade DirectX to version 11.0 using the following service pack.
https://support.microsoft.com/ru-ru/help/971512
Windows XP and Windows Server 2003
Windows XP and Windows Server 2003 ship with DirectX 8.0. It is possible to update DirectX to version 9.0c using the next update package.
https://www.microsoft.com/ru-ru/download/details.aspx?id=34429
Timeless classic Windows XP
Not everyone can have modern computers that support the operating systems described above. Many devices around the world remain with Windows XP installed on them. Therefore, this version of the system also needs to be mentioned in this article.
The maximum library that XP will support is version 9. It is freely available on the official Microsoft website.
The entire installation process is similar to Windows XP. Therefore, we will not repeat ourselves. The only thing I would like to add. After installation, be sure to reboot your device. This action will allow you to approve all changes made.
Update or install the latest version of DirectX from Windows Update
Windows Update is the most convenient and easiest way to update DirectX. We can update DirectX from Windows Update quickly and easily. To do this, open “Control Panel” -> “Windows Update”. Then check for updates for your OS. Then simply install the listed updates, where the DirectX update will be.
Problems during installation
If during installation of the program an error appears that prevents the process from reaching completion, you can try the following methods to resolve the problem:
- Download the installation file from another site. It is recommended to download from the official Microsoft or DirectX website.
- Disable your antivirus during installation. There are times when it mistakes DirectX for a malware because it makes changes to the system and blocks some of its actions.
Disabling the antivirus
- Run the installation file through “Fixing compatibility problems” by right-clicking on it and selecting the appropriate option in the menu that opens.
Launching the program to fix compatibility problems
- Uninstall the previous version of DirectX that is already installed on your computer and go through the installation process again.
How do you know when you need to update?
Signs of outdated DirectX usually appear when installing a new game. This may result in graphics failures, incorrect sound performance, and other problems in the game. Often it may simply not start. A black screen appears briefly.
Pop-up errors like “d3dx9_42.dll not found” also refer to problems with Direct X.
On a note! Game lags are not necessarily related to DirectX. This may be due to weak hardware, viruses, or a “cluttered” system.
How to install/update DirectX
DirectX, like any other Windows 10 system component, is constantly being improved, so it needs to be updated or reinstalled periodically.
Installing DirectX
To install DirectX from scratch you need:
- Go to the Microsoft website, in the Download Center tab, find and download the DirectX Web Installer.
To find the DirectX web installer, use the site search - Download the installer, run it and accept the “License Agreement”.
After accepting the License Agreement, you may be asked to install additional software (this is not necessary) - Wait until the end of checking the free space on the system HDD.
During the pre-installation phase you will be provided with information about the size of the downloaded files - As soon as the preparatory stage is completed, the automatic downloading of the DirectX file library will begin.
The window displays the progress of the DirectX download process - After the download is complete, the installation of DIrectX will begin.
Installation time depends on the power of your PC - Done, all that remains is to restart the PC.
If after installing DirectX the PC does not reboot automatically, then it must be rebooted manually
Video: how to install DirectX
DIrectX update
If you already have DirectX installed, then to update it you will need:
- Click the Start button, open Settings and select Update & Security.
You can also open the Update & Security settings window by using the search bar in the Start menu. - Then go to the “Windows Update” tab and click on the “Check for updates” line.
To view the date and time of all recent updates, you can open the "Update History" - If a newer version of DirectX is found in the list of available updates, Update Center will automatically begin downloading and installing the library package.
Before checking for updates, make sure your PC is connected to the Internet - After successful installation, reboot the system.
How to reinstall DirectX
There are two ways to reinstall the application:
- Complete removal of the installed version and replacing it with a similar one. Used when windows with warnings about DirectX errors frequently drop out;
- updating the installed version. DirectX software is configured in such a way that when it is reinstalled, the missing dll files are added to the existing library package. If you need to add libraries from DirectX 9.0C to DirectX 12.0, they will simply be attached to the files of the installed version.
To perform the reinstallation correctly, you need to carry out a number of certain actions before performing it:
- Create a system restore point using the utility built into Windows 10 in system properties by clicking the “Create” button.
- Disconnect from the Internet to avoid automatic recovery of libraries.
- Disable system protection. If you do not do this, you will not be able to completely remove DirectX 12, since the application is part of the Windows 10 OS. Undeleted “tails” will remain, which affect the reinstallation of libraries.
Without disabling system protection, you will not be able to completely remove DirectX from your computer. - In the window that opens, click on the “Configure” button.
- In the next window, select the “Disable system protection” switch.
- After this, you can reinstall DirectX.
How to update DirectX on a Windows 7 computer?
After installing a new computer game on Windows, you can often encounter problems with its operation: the graphics will fail, the sounds will disappear, or other functions will be disabled. To solve this problem, the developers, first of all, suggest figuring out how to update the DirectX program built into Windows 7 on your computer. This is explained by the fact that it is precisely it that is designed to ensure full reproduction of graphics and sounds on a PC. In this case, it is enough to install an update for DirectX in Windows and the problem will be resolved automatically.
Checking the new version
It's quite simple to do this:
For Windows 7, the current version is DirectX 11. But even if it is installed, problems are possible, because its components must also be constantly updated.
Attention! DirectX 12 and higher are not designed to work on Windows 7, and attempts to install it will lead to nothing. Only updating the OS will help here.