Modern smartphones are capable of taking high-quality pictures and surpass even many cameras in this parameter. However, the slightest mistake when shooting can ruin your shot. External conditions are also not having the best effect. Lack of lighting and bad weather can easily damage your photo. And uploading it to the Internet and then resaving it again in a compressed form will have an even worse effect on the photo. You can also encounter poor quality in old photographs. In such situations, pictures can be corrected. An application for improving photo quality successfully copes with this. After it, the image changes radically.
The best mobile photo enhancement apps allow you to achieve noticeable results with minimal processing. Most of them are capable of working automatically, do not have watermarks and do not put forward any special requirements for the initial image. However, they can process photos without serious damage or deleted fragments. Therefore, it will still be possible to restore only images with moderate defects. And the most successful results are obtained when processing photographs with people’s faces.
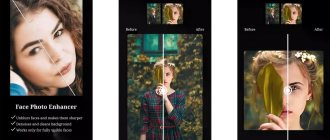
AI Photo Enhance/Unblur
QR Code
Improve blurry photos with AI
Developer: KallosSoft
Price: Free
This handy app will help you improve the quality of your photos. It is designed to work with regular photos of people or selfies. Therefore, the emphasis is on improving a person's face. All you have to do is select a photo and confirm its adjustment. After this, the file will be sent to the server, where it will be processed. Then you can save it to your smartphone or forward it to friends.
The application removes any amount of noise in pictures and increases the sharpness of the picture. Therefore, even unsuccessful shots can become beautiful and suitable for further use. The service also performs exposure correction to correct the quality of colors, contrast and light in the image. Processing takes place in an accelerated manner and does not take much time. You will have to wait less than 30 seconds.
Advantages:
- advanced algorithms for analyzing people's faces with further automatic improvement;
- simultaneous removal of noise, sharpening and correction of photo parameters;
- Quickly correct images and then save or send them to friends.
The application requires good lighting and facial visibility. If it is only partially included in the frame, then the result of quality correction will not be so impressive. However, even then the picture will be better.
Sharpen image is an application that will make photos clearer
This is an application that makes blurry photos better and clearer. Sharpen image works on Android using simpler algorithms than Remini, so the quality is not always acceptable, but it is faster and free. Despite this, there is also a paid option, which differs from free only in the absence of advertising - the subscription does not affect the operation algorithms.
The application is very easy to use. After installation and launch, you can see examples of the program by clicking on the buttons “Example 1“, “Example 2” and “Example 3“ below. To add your photo to processing, click on the gallery icon at the bottom right (if you want to load a picture from the device’s file system), or the camera (if you want to take a photo and then process it).
There are two control tools at the top left - "Intesity" and "Radius", which allow you to control the intensity of the deblurring effect and the radius of its application, respectively. Using the plus and minus buttons you can add or subtract these parameters.
Using the "Intesity" and "Radius" buttons you can adjust the image processing
By clicking on the button with the checkmark icon at the top right, you can apply the specified parameters and see how it will be reflected in the photo. If you are not satisfied with the results, you can change the parameters again and reapply the effect. If you are happy with it, you can save the photo to the gallery using the button with the floppy disk icon at the top right, or share it in instant messengers or social networks.
The application is developed only for the Android operating system.
Final table
| Name | Platform | Manual processing | Functional |
| Remini | Android, iOS | No | Base |
| Enhance Photo Quality | Android, iOS | Yes | Basic, double exposure, coloring, advanced effects, video work |
| MintAI | Android, iOS | No | Basic, restoration, coloring, change of style |
| AI Photo Enhance | Android | No | Base |
| Bigjpg | Android, iOS | No | Base |
Summary – Mobile Photo Editing
There are so many great photo editing apps out there that it can get overwhelming at times. To find the best free photo editing app, you need to first think about what you want to achieve and then test several photo editing apps to find the right one for you.
For best results, stick to one or two—it's better to become highly skilled in one application than to be mediocre in many.
Here's our complete list of the best photo editing apps for your mobile device:
- Snapseed: For advanced photo editing on your mobile device.
- VSCO: the best set of classic filters.
- Adobe Photoshop Express: The best option for versatile photo editing.
- Adobe Photoshop Lightroom CC: For professionals and those who want to make quick adjustments.
- Prisma Photo Editor: to turn your photos into artistic “paintings” and “drawings”.
- Foodie: Best for editing food photos.
- LiveCollage: Suitable for creating excellent photo collages.
- Adobe Photoshop Fix: for editing portraits.
- Visage: The best selfie editing app.
- Enlight Photofox: The best option for artistic photo editing.
- Instagram: For sharing photos and gaining followers online.
- Afterlight 2: For in-depth editing and artistic overlays.
- Canva: For corporate photography.
- Over: To add beautiful text to images.
- SKRWT: To adjust the perspective of your photos.
- Facetune: Professional selfie editing app.
- TouchRetouch: For removing unwanted objects from your photos.
- Pixelmator: Huge set of photo editing features.
- Mexture: For fast and professional layer editing.
- Distressed FX: to unleash your creative potential.
- Superimpose X: For stunning double exposure images
Did we miss any great photo editing apps? What photo editing apps do you use? Let us know in the comments below!
Tip 6: Turn on image stabilization
When a person takes a photo, his frames almost always shake. This prevents the camera from focusing, causing the photo to be blurry. A special stabilization mode helps avoid problems.
Just open the settings of the Camera application and try to find the stabilization option there. But keep in mind that the function is only available on advanced devices. It is extremely rare in budget models.
Tip 7: Check the resolution
The number of megapixels affects the quality of the image. So if you end up with a bad photo, check what the default resolution is. Perhaps the set value is not the highest.
Be sure to set the maximum value, otherwise you will not be able to test all the capabilities of the smartphone camera. However, on models with a special mode (48 MP, 64 MP, 108 MP), the resolution is increased by dividing each pixel by 4. If you can get an increase in quality, then only during the day.
Flash
Most photographers recommend turning off the flash on your smartphone altogether and using it only as a flashlight. However, in a situation where you need to take a photo in the dark, flash can still come in handy. Just put it in “Auto” mode and the smartphone will decide when to turn it on.
If a situation arises in which you doubt whether a flash is needed, then the best choice would be to take two photos: one with a flash, the other without, and then figure out which one turned out better.
Tip 8. Adjust the color rendering
Color rendition plays an important role in getting a good photograph. This indicator largely depends on the firmware of the smartphone. Models with different processors shoot differently. Even if the devices have the same cameras.
Unfortunately, changing color rendering is not available on all smartphones. But the user can use a little trick by selecting an effect in advance. All this affects the final color, so you can still play around with this indicator to a certain extent.
How to choose a smartphone for photography
But the problem is that the average user does not pay attention to the characteristics of the cameras. For example, he buys a cheap device, which a priori cannot have excellent photosensors. With such a device you will not be able to achieve high quality images. In addition, even expensive models do not always photograph well.
When choosing a smartphone that you plan to use as a photo tool, you need to pay attention to the following parameters:
- number of camera pixels and their size;
- sensor variability (main lens, wide-angle, macro, and so on);
- aperture;
- software.
Now the main argument is the number of megapixels. The developers have started a real pursuit of these indicators, which is why in 2022 you won’t surprise anyone with a 108 MP camera. But the size of the pixels will be much more important, not their number, since the final quality of the image depends on this.
Manufacturers are also chasing the number of cameras. Mid-budget and flagship models generally have 1 front and 4 main cameras. Typically this includes a main lens, a wide-angle lens, a macro lens, and a depth sensor. With their help, you can adapt the image to a specific scenario. For example, for shooting a large area or plants at close range.
Some sensors have only a nominal value. The need for a depth sensor for portrait shots has been criticized since many smartphones can handle this task without an additional camera. The same goes for a macro lens.
Aperture is a parameter that affects the camera’s preparedness for shooting in poor lighting conditions. If the aperture value is higher than f/2.0, then taking photographs in the evening is out of the question. The optimal indicator is f/1.7. But pixel size along with resolution can also play an important role.
All the advantages of installed cameras can come to naught if the manufacturer has installed bad software. It will ruin any frame, regardless of resolution and other parameters. Therefore, you should not expect good photos from cheap and little-known smartphones. For mobile photography, you need to buy a proven device with decent characteristics.
Tip 9: Adjust White Balance
White balance is one of the methods for changing color rendering, which is available in the camera settings of any smartphone.
The BB can work automatically or in accordance with the settings of the device owner. This indicator needs to be adjusted, since the smartphone cannot always orient itself when the lighting changes. You can learn more about white balance functions from the video, which we recommend watching right now.
Tip 5. Use filters
Almost no one posts photos on social networks without editing. As a rule, people's phones don't take very good pictures, and filters help get rid of the shortcomings.
But not everyone knows that a certain effect can be applied not only at the post-processing stage, but also during shooting. Be sure to check the Camera app on your smartphone. There must be an “Effects” or “Filters” tab. They will change the color of the picture to hide the shortcomings of the camera's capabilities.
For selfies, so-called beauty effects are used. They smooth the face, eliminate acne and even enlarge the eyes. But the quality of the photo itself is not very high.
Focus Magic
The program requires installation on Windows or Mac.
To use it, you need to upload a photo and select a filter: focus, blur, enhance quality, get rid of noise, blur. And then edit.
You can edit ten photos without registration. Registration costs $65, but is concluded once, that is, after updating the program or changing your computer, you will not have to register again. You just need to enter a confirmation code.
Original photo on the left, edited photo on the right
Bottom line. When you zoom in, you can see that the edited image is clearer.
Tip 1. The right light
Regardless of whether you use an expensive or cheap smartphone, any shot can be ruined by the wrong lighting. You need to choose a place for the photo so that the light source falls exactly on the subject of the mobile photo. Otherwise, the person in the evening photo will hardly be noticeable against the general background, and the landscape photo will be completely darkened.
Advanced models partially compensate for user error. They can capture light even where there is virtually no light. But with an inexpensive device you will have to work for quite a long time, selecting the perfect shot.
If you take a photo in low light conditions, don't forget to turn on night mode.
During the day the problem resolves itself. There is more than enough light outside or indoors, but at the same time you need to make sure that the sun's rays do not highlight the photo. The object should be located on the side of the Sun, and not against it.
Tip 3: Use the rule of thirds
In mobile photography, the so-called rule of thirds is often used. It assumes that any frame can be divided by two vertical and horizontal lines. With their help, the user can select the scene in such a way that the frame is not skewed, that is, the horizon is not blocked.
A more attractive photo will be one in which the smartphone owner can fit the object at the intersection points or inside the square. But here many people will have a question: how to use the rule of thirds on a regular smartphone? In fact, everything is very simple:
- Open the camera app.
- Go to settings.
- Find the “Grid” or “Markup” item and activate it.
Now the frame will be divided into 9 squares, with the help of which you can eliminate the obstruction of the horizon and line up the frame in the best possible way.
Tip 10: Adjust exposure
A final tip that any smartphone owner who wants to take a beautiful photo should take into account. It is the exposure that allows you to determine the amount of light so that the photo comes out as saturated as possible.
Typically, exposure settings are listed at the bottom of the main Camera app screen. The higher the value, the brighter the photo will be. Using the function, the smartphone owner can correct the frame when exposed to direct sunlight or add light in the evening.
BeautyPlus
This photo editing app for your phone offers many simple and intuitive tools, artistic effects and augmented reality filters, as well as many other ways to enhance your selfies. In this case, the resulting photos look “alive” and natural.
Functions:
- Face retouching: removing acne, wrinkles, blemishes, dark circles under the eyes, smoothes the skin, removes oily shine;
- Automatic retouching;
- Hairstyle editing: adding volume, smoothing unruly curls;
- Whitens teeth;
- Edits eye color, gives them shine;
- Brightens faces;
- Various filters and effects;
- Professional photo editing: background blur, photo resizing, dozens of special filters.
System: iOS/Android
Price: free, with advertising.