This is a protocol for the interaction of drives with other PC components at the software level. It is supported by absolutely all current operating systems, hard drives and motherboards. Thanks to AHCI, you can take advantage of the ever-increasing data transfer rates of modern drives.
There is no need to install any utilities to operate the mechanism. Therefore, when asked - SATA AHCI Driver, what kind of driver is it, you should always confidently say that this is a component built into the OS that is responsible for the normal functioning of HDDs and SSDs.
Usage problems
Regarding this, there are the following nuances:
- the mode does not change automatically - you need to configure it and take certain, but simple steps;
- if Windows was used and AHCI was turned off, but then it was turned on through the BIOS, then when you turn on the PC, a blue screen of death will be displayed;
- Windows XP does not support this technology, so to activate, download and install the driver - everything is available on the Internet, but you need to focus on the motherboard model.
It is also important to answer the question: “AHCI mode – what is it?” In its broadest meaning, this is the parameter in the BIOS/UEFI that allows you to connect modern drives to your PC.
Switch from IDE to AHCI without reinstalling Windows
What should you do if you have a hard drive with a SATA interface installed in your computer, and before installing the OS you forgot to switch the “SATA Mode” from IDE to SATA (the name of the option in the BIOS may differ)?
Usually, an already installed Windows displays a blue screen after switching the value of this option. Some people find nothing better than reinstalling the OS again. But there is another way. I recently had this problem. I tested the hard drive in the client laptop using the mHDD utility, having previously switched the “SATA Mode” option in the BIOS to IDE mode. After testing, I forgot to switch back and installed the operating system. I discovered my error already at the stage of installing drivers on the installed system, when I did not want to install the Intel AHCI driver. Fortunately, the problem was solved without reinstalling the OS, just by digging into the Windows registry. Read on to find out how to do this.
First of all, call up the “Run” dialog box. It can be called up through the Start menu or the Win+R key combination. In the Run dialog box, enter and execute the command “regedit” (without quotes).
In the registry editor that opens, we find the following section: HKEY_LOCAL_MACHINESYSTEMCurrentControlSetservicesmsahci
In this section, we need to change the value of the "Start" key to 0.
Now we find the following section: HKEY_LOCAL_MACHINESYSTEMCurrentControlSetservicesiaStorV
And also change the value of the “Start” key to 0.
After the steps described above, reboot the PC. When rebooting, enter the BIOS and change the value of the “SATA Mode” option from IDE to AHCI. Save the changes to the BIOS settings and reboot the computer.
After rebooting, Windows will find new hardware and install its driver. After this, you can safely download the Intel AHCI driver, because now our hard drive will operate in AHCI mode.
Enable AHCI support in the registry
- First you need to boot into the working system. To do this, leave the controller operating mode in IDE in the BIOS and load Windows.
- Next, launch the registry editor. This is done as follows: press the Win + R keys, enter the regedit command, and then press the OK button.
- If the “Allow the following program to make changes on this computer” window appears, click “Yes”.
- In the registry editor that opens, look for HKEY_LOCAL_MACHINE in the left panel and expand it. In it, open the SYSTEM section, then the CurrentControlSet section, then services and finally msahci. The full path in the registry looks like this: HKEY_LOCAL_MACHINESYSTEMCurrentControlSetservicesmsahci
- In the right panel we find “Start”, open it by double clicking and change the parameter value from “3” to “0”. Click OK.
- We proceed similarly for the Start parameter, located at the following path: HKEY_LOCAL_MACHINESystemCurrentControlSetServicesIastorV
- Reboot the computer, go into the BIOS, change the operating mode from IDE to AHCI. Save the BIOS settings and reboot the computer.
After these steps everything should work.
- 25-05-2015
- 207 280
HDD
- Hello admin, I need to switch the AHCI parameter to IDE
to check the laptop hard drive in the Victoria program, but this option is not in my BIOS, what can I do? - Please tell me how to change AHCI to IDE on an Acer laptop, I want to install Windows XP on it? I went to the Main tab and connected the IDE interface, but the laptop still does not boot from the XP distribution.
How to change AHCI to IDE in BIOS
Good day.
Quite often I am asked about how to change the AHCI to IDE parameter in the BIOS of a laptop (computer). Most often they encounter this when they want to:
— check your computer’s hard drive with Victoria (or similar). By the way, such questions were in one of my articles: https://pcpro100.info/proverka-zhestkogo-diska/;
— install “old” Windows XP on a relatively new laptop (if you don’t switch the parameter, the laptop simply won’t see your installation distribution).
So, in this article I want to look at this issue in more detail...
Difference between AHCI and IDE, mode selection
Some terms and concepts will be simplified later in the article for a simpler explanation :).
IDE is an outdated 40-pin connector that was previously used to connect hard drives, floppy drives, and other devices. Today, this connector is not used in modern computers and laptops. This means that its popularity is falling and it is necessary to use this mode only in certain rare cases (for example, if you decide to install the old Windows XP OS).
The IDE connector has been replaced by SATA, which is superior to IDE due to its increased speed. AHCI is an operating mode for SATA devices (for example, disks) that ensures their normal functioning.
It’s better to choose AHCI (if you have such an option. On modern PCs it’s everywhere...). You need to choose an IDE only in specific cases, for example, if SATA drivers are not “added” to your Windows OS.
And by choosing the IDE mode, you seem to be “forcing” a modern computer to emulate its operation, and this certainly does not lead to an increase in productivity. Moreover, if we are talking about a modern SSD drive, when using it, you will get a speed gain only on AHCI and only on SATA II/III. In other cases, you don’t have to bother installing it...
You can read about how to find out what mode your disk is operating in in this article: https://pcpro100.info/v-kakom-rezhime-rabotaet-zhestkiy-disk-ssd-hdd/
How to switch AHCI to IDE (using the example of a TOSHIBA laptop)
For example, I’ll take a more or less modern laptop of the TOSHIBA L745 brand (by the way, in many other laptops the BIOS settings will be similar!).
To enable IDE mode in it, you need to do the following:
1) Go to the laptop BIOS (how this is done is described in my previous article: https://pcpro100.info/kak-voyti-v-bios-klavishi-vhoda/).
2) Next you need to find the Security tab and change the Secure Boot option to Disabled (i.e. turn it off).
3) Then, in the Advanced tab, go to the System Configuration menu (screenshot below).
4) In the Sata Controller Mode tab, change the AHCI parameter to Compatibility (screen below). By the way, you may have to switch UEFI Boot to CSM Boot mode in the same section (in order for the Sata Controller Mode tab to appear).
Actually, it is the Compatibility mode that is similar to the IDE mode on Toshiba (and some other brands) laptops. You don’t have to look for the IDE lines - you won’t find it!
What is it and why install it
Today, SATA hard drives have two modes, namely “IDE” and “AHCI”. Thanks to the first, older devices do not conflict with more modern ones, thereby not causing PC malfunctions. But at the same time, the operating speed is significantly reduced and is not much different from the speed of drives developed about 20 years ago.
Note! But “AHCI” allows you to use “SATA” to the fullest, increasing speed and performance. After turning it on, the user will note that the PC runs 20% faster.
But the user must remember that these actions are relevant only when there is a “SATA II/III” interface. Otherwise, all of the following actions will not lead to the desired changes.
Enabling AHCI hard drive mode without reinstalling Windows
Enabling AHCI hard drive mode without reinstalling Windows
Browser for Windows XP: what is the most ideal option?
A browser without ads and pop-ups: does it exist in nature?
Windows update that turns off sound and deletes files: who is to blame and what to do?
Google Chrome asks you to urgently update your browser: let everyone in, don’t let anyone out
Cyberattacks paralyze the development of a coronavirus vaccine and Microsoft has released a fighter against them
Modern hard drives are connected to the motherboard of computer devices via the SATA interface, which allows operation, in particular, in IDE and AHCI modes. IDE is an old mode, it is necessary to ensure compatibility with outdated components and programs. The AHCI mode is also not a new development in the IT field, it appeared back in 2004, but it is a current mechanism for connecting hard drives via the SATA II and SATA III interface. AHCI has a number of advantages over IDE:
- the ability to connect more devices to the motherboard;
- operating hard drives at their highest possible speed;
- so-called “hot swapping” of hard drives, that is, disconnecting and connecting without having to turn off the computer;
- support for NCQ technology, which improves hard drive performance under multitasking conditions.
SATA mode is set in the BIOS. On modern laptops, AHCI mode is usually set by default. But new motherboards for PC builds may come with IDE mode active for hardware compatibility purposes. You can change IDE to AHCI (or vice versa) at any time in the BIOS of computers that support both modes. Not all computers support AHCI, but most do, since this mode has been around for 12 years. The minority includes rare vintage devices that were released onto the market, respectively, before the advent of AHCI. But even if the computer is less than 12 years old, if it supports AHCI, switching to this mode may still cause problems due to the lack of the appropriate setting in the outdated BIOS version. In such cases, you must first resolve the issue of updating the BIOS.
AHCI features and how to enable it in Windows 7
Advanced Host Controller Interface
(
AHCI
) is a modern mode of operation of hard drive controllers that allows
SATA to use a number of advanced functions. Let's look at the main and most relevant ones.
Hot plugging of SATA drives - Hot Swap, Hot Plug
( Hot Swap - hot replacement, Hot Plug - hot plug), that is, directly during operation without turning off or rebooting the computer.
In relation to desktop computers, this option will be extremely useful for those who work with drives connected via the eSATA interface, or SATA drives installed in a mobile rack.
Before installing Intel AHCI drivers on Windows, it might look like this:
Using the “Safely Remove Hardware and Disks” icon, you can disconnect SATA drives.
After installing the Intel AHCI drivers, you will need to use the Device Manager in Computer Management to hot-plug and connect previously disconnected drives:
In the case of a more common connection of external drives - to USB ports via a SATA-USB adapter, hot plugging/unplugging is available without AHCI.
NCQ (Native Command Queuing) – command queuing
In a nutshell, we can say that NCQ is the logistics of moving disk heads. If at a particular moment in time the hard disk controller receives several requests to read/write data, then AHCI will change the order of their processing so that, by optimizing the sequence of head movements, it can process all requests in a minimum number of revolutions of the disk platters, that is, in less time.
Let's imagine this analogy of NCQ. The courier (HDD heads) serves a certain office building, on several floors of which various organizations are located. Every day the courier brings and picks up correspondence. A peculiarity of the functioning of these numerous organizations is that their offices work for reception and delivery at strictly defined, and different, hours and you must arrive at the very beginning, otherwise the window will close. The courier has a list of organizations that he must serve in the near future.
Now let’s imagine that the courier visits organizations strictly according to the list in the order of their priority. Let's assume that the first organization on the list is located on the nth floor of the building. Early in the morning, the courier rises to this floor, approaches the office window and finds out that it will open in the late afternoon (Floors, in our case, are the tracks, or cylinders, of the hard drive, and the opening hours are its sectors).
If the courier must go around the organizations strictly according to the list, then he will wait idle until the evening, pick up the documents and go to the second organization on the list on another floor. The probability that the office hours in this organization have already ended is quite high, which means that on this day the courier may not pick up/transfer anything, but will wait for the next day (HDD disk turnover). And so on.
Not very productive.
However, if you change the order of the crawl, then in one day (disk revolution) you can visit a significantly larger number of organizations. To do this, we need to arrange them according to the start time of the offices, but taking into account the fact that the elevator moving the courier in our hypothetical building is not very fast in itself (the time it takes to move the heads to the desired track). If the times (sectors) are close, then starting to move to the selected floor may not be in time for the window to open.
On the other hand, it is obvious that if there is only one organization on the list for the day, then no winnings will result.
Also in this regard, I can’t help but remember the ancient Sinclair toy, which, if I’m not mistaken, was called “Taper”. In it, the waiter of the beer bar had to not only pour beer to visitors, but also, moving from table to table, collect empty mugs that were inexorably moving towards the edge. True, it was impossible to hesitate at all - if the mug fell to the floor, the game immediately stopped. Very similar, logistics in its purest form is to issue/collect as much as possible per unit of time by optimizing movements.
NCQ is mostly relevant for loaded servers and storage systems with SATA drives. You should not expect any dramatic increase in the speed of a regular desktop computer or laptop from enabling this option. But it won't be worse for sure.
How to find out which mode - IDE or AHCI - is currently installed
You can find out which mode - IDE or AHCI - is currently active on your computer in Windows Device Manager. Expanding the thread:
- “IDE ATA/ATAPI controllers” in Windows versions 8.1 and 10;
- "IDE ATA/ATAPI controllers" in Windows 7.
If your computer's hard drives are connected via AHCI mode, the list of devices will include a SATA AHCI controller.
If IDE mode is active on the computer, the list of branches will contain an entry, respectively, about the IDE controller.
An alternative way is to use the AS SSD Benchmark utility to test the speed of hard drives. If hard drives can operate in AHCI mode, but the BIOS is set to IDE, the utility will notify you of this with the red value “pciide BAD”.
If the computer is running in AHCI mode, in the utility window we will see the green value “storahci - Ok”.
These two methods will make it possible to understand which mode is currently installed. But to determine whether support for AHCI mode is implemented in the BIOS, you need to enter it and find the option to enable AHCI. The selection of SATA operating modes in different BIOS versions may be located in the “Advanced” or “Main” sections. For example, in the BIOS UEFI of the Asus motherboard, this is the “Advanced” section, in it you need to enter the “SATA Configuration” subsection and expand the options for the “SATA Mode” parameter.
Another example is the BIOS AMI (V17.9) of the MSI motherboard, here everything is more complicated, and not everyone will be able to immediately figure out where the AHCI setting is. In the “Integrated Peripherals” section, you must select the “On-Chip ATA Devices” subsection, and in it – “Raid Mode”, which provides a choice of hard drive connection modes.
How to determine in what mode the computer controller is operating?
It is likely that AHCI mode is already activated on your computer. You can check this in several ways:
Method 1
- Go to
- Open the “IDE ATA/ATAPI Controllers”
- If there is a device in this section with the word “AHCI” in the name, as in our case, then the AHCI mode on the computer is already in use.
Method 2
Please note that in the BIOS of some computers there is no option to change the mode to AHCI. In this case, the problem can sometimes be solved by updating (flashing) the BIOS version.
Consequences of switching to AHCI mode for Windows operation
So, you can change the IDE mode to AHCI at any time in the BIOS settings. But for Windows, such a move will not result in a slight delay at startup due to the automatic installation of the necessary drivers, as when replacing some computer components. In this case, even getting rid of the connection to computer components using the standard Windows Sysprep utility, as is the case with replacing the motherboard or processor, will not help. Changing the IDE mode to AHCI leads to serious consequences - Windows simply will not start again. As a result, we will get either a blue screen of death or a cyclic reboot of Windows with a notification that the system has not started correctly.
The fact is that IDE and AHCI modes when installing Windows are registered at the registry level. To operate hard drives in AHCI mode, a special driver is required, which is automatically installed with versions of Windows starting with Vista. Since the AHCI mode appeared later than Windows XP, the AHCI driver must first be integrated into the distribution of this version of the system, taken from the motherboard driver disk or downloaded from the Internet.
How to enable AHCI
This instruction describes how to enable AHCI mode on computers with an Intel chipset in Windows 8 (8.1) and Windows 7 after installing the operating system.
If after installing Windows you simply enable AHCI mode, you will see error 0x0000007B INACCESSABLE_BOOT_DEVICE and a blue screen of death (however, in Windows 8, sometimes everything works, and sometimes it reboots endlessly), so in most cases it is recommended to enable AHCI before installation. However, you can do without this. Enabling AHCI mode for hard drives and SSDs allows you to use NCQ (Native Command Queuing), which in theory should have a positive effect on the speed of the drives. In addition, AHCI supports some additional features, such as hot-plugging drives. See also: How to enable AHCI mode in Windows 10 after installation. Note: The steps described in this manual require some computer skills and understanding of what exactly is being done. In some cases, the procedure may not be successful and may require reinstalling Windows.
Mandatory measures and procedures
In principle, any experiments with Windows can lead to undesirable results, but methods for adapting the operating system to AHCI mode must be taken with particular seriousness. Because in this case, settings that affect the system's ability to boot will be affected. It is strictly forbidden to proceed with the instructions below without having previously prepared emergency means. You must either make a backup copy of the system and burn bootable media with a backup program, or create a system restore point and prepare Windows installation media. Using the latter, you can enter the recovery environment of the current system or, as a last resort, start the process of reinstalling Windows.
The procedure is as follows:
- Step 1 – check the AHCI enable setting in the BIOS;
- Step 2 – preparation of emergency means;
- Step 3 - depending on the chosen method, either configure the next system startup in safe mode, or edit the system registry;
- Step 4 – reboot, enter BIOS and enable AHCI mode;
- Step 5 – start the computer.
What to do if important data is missing?
Any manipulation of the hard drive increases the likelihood of data loss. Especially when it comes to manipulating the disk operating mode, etc.
Often, in an attempt to enable ACHI mode, users perform actions that disrupt the logical structure of disks . Moreover, often inexperienced users, when enabling ACHI via the command line, execute commands that initialize the disk - that is, all data on the disk is destroyed and initial settings are made.
Therefore, be extremely careful when performing any manipulations with the disk.
If you notice the disappearance of important files or problems with local drives, immediately restore the data to a safe place. Otherwise, you may lose your data permanently .
To recover data, download and install the RS Partition Recovery .
RS Partition Recovery program
One-stop data recovery solution
The program allows you to recover lost data due to accidental deletion of files , formatting of the drive , damage to the logical structure of the drive and in many other cases.
In addition, RS Partition Recovery supports ALL types of modern file systems , so you can recover files not only from Windows disks, but also from those that worked in other operating systems (including server ones).
Important : Be sure to select a drive that is different from the one on which the file was previously stored as a location for recording the recovered files. This will avoid overwriting the file.
It is for this reason that RS Partition Recovery allows you to write recovered files to a separate hard or local drive (or flash drive ), pack the recovered information into a ZIP archive , or immediately send it to an FTP server .
Windows Safe Mode
The first method is designed so that when you enter Windows Safe Mode, the AHCI driver will be installed automatically. But, unfortunately, this will not work in every case. On a running system, you need to configure the next startup in safe mode, reboot, enter the BIOS and set the AHCI mode. After starting the computer in safe mode, the AHCI driver should in theory be installed. If everything goes well, all that remains is to reboot the system in normal operation.
A universal way to enter safe mode the next time you boot Windows for all current versions of the system is to use the msconfig utility, called using the “Run” command.
Editing the Windows Registry
If the safe mode method does not work, you can avoid reinstalling the system by editing its registry. To launch the Registry Editor, in the “Run” command field, enter:
4.1 Editing the registry Windows 8.1 and 10
In the Registry Editor window, expand the branch:
In this branch, look for the “iaStorV” folder, click on it, open the “Start” parameter and set its value to “0”. Click "Ok".
Expand the “iaStorV” folder, select the “StartOverride” subfolder, open the “0” parameter and set its value to “0”. Click "Ok".
We go down alphabetically and find the “storahci” folder. Click on it and open the “ErrorControl” parameter. We remove the preset value “3” and enter “0” instead. Click "Ok".
Next, inside the “storahci” folder, open the “StartOverride” subfolder. Double click to open parameter “0”. And here we also set the value to “0”. Click "Ok".
4.2. Editing the Windows 7 registry
In the Registry Editor window, expand the branch:
In the branch we find the “iaStorV” folder, click on it, open the “Start” parameter and set the value to “0”. Click "Ok".
Next in the branch we look for the “storahci” folder, click on it, open the “Start” parameter, set the value to “0”. Click "Ok".
After editing the registry, reboot the computer, go into the BIOS, activate the AHCI mode and start the system.
If Windows won't boot
If none of the methods helped adapt Windows to work in AHCI mode, the system will have to be reinstalled. But the current Windows can be started if, for example, you need to remove the settings of installed software or save some important files stored on drive C in a safe place. To do this, you need to enter the BIOS again and set the active IDE mode setting back.
However, it may also happen that the system will not be able to boot in either AHCI or IDE mode. If there is no blue screen of death, but versions of Windows 8.1 and 10 reboot cyclically, giving a screen that says “Automatic recovery,” click “Advanced options.”
Going to the “Select Action” menu, follow the path indicated in the screenshot below and roll back to the restore point.
If a blue screen of death appears when you start your computer, boot from the Windows installation media and at the system installation stage, select the “System Restore” option at the bottom.
Once in the “Select Action” menu, we follow the steps described above.
Those who choose the backup method using third-party software use the bootable media of the backup program.
Enabling AHCI in Windows 8 and 8.1
One of the easiest ways to enable AHCI after installing Windows 8 or 8.1 is to use Safe Mode (the same method is recommended by the official Microsoft support site).
First, if you are having errors when starting Windows 8 in AHCI mode, return to IDE ATA mode and turn on your computer. The next steps are as follows:
- Run Command Prompt as an administrator (you can press Windows + X keys and select the desired menu item).
- At the command prompt, type bcdedit /set safeboot minimal and press Enter.
- Reboot the computer and before booting the computer, enable AHCI in the BIOS or UEFI (SATA Mode or Type in the Integrated Peripherals section), save the settings. The computer will boot into safe mode and install the necessary drivers.
- Run Command Prompt as Administrator again and type bcdedit /deletevalue safeboot
- After running the command, reboot your computer again, this time Windows 8 should boot without any problems with AHCI mode enabled for the drive.
This is not the only method, although it is the one most often described in various sources.
Another option for enabling AHCI (Intel only).
- Download the driver from the official Intel website (f6flpy x32 or x64, depending on which version of the operating system is installed, zip archive). https://downloadcenter.intel.com/Detail_Desc.aspx?DwnldID=24293&lang=rus&ProdId=2101
- Also download the SetupRST.exe file from there.
- In Device Manager, install the f6 AHCI driver instead of the 5 Series SATA or other SATA controller driver.
- Restart your computer and enable AHCI mode in BIOS.
- After reboot, run SetupRST.exe.
If none of the described options helped, you can also try the first method of enabling AHCI from the next part of this instruction.
How to switch from AHCI to IDE
Although the IDE mode is quite old, without it, for example, Windows XP will not work, or you need to test the hard drive using various programs. Users still ask the question of how to switch AHCI to IDE in the BIOS.
I would like to note that a very common occurrence occurs when, when installing Windows XP, your mode is switched to AHCI, then you simply will not see the XP distribution kit. And all because AHCI appeared a little later than XP. I have an article on how to switch to AHCI Window 7 and 8 and what that even is.
What are AHCI and IDE?
Still, I decided to give a little terminology so that some users understand what's what.
IDE – as mentioned above, this is an outdated mode; physically it has a 40-pin connector and is intended for connecting hard drives, drives, and more. Most laptops and modern PCs no longer have an IDE, as well as switching properties in the BIOS. If your device has an IDE connector, then you need to switch to it only in the most extreme cases - installing Windows XP.
AHCI is a modern standard that is several times higher in throughput than IDE. Works with SATA devices. If you need to choose between these two modes, then AHCI is definitely much better suited for this role. As a note, I would like to say that if you purchase an SSD, it will only work with AHCI, otherwise you can even forget about such a drive.
Switching SATA mode from IDE to AHCI with Windows 7 installed
Today we will learn a simple thing - how to change the SATA mode from IDE to AHCI in the BIOS with Windows 7 already running. After all, those who have already tried to change this mode were able to see the blue screen of death the first time they tried to boot Windows. And the solution would be to make changes to the Windows registry, which is what we will do now.
A very brief note: In the era of Windows XP and earlier, the IDE or PATA interface was widely used, which is retained in modern motherboards only for compatibility with older devices and systems. Today the standard is SATA, different revisions of which differ in bandwidth.
Yesterday I visited one of my clients and on one of the computers I had the opportunity to put this method into practice. Windows 7 was just standing there and sad in ide mode. I decided to transfer it to AHCI without reinstalling it, and at the same time improve performance.
Press Win+R and write regedit , click OK, the Registry Editor opens.
Next, we follow this path in the registry:
HKEY_LOCAL_MACHINESYSTEMCurrentControlSetservicesmsahci
If you have, for example, RAID mode, then you may need this address in the registry:
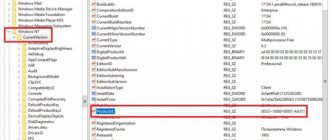
You should see something similar to the one in the screenshot. We need the Start parameter, for me it has a value of 3. Double click on the parameter name.
When you double-click on the name, an editing window will open. Here you need to change the number to 0 (zero).
To look like this. Click OK and save.
After our manipulations, the final value looks like this:
The finishing touches remain. Now you need to restart Windows and go into the BIOS, change the mode there to the desired one.
When the computer starts to restart, do not miss entering the BIOS. This is usually the Del key. Laptops may have F2, F10, or F12 keys.
On my client’s motherboard, the item looks like Storage configuration, with a SATA configuration (compatible or enhanced) subitem inside.
Select the Configure SATA as sub-item, which is set to [IDE] and press Enter. Select the AHCI value
Ultimately, the item now looks like Configure SATA as [AHCI]. Press F10 to save the BIOS settings, then Enter and the computer reboots again.
And now comes the moment of truth!)
Windows 7 should boot normally and upon boot it will detect new devices for which it will begin vigorously searching and installing drivers. It may then ask you to reboot. Reboot, make Windows pleasant.
This method worked in my case and even visually the computer began to run faster.
Did this method help you? Share in the comments.
What is the difference between AHCI mode and IDE mode?
IDE is a 40-pin connector for connecting a hard drive (and not only) to the motherboard. Modern devices do not use this connector. Therefore, the IDE can be found on older devices. It may be needed only in extreme cases, for example, to install Windows XP or Vista. The data transfer speed through this connector is 1000 Mbit/s.
After IDE, a new SATA connector appeared on motherboards and hard drives. It surpasses its predecessor with good operating speed. The AHCI mode is responsible for this work. The data transfer speed in this mode ranges from 1500 to 6000 Mbit/s (depending on which SATA I, II or III is used).
If your device has a SATA connector, it is better to use it, since IDE mode reduces the performance of the hard drive. You can switch to it if drivers for SATA are not added to your PC or in cases that require it.
How to switch from AHCI to IDE?
Depending on the motherboard model and BIOS firmware version, the steps to switch modes will be different.
- Booting into BIOS. If your PC is old, then go to “Main” mode and select “Sata Mode” or “Configure SATA as”. Two options will appear: “IDE Mode” and “AHCI Mode”
- If your BIOS firmware is different, then you need to find the “Security” section and change the “Secure Boot” setting to “Disabled”.
- This setting may be in the "Boot" section.
- Next, go to the “Advanced” tab and go to the “System Configuration” item.
- A new menu will open. Select “SATA Controller Mode”. In it we change “AHCI” to “Compatibility” (in new IDE firmware).
It is worth noting that if you do not have the “SATA Controller Mode” section, you need to switch “UEFI Boot” to “CSM Boot” in the same section.
It is important to note that some motherboard and laptop manufacturers have greatly reduced the functionality of BIOSa, and therefore switching to IDE mode is impossible.
Enabling the mode
If your smart machine already has Windows installed, you will have to make important changes to the registry of the system itself. By following the recommendations of experienced users, you will definitely succeed and be crowned with great success.
The main thing is not to make your own fantasy adjustments, especially in cases where you are little familiar with this kind of manipulation.
Mode connection algorithm
First of all, you must understand that the AHCI mode must be enabled before installing the operating system, otherwise the operating system simply will not boot upon a subsequent reboot.
Launch registry editor, to do this you can also type the phrase “RegEdit” in the search bar.
In the registry that opens, you will have to carefully review all available branches to find “HKEY_LOCAL_MACHINE\SYSTEM\CurrentControlSet\services\msahci”.
On the right side of the open window you can find the “Start” key, which you will have to edit; accordingly, click on the “Modify” parameter.
A new window will open in front of you again, in which you will need to set a numeric parameter. Most often, by default, when the mode is disabled, you will be able to find the number 3 there, and you should change it to 0.
This completes the work with the registry, close all windows and restart your PC.
When the operating system starts, call BIOS. This needs to be done to make some changes to enable AHCI on the motherboard.
It’s not difficult to figure out how to change the BIOS IDE to AHCI. Immediately after loading the BIOS, go to the “Advanced” tab, and then in the list that opens, find the “SATA Configuration” line, click on it. A small window will immediately pop up with only two choices: IDE and AHCI. Select the second option.
If you have done everything as prescribed by the algorithm, then upon startup the operating system will detect new hardware and automatically install drivers.
There are times when the user has to do the opposite, look for ways to disable AHCI in the BIOS.
It’s easy to guess that to implement your plan, you will have to go the same way as described above, only in reverse order. It is advisable to start by switching the new mode to IDE in the BIOS, and then making all the changes to the registry. So, you can easily figure out how to disable AHCI even on your own.
So, the desire to enable AHCI mode is justified by the emergence of new successful capabilities and technologies. It is not difficult to carry out these actions if you have patience, attention and the appropriate algorithm for how to do it all.
Advanced Host Controller Interface
(
AHCI
) is a mechanism used to connect storage devices using the Serial ATA protocol, allowing for advanced features such as built-in command queuing (NCQ) and hot swapping.Designed to replace the outdated classic ATA controller, which maintains top-down compatibility with the original IBM PC/AT, and supports direct memory access only as an addition. The main real problems of this controller are the lack of support for hot swapping (even though eSATA hardware supports it) and command queues on one channel (in the case of SATA, each device has one channel) - only one command can be executed at a time. Thus, using the ATA NCQ feature, even if it is supported by the disk itself, is impossible on a classic ATA controller.
When switching, with Windows OS already installed, the ATA controller included in the south bridge to the “AHCI” mode, this will mean, for the installed operating system, the use of incompatible operating logic of the hard drive controller - this action is equivalent to installing an ATA controller in the board system that is different from the existing one, and physically switching the boot disk to this board.
In this case, Windows will not find the boot disk when loading and will crash with BSOD STOP 0x0000007B, INACCESSIBLE_BOOT_DEVICE
.
Text taken from the free encyclopedia https://wikipedia.org/
So, since you came to my site, it means we have a common problem that you had after purchasing a new SSD (For example, in OGO.ru). And after reading the text above, you could understand its root. For some reason, Microsoft still cannot make a free transition from one driver to another. And to do this, users have to work a little with their hands, but in principle, very little. To solve the problem, you need to install the AHCI driver in Windows before switching to the BIOS, or rather, make a small amendment in the registry. This instruction is for Windows 7, Windows Vista and Windows Server 2008 R2 operating systems. For Windows 8, the instructions are slightly different and are available at the following link: