In this article we will present several ways to enable AHCI mode for SATA in the BIOS without reinstalling Windows 10 and thereby increase performance, efficiency, and also reduce energy consumption of modern HDD and SSD drives...
What is the difference between AHCI and IDE?
IDE is the old mode of operation via the SATA interface, which is practically no different from its predecessor PATA (a wide and thin cable was used for PATA). This operating mode was popular before the widespread introduction of AHCI, which allowed modern drives to unleash their full potential in speed and capabilities.
AHCI is a modern mode of operation via the SATA interface. Working in this mode allows you to get maximum efficiency from SSD media with a very high data writing speed. In addition, AHCI mode has more economical power consumption and also allows you to replace hard drives without turning off the computer. Working in AHCI fully reveals the capabilities of the SATA interface.
Table
| AHCI | IDE |
| SATA connection protocol | A protocol that emulates a connection via the PATA interface |
| Incompatible with outdated software and components (drivers required) | Compatible with any hardware and software |
| Supports SSD | Not compatible with SSD |
| Supports NCQ, higher HDD sector reading speed | Keeps SATA performance at PATA level |
| Supports hot plugging of devices | Requires system shutdown to install device |
How to determine the current operating mode?
To determine the current operating mode, simply follow these steps:
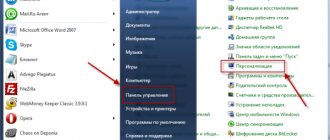
Step 1. Go to “Control Panel” “Start” button .
Step 2. In the window that opens, select the “Small icons” display mode and LMB click on the “Device Manager” .
Step 3. In the window that opens, click on the “IDE/SATA controllers...” and the operating mode will be indicated opposite the standard controllers. The screenshot shows IDE mode.
You can also find out the operating mode through the BIOS or UEFI. The parameters where information about the operating mode is located are usually located in the items “SATA Mode” , “Storage options” , etc. depending on the motherboard model and firmware.
Important! Do not switch operating modes in BIOS or UEFI, as this will make it impossible to boot the operating system.
Possible SATA Mode values
Nowadays it is increasingly rare to find a BIOS with expanded functionality of the “SATA Mode” option. The reason for this will be explained a little later, but for now let’s look at the main values that exist in any “SATA Mode” variation.
- IDE - compatibility mode with legacy hard drives and Windows. By switching to this mode, you will get all the features of the motherboard IDE controller. In general, this affects the performance of the HDD, reducing its speed. The user does not need to install additional drivers, since they are already built into the operating system.
- AHCI is a modern mode that gives the user increased speed of working with the hard drive (and, as a result, the entire OS), the ability to connect an SSD, and “Hot Swap” technology (“hot” replacement of the drive without stopping the system). For it to work, you may need a SATA driver, which can be downloaded from the motherboard manufacturer’s website.
- A little less often you can find the RAID mode - only owners of motherboards that support the creation of RAID arrays from hard drives connected to an IDE/SATA controller have it. This mode is designed to speed up the operation of drives, the computer itself, and increase the reliability of information storage. To select this mode, at least 2 HDDs must be connected to the PC, preferably completely identical to each other, including the firmware version.
The other 3 modes are less popular. Some BIOS have them (located in “SATA Configuration”) in order to eliminate any problems when using older OS:
- Enhanced Mode (Native) - activates the enhanced mode of the SATA controller. With its help, it becomes possible to connect HDDs in an amount equal to the number of corresponding connectors on the motherboard. This option is not supported by Windows ME and lower operating systems and is intended for more or less modern versions of this OS line.
- Compatible Mode (Combined) - compatible mode with restrictions. When you turn it on, up to four drives become visible. It is used in cases with Windows 95/98/ME installed, which cannot interact with the HDD of both interfaces in a total number of more than two. By turning on this mode, you force the operating system to see one of the following options: two regular IDE connections;
- one IDE and one pseudo-IDE, consisting of two SATA drives;
- two pseudo-IDEs made up of four SATA connections (this option will require selecting the “Non-Combined” mode, if there is one in the BIOS.).
The compatible mode can also be enabled for Windows 2000, XP, Vista, if, for example, the second operating system is Windows 95/98/ME. This allows you to see the SATA connection in both Windows.
Method number 1. Enabling AHCI mode through the registry
Step 1: First, you need to open the Registry Editor. This can be done by right-clicking on the “Start” button and then selecting “Run”. In the jnr line you must enter the regedit and confirm with the OK .
Step 2. In the window that opens, go to the path HKEY_LOCAL_MACHINE\ SYSTEM\ CurrentControlSet\ Services\ iaStorV
Step 3. Click on the “Start” , set the value to 0 and confirm the action with the “Ok” , as shown in the screenshot.
Step 4. Go to HKEY_LOCAL_MACHINE\SYSTEM\CurrentControlSet\Services\iaStorAV\StartOverride and do the same steps for the parameter called 0.
Step 5. Go to HKEY_LOCAL_MACHINE\SYSTEM\CurrentControlSet\Services\storahci , double-click on the Start and set the value to 0.
Step 6. Go to HKEY_LOCAL_MACHINE\SYSTEM\CurrentControlSet\Services\storahci\StartOverride and set the value 0 for the parameter called 0.
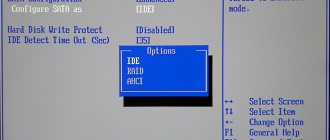
Step 7. Reboot the PC and go into the BIOS, where you need to set the AHCI operating mode. In different models of mother cards, the path to the mode switching screen may have different names. The screenshot below shows the most common option.
Save the changes and restart the computer in safe mode.
After the reboot, a new SATA driver package will be installed, and the system will require another reboot, after which AHCI mode will be enabled.
It is worth noting that in some cases this method does not work, which leads to a “blue screen” and a further reboot.
To try another method, you need to return IDE mode to the BIOS
Features of ACHI activation in Windows 7
"Seven", although several patches have been released for it, does not work entirely correctly in this mode. Sometimes it takes some extra work with a file to force the system to recognize this controller. As a rule, glitches do not occur if you install this mode before installing the OS - then everything works correctly.
What should be done:
Press the Win+R combination and enter or copy the regedit command, then run the found EXE file;
Go to path HKEY_LOCAL_MACHINESYSTEMCurrentControlSetservicesmsahci;
In the Start item, which is assigned attribute 3, change it to 0;
In the IastorV branch for the Start item, similarly change the attribute to 0.
You may need to restart your computer for the changes to take effect. In “Eight” and “Ten”, when using this mode, usually no problems arise. The developers took into account previous mistakes and perfected the use of this technology.
For Windows XP, which is still used in some places, the “native” ACHI driver does not exist in principle, since at the time of writing the OS did not exist this technology. Please note that if you are going to use third-party drivers, you do so at your own peril and risk, and no one guarantees stable operation of the system.
Method number 2. Enable AHCI mode using the command line
Step 1. Turn on the computer, right-click on the “Start” and open the “Command Prompt” or “Windows PowerShell” as an administrator.
Step 2. In the window that opens, enter bcdedit /set {current} safeboot minimal and confirm by pressing Enter .
Step 3. After completing the operation, you need to restart the PC, go into the BIOS and change the operating mode, as described in the first method. The computer will boot into safe mode and install the necessary drivers. After that, open the command line again as an administrator and enter the command bcdedit /deletevalue {current} safeboot . Confirm by pressing Enter .
After the next reboot, a new operating mode will be enabled, optimized for the use of high-speed SSD drives.
Nuances of use
Although you can switch modes in the BIOS in a few seconds, there is one important point to consider. It is as follows: if the operating system was installed, for example, with AHCI, then after transferring to IDE, loading may not be possible. This is not a rule, but most often this is how things happen. Therefore, even before installing the distribution, you need to decide which disk subsystem protocol you plan to work with.
AHCI driver packages began to be integrated into the system only with Vista. All previous solutions from Microsoft do not have built-in support, so you need to either use “assemblies” or prepare media with the appropriate driver before installation. Windows 7 works fine with the new standard. Switching SATA from IDE mode to AHCI must be done from the BIOS (Configure SATA item). In very rare cases, changes to the registry may be required.
What to do if important data is missing?
Any manipulation of the hard drive increases the likelihood of data loss. Especially when it comes to manipulating the disk operating mode, etc.
Often, in an attempt to enable ACHI mode, users perform actions that disrupt the logical structure of disks . Moreover, often inexperienced users, when enabling ACHI via the command line, execute commands that initialize the disk - that is, all data on the disk is destroyed and initial settings are made.
Therefore, be extremely careful when performing any manipulations with the disk.
If you notice the disappearance of important files or problems with local drives, immediately restore the data to a safe place. Otherwise, you may lose your data permanently .
To recover data, download and install the RS Partition Recovery .
RS Partition Recovery program
One-stop data recovery solution
The program allows you to recover lost data due to accidental deletion of files , formatting of the drive , damage to the logical structure of the drive and in many other cases.
In addition, RS Partition Recovery supports ALL types of modern file systems , so you can recover files not only from Windows disks, but also from those that worked in other operating systems (including server ones).
Important : Be sure to select a drive that is different from the one on which the file was previously stored as a location for recording the recovered files. This will avoid overwriting the file.
It is for this reason that RS Partition Recovery allows you to write recovered files to a separate hard or local drive (or flash drive ), pack the recovered information into a ZIP archive , or immediately send it to an FTP server .
"Bottleneck"
It is known that one of the slowest components of a modern computing system is a hard drive based on a classic spindle system. Today, SSD analogues have appeared, but they have not yet become widespread due to their too high cost.
Therefore, regular HDDs are installed on almost every computer. The result is that DDR3 memory easily transfers 20,000 MB/s; The internal CPU bus allows you to process ten times more data; and a hard drive with the SATA-3 standard only “accelerates” to a real 100 megabytes per second under ideal conditions. It is no coincidence that it is recommended to use high-performance SSD models, at least for system files. From all of the above, a simple conclusion follows: it is the HDD that slows down the modern system, thereby being a “bottleneck”. And since the user can easily make changes to the way the disk subsystem processes commands, affecting speed to a certain extent, you can often hear the question of which mode is better: AHCI or IDE.
GPT or MBR
MBR (Master Boot Record)
- located at the beginning of the hard drive, contains a small fragment of executable code (binary program), a disk partition table and a special signature. After loading the BIOS, the MBR transmits information from which partition of the disk to boot into RAM and the OS loads.
GPT (GUID Partition Table, a partition table using globally unique identifiers)
- an improved MBR that is part of UEFI.
Starts with the Table of Contents of the partition table, and not from the beginning of the disk, because there is a legacy MBR with a value of 0xEE so that old systems do not lose GPT, and new ones ignore the MBR and boot from GPT. Uses a modern Logical Block Addressing (LBA) system instead of the Cylinder-Head-Sector addressing used in the MBR. LBA0 is the legacy MBR, LBA1 is the table of contents of the partition table, LBA2-33 records about partitions, LBA34 and further are the partitions themselves. There are also negative LBAs, these are copies of regular ones at the end of the disk (reservation).
| GPT | MBR (obsolete) |
| Maximum number of partitions 128 on Windows, 256 on Linux | The maximum number of partitions is 4 (critical, because Windows will take 3 and you will only have one left) |
| Maximum disk size 18 Exabytes | Maximum disk size 2 Terabytes |
| There is a reservation (the table of contents and sections are duplicated at the end of the disk) | No reservation |
Windows 7 32 bit does not support GPT, 64 bit does.
To find out which partition table you are using:
- In Windows, go to Disk Management, click Disk Properties, Volumes and in the Partition Style column.
- On Linux, fdisk -l <disk path>.
Results
The decision about which protocol to choose depends on several factors. First of all, it depends on the operating system used. From compatibility at the “hardware” level. And of course from the load on the subsystem. The higher it is, the more preferable AHCI is. If we analyze all the reviews, we can say that both protocols work great, without causing any failures when configured correctly. However, it makes more sense to use the updated version. This is, so to speak, a foundation “for the future,” for example, for the purchase of an SSD.


