Photoshop is a program that allows you to change photos beyond recognition. However, the first tool that anyone who wants to learn how to edit an image should become familiar with is selection and cutting. In this article we will look at ways in which you can cut out both simple and complex objects, as well as scale them.
Scaling
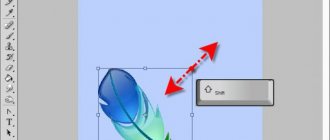
Scaling is used if the user needs to resize the entire picture , and not just some part of it. To apply the function, you need to find the “ editing ” tab on the top panel, go to “ transform ”, go from there and click on “ scaling ”. A frame should appear around the canvas, by pulling the corners of which the user will be able to change the proportions of the picture at their discretion. To ensure that the object does not stretch when enlarging or reducing the image in Photoshop, but maintains its proportions, you must hold down the SHIFT key .
If the user knows in advance what width and height parameters need to be given to the photo, he needs to enter these values in a special dialog box. This window is called by the key combination ALT+CTRL+I , or the “ Image size ” function in the “ Image ” tab on the top panel.
To maintain the proportions maintain proportions box .
Both options work almost the same, but when using the first, the picture quality deteriorates greatly when enlarged, while in the second case the quality does not suffer as much.
Maintaining proportions
In order for the inserted picture or individual figure to maintain its proportions when scaling, you must hold down the SHIFT key . Thus, the object increases (decreases) relative to the center of the layer, and when you hold down the ALT key, the image changes proportions relative to its center.
Free transformation
The key combination CTRL+T enables the “ Transform ” function. Free differs from the usual one in that with it the object can be rotated and reflected . If you can’t call the function with a key combination, then you can use the top menu, there you need to find the “ editing ” tab, go from it to “ transform ”, then click “ free transformation ”.
In the case of the English version of Photoshop, the path looks like this: “ Edit” - “Transform” - “Free Transform ”. You can perform various actions with the image by simply dragging the corners of the frame, and when you right-click on it, the user will see a context menu with advanced options.
Zooming in and out of an image using the keyboard
To zoom in from the center on a computer running Windows PC, press Ctrl + and the “+” icon. For Mac operating systems, press Command + and the + icon. By pressing the key combination several times, the image will be zoomed in by a certain amount.
To zoom out from the center on a Windows PC, press Ctrl + and the - icon. For the Mac operating system, respectively, you need to press the keyboard shortcut Command + and the “-” icon. To zoom out the image by a certain amount, press the key combination several times.
Change layer size
This option is useful when you need to reduce or enlarge an entire layer, especially convenient when changing the size of a cut out object. Scaling can be done in the following ways:
- Change the content scale . To use this method, you must use the “ Free Transform ” function. Borders will appear around the entire image; by dragging it, you can enlarge or reduce it.
- Zoom out/zoom in on background . Background has a lot of restrictions, so its scaling is different from scaling a regular layer.
To change the background parameters , you need to go to the “ image size ” tab, then simply enter the desired Width and Height . Another option is to unlock Background , thereby making it a regular layer, after which the program will allow you to resize it in the usual way. To unlock, you need to double-click on the background layer icon and click OK without changing anything. Once unlocked, the user can change the proportions in the same way as with a regular one.
Editing the resulting fragment
Before describing the first method, I would like to remind you that I discussed a similar topic earlier in the article “How to quickly reduce an object in Photoshop - professionally and without loss of quality.” A nice addition is a description of this process in the online versions of the graphic editor.
You can change the parameters before transferring the ball to the main picture. To change the size, follow the following path:
The following window will open:
Here we are interested in the “Dimension” block and the width and height configurations. I recommend using pixel values. Enter the values you need in these fields. If you want to change the proportions, then uncheck this item:
After editing is complete, you can transfer the resulting fragment to another illustration or use it for other purposes. Now let's talk about the second method.
Resizing a selected image
When you need to resize only part of an image, the “ selection ” tool is suitable, it can be found in the side toolbar. You can select an object using an ellipse, a rectangle, a vertical and horizontal line, a lasso and a magic wand. right-click on the selected area of the picture , after which a context menu will appear in which you need to select “ free transformation ” or “ transform selected area ”.
Zooming out using scale
On the left side of the working surface there is a toolbar. On it you can find an icon and a magnifying glass. By clicking on it, in the top line, under the main menu, you will see the tool parameters, including a switch for zoom in and out modes. They are depicted as two magnifying glasses with + and - icons. To activate the zoom out mode, click on the magnifying glass with a minus sign. Then, click on any area of the photo that you are processing. The picture will move away.
Quality when resizing
Zooming in and out directly affects the quality of the edited photo. If you take any object, reduce it using Photoshop tools, and then increase it to its previous parameters, you will notice with the naked eye that the photo has become more blurry.
The deterioration in image quality is due to the fact that when a picture is reduced, the number of pixels in it also decreases , and when it is enlarged, the disappeared pixels do not return, so the photo becomes blurrier, less clear and of less quality. Therefore, if the user wants to change the scale of an edited cut out or selected object, then it is better for him to immediately decide on the proportions so as not to change them several times, thereby losing quality.
What to avoid
In scaling
We avoid “incorrect” size values. We “read” the sizes by percentage. Correct sizes are considered to be all those that are divisible by 5 or, at worst, 2. The top is headed by: 25, 50 and 75%; They are followed by: 10 and 90%, 20 and 80%, 40 and 60%. Then everything that is a multiple of 5, but not previously announced, and the list of successful ones is closed - multiples of 2.
The scale will be calculated more correctly if the picture is reduced not to 73.91%, but to the normal 75%. If the size is needed exactly with the figure above, and not rounded by us to 75%, I will condescend to round as much as 73%. It must be remembered that there is no concept of “half a pixel”. There is a pixel - this is the smallest unit. Anything smaller is also a pixel, but with transparency, the density of which is calculated based on the size of the “under-pixel”.
In a turn
I avoid several rotations when I can get by with one: Instead of two at 15°, I do one at 30°. The exception is turns that are multiples of 90°. The pixel does not undergo recalculation, since it remains the same, changing its location.
Turns that are multiples of 45° are killer. They crush the pixels the most and we get garbage.
Poor quality is visible to the naked eye. The illustration is rotated 8 times by 45° (made a 360° rotation)
How to resize a picture in Photoshop
After studying this lesson you will learn in Photoshop:
- Reduce photo size
- Reduce the size of an individual object in the photo
- Transform photos and objects - twist, compress, flip and flip.
In this article I will tell you how to use Photoshop to reduce a picture, image, text, layer, individual object - everything that can be reduced in Photoshop. Photoshop allows you to quickly and easily reduce objects without losing image quality.
After all, it often happens that it is necessary to reduce a photograph or picture before sending it by mail or uploading it to any website in order to show it to people. The huge original sizes of photos are not suitable and therefore Photoshop comes to the rescue to make the photo smaller.
The best sequence of all types of transformations
Finally, I will describe the most successful sequence of actions that preserves the quality in the best condition.
When decreasing
First of all, distortion is always done, followed by rotation. And only after that we reduce the object.
This is due to anti-aliasing, which occurs by merging pixels when reduced. The reduction itself is best done through the previously described pop-up save window.
When increasing
Priority should be given to scaling, after which you can act as you wish - as it is more convenient.
When working in Photoshop, it is often necessary to reduce the size of the processed object in order to fit it into the overall picture as best as possible.
In this lesson we will look in detail at how to reduce the size of an object in Photoshop using simple steps.
Let's take for example any object on a transparent background. In our case, this will be our logo.
Now let's proceed directly to reducing the size of our object (logo).
How to make a photo smaller
First, open the desired photo in Photoshop. Press CTRL+O or File - Open ( File - Open ) and select the desired photo on the disk.
The photo was opened in Photoshop:
The photo is a huge size 1600x1200 pixels. But for example, we need 600x450 or so.
There is a way to reduce the photo proportionally; to do this, go to the menu Image - Image size ( Image - Image Size ). In English Photoshop this window looks like this:
We see the Width and Height ( Width and Height ), make sure the values are shown in pixels, but if you need you can look and change in centimeters and other measurements.
Enter the width instead of 1600 to 600 and you will see how the height is automatically adjusted to 450 so that the photo resize is proportional.
Click OK and that's it! Our photo has been reduced in size:
Saving for WEB
If you need the image to upload it to the site, and not to keep it as a memorable photo, then you can save it in a slightly different way. With this method, the size of the picture (that is, its weight) will decrease several times more, and you will not notice any loss of quality.
So, we again have an unlabeled image with a higher resolution. If you need to crop, then crop, but then you must click “File”, then “Export”, and in the next drop select “Save for web (old version)”.
ATTENTION! This path is valid for Photoshop version 2015. For earlier versions, you simply go to the "File" menu and select "Save for Web". There will be no “Export” item there.
In the window that opens, select “High quality JPG” and you don’t have to set the quality to more than 60 . If you set it more, you won’t notice the difference, but the picture will take up more space, although not very significantly.
Below you will see the line “Image size”. The essence is absolutely the same as in the previous example. You need to reduce the size in width and height. There is even a chain). We set it to 200*200, and then click “Save”. Voila)
As a result, using the above two methods, I received two images measuring 200*200 pixels. But the size (volume) of the first image is 26 kilobytes, and the second one is 10. Accordingly, the second one is more convenient to use, but only if you save for websites. For regular storage of a reduced copy, it is better to use the first method.
Select the desired area and zoom out
But what if we don’t need the whole photo, but part of it? And we need to reduce this part, but not proportionally and in our own opinion. The function we used before will not work for this.
Let's say we have this picture with balloons and we opened it in Photoshop:
But we don’t need all the balls, we only need the blue one and we need to reduce it a little. To do this, select the Crop Tool (called Crop ) - with it we can select the area of the image we need and crop it. Namely the blue ball.
The tool itself on the panel looks like this:
Select the desired area:
Press Enter on the keyboard - we will cut out this ball and the rest of the image will be deleted.
Great. Now we need to make the ball smaller. You can use the function as in the previous step. Or you can do it differently, while maintaining the size of the image. First, let's get rid of the background and make it plain. To do this, we need to select the ball, cut it out and place it on a separate layer. And on another layer we will make the background.
Use the Polygonal Lasso Tool to select the ball.
Press CTRL+X to cut and copy it. After you click, it will disappear, and behind it there will be a transparent background. Press CTRL+V immediately to insert the ball. The ball is inserted a little to the side from the original place. And it will be immediately inserted automatically onto a new layer:
Now we'll quickly make a different background so that the ball doesn't seem cut out. But the old background is not suitable because there is a cut-out area due to the ball, and since we will make the ball even smaller, it will be even larger.
Create a new layer under the ball and fill it with any color:
Of course, the ball does not look neat, but the purpose of this article is to tell you how to reduce it in Photoshop, and not cut it out. Read about how to cut in Photoshop and in what ways in our other article.
Now let's make the ball smaller. Select the layer with the ball and press CTRL+T (or menu Edit – Transform – Scale ( Edit – Transform – Scale )) and you will see how a frame appears around the ball to reduce it:
Now drag the squares to scale the ball. You can make an image smaller as needed while maintaining the overall size of the document in Photoshop. You're scaling down an individual object that's on a separate layer, not the entire image document.
You can apply all these methods as you need, in any order. Knowing these techniques, you will cope with any task in which you need to reduce something in Photoshop.
Cut out the desired object
To begin, we will separate some area from the main image. To do this, we will use the “Frame” tool. It is activated by pressing the "C" button on the keyboard. It is also easy to find in the side navigation of Adobe Photoshop CC:
In general, how does this tool differ from the standard selection tool? The size of the selected area can be edited before changes are made. The “rectangular area” does not have this ability. If you do something wrong, you will have to select the item again and again until the required result is achieved.
Well, let's get down to business. Activate “Frame” and circle, for example, a red ball. This is done as usual: at any point, press the left mouse button and, without releasing it, drag diagonally. You should get the following:
Now, in order to transfer the selected object to a separate layer, just press the “Enter” key. The result should be like this:
If you want to cut out a ball without a background, check out the material “How to quickly cut out an image of any complexity in Photoshop.” It describes how the Quick Selection tool works.
As you can see, there is nothing complicated about this. It takes no more than 2-3 minutes to complete all actions. What can you do next? While maintaining its quality, you can use one of the Lasso tools to cut out the ball. This is much easier to do than when working with a large original image. You can also change the size if the cut out item is too large and its dimensions are not suitable for your purposes. In this case, there are two simple ways.
Increasing and decreasing the size of an image or object in Photoshop
Resizing - reducing and enlarging an image using Adobe Photoshop is done in the following ways:
- zoom " function
- «transformation»;
- «free transformation»;
- scaling ;
- using selection tools .
All methods are different from each other and are used in certain situations.
Cut out objects and transfer them to another photo
Photoshop is a program that allows you to change photos beyond recognition. However, the first tool that anyone who wants to learn how to edit an image should become familiar with is selection and cutting. In this article we will look at ways in which you can cut out both simple and complex objects, as well as scale them.
Scaling
Scaling is used if the user needs to resize the entire picture , and not just some part of it. To apply the function, you need to find the “ editing ” tab on the top panel, go to “ transform ”, go from there and click on “ scaling ”. A frame should appear around the canvas, by pulling the corners of which the user will be able to change the proportions of the picture at their discretion. To ensure that the object does not stretch when enlarging or reducing the image in Photoshop, but maintains its proportions, you must hold down the SHIFT key .
If the user knows in advance what width and height parameters need to be given to the photo, he needs to enter these values in a special dialog box. This window is called by the key combination ALT+CTRL+I , or the “ Image size ” function in the “ Image ” tab on the top panel.
To maintain the proportions maintain proportions box .
Both options work almost the same, but when using the first, the picture quality deteriorates greatly when enlarged, while in the second case the quality does not suffer as much.
Maintaining proportions
In order for the inserted picture or individual figure to maintain its proportions when scaling, you must hold down the SHIFT key . Thus, the object increases (decreases) relative to the center of the layer, and when you hold down the ALT key, the image changes proportions relative to its center.
Cropping
To crop the photo or picture you are editing, you need to use a tool called “Frame”. It is important to note that it is in many ways reminiscent of the operating principle of another previously discussed tool. Namely “Canvas Size”.
Using the frame, the size of the image itself will not change. It is cut off when reduced, or additional voids are obtained when enlarged.
Change layer size
This option is useful when you need to reduce or enlarge an entire layer, especially convenient when changing the size of a cut out object. Scaling can be done in the following ways:
- Change the content scale . To use this method, you must use the “ Free Transform ” function. Borders will appear around the entire image; by dragging it, you can enlarge or reduce it.
- Zoom out/zoom in on background . Background has a lot of restrictions, so its scaling is different from scaling a regular layer.
To change the background parameters , you need to go to the “ image size ” tab, then simply enter the desired Width and Height . Another option is to unlock Background , thereby making it a regular layer, after which the program will allow you to resize it in the usual way. To unlock, you need to double-click on the background layer icon and click OK without changing anything. Once unlocked, the user can change the proportions in the same way as with a regular one.
Highlighting Method #4: Color Range
Suitable in cases where the background is contrasting. For example, a splash of water, as in the photo below.
Go to the "Selection" menu, find "Color Range".
Use the color selector button, click on the object.
In the example in the photo, the carps were highlighted, so the red color was selected, and you need to click on the carps accordingly. Once you have made your selection, click OK. Next, copy the image and move it.
Resizing a selected image
When you need to resize only part of an image, the “ selection ” tool is suitable, it can be found in the side toolbar. You can select an object using an ellipse, a rectangle, a vertical and horizontal line, a lasso and a magic wand. right-click on the selected area of the picture , after which a context menu will appear in which you need to select “ free transformation ” or “ transform selected area ”.
We scale correctly
Transformation in live mode is much worse than the final one, when the program allows you to change the size in a dialog box while saving the result on your computer.
For simple, single scaling, the Save as button is sufficient.
or
Save for web
with a drop-down dialog box in which you can specify the file format and its required dimensions.
It is in the save dialog that it is recommended to set the final dimensions to save the layout. Dimensions can also be set as percentages.
And then we insert our image into the layout and place it in the right place. It takes an extra 15 seconds, and the result is of the highest acceptable quality.
Quality when resizing
Zooming in and out directly affects the quality of the edited photo. If you take any object, reduce it using Photoshop tools, and then increase it to its previous parameters, you will notice with the naked eye that the photo has become more blurry.
The deterioration in image quality is due to the fact that when a picture is reduced, the number of pixels in it also decreases , and when it is enlarged, the disappeared pixels do not return, so the photo becomes blurrier, less clear and of less quality. Therefore, if the user wants to change the scale of an edited cut out or selected object, then it is better for him to immediately decide on the proportions so as not to change them several times, thereby losing quality.
Complex manipulations
The program does not allow correct rendering during complex transformations and therefore operations must be carried out step by step. The result when scaling and rotating at the same time will be worse than if the object were first rotated and then scaled. Moreover, the difference in quality is noticeable even to an inexperienced user.
Note the “waves” and “ladders” at the edge of the monitor, the black button, the edge of the image and the bend line of the laptop, which appeared from inconsistent transformation (Reducing the scale to 68% and rotating by 27°)
How to reduce or increase the size of an image in Photoshop
| The content of the article | |
| 1 | Method 1 – Image Size Dialog Box |
| 2 | Method 2 – Resizing using Transformation |
| 3 | How to reduce or increase the size of an entire image |
| 4 | How to reduce or enlarge an inserted image in Photoshop |
| 5 | Method 3 – Canvas Size |
| 6 | Method 4 – Cropping |
| 7 | How to reduce image size without losing quality |
| 8 | How to make a cropped image smaller in Photoshop |
Using Photoshop, you can easily reduce or increase the size of an image. Moreover, this can be done in different ways depending on what result you are striving for.
Before we start looking at the methods, first a little theory.
Firstly, what is reducing or increasing the size of an image? First of all, this concept should be understood as reducing/increasing the resolution of a picture, that is, its length and width and, accordingly, the number of pixels that make up any raster image. Learn more about resolution.
Secondly, what happens to the quality of the picture after resizing it?
- During the reduction process, pixels are lost, but the overall quality does not suffer, it remains quite clear.
- During the enlargement process, Photoshop stretches the pixels and draws them in accordance with its algorithm. Therefore, when enlarging, the picture quality always suffers. The higher the magnification, the more clearly the irreversible loss of quality is visible.
A similar issue was discussed in the lesson related to changing the layer size, I recommend you read it
A clear example of how image quality changes:
In this article, we’ll look at 4 ways to change the size of a picture in Photoshop and look at when and which method is best to use.
The principle of calculation of transformation
Let's figure out how transformation calculation works: By reducing the image, the program takes the nearest pixels and merging them produces an average color for the newly created one, and when enlarging, information, on the contrary, is taken from neighboring pixels to create new ones. Rough recalculation will at best preserve the image quality if the scaling was insignificant (for example, ±10%)
The difference between the original and scaling an illustration and then restoring the size.
With any transformation, the original quality of the illustration is lost. It doesn’t matter whether the picture was scaled, distorted or rotated. The principle “More manipulations - worse results” applies.
Method 1 - Image Size Dialog Box
This is the classic and most universal way. It is suitable in most cases, especially when you already know to what size you should reduce and enlarge the image size.
Open the image in Photoshop.
Open the Image - Image Size dialog box (or key combination - Alt+Ctrl+I). The following window will appear:
Pay attention immediately to the Width and Height fields. The values that will be indicated there are the current dimensions of the image. By default they are measured in pixels.
If you initially know to what size you need to resize the image, then enter these values in the above fields.
Proportions
If the Save proportions checkbox is not checked in the window settings, you can enter any values in the length and width fields. But you risk that the picture will be stretched vertically or horizontally. It is very easy to make a mistake and choose the wrong proportions.
Easy saving
- First, load the image into Photoshop.
- Now go to the main menu and select “Image”, and in the drop-down list that opens “Image size”.
In the window that opens, you can see two cells (width and height) with the current size of the picture. This is where you have to change the size itself.
By default, width and height are linked in this way. This means the size is proportional. That is, if you change the value in any of these two cells, the size in the second cell will automatically change. Those. the image proportions will be preserved.
And if you click on this chain, the connection will be broken and changing any value will not lead to a change in another value. The picture will become disproportionate.
Just like when you create a new document in Photoshop, you can choose units of measurement, such as pixels, centimeters, inches, or even percentages of the current image.
After resizing, at the top of this window you will see the current size of the image in kilobytes (or other units), and the old size in brackets. This is not the final size, so don't pay too much attention to it.
Well, is the point clear? Let's look at a live example for greater clarity.
I need a photo for a website measuring 200*200 pixels. I take our photo size 1920*1200 and load it into Photoshop. And then point by point.
- Select the “Frame” tool, setting the proportion to square (1 to 1) and select part of the photo so that the entire face and a small part of the body up to the chest are included in the frame. And we frame it. We will get a square image, but the size is clearly not 200*200. Therefore, let's proceed directly to the reduction.
- We go to the “Size” of the image, as I described above, and set the width there to 200 , and the height will be set by itself, since there is a connection. I check that the unit of measurement is “pixels” and click OK . That's all. Now all that remains is to save the image, but you should already know that.
Method 2 - Resizing using Transformation
Transforming an image is a cool method that definitely needs to be added to your Photoshop knowledge base. This method is good in two cases:
- reduce or increase the size of the entire image;
- Reduce or enlarge the inserted image in Photoshop.
Size details for each case.
How to reduce or increase the size of an entire image
Open the picture. Select the command Edit - Free Transform or press the key combination Ctrl + T.
If this command is not active (grayed out), then your background layer is locked to change. This is indicated by a padlock icon directly on the layer.
To unlock the background layer, double-click on it. The New Layer window will appear, click OK.
A frame will appear around the image. There are markers in the corners and on each side that you need to pull to make the image smaller or larger.
After resizing, click on the checkmark at the top of the options bar. There is a bug in Photoshop CS6 and this checkbox is not visible. If you also don’t see it, then press the Enter button to accept the changes or Esc to cancel.
Step 3.1 Magnification case
If you enlarged the picture in this way, then, as you can see, part of it became hidden, it seemed to not fit into the size in which it was opened. On the one hand, this is also not bad and can also be used in some cases.
But if you insist on showing the entire image, select Image - Show All.
Step 3.2 Case when decreasing
When you zoom out, you'll see a checkerboard background. This is emptiness, transparency. It will disappear when you save the image. But it would be correct to cut off the void in order to ultimately see what the final size of the picture is.
To trim the void, select the Image - Trimming command.
In order not to disturb the proportions of the image in this method, when you drag the frame markers, simultaneously hold down the Shift .
How to reduce or enlarge an inserted image in Photoshop
In any case, take the case described above into account. Namely, the ability to use the Free Transform command (Ctrl+T). This technique will be needed to carry out such a common operation as reducing or enlarging an inserted picture, item, object (call it what you want).
So, a familiar situation: you inserted another picture into your main image in Photoshop, but it did not fit in size.
Select this image and use the transform command. Now, as described above, pull the markers in the desired direction.
Basic selection tools
Good highlighting starts with choosing the right tool. The very first group of buttons in the toolbar is dedicated to selecting objects.
The arrow in the lower right corner means there are additional variations of these tools. If you click and hold the mouse button on one of them, a list of additional tools opens.
At the beginning there are simple selection shapes “Rectangular area”, “Oval area” and stripes one pixel thick. Most often, the first two are used.
Holding down the SHIFT key while drawing produces a clean square or circle.
The usual "Lasso" (Lasso Tool) draws a line along the trajectory of the mouse. As a rule, it is quite difficult to hit the edge of an object with the mouse, so this tool is suitable for rough selection when precision is not important.
The Polygonal Lasso Tool draws a selection using straight lines. Suitable for highlighting objects with right angles. For example, boxes, buildings, pencils.
Double-clicking closes the selection, so be careful.
Magnetic Lasso Tool works in automatic mode. Just weigh on the edge of the object, the computer will recognize its shape and the line will be “magnetized” to the edge of the object.
If the line is not laid correctly, press the Backspace key on the keyboard to remove the last links and lay the line along a new course. Also, this button works with the rectangular selection tool.
The Magic Wand Tool automatically recognizes spots of the same color and highlights them.
The magic wand is suitable for objects lying on a plain background; one click on the background will recognize it and highlight it.
The sensitivity of the magic wand (tolerance) is adjusted in the options panel. The higher the value, the more the wand “sees”. Sensitivity that is too low will leave a white halo, as in the picture above, and sensitivity that is too high will capture the edges of the object.
Selection Tool works in a similar way, but is more effective at selecting multi-colored objects. The tool lives up to its name and indeed, it selects an object faster than all others.
Select the optimal brush diameter and draw inside the object. The brush will grab it in parts, trying to guess the boundaries of the object.
Even if the Quick Selection Tool has grabbed the excess, holding down the ALT key allows you to remove pieces of the selection back.
Selecting multiple objects
Absolutely all of the above tools can be combined with each other. It is this technique that allows you to achieve high quality selection.
- Holding SHIFT adds the next selection to the existing one.
- Holding ALT subtracts the new selection from the old one.
When working with lasso tools, you can always modify an existing selection by adding a new one or subtracting from an old one.
In addition, each new selection can have its own shading. This allows you to highlight a subject with blurred edges, as in the image above.
The feather value can be set before drawing (in the options bar, as in the picture above), or after drawing by pressing SHIFT+F6 (or right-clicking - Feather).
Method 3 - Canvas Size
Not the most popular method, but nevertheless we will also consider it - the Canvas Size command.
The peculiarity of this method is that we change the size of the image resolution, while the picture itself does not change in any way. Photoshop simply cuts off part of the image (if we are talking about reduction), or adds a background color (if we are talking about enlargement).
That is, let’s say your picture is 700x700 pixels. Through Image - Canvas Size you set the size to 500x500. As a result, Photoshop cuts off the extra 200 pixels in height and width. In the settings, you can specify where it cuts from: it is either evenly on all sides, or you can select a specific side.
Reducing Weight in Photoshop
This method will be very useful for website owners, since the smaller the page weighs, the faster it loads. And this is very important. The method is also suitable for any needs.
After opening an image in Photoshop, you need to immediately save it, but not usually, but for the web and devices.
In the next window you need to set image quality parameters:
- Quality - high (60-70). Adjust the value to suit your needs;
- Format - jpeg. If you need to save transparent areas in the image, then you need the png format;
- We also set the “Progressive” setting.
You can also change the sizes directly in this window, and not separately through the “Image - image size” item, as I showed in the paragraph earlier. It is very comfortable.
After setting the parameters, save the settings (see screenshot above).
This is the only way I was able to reduce the weight of the image from 116 kb to 75 kb without changing the dimensions (height and width remained the same).