Device Manager is a very useful application that is required to be installed on all modern Windows computers. By opening it, you will find a list of components that are currently on the computer or connected to it.
It is much more useful and interesting to look at the status of devices in the manager. If you feel that your computer or a specific device is unstable, then go there.
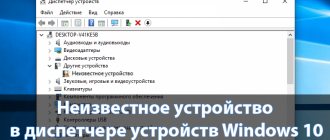
Non-functioning elements will have a special sign. In addition, here you can view important information about device drivers. If there is something wrong with the computer components, then a yellow triangle with an exclamation mark will be located next to them.
But how can you get into this wonderful application and start using it to the fullest? We will consider these issues using the example of all popular operating systems.
How to open Device Manager in Windows 7.10
Windows interface
The fastest way to enable Device Manager is to right-click on the “Computer” icon and select “Manage” from the context menu. In the “Computer Management” window that appears, select “Device Manager” from the menu on the left.
You can take a slightly longer route and launch the dispatcher through the “Control Panel”:
- Open the System and Security tab.
- Find the "System" section.
- Launch Device Manager.
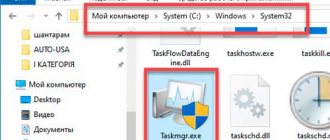
If this method does not work, try calling the hardware manager directly from the “system32” folder. It doesn't matter what system you have installed: XP, Windows 7 or Ten. The path to the executable file of the hardware tool remains unchanged.
- Open the “C:WINDOWSsystem32” folder. (C: here is the system partition where the files of the installed operating system are stored).
- Find the devmgmt.msc utility and double-click it to run.
A hardware manager will appear on the screen, with which you can continue to work, making changes to the software of connected devices.
Solving Common Problems
It is possible that you may encounter a number of problems during the process. It's quite easy to fix them by simply following the instructions.
- Sometimes Windows may block Device Manager from opening for protection purposes. As a rule, the message “The administrator has blocked the execution of this application” appears. This can be fixed by disabling UAC.
- If you have tried all the methods and none of them work, then the problem may be due to damaged system files. In this case, perform a standard disk check.
After all problems are resolved, try re-enabling Device Manager.
Run menu
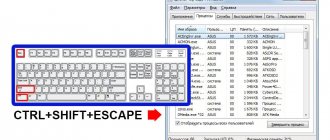
Another method, which works on all versions of Windows without exception (from XP to Windows 10), is to use the “Run” window, which can be opened through Start or launched using the Win + R combination.
- Open the Run tool.
- Enter "devmgmt.msc".
- Click OK.
Through Run, any programs, system tools and folders are included - you just need to correctly specify the launch command.
Why do you need a dispatcher at all?
The device manager in all Windows systems provides all the necessary information about the computer’s hardware (it doesn’t matter whether it’s a desktop or a laptop). It is required to check the operation of all equipment installed on this machine . Also - to safely remove a particular component, as well as to install/update/remove drivers. In a word - sometimes you can’t go anywhere without it .
For example, you reinstalled the system, and now you are installing drivers, and at the same time you do not have accurate information about what exactly they will be needed for. In this case, you should look into the device manager: a module without a driver will be marked with an exclamation mark next to its name.
Using Device Manager you can do the following:
* Find out the status of any part of the computer
You just need to open the appropriate section. For example, in order to get information about the name of the installed video card, you need to double-click the “Video adapters” section.
For details about a component, you need to right-click once while hovering over it, and then click “Properties”.
* Find out if there are any problems in the work
Special icons are displayed next to those computer modules that have any problems. For example - a red cross, question/exclamation mark. So, as soon as you open the device manager, you will be able to notice them.
* Install module driver
To install a driver for a component of a computer, you need to right-click on it, and then select “Update drivers.” Then specify the address of the folder where the drivers are stored.
* Reinstall the driver
Sometimes certain modules of the machine refuse to work properly - for example, the sound disappears due to problems with the sound card. Reinstalling the driver often helps. To do this, in the device manager you need to right-click on the faulty module, and then click “Delete”. Then - in its menu, click “Action” - “Update hardware configuration”.
* Deactivate (disable) module
To do this, right-click on it and select “Disable” in the context menu that appears. Then you can always turn it on again - just right-click on it and select “Enable”.
It makes sense to disable those modules that will not be used for some time, for example, in laptops, to save battery power.
Using the Command Line
Let's try to launch the device manager from the command line. First you need to open the command interpreter window itself. On Windows XP, for example, this is done through the Start menu, where among the standard programs there is a command line.
On other versions of Windows, you can use the built-in search bar or the “Run” menu mentioned above, specifying the query “cmd” in it. In addition, the command line is a system application, the executive file of which is stored in the “system32” folder in the “Windows” directory. Go here and double-click on the cmd.exe file to access the Windows command interpreter.
To open the hardware manager via the command line, you need to enter the same command as in the “Run” window – “devmgmt.msc”. After pressing the Enter key, a list of all connected devices with which you can work will appear.
Operating instructions
It is primarily used to manage installed drivers and view detailed information about installed hardware.
The main section consists of a list of headings, which can be viewed by clicking on the arrow to the left of the title. After which a list of connected elements to the PC will be displayed. For example, in the “Video adapters” category, video cards (external or internal) will be located; if you have 2 external video cards connected, then all two will be displayed.
To get detailed information about an object, right-click on it and go to “Properties”.
A window will appear consisting of 1-5 tabs.
- In the “General” section, information about the name (model), manufacturer and current status is displayed.
- The “Drivers” section contains information about the driver, the developer, its version and development date. As necessary, it can be updated, rolled back, or completely deleted.
- The “Information” tab contains information about various equipment properties.
- The “Resources” tab displays information about consumed system resources.
Win+X menu
Windows 8 has a new convenient menu for navigating system tools, which can be accessed using the Win+X key combination. In previous versions, this menu does not work, but it is preserved in the “top ten”, where it can also be called up by right-clicking on “Start”.
In the Win+X context menu, among other things, there is a link to the device manager - click on it to see a list of connected equipment on the screen.
System Information
If there is no “This PC” icon on your desktop, then you can use another option. For example, you can press the Win-Pause/Break key combination. After using this key combination, the “Options” menu will open, the “About” section. Here at the bottom of the window in the “Related Settings” block there will be a link to open Device Manager.
On Windows 11 it looks like this:
On Windows 10:
If you have an older version of Windows 10, then after clicking Win-Pause/Break, the “View basic information about your computer” window will appear.
Here on the left side of the window there is also a link to open Device Manager.
Making changes to the registry
The first method describes how to launch the hardware manager through the “Management” section of the “Computer” context menu. But if you make small changes to the system registry, you won’t have to open the “Management” window—the “Device Manager” item will immediately appear in the context menu:
- Press Win+R and type “regedit”.
- Go to HKEY_CLASSES_ROOTCLSID{20D04FE0-3AEA-1069-A2D8-08002B30309D}.
- Create a new subkey under the "shell" section and name it "Device Manager".
- In the created directory, create another subsection - it should be called “command”.
- Go to "command" and double-click on the "Default" option.
- Set the value to "mmc devmgmt.msc" and save the changes.
After completing these steps, a link to the Hardware Manager will appear in the Computer context menu next to the Manage tool, which you can use if necessary.
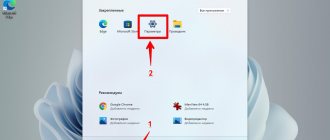
Method 5. How to open Device Manager through Windows 11 Settings
1. To open the Settings
", press the keys "
Win + I
".
2. Go to the “ System”
" and select the "
About the system
" option.
3. Find the section “ Related parameters”
", scrolling down the window and finding the item "
Device Manager
".
How to show hidden devices
Some devices are hidden in the manager by default for the following reasons:
- The device connected to the computer was manufactured a long time ago, and therefore does not have a Plug and Play function that allows the dispatcher to recognize the device. In this case, the device can work fully if the corresponding drivers are installed, but it will be hidden in the manager;
- the device was removed using an unsafe removal method, the “Remove Device” button was not pressed before it was pulled out. Or the computer turned off automatically after a power outage, and because of this, all connected devices were turned off incorrectly;
- Let's say you had a modem plugged into one port, and then for some reason you moved it to another, and the computer recognized it as a new device. In this case, the “old” modem connected to the first port will be hidden, and the new one will be displayed in the manager;
- The hidden group sometimes includes temporary storage devices: flash drives, phones and cameras connected in external storage mode.
Ports are not displayed
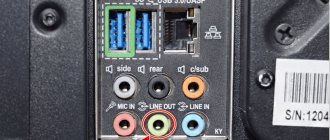
COM and LPT ports may not be displayed in the manager for the following reasons:
- working with ports is disabled in the BIOS; on some computers it is disabled by default. To fix the problem, go into the BIOS and change the SMART LAN parameter to the desired port, and not to Disable;
- ports are physically absent from the computer, in this case there is only one way out - to purchase adapters for the ports you need;
- the latest drivers are not installed for the motherboard connected to the computer, download and install the drivers from the official website of the company that created your board to get rid of the problem;
- some programs created virtual ports that replaced real ones. Remove all virtual ports from the manager, restart your computer, and the real ports will appear.