Many users encounter error 0x8007000d when trying to update Windows 10 to the latest version. After this message appears, Microsoft operating system users can no longer receive monthly security updates. Sometimes it is possible to initialize the process of obtaining a new version, but the problem will appear again at the start of downloading files or already during the process of integrating innovations.
What is Windows Update error 0x8007000d
Errors like 0x8007000d are related to updates and can be encountered by users quite often. Unfortunately, this and many other problems have persisted since the introduction of Windows 7 to the latest versions available. Currently, the range of reported cases includes the number of cumulative updates that users are unable to install - KB3124200, KB4586853, KB4592438 for Windows 10 version 1511 and 20H2. The error message displayed after a crash does not provide valuable guidance on how to restore updates. It only provides the corresponding error code (0x8007000d) to help users raise awareness and collaborate on solutions in forums and troubleshooting resources. If you are wondering what causes such problems, here are a couple of them. Typically, update problems can be caused by a damaged or missing file system. In other cases, a successful update may be prevented by incorrect configuration or third-party software causing a conflict. Be that as it may, it's difficult to decide which one is actually yours. Thus, it is worth trying all the methods until you find the one that solves the problem. So, make sure to follow the list of step-by-step instructions below that will help you get rid of error 0x8007000d.
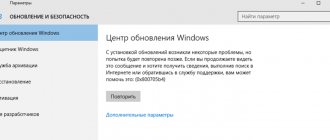
Windows Update Error 0x8007000d
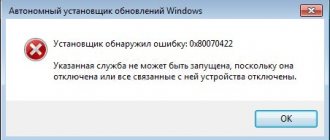
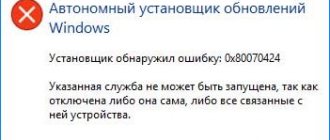
Windows Update Offline Installer Error 0x8007000d
Option three
There is a small chance that the previous method will not fix the damaged file. But this is not a reason to give up looking for a solution. Microsoft operating systems have other tools that allow you to achieve the desired result. For example, DISM is a special system that also allows you to effectively eliminate the cause of the failure.
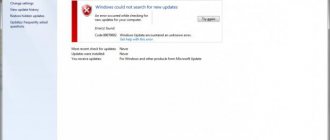
When error code 0x8007000d appears on your computer, it usually means that there is a file on the disk that Windows Update requests, but it could not be accessed because it is damaged or missing. This incident will prevent you from updating the Windows 10 operating system and any of its components. Another possible cause of this error could be any damaged drivers.
Error 0x8007000d is perhaps one of the most common and common problems with Windows Update. It can be solved using almost the same set of methods that are used in case of other errors. Let's move on to them right away.
Use the Windows Update troubleshooter
Although this method rarely works, it is still worth trying an already installed Windows Update troubleshooter. It is designed to solve the most common problems associated with updates at a basic level. It will scan your system for potential problems and try to fix them eventually. Find out how to do this by following the instructions below:
- Open Settings and go to Update & Security > Troubleshooting .
- In the right pane, find Windows Update and click Run the troubleshooter .
- Complete the process by following the onscreen instructions and restart your computer.
Methods for solving the error
Because modern operating systems are complex, modular tools, they are prone to glitches. Therefore, Microsoft is also developing special standard utilities that can restore system files, fix problems and restore Windows to its previous working state without error 0x8007000d.
Method 1: Run File Checker
This program is standard for the OS and is launched from the command line. To try to fix fault code 0x8007000d do:
dism /online /cleanup-image /restorehealth
dism /online /cleanup-image /StartComponentCleanup
Method 2: Troubleshooters
This is a built-in utility that can help you fix some common problems, including Windows 10 update error 0x8007000d.
The program works automatically. You will have to wait until the operation is completed.
Method 3: Apply Group Policy Editor
The Group Policy Editor can also be helpful in fixing error code 0x8007000d. Some users confirm that this can help. So it's worth a try.
Check the integrity of system files.
Most often, missing or damaged files are the main culprits behind update errors. Even minor files can sometimes be vital for Windows services to interact properly. If any of these files fall out of the puzzle, it will most likely be the cause of the update problems. Below we are going to use both SFC (System File Checker) and DISM (Deployment Image Servicing and Management) which will detect and repair missing components if any. Be sure to use both scans as they may have different effects on resolving the error. Here's how:
Using SFC
- Open Command Prompt by entering cmd in the search box next to the Start Menu button.
- Right-click on Command Prompt and then Run as administrator .
- Once the console opens, type sfc /scannow command and press Enter .
- When the recovery process is complete, restart your computer.
Using DISM
- Open Command Prompt as we did in the previous step.
- Copy and paste this command DISM.exe /Online /Cleanup-image /Restorehealth.
- Press Enter and wait for Windows to finish scanning and fixing.
- After that, restart your computer and install the update again.
After both of these scans are completed, try installing the updates again. If this does not resolve the issue, please proceed to the alternative methods below.
How to get rid of error 0x8007000d during installation of Windows 10
To resolve this dysfunction, you need to follow the steps given below. Moreover, if you are installing Windows 10 from scratch and you have this problem, it is recommended to use alternative installation files, which you can either search on the Internet or use the Microsoft website.
Step #1. Remove (disable) unnecessary programs
If you are installing Windows 10 from Windows 7 (or simply updating the system), try disabling (uninstalling) running third-party programs, disabling the antivirus and firewall, and only then try installing the required update.
Step #2. Use a special tool from Microsoft
The next step is to use Microsoft's troubleshooting tool to identify and fix problems that arise when updating Windows. Download and run this tool, and follow its further prompts to fix the error. If this does not give an effective effect, move on.
Take advantage of the Windows Update functionality
Step #3. Restore an existing Windows image
Launch a command line and type the following directives in sequence:
Then try updating your system again.
Step #4. Restart update services
The next step is to restart the services responsible for updating Windows.
- In the taskbar search bar, type services.msc and press enter.
- In the window that opens, find the Windows Update and Windows Installer services and restart them.
- To do this, you need to click on each of the mentioned services in the list, and at the top left select “Restart service” (and if it is disabled for some reason, then “Start service”).
Step #5. Install the update "KB947821"
Go to the Microsoft website, select the specified update for Windows 10, and install it on the system.
Then boot into safe mode, launch the command prompt, and in it sequentially enter:
Then boot into normal mode and view the result.
Step #6. Use the sfc utility toolkit
To check the integrity of system files, you can also use the functionality of the sfc utility, which allows you to check, and, if necessary, restore the integrity of the mentioned files. To work with it, run the command line again and type:
Step #7. Perform a system rollback to an earlier stable point
In some cases, an effective solution to the 0x8007000d problem in Windows 10 was to roll back the system to an earlier, more stable state.
- To do this, launch a command prompt as administrator, enter “rstrui” in it, and press “Enter”.
- In the window that appears, select a restore point that did not experience the update problems in question, and roll back your PC to it.
Specify options for installing optional components and repairing components.
In this method, we are going to affect some changes in Group Policy settings. Specifically, having Windows download recovery materials and additional features directly from Windows Update. Here's how to perform this simple but very effective solution:
- Press Windows key + R key combination and write gpedit.msc.
- The Local Group Policy Editor will open. In the left pane, go to Administrative Templates > System .
- In the right pane, scroll down the list until you find Specify options for installing optional components and repairing components .
- Double-click this text and select Enabled , then check the box next to Download recovery content and additional components directly from Windows Update instead of using Windows Server Update Services (WSUS). option.
- After completing these steps, click Apply and OK to save the changes.
Finally, try installing the updates again. No effect yet? - skip to the rest of the solutions below.
Clean up unnecessary system files.
Removing redundant system files may help. In other words, some users have benefited from clearing their disk of recovery copies and cached files stored on the PC. Note that deleting recovery copies means you won't be able to use previous restore points to roll back if you ever need them. Despite this, using this method has helped some users get rid of the problem.
- Open This PC .
- Right-click on your primary drive and select Properties .
- Find and click on Disk Cleanup .
- Then select Clean up system files , check all the boxes, and click OK .
- After that, restart your computer and try installing the update again.
Conclusion
The above methods to fix error code 0x8007000d help most users. However, some users may not be able to get rid of the problem. The surest way to fix the problem is to cleanly reinstall the operating system. In any case, try the presented methods first.
Error code 0x8007000d occurs in several different situations - during Windows installation, during activation, when installing Windows updates. In this article I will talk about all the ways to fix error 0x8007000d depending on the situation in which it occurred.
Enable Windows Clean Startup.
Error 0x8007000d can also occur due to incompatibility issues. Anti-malware or any other third-party software may conflict with Windows services, causing the error. That's why Windows has a clean boot feature that helps users boot their computer with only built-in applications and services to see if any additional application is part of the problem. To start the system in clean boot mode, follow these steps:
- Press Windows Key + R buttons simultaneously and paste msconfig.
- Then in the window that opens, go to Services at the top.
- Check the box next to Hide Microsoft services and click the Disable all button.
- Now go to General and select the Selective startup option. Make sure the checkbox is only checked next to Load system services .
- Click Apply and OK . Then restart your computer.
Now you can try updating your system while in clean boot mode. Regardless of whether you were able to install the problematic updates or not, you should return Windows to normal startup settings. To do this, simply repeat all the steps above, enabling the disabled services and changing the startup option from Selective startup to Normal startup .
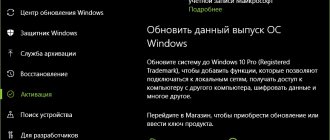
Resolving error 0x8007007b during Windows 10 activation
Activating Windows 10 is a mandatory procedure to obtain a fully functional licensed OS. Errors during this operation are rare, but they still appear - one of them is a failure with code 0x8007007b, methods for eliminating which we will consider further.
Important! Before proceeding further, make sure that the activation key for your version of Windows 10 matches its edition: codes from the Corporate edition do not fit the Home version and vice versa!
Reset Windows Update components.
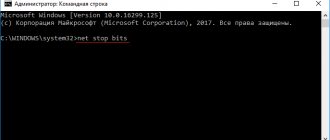
The penultimate measure on our list is resetting Windows Update settings. Statistically, this method has proven to be very effective in solving many update problems. The entire procedure involves restarting the BITS, Cryptographic, MSI Installer and Windows Update services, as well as renaming some of the update folders (SoftwareDistribution and Catroot2). These folders contain temporary files needed to install Windows updates. Based on this, we will force Windows to remove damaged items and create update-related components from scratch. Below we will show you two ways to perform this method. The first requires entering and executing each console command in manual sequence. The other is done using a so-called batch script written in Notepad and saved as WUReset.bat. There is no real difference in which one you choose. Although the entire procedure may seem complex and complicated, it does not require much time or knowledge. Just follow the sequence given below:
Manually
- Open Command Prompt by entering cmd in the search box next to the Start Menu button.
- Right-click on Command Prompt and then Run as administrator .
- Copy and paste this list of commands one by one, pressing Enter after each one. (This action will disable the services responsible for Windows Updates )
- Then we have to rename the above mentioned folders. Just paste these commands, pressing Enter after each one.
- Finally, all that's left to do is bring back the disabled services. Enter these commands in the same way as we did earlier.
- That's all. Go to Windows Update and try the installation again.
net stop wuauserv net stop cryptSvc net stop bits net stop msiserver
ren C:\Windows\SoftwareDistribution SoftwareDistribution.old ren C:\Windows\System32\catroot2 Catroot2.old
net start wuauserv net start cryptSvc net start bits net start msiserver
Using a Batch File
This is an alternative method to the one described above. A batch script is used to run the same commands to reset all Windows Update components, cryptographic services, and folders such as SoftwareDistribution. To some extent, this method is even simpler than the previous one. All you need is a regular Windows Notepad and a little copy and paste. Batch scripts are better than manual typing because they allow you to execute all the necessary commands at once in one click. If you ever encounter similar problems in the future, simply run the already created .bat file and to reset the update components:
- Open a new Notepad . To do this, right-click on any free area on the desktop, select New and Text Document .
- Then paste this list of commands into Notepad:
- After pasting all the commands, click File > Save As and name the file WUReset.bat . Be sure to set Encoding to ANSI and save the file anywhere.
- Finally, right-click on the file and select Run as administrator and enjoy the automatic reset of Windows update components.
@ECHO OFF echo Simple Script to Reset / Clear Windows Update echo. PAUSE echo. attrib -h -r -s %windir%system32catroot2 attrib -h -r -s %windir%system32catroot2*.* net stop wuauserv net stop CryptSvc net stop BITS ren %windir%system32catroot2 catroot2.old ren %windir%SoftwareDistribution sold.old ren "%ALLUSERSPROFILE%\Application Data\Microsoft\Network\Downloader" downloader.old net Start BITS net start CryptSvc net start wuauserv echo. echo Task completed successfully… echo. PAUSE
Use Update Assistant to download problematic updates.
Windows 10 Update Assistant, as it is officially called, is a special utility designed to help people get the latest updates available for their system. It works great as a workaround for many of the issues users encounter when updating. It's completely free and doesn't take long to download. Just follow these steps:
- First, visit the official website of the Update Assistant and click on the Update Now button.
- Then open the downloaded file and click Update Now again.
- Windows will check your PC for compatibility within a few seconds. After that, click Next and wait for Windows to update your computer.
- Finally, click Restart now to allow Windows to finish installing the updates.
That's all. After completing these steps, your computer should be up to date and not encounter problems like it did before.
Useful video
Various methods to solve the problem are given in the following video:
Many users encounter error 0x8007000d when trying to update Windows 10 to the latest version. After this message appears, Microsoft operating system users can no longer receive monthly security updates. Sometimes it is possible to initialize the process of obtaining a new version, but the problem will appear again at the start of downloading files or already during the process of integrating innovations.