Sometimes there are situations when Windows Update is unable to download and install updates. Also, problems may arise if the update is downloaded but not installed. Most often, errors appear after reinstalling or installing the operating system, as well as in case of failures in the OS.
You may need to reset your Update Center settings to fix the errors and resume working properly.
Let's look at the most common errors.
What is the “Something went wrong” error?
"Something went wrong. Try opening Settings again later" is an error message that you may encounter when trying to open Windows Update. Because of this, users cannot open settings with updates to check or install them. This error can occur for a number of reasons. Most often this occurs due to configuration or compatibility issues that people are often unaware of. Any third-party software or internal Windows issues can cause Windows Update to malfunction. It is quite difficult to immediately determine what caused the problem, so it is necessary to test all available solutions until you find a working one. Below we will look at several methods that can solve the “Something went wrong” error. Follow each step carefully so you don't miss any details.
Something went wrong error (Windows Update)
Something went wrong error (Windows installation)
Something went wrong error (PIN change)
Enable Windows Clean Startup.
It is worth checking whether there is third-party software on your PC that is causing incompatibility. A clean boot will help you start your computer with only built-in apps and services to see if a third-party app is causing the problem. Sometimes even anti-malware software can conflict with Windows services. To run in clean boot mode, simply follow these steps:
- Press Windows Key + R buttons simultaneously and paste msconfig.
- Then in the window that opens, go to Services at the top.
- Check the box next to Hide Microsoft services and click the Disable all button.
- Now go to General and select the Selective startup option. Make sure the checkbox is only checked next to Load system services .
- Click Apply and OK . Then restart your computer.
Now you can try to open Update again, in clean boot mode. If everything is working fine now, this means that some third-party program is still conflicting with Windows processes. Think about what you installed recently and try to remove it. After booting into Clean Mode, you should return Windows to its normal startup settings. To do this, simply repeat all the steps above, enabling the disabled services and changing the startup option from Selective startup to Normal startup .
Specify options for installing optional components and repairing components.
In this method, we are going to affect some changes in Group Policy settings. Specifically, having Windows download recovery materials and additional features directly from Windows Update. Here's how to perform this simple but very effective solution:
- Press Windows key + R key combination and write gpedit.msc.
- The Local Group Policy Editor will open. In the left pane, go to Administrative Templates > System .
- In the right pane, scroll down the list until you find Specify options for installing optional components and repairing components .
- Double-click this text and select Enabled , then check the box next to Download recovery content and additional components directly from Windows Update instead of using Windows Server Update Services (WSUS). option.
- After completing these steps, click Apply and OK to save the changes.
Finally, try installing the updates again. No effect yet? - skip to the rest of the solutions below.
Reset Windows Update components.
Another good method you can try to resolve update-related issues is resetting Windows Update. As practice shows, this method helps solve the problem in many cases. The entire procedure involves restarting the BITS, Cryptographic, MSI Installer and Windows Update services, as well as renaming some of the update folders (SoftwareDistribution and Catroot2). These folders contain temporary files needed to install Windows updates. Based on this, we will force Windows to remove the damaged elements and create the update components from scratch. We will use the console to execute the necessary commands. This is a more advanced option, but it does not require much time or knowledge to complete. Follow the steps below:
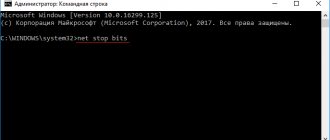
- Open Command Prompt by entering cmd in the search box next to the Start Menu button.
- Right-click on Command Prompt and then Run as administrator .
- Copy and paste this list of commands one by one, pressing Enter after each one. (This action will disable the services responsible for Windows Updates )
- Then we have to rename the above mentioned folders. Just paste these commands, pressing Enter after each one.
- Finally, all that's left to do is bring back the disabled services. Enter these commands in the same way as we did earlier.
- Now that's all. Go to Windows Update and check if anything has changed.
net stop wuauserv net stop cryptSvc net stop bits net stop msiserver
ren C:\Windows\SoftwareDistribution SoftwareDistribution.bak ren C:\Windows\System32\catroot2 Catroot2.bak
net start wuauserv net start cryptSvc net start bits net start msiserver
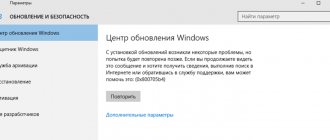
Troubleshooting
Windows' built-in troubleshooting engine helps you diagnose and fix the most common problems.
Remaining in the same section of the operating system settings panel, select the line indicated by one in the side menu. Go to the right side and click on the link marked with a two.
In the additional window, click on the description area indicated by the arrow, expanding the controls. Click the button to launch the diagnostic tool.
In addition to the described method, it is possible to open the troubleshooting panel in the classic interface. Call the “Run” dialog box using the keyboard shortcut “Win + R”. Copy the line below into it: “Shell:::{C58C4893-3BE0-4B45-ABB5-A63E4B8C8651}” and click “OK”.
In the control panel applet that opens, we find the section indicated by one. Click on the link indicated by two to start troubleshooting in the Update Center.
The diagnostic tool is a step-by-step wizard designed in a classic interface. It can also be launched from the new OS settings panel. In the window that appears, click “Next” and wait for the automatic check to complete.
We follow the instructions of the wizard or, as in this example, close the diagnostic window since no violations were detected during its execution.
Check the integrity of system files.
As we mentioned at the beginning, problems with updating can occur due to missing or damaged files. Such files are usually very important for the proper operation of many Windows services. If some of these files are outside of their native environment, this may cause update errors. Below we will use SFC (System File Checker) and DISM (Deployment Image Servicing and Management) to help detect and repair missing components. Here's how:
Using SFC
- Open Command Prompt by entering cmd in the search box next to the Start Menu button.
- Right-click on Command Prompt and then Run as administrator .
- Once the console opens, type sfc /scannow command and press Enter .
- When the recovery process is complete, restart your computer.
Using DISM
- Open Command Prompt as we did in the previous step.
- Copy and paste this command DISM.exe /Online /Cleanup-image /Restorehealth.
- Press Enter and wait for Windows to finish scanning and fixing.
- After that, restart your computer and install the update again.
Reset Windows Update Tool on the Microsoft website
A special utility is available on the Microsoft TechNet website for completely resetting Windows Update Center settings in Windows 10, 8.1 and Windows 7 - Reset Windows Update Tool, which performs a full set of actions, each of which is aimed at correcting various issues that can interfere with downloading and installing updates through the Update Center. Before using the utility, I recommend creating a system restore point. The next steps will look like this:
- Download Reset Windows Update Tool in the required bit depth from the site https://gallery.technet.microsoft.com/scriptcenter/Reset-Windows-Update-Tool-402a3eef (or https://wureset.com/downloads.php) - according to the first You can download a version of the program that does not require installation (ZIP archive) from the link, and from the second link you can download the installer.
- After installation, run the Reset Windows Update Tool as an administrator (right click - run as administrator) and select the desired language, Russian is available, but in my case it is displayed in the wrong encoding, so the following actions are shown in English.
- You will be asked to agree that there are no guarantees that the utility will work properly and enter “Y” if you agree.
- You will see a menu where you can choose what actions to take to fix the update center. I recommend the following order: 2, 3, 6, 11, 12, 13 followed by restarting the computer.
Full list of available options in the current version of the utility:
- Open system protection settings.
- Reset Windows Update components.
- Deleting temporary files.
- Open Internet Explorer settings.
- Run chkdsk on the system partition (checking the disk for errors).
- Run a system file integrity check.
- Checking the integrity of the component store.
- Checking the image for the presence of o.
- Automatically repairing the component store using dism.exe
- Cleaning up obsolete components.
- Removing registry entries with errors.
- Reset and fix Winsock settings.
- Forced update of local group policies.
- Start searching for Windows updates.
- Find your Windows product key.
- Search for other local fixes (opens Windows Troubleshooter).
- Search for additional fixes online (opens Help on the Microsoft website in your browser).
- Restart PC.
Scan your hard drive for damage.
Before moving on to the following methods, it is worth checking your hard drive for damage and errors. You can easily do this with the following steps:
- Open Command Prompt the same way we did above.
- Then you should paste the chkdsk /f /r C: command and press Enter . If necessary, replace "C" with the letter of your hard drive.
- The system will scan for correct configuration and physical errors, and then automatically correct them.
This method is unlikely to solve the problem, so don't worry if it doesn't work.
Change the startup options for the Update Orchestrator Service.
The Update Orchestrator Service is considered a very important service for the correct operation of update processes. By default, this service should be set to start automatically, but there are times when it is disabled for users for unjustified reasons. So let's check if the Update Orchestrator Service is configured correctly:
- Press Windows Key + R , copy and paste services.msc, and press Enter .
- Then find Update Orchestrator Service among the list.
- Next, double-click on it and go to the General menu.
- Set Startup Type to Automatic .
- Finally, click Apply , close the window, restart your computer, and see if the problem is resolved.
Change the values in the Registry Editor.
The problem with Update Center may also be due to incorrect values in the Registry Editor. Below we will check if this is true.
- Press Windows Key + R , copy and paste regedit , and open it.
- Then you should go to this path HKEY_LOCAL_MACHINE\SYSTEM\CurrentControlSet\Services\UsoSvc.
- After clicking on UsoSvc , find and double-click Start in the right pane.
- Next to the Value field, change the number to 2 and click OK at the end.
Everything should now work fine. The same should be done for these services:
HKEY_LOCAL_MACHINE\SYSTEM\CurrentControlSet\Services\WaaSMedicSvc HKEY_LOCAL_MACHINE\SYSTEM\CurrentControlSet\Services\wuauserv
Once finished, restart your computer and check if the error when opening Windows Update is gone.
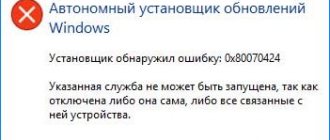
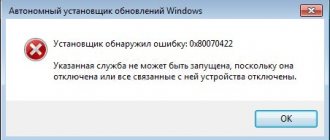
The service is not functioning correctly
The third reason why service packs are not installed in Windows is the incorrect operation of the corresponding service. Like many other operating system services, Update Center is implemented as a Windows service. Sometimes there are conflicts in its operation, which can be resolved by restarting the service and clearing some system folders. Why has Center stopped working normally and is giving errors? Searches and doesn't find patches? Or does it find them, but they are not installed? Yes, because the corresponding Windows service has stopped working adequately.
To fix this problem, you need to open the Windows services window (you can get to it through the “Control Panel”), find our “Center” there and stop this service. Then go to the system folder named SoftwareDistribution - this is a subfolder of the Windows folder - and completely clear it. Then turn on the Center service again. Now the system searches and finds everything it needs.
To solve these issues, special software has been developed. For example, the “Fix It” utility. With its help, troubleshooting these types of problems is especially easy. Such utility programs are always useful to have on hand.
Create a new local account.
If none of the steps mentioned helped you solve the problem, then you should try creating a new user account. Sometimes newly created accounts can solve problems with settings and return some services to normal. Also note that the new accounts do not contain the data that was previously stored, so be sure to move your files there. If the new account helped you solve the problem, you can keep or delete the original one after moving all your important data. Below you can find the steps to create a new account:
- Right-click on the Start Menu and select Settings . You can also press the Windows Key + I keyboard shortcut.
- Go to Accounts > Family & other users .
- In the right pane, scroll down to the Other users section and click Add a user to this computer .
- Now select I don't have this person's login information at the bottom.
- Select Add a user without a Microsoft account at the bottom.
- Then enter the username and password for the new user and click Next .
- Now you can switch to the new account (by clicking on the user icon in the Start Menu ) and try opening Update Center again.
Use the Media Creation Tool.
Today's issue is preventing people from tracking new updates released by Microsoft. This also comes with the challenge of updating your system. Therefore, you can use the Media Creation Tool to bypass this problem. This utility will help you install the latest updates despite the problem. It's possible that new updates will also fix the Windows Update bug discussed in this guide. This procedure will not affect your personal data, but will simply update your computer. To do this, follow these steps:
- First, you need to download the utility from the Microsoft website.
- Then run the downloaded file.
- Once you agree to the Terms of Use, you will be given two options to choose from. Select Upgrade this PC now .
- Select Keep personal files so they are not damaged.
- Finally, start the process and wait for it to complete.
- Hopefully, this method helped you cope with the problem that arose.
Use Update Assistant to download problematic updates.
Windows 10 Update Assistant, as it is officially called, is a special utility designed to help people get the latest updates available for their system. It works great as a workaround for many of the issues users encounter when updating. It's completely free and doesn't take long to download. Just follow these steps:
- First, visit the official website of the Update Assistant and click on the Update Now button.
- Then open the downloaded file and click Update Now again.
- Windows will check your PC for compatibility within a few seconds. After that, click Next and wait for Windows to update your computer.
- Finally, click Restart now to allow Windows to finish installing the updates.
That's all. After completing these steps, your computer should be up to date and not encounter problems like it did before.